
Working With Configuration Transfer Utility
Use the CTU to make small incremental changes (e.g. add a rule for a custom object), medium changes (create a set of workflows), and large changes (provision a new server).
The process for using the new CTU is slightly different and changes have been made on how artifacts and design dependencies are handled.
For instance, in an example scenario a user has added a rule and then later made modifications three separate times. All entries are captured automatically by the tool, and in order to export the change the user needs to include all four entries (the initial rule creation and subsequent changes; i.e. the dependencies) in the export package. Packages can be in one export file or split up, but the import must follow the sequence that creates the object first, then the rules on which they depend. This differs from the old Design Import Tool in that, previously, the package would have only one entry for that rule creation.
Note: The previous Design Import Tool could sometimes be used as a design backup, in that if an upgrade failed users could revert back to the old design, removing any partial changes. CTU does not have this capability.
|
The Old Way: Design Migration Tool |
The New Way: Configuration Transfer Utility |
|---|---|
|
1. Make changes in Development environment |
1. Make changes in Development environment |
|
2. Export entire configuration as a design snapshot |
2. Filter and select only the changes you want |
|
3. Edit XML files in the snapshot to select the changes |
3. Export the changes to a .zip package |
|
4. Import the edited snapshot |
4. Import the package by uploading it |
|
5. If import fails, repeat steps |
Important Note: In order to use the CTU, the user's Group must have Contact, Document, and View Rights for Admin Settings. If the user does not have Contact Rights they cannot see the Changed By nor the Create By values; if the user does not have Document Rights they are unable to view Export Packages.
Export Design Changes
As a TeamConnect administrator, you can select appropriate changes that were made in TeamConnect Setup or Admin Settings to be imported to your next environment. This provides the flexibility to migrate designs in parts depending on the demands of your project, as well as allow for precise scrutiny over the changes to be made.
Accessing the Export Design Changes page
From your TeamConnect homepage, click or hover your mouse pointer over the All tab. Select Export Design Changes, located under the Tools section.
The data found in the top Design Changes table records changes made in TeamConnect Setup (ex: removing, changing, or adding look-up tables). Changes are listed by the date and time the change was made (starting with the most recent), who made the change, change ID number, description of the change, the category (Type) of change, and any notes appended. Each design change is associated with a design category, shown in the Change Type column (e.g. Audit Appender, Custom Tool, Global Navigation, Group Account, etc).
If a change has previously been exported, the file name of that package appears in the Recent Export Package column. Identifying previously exported packages streamlines the process of making corrections or additions to a group of changes, and focuses attention to packages that have not yet been exported.
If a change has been previously imported, an [IMPORTED] indicator will appear in the Description column.

Use the filter tool above the table to show only changes by date range, individual who made the changes, description of changes, note keywords, type, or object (e.g. Appointment, Line Item, Task, etc.). Click Apply Filters to sort the list, or Reset Filters to list all design changes. The Changed By filter layout depends on settings defined in Admin Settings | User Interface | User Selection.
If a design change has been made under Admin Settings, the Change Type column will display "Admin Settings".
Control the amount of design changes displayed in the table by by selecting an option from the Design Changes per Page drop-down menu, located at the bottom right corner of the table. Navigate through the design change pages by clicking the numbers under the table. Warning: Moving from page to page resets the checkboxes you selected. Click Add Selected to Export List before you move on to the next page.
To include a note or details for an individual export change, click the pencil icon  under the Notes column, type into the text box and click the check mark
  to confirm or the red "x" (
 ![]() ) to cancel. Notes are transferred when importing these design changes.
) to cancel. Notes are transferred when importing these design changes.
To include a note or details for multiple design changes in the table, check the boxes of the items for which you would like to include a note, then click the pencil icon located inside the Notes column. A pop-up window appears where you can type in your notes or instructions. Click Apply to confirm or Cancel to exit without saving. Note: If none of the checkboxes are marked, clicking the bulk edit icon has no effect.

To create an export package, use the following steps:
- Click any number of checkboxes from the Design Changes table.
- After selecting the desired design changes, click Add Selected to Export List, located at the bottom of the table. The page refreshes to reflect your selections in the Export List Summary table.
Note:TeamConnect issues a warning if you export changes from multiple versions of TeamConnect, and you can see what versions are included in the TCE Version column. You also receive a warning if there are non-consecutive changes added to your export list. A non- consecutive change is considered a "skip" in the numeric sequence of ID numbers (i.e. exporting 1, 2, 4 would issue a warning because ID number 3 has been omitted). The warnings are an opportunity to correct unintentional changes, and do not prevent the user from dismissing the warning and continuing with the export.
The items in the Export List Summary table are listed by change ID numbers in ascending order and match the ID numbers in the table from which you initially selected the items.

- Click Export Changes. To remove a change from this selection, click the corresponding checkbox and click Remove Selected from Export List. You do not need to select the checkboxes in order to export the changes.
When exported, each change includes a list of host names of the servers on which the change was made and any servers on which it was previously imported. It also indicates the user who originally performed the changes. When a change that has be imported is re-exported, the user identified as the one making the change will be displayed as the one who imported it.
Upon clicking Export Changes, a text field appears in a pop-up window. Using the Export List Summary field, add notes about individual changes or a description of the export. Click Finish Export to confirm.
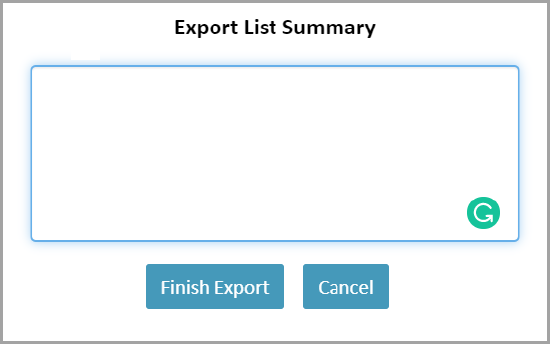
Package files can be downloaded from the Recently Created Export Packages table (in the bottom table, shown above) by clicking the hyperlink under the Name column.
View Older Packages
Because the Export Design Changes page only displays the ten (10) most recently created export packages, you can click the View older packages here hyperlink at the bottom of the screen to view all export packages created by any user in the TeamConnect application.

The Design Migration Packages table records the package name, category, file size and type, the name of the individual who has checked out the package (if applicable) and most recent date and time the package was modified.
Additionally, under the Action column, users can view package properties and/or check out the package.
 —View package properties
 —Check out package

To filter the table layout, use the arrows in each column header ( ) to sort data alphabetically, chronologically, or by size. Use the Documents per page drop-down menu at the bottom right of the table to control how many documents you see per page.
Open a package with Windows Explorer by clicking the hyperlink under the Name column. In the new pop-up window, select the option to open or save the file to your computer, then click OK.
For additional filter criteria, click Custom Search at the top right of the table.
By clicking the Custom Search hyperlink in the View Older Packages page within Export Design Changes, you can further filter the results for design migration packages.
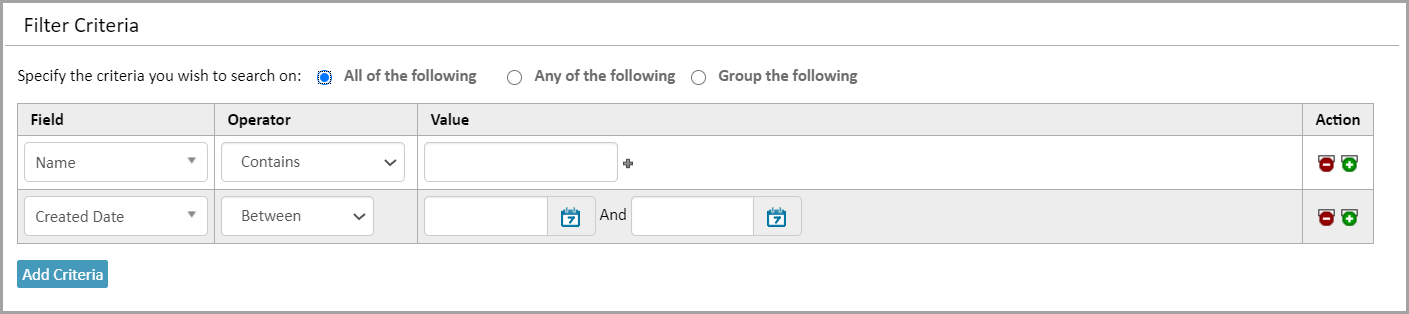
The top portion of the Custom Search page allows you to specify the criteria on which you wish to search by value of a particular field (e.g. package name, category, file type), or date.
- Using the radio buttons above the Filter Criteria table, determine whether you want to include all of the following values, any of the values, or group the values.
- Select a field and operator from the drop-down lists, then type in the value for which you wish to search. For the dates section, click on the
 icon to select a date.
 - Under the Action column, use the plus or minus buttons to add or erase additional search fields, or click the Add Criteria button at the bottom of the table for the same effect as the plus button.
- Click Clear Values at the bottom of the page to remove text under the Value column, or click Reset to Default to remove all values and added search fields.
After filling in all search criteria, click the Search button to apply the filters. Click Cancel to return to the previous page.
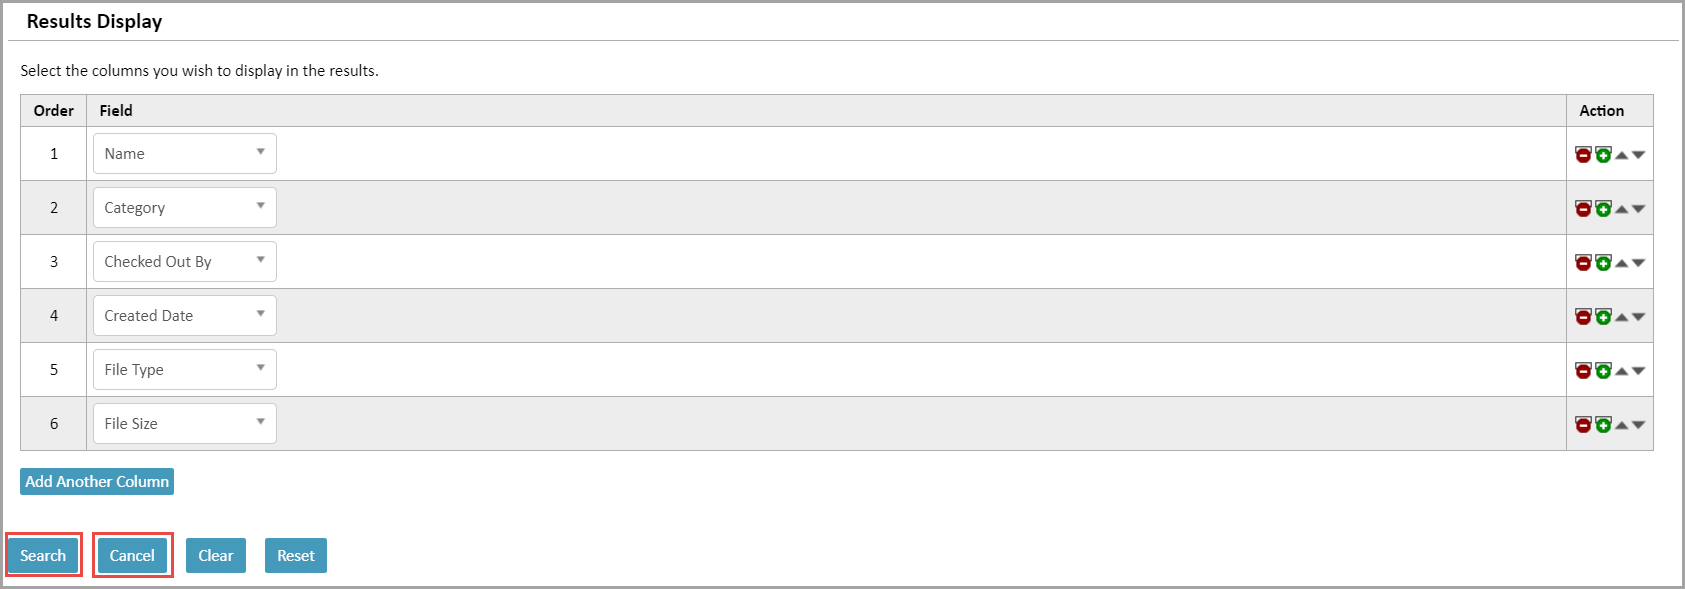
The bottom portion of the Custom Search page allows you to select the columns you wish to display in the Design Migration Packages table.
- Under the Order Field column, make a selection from the drop-down lists. If you would like to remove one of the columns, leave the drop-down list on the "(Select)" option, or click the minus button under the Action column.
- Add a column by clicking the plus button under the Action column, or click the Add Another Column hyperlink at the bottom of the table.
Note: Unless you choose a field from the drop-down list, the added column does not appear in the Design Migration Packages table. - Click Clear Values to remove text under the Value column, or click Reset to Default to reset fields and remove added columns.
After choosing your display criteria, click the Search button to apply the filters. Click Cancel to return to the previous page.
Viewing Your Search Results
Once you have entered your search criteria and selected Search, you can view the modified Design Migration Packages table.
In the new screen, you have additional hyperlinks above the table.

- Save Search—Save your current custom search criteria.
- Modify Search—Return to the Custom Search page with your current values in place.
System Settings Excluded From Export
As part of the Configuration Transfer Utility tool, certain changes made in Admin Settings are captured to be imported into new environments. A number of system settings are excluded from the design migration tool, and these items are listed below:
|
Admin Settings Tab |
Excluded Setting |
|---|---|
|
General |
Business Objects TeamConnect URL |
|
Region |
Default Locale Default Currency |
|
Calendar |
All Settings |
|
|
Outgoing Mail Server Settings Incoming Mail Server Settings TeamConnect IMAP Server Settings |
|
Maintenance |
Maintenance Notification Shutdown Alert |
|
Connections |
Proxy Settings Collaboration Portal |
|
History |
All Settings |
|
About |
Instance Information Available Updates Support Options |
Click Update to add changed system settings. Users must update first before exporting, or the changes cannot be imported.
Import Design Changes
As a TeamConnect Administrator, you can create design migration changes by importing a package not only made to the target environment, but also logged with Data Migration Tools. This ability aids in pinpointing changes that have already been imported, and identifying changes that still need to be made. Additionally, you can create an audit trail for changes that are being made to an environment where they potentially should not be. The import operation runs on foreground processing, as opposed to background processing, so the transaction can run reliably and unattended.
Accessing the Import Design Changes page
From your TeamConnect homepage, click the Tools button in the upper right corner of TeamConnect. Select Import Design Changes.
At the top of the Import Design Changes page, select Browse to import your package. Once you have selected the appropriate file from your computer, click Open, then click Upload.
When user is uploading the same design package, the validation message appears, "DesignExport_xxxxxxxx_xxx.zip has already completed Pre-Check Validation on mm-dd-yyyy at {time} and has x errors".
- Your imported package appears in the Import Details table. If any notes were made in the Export Design Changes page, they appear in the Notes column. Note: Uploading an incompatible file does not display results in the table.
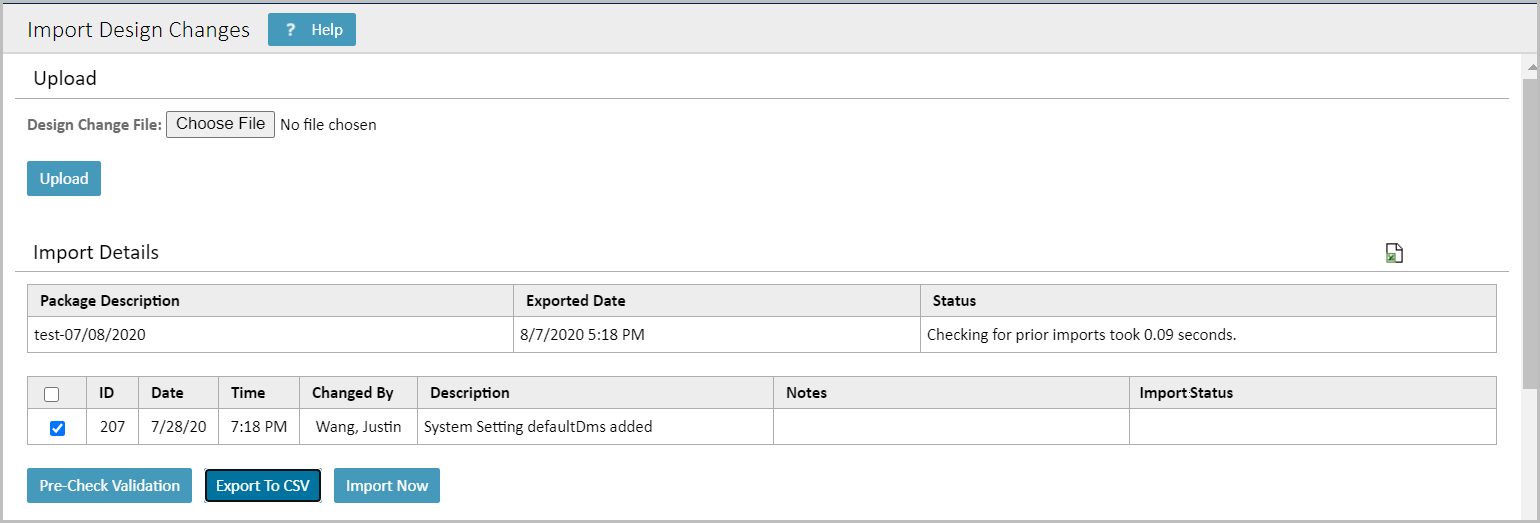
- Click Pre-Check Validation button to check the status of the PreCheck report and the error count in the pop-window.

Important Note:
- You cannot stop the import unless an error occurs. If you log out of TeamConnect, the import will continue to change the environment, but will go no further if an error is encountered.
- The Pre-Check Validation runs on the entire Design Package. If the user tries to run the pre-check on a partial list of design package changes, a validation message appears, "All Changes must be selected to run the Pre-Check Validation".
- Export your list of uploaded changes to Excel by selecting the
 icon in the top right section of the Import Details table, or click the Export to CSV button below the table.
- Choose to open or save the file by selecting the corresponding button in the download bar that appears at the bottom of your screen, or click Cancel to exit.
- A .CSV file is downloaded through your browser containing all of the data shown in the Import Details table (i.e. design change ID, date, time, changed by, description, notes, and status), and also includes any other fields that are included in the XML of the change record, but are not displayed in the on-screen table.
- If no errors fount, click Import Now button.
Once the data is generated into the Import Details table, click the checkboxes of the changes to be applied, then click Import Now. All applied changes appear in the Imported Change History table at the bottom of the page.
Upon clicking Import Now, choose to skip previously imported changes or errors encountered by clicking the "Yes" radio button in the Import Options pop-up window. Previously imported packages are already identified in the Status column after file upload. If you choose not to skip errors, you still have the option to skip all errors after the first error is generated during importation. The reason for having multiple options to skip errors is helpful if the imported package has a long list of changes and the first error may not be identified for a while.

Previously imported packages are skipped without stopping the import process as an error might. In order to eliminate duplicate packages, any package that has already been imported displays the information in the second Status column (see example below).
Error notices help you identify a solution for the issue, and TeamConnect provides warnings for the following cases:
- A change has already been imported (duplicate ID and data).
- There is an ID gap between the last imported change and the first change of the uploaded package (this may have occurred when selecting design changes to add to the Export List).
Any of the uploaded design changes were done on a TeamConnect version that is later than the current instance
Note: TeamConnect allows the import of design changes that were done on an older TeamConnect version. The error serves as notice in case this was done unintentionally.
At this point, you have several options:
- Stop Import: Cancel design import and start over.
- Retry Change: Reattempt the import if you have made the necessary changes.
- Skip Change: If the Import Details table has more than one item within the package, you can select this option to skip the first error to test the remaining items one-by-one. Selecting Skip Change does not import failed changes.
- Skip All Errors: If the Import Details table has more than one item within the package, you can select this option to test all items simultaneously. Selecting Skip All Errors does not import a failed change.
Imported Change History
At the bottom of the Import Design Changes page, you can view all imported packages in the Imported Change History table.
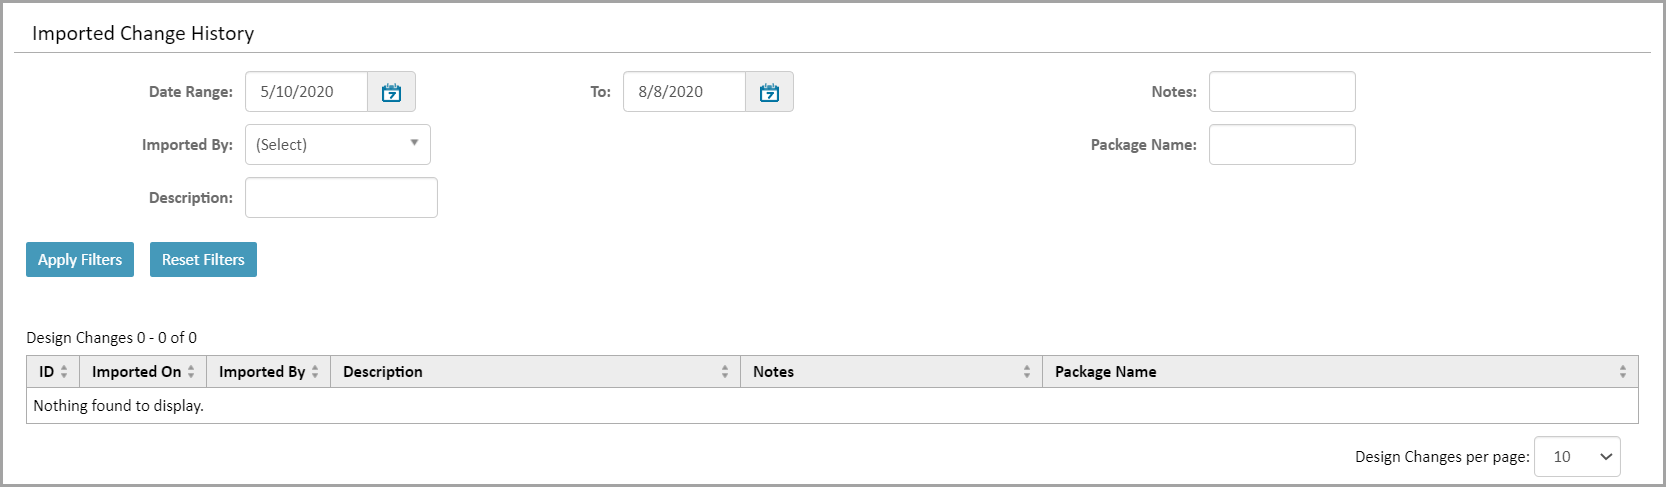
Use the search filter above the Imported Change History table to pinpoint a specific package import, or to view changes made during a specific time range.
- Click the Date Range "from" and "to" dates from the calendar
 icon, or type a date directly into the date fields.
 - Find changes made by an individual by selecting a TeamConnect user from the Imported By drop-down list, or search by description of the imported package by typing directly into the Description text box.
- If the imported package contained text in the Notes column, search for that package by matching the text in the Notes text box.
- Enter Package Name.
- Click Apply Filters to search using the updated criteria, or Reset Filters to start over. Results display above the search filter.
- Further refine your search by toggling the direction of the lists using the directional arrows ( ) in each of the column headers. The first click causes the column to list items in ascending order; click again for descending order.
At the bottom of the Imported Change History table, dictate how many design changes you would like to see per page by making a selection from the drop-down list (shown below).
Navigate through multiple pages of design changes using the number hyperlinks or the ![]() icon to the left of the drop-down.
icon to the left of the drop-down.

Pre-Check and Design Import History
To view the Pre-Check and Design Import History:
- Click the "Date Range"and "To" dates from the calendar icon, or type a date directly into the date fields.
- Select Action Run By from the drop-down list.
- Enter Package Name.
- Select Status and Function from the drop-down list.
- Click Apply Filters to search using the updated criteria, or Reset Filters to start over. Search results display below the search filter.
At the bottom of the Imported Change History table, dictate how many design changes you would like to see per page by making a selection from the drop-down list (shown below).

The grid consists of the following:
- Run-Date: Displays the date and time of the Import Design.
- Function: Displays the function of the Design Package
- Status: Displays the status of the Import.
- Action Run By: Displays the name of the person who imported.
- Package Name: Displays the name of the Package.
Troubleshooting and Best Practices
- When creating a Custom Action or Scheduled Action Rule (Object Definition>Rules) within setup for an Address Book as the recipient, the address book must first be created in the import instance before the actions assigned to the address book can be successfully imported into the new instance. To create the address book, click the Contacts tab at the top of the TeamConnect application, then select the New drop-down and click New Address Book. Enter the same name as the address book for which the custom action or scheduled action rule is being created, then click Save.
- Workflow: Make configuration changes only on development server(s). If a problem is discovered in staging or production, correct this problem in development, re-export the changes, then import the changes again. This process takes more time, but it ensures that the same content is deployed and tested across all environments.
- Export: Build and test small export packages before assembling large ones. Once you can verify that they are importing accurately, you can consider bundling them into larger packages for export.
- Import: Skip errors when importing to a non-production environment. It is more efficient to troubleshoot errors found during import after completion, rather than stopping at every error. Refer to the results and warning icons to locate the steps that failed, and test again once they are fixed. However, when importing changes in production, it is best practice to stop immediately when an error occurs, as errors should generally not be expected for this type of environment.
- Users: Log in as a "Special User" to avoid the possibility of two users importing at the same time. The Design Change Tool does not prevent two users from simultaneously performing imports on the same server, which could result in unpredictable behavior and conflicting changes. It is best practice to define a design change group and assign a single user with permissions to the design import section of the application. If you have a package that is in the process of importing changes and another user attempts to import changes, both imports will fail.
- If a design change has dependencies (or rules on which a custom object depends) on artifacts on the Export instance, but not on the Import instance, the dependencies will need to be in the same package. If any package is imported without the dependencies either existing in the Import instance's design, or in the package itself, the import process will result in an error.
- If your search results preferences is set to display less records per page than the number of design changes you have made, the changes may not appear in their entirety. Avoid this by going to Preferences and entering a larger number (i.e. 999) in the "Number of records per result page" text box, located under Search Results.
A brief description of the XML package tags:
|
Tag |
Description |
|---|---|
|
Operation type |
The design change will be either an update, insertion, or deletion. |
|
number |
This is the display order of the change. |
|
entityName |
The type of change (e.g. rule condition, object data field, user system setting, etc.). |
|
exportDate |
The date and time the export was committed. |
|
description |
This is the description the user entered for the package. |
|
Change description |
A short description of the design change included in the package. This is the same description found on the Export Design Changes page in the Description column. |
|
type |
The category that the design change falls into. This is the same description found on the Export Design Changes page in the Type column. |
|
time |
The time the design change was made. |
|
tcVersion |
The TeamConnect application version (update) on which the change was made. |
|
objUniqueCode |
A unique code required for identification that was entered by the user at the time of design change creation. This code is related to an object and its object rights, and ensures that proper rights are assigned to the correct object, despite order of import or object creation. |
|
notes |
Any notes appended to the change by the user appear here. |
|
id |
The ID number of the design change as it appears on the Export Design Change page. |
|
date |
The date on which the design change was made. |
|
changedBy |
The name of the user who made the design change. |
Artifacts Captured for Custom Designs
At the bottom of this page is a table outlining the custom design changes that are captured in the TeamConnect Configuration Transfer Utility environment. Custom design changes are made in TeamConnect Setup.
Note: CTU does not capture Reporting artifacts.
Click on the highlighted link for more information on the artifact and how to make captures for exporting and importing.
|
Artifact |
Category |
|---|---|
|
Audit Appender |
|
|
Object Definition XXXX |
|
|
Object Definition XXXX |
|
|
Object Definition XXXX: Custom Field |
|
|
Custom Look-up Table |
|
|
Custom Look-up Table |
|
|
Custom Tool |
|
|
Settings |
|
|
Global Navigation |
Global Navigation |
|
Group Account |
|
|
Group account tool access |
Group Account |
|
Group account object copy items |
Group Account |
|
Home Page |
|
|
Home Page |
|
|
Home Page |
|
|
Line item adjustment reasons |
Object Definition $LNI |
|
Line item display items |
Object Definition $LNI |
|
Object Definition $LNI |
|
|
Line item task codes |
Object Definition $LNI |
|
Notifications |
|
|
Object Definition XXXX |
|
|
Object Definition XXXX |
|
|
Object definition files (automated actions) |
Object Definition XXXX: Automated Action |
|
Object definition files (automated qualifiers) |
Object Definition XXXX: Automated Qualifier |
|
Object definitions files (screens) |
Object Definition XXXX: Screen |
|
Object Definition XXXX |
|
|
Object Definition XXXX |
|
|
Object Definition XXXX |
|
|
Object definition batch view items |
Object Definition XXXX |
|
Object definition field configuration |
Object Definition XXXX |
|
Object Definition XXXX |
|
|
Object Definition XXXX: Object View |
|
|
Object Definition XXXX: Object View |
|
|
Object Definition XXXX: Object View |
|
|
Portal Pane |
|
|
Portal Pane |
|
|
Route |
|
|
Route |
|
|
Route |
|
|
Route |
|
|
Object Definition XXXX : Rule |
|
|
Object Definition XXXX : Rule |
|
|
Object Definition XXXX : Rule |
|
|
Object Definition XXXX : Rule |
|
|
Object Definition XXXX : Rule |
|
|
Object Definition XXXX : Rule |
|
|
Object Definition XXXX : Search View |
|
|
Object Definition XXXX : Search View |
|
|
Object Definition XXXX : Search View |
|
|
System Appender |
|
|
Settings |
|
|
System folders (every folder under System except Design Versions and every folder under HTTPRoot) |
System File |
|
Object Definition XXXX : Template |
|
|
Object Definition XXXX : Template |
|
|
Object Definition XXXX : Template |
|
|
Object Definition XXXX : Template |
|
|
Object Definition XXXX : Template |
|
|
Object Definition XXXX : Template |
|
|
Object Definition XXXX : Wizard |
|
|
Object Definition XXXX : Wizard |
|
|
Object Definition XXXX : Wizard |
|
|
Object Definition XXXX : Wizard |
|
|
Object Definition XXXX : Wizard |
|
|
Object Definition XXXX : Wizard |