
Creating Routes
For details about how approval rules are constructed, see Approval Rules.
Routes may have multiple stops, which define the order in which the approval is sent to each user whose approval is required. The members of a route may approve or reject the attempted operation, reassign it to another user, or even edit items in a workflow that are still pending approval. Note: Editing items pending approval in workflow is only available in TC 4.0.8 and later.
Members of a route may include:
- User groups
- Users who have a certain role in a project record
- Other users who are identified by association
If a route is associated with all objects, only the first choice (user groups) is available when creating stops. The choices for users with roles, or users identified by association, are available for routes that are linked to one specific object type.
If the sequence of approval is important, the stops must be separate. Otherwise, all members may be in the same stop.
For example, to create a route that requires approval from a transaction attorney and a supervisor before an invoice payment over $10,000 is posted, you would need an approval rule that checks whether an invoice being posted is for more than $10,000. If only one person must approve the posting, then the route would need only one stop with all members.
If, however, the invoice may only be posted after a transaction attorney and a supervisor both approve the posting, in that order, then the route would contain two stops. The first stop would send the approval to the transaction attorney. If the transaction attorney approves the posting, the approval would then be sent to the supervisor.
You may also define multiple branches (with the same rule) for the same operation when the levels of authority to approve differ depending on the qualifiers that trigger the approval rule. This is because it
is impossible to have an approval finish part of the way through the route. It must finish the route before it is approved.
For example, for invoice posting approval:
- Up to $5,000: the Main Assignee's approval is sufficient.
- More than $5,000, but less than $20,000: the Main Assignee and the supervisor must approve the posting.
- More than $20,000: the first two individuals and the vice president must all approve the posting.
Accessing Routes Screen
If you have user group rights to Routes, you may access them from the Setup link, which starts Designer.
To open a new or existing route definition
- In the Designer window bar, in the Go To drop-down list, select Routes.
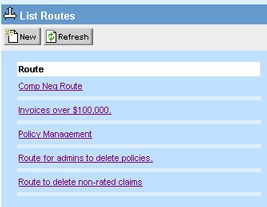
The List Routes screen appears. - Do one of the following actions:
- In the list of existing routes, click the name of the route you want to open.
- Click New to create a route.The General screen displays by default.
- Click the Stops tab to view the stops information, if necessary.
You may create, view, and modify a route on its Route screen, which has the following tabs:
![]()
- General—Displays the name of the route and object for which it may be used. See Defining General Route Information.
- Stops—Displays the stops and members of each stop. See Route Stops.
Defining General Route Information
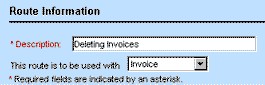
General route information includes the name of the route and the object to which it applies. These fields are located on the General tab of the route.
The following table describes the items in the General tab of Route screens.
General Tab on Route Screens
|
Field |
Description |
|---|---|
|
Description |
Enter a name (maximum 250 characters) that uniquely identifies the route. This description appears on the Action tab of an approval rule to allow you to select it. |
|
This route is to be used with |
Select the object for which the route may be used. You may either specify one object, or select (All) to make the route accessible to all objects.
When the route is saved, you cannot change this selection. |
After saving the name and the object selection for the route, you may click the Stops tab and define the stops in the route.
Points To Remember
In TC 5.0.3 version, an issue is encountered that is unable to open route from action tab of Approval rules and a popup is displayed with page loading.

Even after the user clicking the "ok" button, the page still keeps on loading and no other action can be performed on the page. To resolve this issue, the user must do the following action:
Apart from the following 'Setup Rights' to the user, i.e.,
Under Object Definitions→ View Object Definitions records and View Object Definitions rules
Under Routes→ View Routes records and View Route Stops
The user should also have the minimum requirement of “View History category” permission enabled in Admin→Groups→Any specific group→Category Rights→ View tab→History→ View category should be ticked.
By providing the minimum requirement, the user will not face this issue anymore.
Route Stops
Stops represent approval rule check points. The route follows the order in which you organize the stops, starting with Stop 1. A stop consists of members who may approve or reject the operation attempted by a user. All members of each stop receive the approval notice in their My Approvals screen.
Points To Remember
-
If all users in a stop do not exist, the stop is skipped and the route proceeds to the next stop. For example:
-
If a stop includes only the Main Assignee of a Claim and there is no Main Assignee, then the stop is skipped and the route proceeds to the next stop.
-
If a stop includes only a certain assignee in the parent project of a project that is being deleted. If there is no parent project, then the route proceeds to the next stop.
-
If a user with a specified role is assigned to a stop in a route, and there is no such role assigned to any active assignee or group, the assignee is skipped and the request goes to the next approver.
-
Note: We have introduced a stop level check box from TCE 6.3.7 which helps the user to add a valid approver at the stop level if needed. For more information, refer to the Add Valid Approver at the Stop Level.
- If an assigned user with a specified role exists, but the user account is inactive, an error message appears if all members are required for approval or if there are no other valid members in the stop.
- Rejection of an approval request always works on a "first come, first serve" basis. Once any designated approver rejects a request, the request record is removed from the My Approvals list of all route members, regardless of which stop in the route the rejection occurred.
- Approval may work on a "first come, first serve" basis only if you want it to. For each stop of the route, you may control whether one approval is enough to allow the operation, or all stop members must approve the operation before the route proceeds to the next stop.
- If the sequence of approval does not matter, then you must place all of these members in one stop. Placing multiple members in one stop and requiring approval from all stop members (selecting the check-box) allows you to give more time for all members to approve the operation, rather than having them wait for the previous stop members to approve the operation first.
- If the sequence of approval does matter, then each member whose approval is required must be placed in a separate stop, in the order in which their approval is required. You must also make sure that the expiration time allows for all stops to be reached.
Stops may be viewed, added, deleted, or modified on the Stops tab of the route. The Stops tab also defines the order of the stops and whether all members of each stop must approve the request before the route proceeds to the next stop.
The following table describes the items on the Stops tab.
Stops Tab
|
Field or button |
Description |
|---|---|
|
Create New Stop |
Click to create a new stop for the route. The new stop is added to the end of the route. |
|
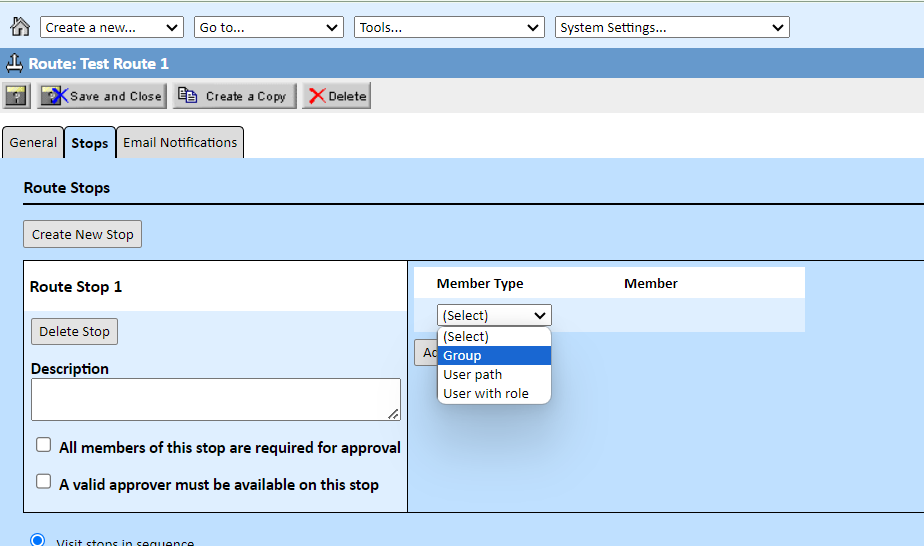
All members of this stop are required for approval |
Select this check-box if all members of the stop are required to approve the request. If the check-box is selected, then the route does not continue to the next stop until all users in the stop have approved the operation. If this check-box is NOT selected, then the route continues to the next stop as soon as one user in the stop has approved the operation. This check-box requires all members no matter how they are added to the stop. This means that a member's approval is required in all of the following situations:
Whether or not this option is selected, a single user may reject the attempted operation and thus delete the request from the My Approvals screen of all route members. You cannot set a route to reject an operation only after all members have rejected it. |
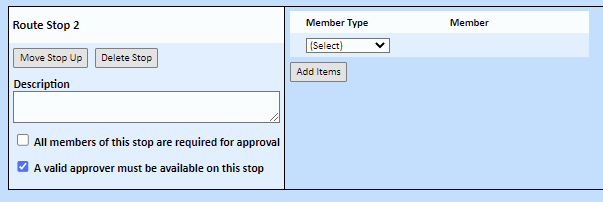
| A valid approver must be available on this stop | Selecting this check-box enables the user to choose if they need a valid approver or avoid it on the workflow if a valid approver is not required. For more information, refer to the Add Valid Approver at the Stop Level. |
|
Member Type |
Select the type of stop member you want to add to the stop. For details, see Adding Stop Members. |
|
Member |
Select or identify the user or group you want to add to the stop. For details, see the following: |
|
Member List |
Displays the members of the corresponding stop. |
|
Move Up or Down Arrows |
Use these arrows to change the order of the stops if needed. Click the respective arrow to move the entire stop up or down one level. The route follows the order in which you organize the stops, starting with Stop 1. |
|
delete |
Click to delete the corresponding stop from the route. Each delete button corresponds to the stop with which it is aligned. Note: Do not confuse the delete buttons for the stops with the delete button at the bottom of the screen that appears in all batch screens. The delete button for the batch screen applies to stop members rather than an entire stop. |
|
Visit stops in sequence |
Select to specify that the route visits each stop in numerical order. This option does not appear if you can use the route with all record types. |
|
Custom sequence |
Select to place a condition on a stop to determine whether the route visits the stop. Refer to the Custom Sequence Entries table for details about this field. This option does not appear if you can use the route with all record types. |
Adding Stop Members
You may add stop members on the Stops tab of the route. You may add static members and dynamic members to a stop, depending on your needs.
Important: Make sure that there is at least one active user in a route that is being referenced by an approval rule. If no users are identified in a route, the route behaves as if everyone in the route approved the operation. The operation will be completed.
Adding dynamic stop members requires an understanding of Object Navigator. For details, see Using Object Navigator.
Member Types
The Member Type determines how users are included in a route stop as members: as members of a static user group, or as dynamically selected members. The following table explains the three member types.
Stop Member Types in Routes
|
Member type |
Description |
Example |
|---|---|---|
|
Group |
|
The group Senior Claim Officers must approve posting of invoice payments over $100,000. |
|
User path (Not available in routes that are specified for All objects in the route's General tab.) |
|
Posting of invoice payments over $100,000 must be approved by the user who is the main assignee of the claim that is identified in the line item of the invoice. In this example, if more than one project is listed in the line items of the invoice, then the approval goes to the main assignee of each project. |
|
User with role (Not available in routes that are specified for All objects in the route's General tab.) |
|
Posting of invoice payments over $100,000 must be approved by the user who is the Supervisor of the claim. In this example, if the claim record has more than one supervisor, then the approval goes to each supervisor. |
The steps necessary to add members to a stop are different for each member type. The following are step-by-step instructions to help guide you through adding stop members:
- Adding Groups as Stop Members
- Adding User Paths as Stop Members
- Adding Users With Roles as Stop Members
You may add user groups to route stops. If any or all members of a certain group must always approve certain actions, then adding the group as a member of the route is a good idea.
Even though a group is a static stop member type, the route automatically uses only the current, active members of the group in the approval process.

To add a group as a stop member
- Click the Stops tab of the route to which you want to add a group as a member.
- From the Member Type drop-down list, select Group.
- From the list of groups, select the appropriate group.
- If appropriate, select the check-box requiring approval for all members.
This requires approval for all members of the group and all other members of the stop, if there are other members. - Click add more to continue adding stop members, or click Save to save the route.
A User path stop member identifies a dynamic user. The user who receives the approval depends on which user is identified by the path. This stop member type is only available if a specific object is identified for the route on its General tab.
To add a user path as a stop member
- Click the Stops tab of the route to which you want to add a user path as a stop member.
- From the Member Type drop-down list, select User path.

- Click the Navigator
 icon and create a path using Object Navigator.
 - If appropriate, select the check-box to require all members of the stop to approve the requested operation.
This requires approval from all members of the stop, including all users who are identified by this path, as well as other members of the stop. - Click add more to continue adding stop members, or click Save to save the route.
When adding a user path as a member of a stop, keep in mind that if there is no user identified by the path, then the member is not added to the stop. For example, if you want the route to go to the Main Assignee of a project and this is the only member of the stop, then the stop is skipped if there is no Main Assignee, and the route automatically proceeds to the next stop.
When creating a path to a user for a member of a stop, the path must end with an attribute in the object model that identifies a user. This means that your final selection in Object Navigator must be one of the following:
user->createdBy->modifiedBy->expensedBy->enteredBy->transitionedBy->- Another attribute that identifies a user.
Important: Only users may be members of a route. Do not select an attribute that identifies a contact as your final selection for a user path.
The following table provides sample user paths created for a stop member.
User Path Examples for Route Stops
|
User identified by this path |
What to select in Object Navigator to build this path |
|---|---|
|
The user who created the record. |
|
|
The user who is the Main Assignee of the project for which you are creating a route. |
|
|
The user who is the Main Assignee of the project to which the current object for which you are creating a route (such as Account, Expense, Task, etc.) is a related object. |
|
|
The user who is the main assignee of the project indicated in the invoice's line items (for a route created for the Invoice object). |
|
|
The user who entered or posted the expense (for a route created for the Expense object). |
|
A User with role stop member identifies a dynamic user who is an assignee of a project. The user who receives the approval depends on which user is identified by the Assignee role indicated in the stop. This stop member type is only available if one specific object is identified for the route in its General tab.
To add a user with role as a stop member
- Click the Stops tab of the route to which you want to add a user with role as a stop member.
- From the Member Type drop-down list, select User with role.

- Select the appropriate role in the second field.
- Do one of the following actions:
- If the role you selected belongs to the object for which you are creating the route, you do not need to create a path. Instead, continue to the following step.
- If the role you selected belongs to a different object than the object for which you are creating the route, click the Navigator
 icon and create a path to the necessary project using Object Navigator.
For example, if you want the stop member to be the user with the role GC Attorney in the parent project of the project for which you are creating the route, select parent-> in Object Navigator.
- Click add more to continue adding stop members, or click Save to save the route.
When you create a user with role stop member, follow these guidelines:
- If you are creating a user with role stop member and the Assignee role exists within the object for which you are creating the route, you do not need to create a path to identify the role.
- If the role belongs to a different object, you must create a path that indicates which object the role is from, in relation to the object for which you are creating the route, as shown in the examples in the User with Role Examples for Route Stops table.
When creating a path to a user with role, the path must end with an attribute in the object model that identifies a project (custom object). This means that your final selection in Object Navigator must be one of the following:
project->parent->applProject->leftProject->(this is not common in routes)rightProject->(this is not common in routes)- Another attribute that identifies a project.
Important: To build a path that identifies the PROJECT in which the user has the specified assignee role, do not select an end-of-path attribute that identifies the user.
The following table provides sample User with role paths for stop members.
User with Role Examples for Route Stops
|
Project identified by this path |
Example |
What to select in Object Navigator to build this path |
|---|---|---|
|
The parent project of the current project. Note: This path may only be used for custom objects that have parent-child relationships. |
When creating a route for Claim (a custom object): If Policy is the parent object of Claim, this would send the approval request to assignees of the policy record that is the parent of the claim record. |
|
|
The project to which the current object (such as Task or Expense) is related. |
When creating a route for Task, Expense, or other system object that may be related to a project record: This would send the approval request to assignees of the project that is selected in the General information for the record. |
|
|
The project to which an account belongs. |
When creating a route for account: This would send the approval request to assignees of the project that is selected in the General information for the account. |
|
|
The project referenced on a line item of an Invoice. If more than one project is listed, then the approval goes to each user who has the selected role in each of the projects. |
When creating a route for invoice: This would send the approval request to assignees of the projects that are referenced by each line item on the invoice. If all line items in the invoice reference the same project record, then only the assignees of that project receive the approval request. |
|
|
The parent of the parent project of the current project. |
When creating a route for litigation (a custom object): In a litigation record that has a parent claim, which in turn has a parent policy, this would send the approval request to the assignees of the policy record. |
|
When adding a user with role as a member of a stop, keep in mind that if there is no user identified by the path, or if the user is inactive, then the member is not added to the stop. For example, if you want the route to go to the General Counsel assignee of a project and this is the only member of the stop, then the stop is skipped if there is no such assignee, and the route automatically proceeds to the next stop. If there are no further stops, then the request is approved.
Tip: You may add all project assignees as members of a stop by adding a User with role member for each role that is possible for the project. TeamConnect automatically routes the approval request to all users who are assignees of the project.
Customizing Route Stops
When you add stops to a route, records visit each stop by default. If you want a record to visit stops when certain conditions are present, you can customize the route.
Select Custom Sequence on the Stops tab of a route to enter the custom sequence. The following table describes the fields for entering a custom sequence.
Custom Sequence Entries
|
Column Name |
Description of Fields |
How Fields Work |
|---|---|---|
|
Starting Stop |
Specifies where the route starts or the last stop that just occurred. You can select the following fields:
|
If more than one entry has the same field in the first column, the route evaluates the first of those entries. The route continues to each entry with the same field under Starting Stop until a condition is true. If no conditions are true, the workflow process ends. Note: When a work flow process ends, the action that put the record into work flow occurs. |
|
Condition |
Specifies the conditions available for the record type of the route. You can select the following fields:
|
When evaluating a condition, the route visits the Destination Stop for the conditions that are true. See Conditional Expressions for more information about conditions. |
|
Destination Stop |
Specifies the stop that the route visits if the condition is true. You can select the following fields:
|
For each entry, the Destination Stop number must come after the Starting Stop number. |
In the following image, consider an example of how the route evaluates each entry for a record. In this example, the record visits only Stop 2 and Stop 4 before completing. Invoice Condition3 and Invoice Condition4 are true for the record and all other conditions are false.
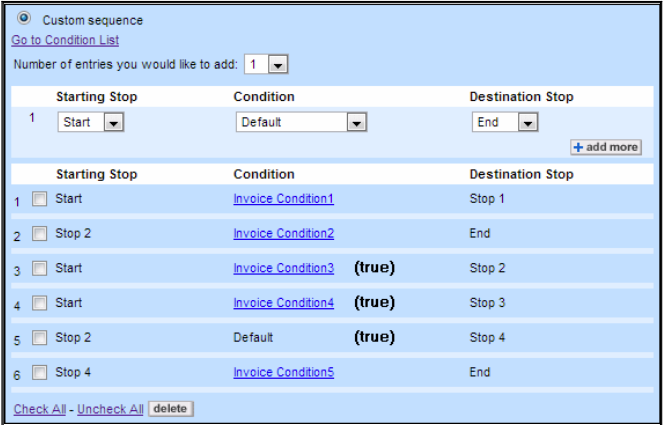
Customization Sequence for a Route
The following actions occur for the example:
- From the first entry with Start as the Starting Stop (line 1), the route evaluates Invoice Condition1. Because Invoice Condition1 is not true, the route continues to the next Start entry (line 3).
- From the second entry with Start as the Starting Stop (line 3), the route evaluates Invoice Condition3. Because Invoice Condition3 is true, the route visits Stop 2.
Note: Even though Invoice Condition4 is true, the route does not evaluate the condition because the previous Start entry is true.
-
After Stop 2 is complete, from the first Stop 2 entry (line 2), the route evaluates Invoice Condition2. Because Invoice Condition2 is not true, the route continues to the next Stop 2 entry (line 5).
-
The second Stop 2 entry (line 5) lists Default as the Condition, which means that the route visits Stop 4 without evaluating a condition.
-
After Stop 4 is complete, from the only Stop 4 entry (line 6), the route evaluates Invoice Condition5. Even though Invoice Condition5 is not true, the workflow process still ends and can no longer send requests to approvers because no more entries with Stop 4 exist in the Starting Stop column.
To customize the sequence conditions
- From the route, click the Stops tab.
- Add all stops to the page. See Adding Stop Members for information about adding stops.
- Select the Custom Sequence option, as shown in the Customization Sequence for a Route image.
- From the Starting Stop drop-down list, select Start or a stop. Start indicates which entry the route evaluates first before visiting a stop. A stop indicates which entry the route evaluates after that stop is complete.
- From the Condition drop-down list, select the condition that must be true for the record to continue to the Destination Stop.
- From the Destination Stop drop-down list, select the stop that the route visits if the condition is true.
- Click add more to save the entry.
- Add additional conditions if necessary.
- Save the route.
Background Approver
The Background Approver is a scheduled action that runs on a recurring schedule and approves any invoice that is Pending when the Background Approver user is the final approval stop. To set up a Background Approver:
1. Create a new Group called ‘Background Approver’.
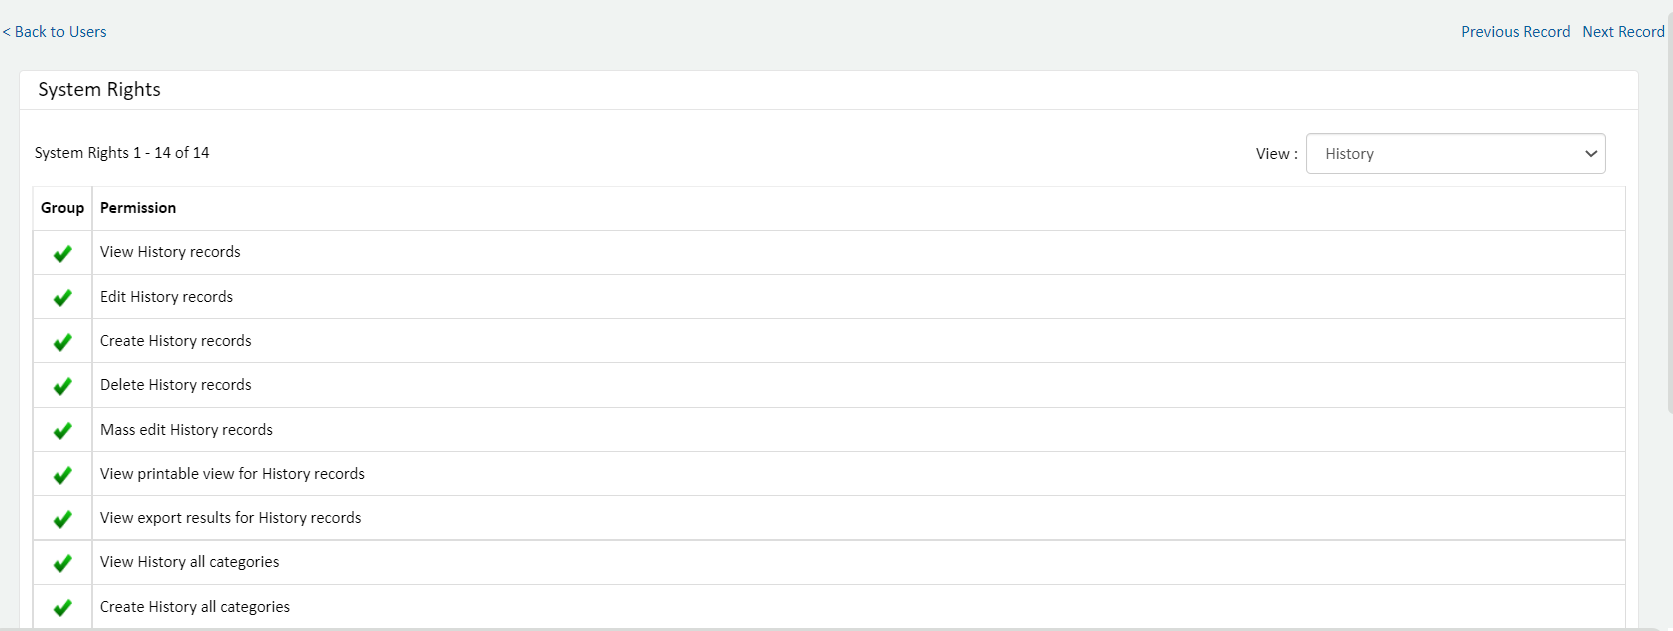
2. Navigate to System Rights > User Rights and give this Group the following permissions:
a. Select ‘View all records’
b. Select ‘Edit all records’
c. Select ‘Create all records’
3. Create a new User called ‘backgroundapprover’. This is the exact name you must use. For the User set up:
a. The ‘User Type’ must be ‘Super’
b. Navigate to ‘Group Memberships’ and add ‘Background Approver’
4. Update the required routes.
a. Navigate to ‘Setup’
b. From the Go to…drop down > Routes
c. Click on the desired routes and add a new stop
d. ‘Member Type’ – Group
e. ‘Member’ – ‘Background Approver’
5. Create the scheduled action rule
a. Switch back to the user interface of TeamConnect.
b. Navigate to All > Tools > Scheduled Actions.
c. Click on the link ‘View Scheduled Actions folder’.
d. Upload the file – ‘ScheduledApprovalAction.class’. Click on the filename to download the file.
e. Navigate back to the ‘Scheduled Actions’ page.
f. Create the scheduled action as follows. The values associated to ‘Repeat’, / ‘Start Time’ can be changed based on the requirement.
g. Click on the ‘Add’ button.
6. Testing the rule.
a. Create an invoice and push it in workflow.
b. The workflow must now have the ‘backgroundapprover’ as the last stop member.
c. Approve the invoice until the ‘backgroundapprover’ is the current stop.
d. The rule utilizes the Rule logger to DEBUG and the XML logger to DEBUG. Make sure that these loggers are set to DEBUG.
e. Navigate to ‘Scheduled Actions’.
f. Click on the ‘Run Now’ button for the ‘Background Approver Auto Approve’ rule.
h. Once the rule completes, the test invoice must be directly posted. Check the ‘Approval History’ as well.
i. The logs associated to the ‘XML Appender’ will display the invoice name that was auto approved.
Adding Email Notification Recipients
You may configure email notifications to dynamically selected users or groups for the following events related to a pending approval request:
- Final approval
- Final rejection
- Error
To add a user or group as an email notification recipient
- Click the Email Notifications tab of the route to which you want to add an email notification recipient.

- From the Number of entries you want to add drop-down list, select the number of recipients to add.
- From the Recipient Type drop-down list, select Group, User Path, or User with Role.
- From the resulting Recipient drop-down list, select either the user name or group name.
- From the Event drop-down list, select one of the following:
- Final approval
- Final rejection
- Error
- Repeat steps 3-5 for adding multiple recipients.
- Click add more.
- Click Save.
Note: When a user is the only recipient of an email notification, it is sent in the user's preferred language. When there are multiple recipients, the email is sent in the selected system language.
The following table describes the items in the Email Notifications tab.
Email Notifications Tab
|
Field or button |
Description |
|---|---|
|
Number of entries you want to add |
Select the number of users or groups to add to the email notifications recipients list. |
|
Recipient Type |
Select Group, User Path, or User With Role. |
|
Recipient |
Select either the group name or a dynamic user. Make this selection using the steps previously described in: |
|
Event |
Select one of the following:
|
|
Email notification recipients list |
Displays the current route's list of email notification recipients. |
|
delete |
Select the current email notification recipient box(es) and click the delete button to remove that recipient from the notifications list. |
Important: To set email notifications for users involved with the approval process as well as users with no direct role in the approval process, email notifications must be properly configured.2
Add Valid Approver at the Stop Level
Note: This option is available to the users who are on TCE 6.3.7 or above versions only.
A stop level check box is implemented named “A valid approver must be available on this stop”. It can be enabled at the stop level based on the user workflow, and the user can choose if they need a valid approver or avoid it on the workflow if a valid approver is not required.
The valid approver includes a group of active users or, if using a user path with role, the assignee must be active and have the required role. Following are the results if the valid approver check box is enabled and the stop has an Inactive User/Inactive Assignee or Assignee Role not available:
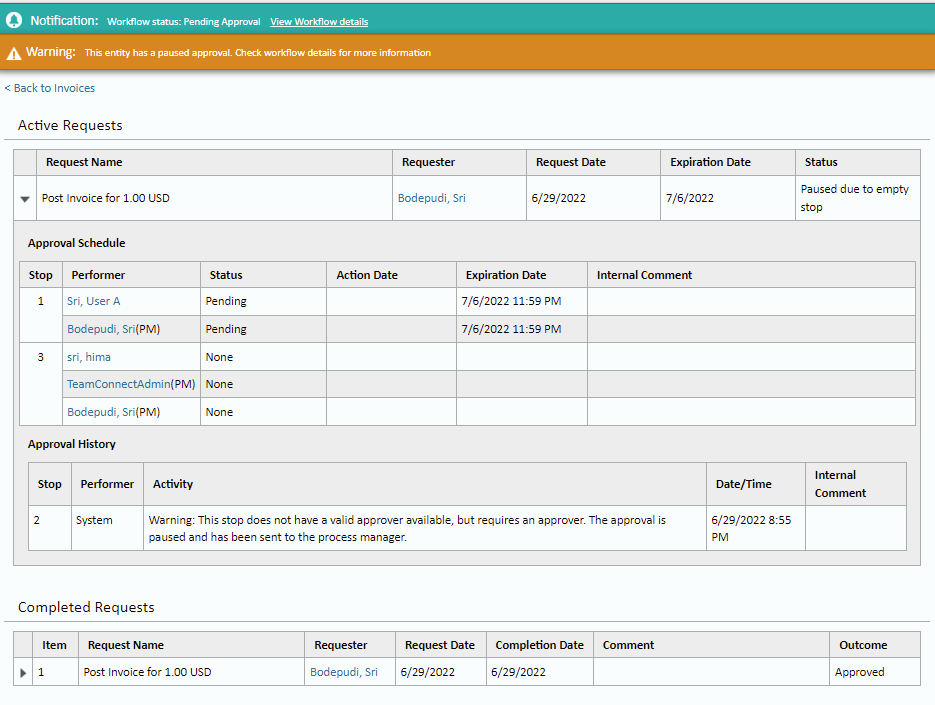
- When the Invoice is posted, it will be paused due to an empty stop.
- The Invoice displays a message indicating that it is paused - “Warning: This entity has a paused approval. Check workflow details for more information”.
- Under the Approval History section of the Invoice displays - “Warning: This stop does not have a valid approver available, but requires an approver. The approval is paused and has been sent to the process manager”.
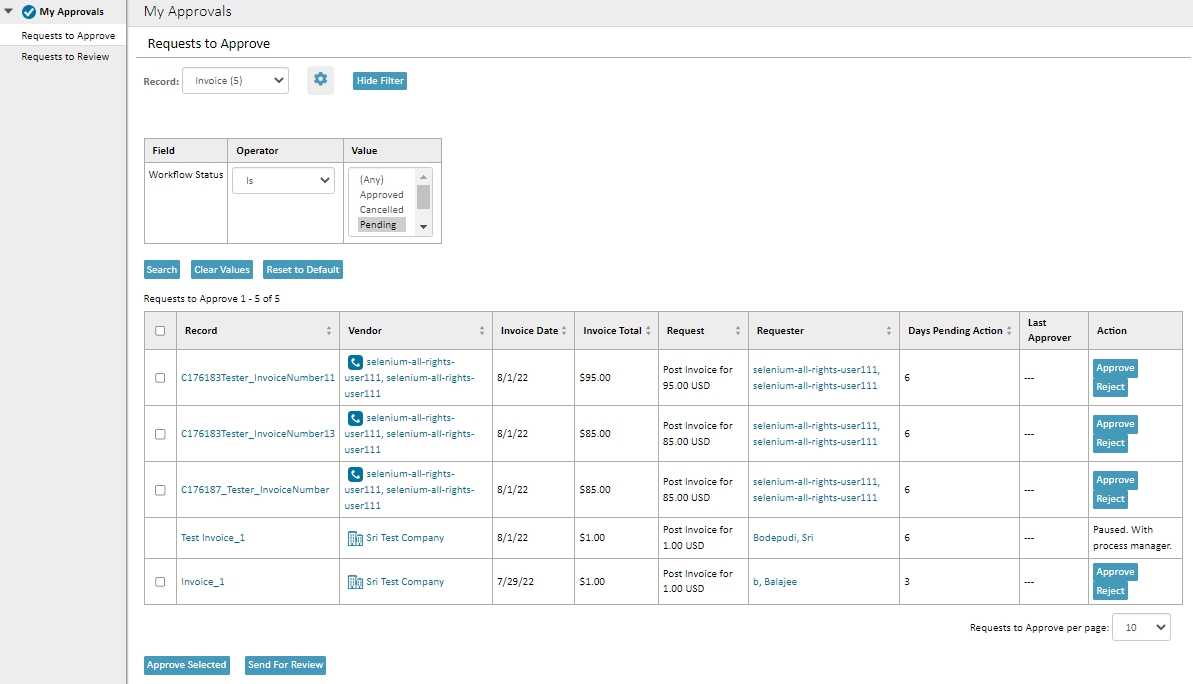
- For Approvals- The Invoice is displayed on My Approvals page.
- In the “Requests to Approve” column, the check box is not displayed to approve the paused Invoice or to send it to review.
- The Action column displays as “Paused. With process manager” and no “Approve” & “Reject” buttons are displayed.
- For Workflow Process: The Invoice is moved to the “Attention Required” page when paused. When the Invoice is paused, “Reassign” and “Forward” options will not be available.

My Workflow Process Tab
| Field or button | Description |
|---|---|
|
Restart |
Click to restart the workflow and move it back to “Attention Required”. |
| Return to Requester | Click to return the Invoice to the Requester and as ‘Rejected’ posting status. |
Important:
-
If the stop level check box named “A valid approver must be available on this stop” is enabled and the route has multiple stops and one of the stop has an Inactive User/Inactive Assignee or Assignee Role not available, then the Invoice will be paused when posted, even if the other stops have valid approvers and stop level check box is not enabled for other stops.
-
An empty stop cannot be added when the option is enabled or disabled.
-
Multiple Groups in 1 Stop - When there are multiple groups in a stop and one of them is an Inactive User/Inactive Assignee or Assignee Role not available, the Invoice will enter the workflow if both the options named “All members of this stop are required for approval” and “A valid approver must be available on this stop” are enabled.
-
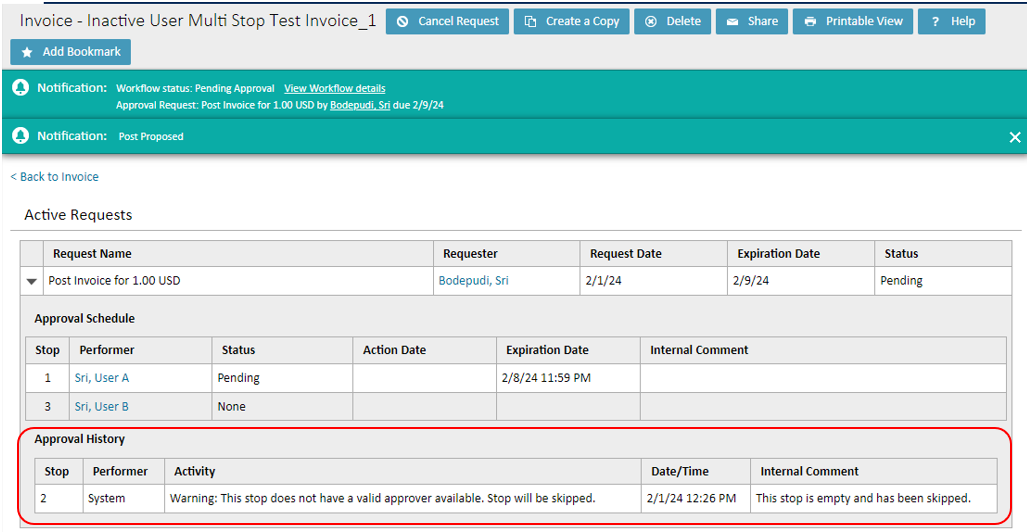
When the Valid Approver Check Box is disabled and the Stop has an Inactive User/Inactive Assignee then the Stop is skipped. It is not displayed in the Workflow.
Please see the below screen capture as a reference for the details on the skipped stop in the approval history.
Note: There is currently no email notification when a workflow is paused, such as when an Invoice is approved or rejected.
Invoice Approval — Suspended Status
Overview
During the invoice approval workflow in TeamConnect, an approval stop may enter a Suspended state. When this occurs, a "Suspended" entry appears in the invoice's Approval History (workflow activity log). This document explains what the Suspended status means, when it is triggered, and what actions follow.
What Does "Suspended" Mean?
Suspended is a workflow activity status — not a direct invoice status. It indicates that the approval workflow has been paused at a specific approval stop because a configured hold condition evaluated to true.
When an invoice is suspended:
- The approval process does not advance to the next stop.
- A "Suspended" entry is recorded in the invoice's approval history log.
- The invoice remains at the current approval stop until the hold condition is no longer met or until an administrator intervenes.
When Does Suspension Occur?
Suspension is triggered during the approval action on an invoice. Specifically:
- A user (or the system) approves the invoice at the current approval stop.
- After approval, TeamConnect's approval engine evaluates the hold condition configured on the next approval stop.
- If the hold condition evaluates to true, the workflow is suspended at that stop.
- A "Suspended" activity entry is written to the approval history log, along with the name of the approver or system user.
Flow Diagram
User approves invoice at Stop N
        │
        ▼
Engine prepares to advance to Stop N+1
        │
        ▼
Hold condition on Stop N+1 is evaluated
        │
        ├── Condition = FALSE → Workflow advances normally to Stop N+1
        │
        └── Condition = TRUE  → Workflow is SUSPENDED
                                  │
                                  ├── "Suspended" logged in approval history
                                  └── Invoice remains at current stop
What Is a Hold Condition?
A hold condition is a configurable rule defined on an approval stop within the approval workflow template. It is a logical expression that TeamConnect evaluates automatically during the approval process.
Examples of hold conditions:
- Invoice amount exceeds a certain threshold
- A required field is missing or incomplete
- A related record is in a specific state (e.g., contract not yet signed)
- A date-based condition (e.g., invoice date is in a future period)
Hold conditions are configured by Setup/Designer administrators in the approval workflow definition. End users do not directly control hold conditions.
Where to See the Suspended Status
The "Suspended" status appears in the Approval History section of the invoice record. Each approval history entry includes:
| Field | Description |
|---|---|
| Stop | The approval stop number where the suspension occurred |
| Activity | "Suspended" |
| User | The approver whose approval triggered the hold condition evaluation |
| Date/Time | When the suspension occurred |
What Happens After Suspension?
Once an invoice is suspended, it will remain in that state until one of the following occurs:
- The hold condition is no longer met — If the underlying data changes (e.g., a required field is populated, a related record's status changes), the next approval action will re-evaluate the hold condition. If it evaluates to
false, the workflow proceeds normally. - Administrative intervention — An administrator may manually advance or modify the approval workflow.
- Workflow reassignment or reset — Depending on system configuration, the workflow may be reassigned or restarted.
Frequently Asked Questions
Q: Is "Suspended" the same as "Rejected"?
No. "Rejected" means an approver explicitly declined the invoice. "Suspended" means the workflow was automatically paused by a hold condition — no one rejected it.
Q: Can I unsuspend an invoice myself?
It depends on your permissions and the hold condition. If the hold condition depends on data you can modify (e.g., filling in a missing field), updating that data and re-submitting for approval may resolve the suspension. Otherwise, contact your system administrator.
Q: Does suspension affect the invoice's financial status?
No. Suspension is purely a workflow state. The invoice's financial data (amount, line items, etc.) remains unchanged. However, the invoice will not proceed through the approval chain until the suspension is resolved.
Q: Who configures hold conditions?
Hold conditions are configured by Setup/Designer administrators in the approval workflow template. If you believe a hold condition is incorrect or needs adjustment, contact your TeamConnect administrator.
Q: Can multiple suspensions occur on the same invoice?
Yes. Each time the workflow advances and encounters a stop with a hold condition that evaluates to true, a new "Suspended" entry is logged. An invoice can have multiple suspension events across different approval stops.