
Creating Rules
To create rules through the user interface, determine the following for each rule:
- The object records that the rule affects, such as accounts records.
- The actions the rule takes, such as require approval before a user may perform an operation.
- The conditions that must be met to trigger the rule.
- The specific fields within records that the rule uses.
- The users or groups the rule affects.
Tip: Consider whether group rights may accomplish your objectives without creating a rule.
Defining General Rule Information
General rule information includes several settings, such as the name of the rule, the rule type, and what actions will trigger the rule. This information may be viewed, added, or modified on the General tab of the Rules screen.
Each rule has its own screen where it is defined. This screen contains the following tabs:
![]()
- General—General information about the rule, including its name, whether it is active, its rule type, and its trigger(s).
- Qualifier—Allows you to define the qualifier that must be met in order for the rule to take effect. For details, see Creating Rule Qualifiers.
- Action—For security and validation rules, this tab allows you to enter the message that appears to the user when an operation is denied. For details, see Defining Messages for Security and Validation Rules.
For pre-population rules, the Action tab allows you to select the template used to add or populate records. For details, see Using Templates.
For approval rules, the Action tab allows you to select the route and specify details about what happens when the route is in effect. For details, see Defining Actions for Approval Rules and Creating Routes.
For scheduled action rules, the Action tab allows you to schedule the rule. For details, see Defining Settings for Scheduled Action Rules.
The most effective approach is to separate the initiation of an approval from the decision logic. You can achieve this by using a single, simple rule to trigger a dynamic workflow.
- The Rule (The Trigger): Use just one rule to start the process. Its only job is to notice when something needs approval and kick off the workflow.
- The Workflow (The Brain): Use the workflow to handle all the "if/then" logic. It checks the invoice amount, looks at user approval limits, and decides if the request should be approved or sent to a supervisor. For example, if an invoice is over a manager's limit, the workflow automatically routes it to the next person in the hierarchy.
This approach makes your system much easier to maintain. Instead of hunting through dozens of different rules to make a change, you only have to update one workflow. It prevents "rule clutter," stops different configurations from crashing into each other, and makes it simple to add new approval steps as your company grows. In short: use the rule to start the engine and the workflow to drive the process.
Accessing the Rules Screen
All rules that are defined within TeamConnect may be created, viewed, and modified on the Rules tab of the corresponding object definition.
To access the screen for a new or existing rule
- Click the Rules tab of the object definition for which you want to create or access rules. A list of existing rules for the selected object appears, as shown in the following image.

- If appropriate, sort the list of rules you want to view by either or both of the following criteria:
- By rule type—Select the type from the Show ___ Rules drop-down list.
- By rule trigger—Select the operation from the on __ action drop-down list.
The rule list automatically refreshes to show you a list of matching results according to your selections.
- Click the name of a rule to access it, or click new to create a rule.
The following table describes the items on the Rules tab.
Rules Tab
|
Field or column |
Description |
|---|---|
|
new |
Click to create a new rule. |
|
Go to Rules folder |
Click to open the Rules folder for the selected object in the Documents area, where all files for custom action and scheduled action rules are stored. |
|
Show Rules |
Select a rule type by which to filter the list. |
|
on action. |
Select an action (trigger) by which to filter the list. Note: The contents of this drop-down list varies according to the rule type you have selected. For a list of rule triggers, see the Rule Triggers table. |
|
Rule list |
Displays all rules that have been created for the selected object that meet your view criteria. |
|
Order |
Displays the order in which rules are executed when a user attempts the corresponding action. Rules are executed in order from lowest to highest. The order only pertains to rules of the same type. For example, all security rules are executed first according to order. After all security rules are executed, validation rules are executed according to order, and so on, according to the rule type. For details on execution order, see Points To Remember. |
|
Rule |
Displays the name of the rule as a hyperlink, which you may click to view the rule definition. |
|
Trigger(s) |
Displays the names of the triggers that are currently associated with the rule. For a list of rule triggers, see the Rule Triggers table. |
|
Active? |
Displays whether the rule is currently active in TeamConnect.
|
Setting General Rule Information
Before you may define a rule's actions and qualifiers, you must complete the fields on the General tab and save the rule.
To set the general rule information
- Click the Rules tab of the appropriate object definition.
- Click new on the Rules screen to open a new rule. The General tab of a new Rule screen appears.

- Enter the necessary information as described in the General Tab on Rule Screen table.
- Make sure that This rule is Active is not selected until you are ready to test the rule.
Before activating the rule, you must set the necessary information on the Qualifiers and Action tabs. - Click Save.
The following table describes the items on the General tab of the Rule screen.
General Tab on Rule Screen
|
Field |
Description |
|---|---|
|
This Rule is Active |
Select to activate the rule after you have finished developing it and you are ready to test it or make it available for users. Important: When designing rules, you must always deactivate rules you have not completed or are not using. Having active rules may hinder your ability to design and test other rules. |
|
Name |
Enter a name that clearly and uniquely identifies the rule. This field cannot exceed 250 characters. Tip: Avoid similar descriptions for different rules. Emphasize important information, such as the rule trigger, in the description such as the following example:
If this rule is an approval rule, this description appears on the Workflow tab of a record that is pending approval for an operation. This helps users to understand why the operation is being sent for approval. |
|
Unique Key |
Enter an alphanumeric combination to uniquely identify the rule within the object definition. After you save the rule, the unique code appears as read- only text and you cannot change it. The unique key cannot contain spaces, underscores, commas, punctuation marks, or any special characters and must not exceed 50 characters in length. Although rules within the same object definition cannot have the same unique key, rules belonging to different object definitions may have the same key. |
|
Order |
Enter an integer to indicate the order in which the rule must take effect in relation to other rules that are created for the selected object. Organize your rules in the order of their importance in your system, with the most important rule being executed first. |
|
Type |
Select the radio button next to the type of rule you want to create. For an explanation of each type of rule, see Rule Types. Important: After the rule is saved, you cannot change this selection. |
|
Triggering Event |
Select the events, or operations attempted by the user, that you want to trigger the rule. Multiple events can be selected. Note: The checkboxes available vary according to the rule type you select. For details, see Rule Triggers. |
Rule Qualifiers
A qualifier for a rule may be defined either in a file that is uploaded to TeamConnect, or directly through the user interface. This section describes qualifiers defined in the user interface. For details about files that are uploaded (custom code), see Writing Automated Qualifiers for Rules.
A qualifier defined through the user interface consists of two parts:
- A list of qualifier items, which identify data values from fields in TeamConnect, that are to be checked by the rule.
- Logic for determining whether the entire qualifier is met: all of the items must be met, any of them must be met, or a more complex logic that you define.
When the rule is triggered, if the qualifier as a whole is met, then the rule executes its action. If the qualifier is not met as you have defined it, the action is not executed.
It is helpful to use this sentence as a model for creating a validation or security rule and defining its qualifier items through the user interface:
"If the entire qualifier is met, do not allow the user to [update, create, delete] the record."
Following the construction of this sentence when creating qualifiers will help you write them accurately.
Important: If an active rule has no qualifier information defined, the rule action is always executed when the rule's triggering events occur, whether by a user, wizard, or another rule.
Qualifier Tab Information
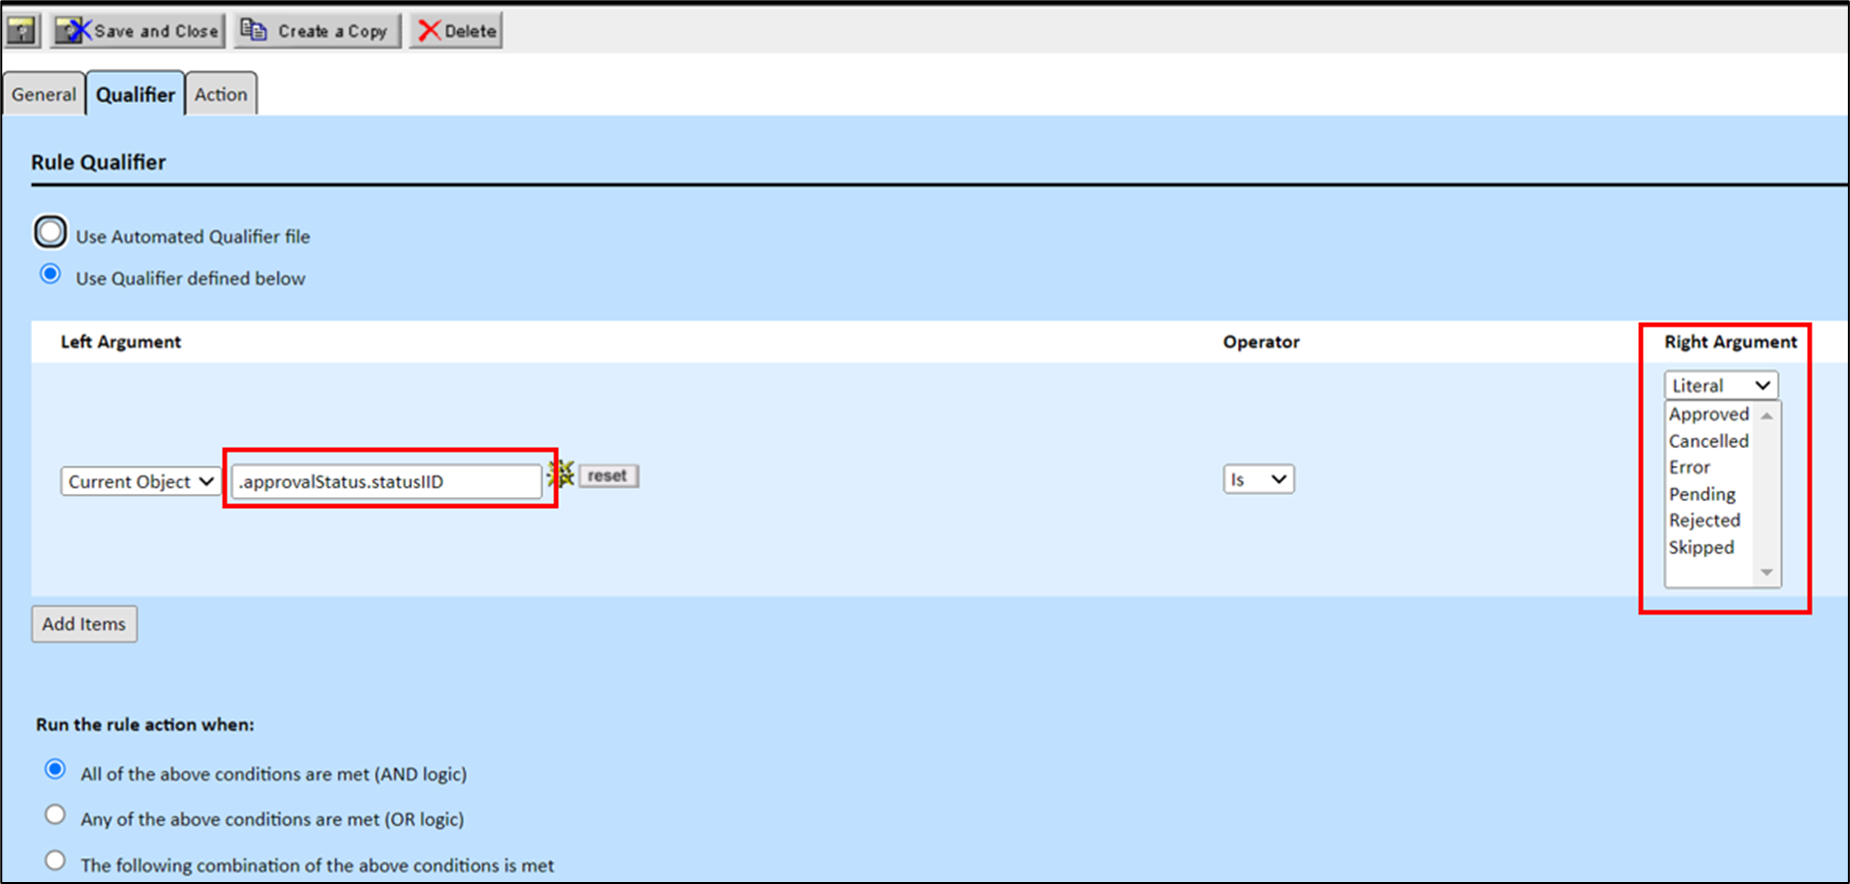
You may view, create, modify, or delete the qualifier information for a rule on the Qualifier tab of the respective Rules screen of an object definition ().
The following table describes the items in the Qualifier tab in Rule screens.
Qualifier Tab on Rule Screens
|
Field |
Description |
|---|---|
|
Use Automated Qualifier file |
Select this option to use a Java class or JavaScript file as the rule's qualifier. When this option is selected, the screen displays a drop- down list labeled Use this Automated Qualifier, where you may select the appropriate Java or JavaScript rule qualifier. For details about automated qualifiers, see Writing Automated Qualifiers for Rules. |
|
Use Qualifier defined below |
Select this option if you want to use the user interface to define the qualifier conditions and logic. |
|
Left Argument |
Allows you to create a path to the attribute that you want to use in the qualifier condition. Select whether you want to create a path to an attribute that is associated with the Current Object or the Current User:
Click the Navigator Important: It is recommended to use "approvalStatus.statusIID" as the path for approval status rather than "approvalStatus", as using only the "approvalStatus" will show duplicated statuses in the Right Argument. |
|
reset |
Clears the path that appears in the Object Navigator field. This button appears after an option has been selected from the drop-down list in the Left Argument. |
|
Operator |
Select the appropriate operator settings for the qualifier condition. For details, see Available Operators in Qualifier Items. |
|
Right Argument |
Select the attribute, literal value, or other setting that you want to compare to the attribute that you selected for the left argument. For details, see Right Argument Options in Qualifier Items. |
|
Qualifier Item List |
Displays a list of qualifier items that have been added to the rule. These are the conditions used by the rule, in combination with the logic that you specify, to determine whether to prevent the operation that is being attempted, or whether the rule's action must be run. Select or clear the corresponding check-boxes to edit or delete qualifier items. |
|
Run the rule action when |
Select how you want the defined qualifier items to be evaluated by the rule. For details, see Qualifier Logic. |
Qualifier Items
To define a qualifier item in Designer, you specify all of the following:
- The left argument
- The operator
- The right argument
These three pieces together form a statement, such as these:
Sample Qualifier Statements
|
Left argument |
Operator |
Right argument |
|---|---|---|
|
The value selected in the Loss Type list field |
is |
Fire Damage |
|
The current user |
is not |
a member of the Outside Counsel group |
|
The Trial Date |
is changed |
from any date to any date |
|
The Expiration Date field |
is populated |
[none] |
If you add these statements as qualifier items, or conditions, the rule will evaluate the statements to determine whether the rule's action must be executed when a user triggers the rule.
The type of data being compared in the left and right arguments must match. For example, if your left argument identifies a list field, then your operator and right argument options allow you to compare the selection with a selection made in another list field or to a literal list value.
The Designer user interface is designed to deny illogical combinations of left arguments, operators, and right arguments, such as: "The Trial Date is the Outside Counsel group."
Tip: If you find a rule executing in a situation where you did not expect it to, carefully check how you have constructed your qualifiers. In some cases, when the left qualifier evaluates to an unknown value and the right qualifier also evaluates to an unknown value, the rule engine will consider this a match. For example, consider an Audit rule triggered by Create that affects Involved records, and has a qualifier with these characteristics:
Left qualifier = inactiveDate

Operation = X Days from Today

Right qualifer = (no value)
In this case, when you create a new Involved record that is active, the rule will execute. That's because the value of inactiveDate is null, since the record has never been inactivated. And because the right qualifier was specified incorrectly (an integer should have been entered, but wasn't), the right qualifier's value is also null. Thus the rule engine considers the two nulls a match, and the rule executes. You should fix the incorrect specification of the right qualifier. Also, to guard against such inadvertent errors, you could add a second qualifier, testing the isPopulated condition for the inactiveDate field, so that the rule would only execute when that field was actually populated.
For details about the options available when constructing qualifier items for each type of data, see:
The operator in a rule qualifier statement determines how the left and right arguments are compared. It may have several components, depending on the type of data value you are working with in the qualifier (text, lookup table value, date, and so on).
The following table describes TeamConnect operators and the corresponding types of data that may be compared.
Rule Qualifier Operator Options
|
Selection |
Description |
Data types where operator selection is available |
|||||
|
Text |
Number |
Date |
List |
Check- box |
Related object |
||
|
Is |
Determines whether the qualifier statement is a positive or negative statement. |
x |
x |
x |
x |
x |
x |
|
Not |
x |
x |
x |
x |
x |
x |
|
|
Equal To |
Evaluates whether the left argument and right argument are the same value. |
x |
x |
x |
x |
x |
x |
|
Populated |
Evaluates whether the field identified in the left argument has a value. Do not use this selection to check whether a field that was previously null now has a value. Instead, use Changed from No Value. |
x |
x |
x |
x |
x |
|
|
Changed |
Evaluates whether the value for the field identified in the left argument has changed. It compares the old value in the database to the value in the record when rule is triggered. Tip: This option is useful for triggering audit rules. Note: For multi-value lists, the right argument behaves in the following manner - from “contains this value” to “contains this value”. |
x |
x |
x |
x |
x |
x |
|
Begins With |
Evaluates whether the text value in the field identified in the left argument begins with, ends with, or contains the text that is identified in the right argument. |
x |
|||||
| Ends With | x | ||||||
| Contains | x | ||||||
| Less Than |
Evaluates the number value identified in the left argument compared to the number value in the right argument. For example, you may specify that if a dollar amount Is - Greater Than Or Equal To 5000, send the action for approval. |
x | |||||
| Less Than Or Equal To | x | ||||||
| Greater Than Or Equal To | x | ||||||
| Greater Than | x | ||||||
|
Exists |
These options appear when you select a particular category by creating a path such as |
||||||
|
Does Not Exist |
|||||||
| Item Added |
Evaluates whether a related object (such as involved) or sub-object (such as assignee) was added, deleted, or modified. |
x | |||||
| Item Deleted | x | ||||||
| Item Modified | x | ||||||
| After |
Compares the date in the left argument to the date in the right argument. An additional field appears when you select one of the options that requires you to specify a number of days. Enter the value for X in this field. |
x | |||||
| Before | x | ||||||
| After The Next X Days | x | ||||||
| Within The Next X Days | x | ||||||
| Within The Last X Days | x | ||||||
| Before The Last X Days | x | ||||||
Depending on the data type of the qualifier item that you are adding to your rule qualifier, the selections that are possible for the right argument are automatically provided to you.
The following table describes the possible selections for the right argument of a rule qualifier.
Rule Qualifier Right Argument Options
|
Selection |
Description |
Data types for which selection is available |
|||||
|
Text |
Number |
Date |
List |
Check-box |
Custom Object/ Involved |
||
|
Literal |
Select this option when you want to specify a value to compare to the field identified by your left argument. For example, select Literal for a qualifier item that checks whether the invoice total is greater than 5000. You must also select Literal when you want to check whether a certain item is selected in a List field. |
x |
x |
x |
x |
x |
|
|
Attribute |
Select this option when you need to compare the values of two fields in TeamConnect. After you select Attribute, you must first select Current Object or Current User, and then use Object Navigator to identify the field to which you want to compare the field identified by your left argument. For example, if you want to compare the Contact of a contact-centric project to the Contact identified in a custom field of type Involved, select Attribute to identify the custom field. |
x |
x |
x |
x |
x |
x |
|
Current Object |
Select one of these options after you have selected Attribute and you need to identify a field in TeamConnect to which you are comparing the field in your left argument. For details about using Object Navigator, see Using Object Navigator. |
x |
x |
x |
x |
x |
x |
|
Current User |
x |
x |
x |
x |
x |
x |
|
|
Any Value |
These options work in conjunction with the Changed option to form a statement, such as Is changed from any value to this value (California). |
x |
x |
x |
x |
x |
x |
|
No Value |
x |
x |
x |
x |
x |
||
|
This Value |
x |
x |
x |
x |
|||
|
Today |
The date that the rule is being triggered. |
x |
|||||
|
This Date |
Allows you to compare the date in the left argument to a date that is identified in another field. |
x |
|||||
|
From Now |
Allows you to specify a number of days from the date that the rule is being triggered. |
x |
|||||
|
From This Date |
Allows you to specify a number of days from a date that is identified in another field. |
x |
|||||
|
Yes |
These options correspond to a check-box being selected or not selected. |
x |
|||||
|
No |
x |
||||||
Qualifier Logic
The Designer user interface is designed for you to complete the qualifier logic in stages. After listing one or more qualifier items on the Qualifier tab, the following options appear, allowing you to specify when the rule action runs:
- All of the conditions are met.
- Any of the conditions are met.
- The conditions are met according to the logic that you specify.
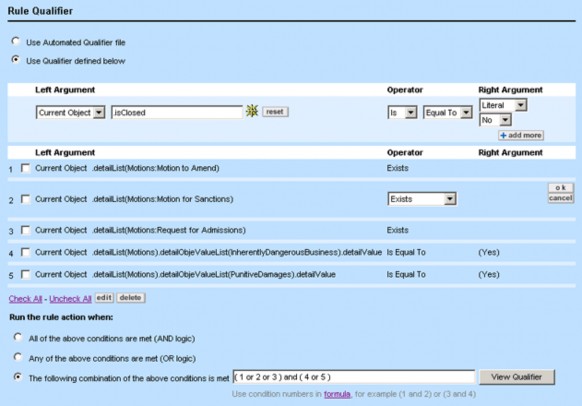
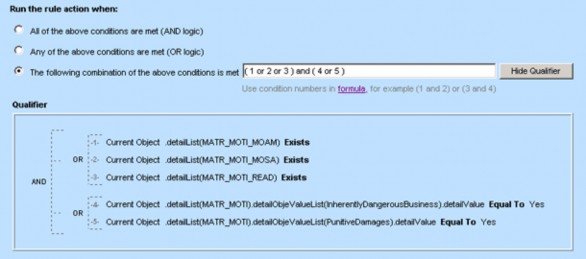
The "logic" option allows you to specify a formula for how the rule evaluates the conditions. You refer to a qualifier condition using the number that is automatically generated on the batch screen for each item (see ). For example, once you create a list of five qualifier conditions, you might create the following formula:
(1 or 2 or 3) and (4 or 5)
Points To Remember
- Keep the following points in mind while working with qualifier logic:
- Define all of the qualifier conditions that you need in your rule qualifier before writing the formula.
- The only words that you may use in your formula are "and" and "or."
- Use parentheses () to logically group conditions. You may also nest parentheses when needed. Make sure to use complete pairs of parentheses.
- If you do not group the conditions where grouping is necessary, grouping is automatically applied by TeamConnect, and you will have to verify that the appropriate logic is achieved. For example:
1 or 2 and 3
is automatically converted to:
1 or (2 and 3)
It is best to apply the grouping yourself to ensure that it is correct. - If necessary, your formula may repeat the same qualifier condition. For example, the following formula is valid:
(1 and 2 and 3) or (1 and 2 and 4)
Viewing Completed Qualifier
Once you have added all of the necessary qualifier conditions and have written the formula that references those conditions, you may view the complete qualifier expression by clicking View Qualifier.
If you modify your qualifier conditions or formula, you may refresh the display of your qualifier by clicking Save, or by clicking View Qualifier again. The following figure shows an example of qualifier logic:
Qualifier Logic Options
The following table describes the items in the qualifier logic section.
|
Field |
Description |
|---|---|
|
Run the rule action when |
Specify when the rule action must be run based on the qualifiers. You may specify AND or OR logic, or a formula using the qualifiers. See Qualifier Logic. |
|
View Qualifier/Hide Qualifier |
Click to view or hide the qualifier logic display. |
|
formula |
Click this hyperlink to view additional help on how to write the formula for a rule qualifier. |
|
Qualifier |
Displays a visual representation of your entire rule qualifier according to the formula that you have provided. You cannot edit the qualifier in this area. It is provided to help you determine whether the formula you have written is correct. |
Creating Rule Qualifiers
Creating rule qualifiers requires an understand of the following items:
- Rule components—Creating appropriate qualifiers is only possible when you understand how rules function, including all of the following:
- TeamConnect object model—The object model is described in detail in Object Model: Read This First and the additional reference tables it points to.
- Creating paths—You need to understand how to create paths to attributes using Object Navigator. For details, see Using Object Navigator.
To create a qualifier for a rule
- Plan your rule so that you know which attributes and conditions you need to identify in TeamConnect.
- Open the Qualifier tab of the appropriate rule.
Important: Before you may create the qualifier, you must save the rule with the correct information on the General tab.
- Create the qualifier conditions as described in Qualifier Items. You may refer to Qualifier Item Examples for examples that may be used as models for your rules.
- Select whether you want to run the rule when:
- All of the above qualifiers are met (AND logic). (This is the default.)
- Any of the above qualifiers are met (OR logic).
- The following combination of the above conditions is met.
- If you selected one of the first two options, this action completes your rule's qualifier. Click Save.
- If you selected the third option, use the text field that appears to write a formula that uses the qualifier conditions that you have defined. For details, see Qualifier Logic.
- Click View Qualifier.
Your entire qualifier expression appears, showing the logical grouping that you have defined in your formula. For an example, see Viewing Completed Qualifier. - Click Save.
To complete a rule, you must define its action. For details about the rule action for various rule types, see Rule Actions.
Qualifier Item Examples
The following are examples of qualifier items for rules. Use these examples as models for constructing your own rule qualifiers.
Each example demonstrates exactly what you would click, select, and type to define the qualifier item, using numbered steps that start with the left argument selections and finish with the right argument selections.
These examples use hypothetical values for categories, custom fields, user group names, and so on.
Rule Qualifier Item Examples
|
Can be used for: |
What this qualifier item is checking |
Left argument selections |
Operator selections |
Right argument selections |
|---|---|---|---|---|
|
Any object |
Checks whether the current user who is attempting the operation is a member of the Paralegals group. |
|
|
|
|
Any object |
Checks whether the current user is Bob Johnson. |
|
|
|
|
Any object |
Checks whether the current user is the same user who created the record. |
|
|
|
|
Contact- centric custom object |
Checks whether the contact selected in the contact-centric field of the project (such as the Insured) is the contact selected in a custom field of type Involved (such as Requestor). |
|
|
|
|
Any object |
Checks whether the value of a custom field Trial Date has changed (for example, to trigger an audit rule). |
|
|
|
|
Custom object (such as a matter) |
Checks whether an assignee with the role Outside Counsel has been added to the record. |
|
|
None |
|
Custom object (such as a matter) |
Checks whether the phase is changed from some other phase to Closed-Pending. |
|
|
|
|
Any object |
Checks whether the custom field Disposition Date has no value (is null). |
|
|
None |
|
Any object |
Checks whether the Suit Served date is after the Suit Filed date (both custom fields). |
|
|
|
|
Any object |
Checks whether the Incident Date was during the last 30 days. Incident Date is a custom field. |
|
|
|
|
Any object |
Checks whether the Loss Estimate is greater than or equal to 1000 dollars. Loss Estimate is a custom field. |
|
|
|
|
Task or Expense |
Checks whether the project associated with the record is in Closed status. (This is the record status—not the phase.) Tip: You may use this qualifier with the Post rule trigger to prevent posting to a closed project. |
|
|
|
|
Invoice |
Checks the type of invoice, since some types may be subject to more stringent verification and approval than other types are. You may want to restrict your rule to a specific invoice type, or you may want to exclude a specific type (for example, "Not Shadow".) |
|
|
|
|
Task or Expense |
Checks whether the Current Phase of the project associated with the record is Pending. Tip: You may use this qualifier with the Post rule trigger to prevent posting to a project when it is in an inappropriate phase for posting. |
|
|
|
|
Contact |
Checks whether there are any phone numbers added to the contact. |
|
|
None |
Limitations for User Interface Qualifiers
If your rule requirements call for qualifiers that cannot be created using Designer, you must write automated qualifiers in Java or JavaScript. For details about creating automated qualifiers, see Writing Automated Qualifiers for Rules.
For example, the following qualifiers cannot be created using Designer and therefore must be written as automated qualifiers:
- Check the values for more than one attribute of a single sub-object. For example:
- A qualifier that checks whether there is an active assignee of the type Underwriter.
- A qualifier that checks whether an invoice line item has a certain task category and the amount of the same line item.
- A qualifier that checks the state and the city of the same address of a particular type from a contact's list of addresses. This is only possible if you are checking the state and city of a contact's default address.
- Check the values for more than one attribute of a single related object from a list of related objects.
For example:- A qualifier that checks whether there is an involved (through involvedList->) with a certain role, and in the same involved's contact record, whether it has a certain firm as its company in the Company field.
- A qualifier that checks whether there is a task related to the project with a certain category and that same task is not completed.
- Check the value in a record that is not somehow related to the current object for which the rule is written. This requires searching, which is possible in rule qualifiers only through custom code.
- Perform complex calculations.
Rule Actions
A rule action is what a rule performs when the entire qualifier is met. The fields on the Action tab depend on the rule type:
- The action for security and validation rules is to deny the operation that is attempted by the user if the qualifier conditions in the rule are met. If an operation is denied by a security or validation rule, a message appears.
You may view, create, or modify a rule's rejection message on the Action tab. For details, see Defining Messages for Security and Validation Rules. - The action for approval rules is to follow a Route of approvers who decide whether to deny or allow the operation.
You must set various parameters for an approval rule, including which route to use, on the Action tab of the rule. For details, see Defining Actions for Approval Rules. - The action for custom action or scheduled action rules is defined using Java or JavaScript. You select the file that defines the action on the Action tab of the rule.
You may also need to make additional selections on the Action tab, depending on the rule type and whether additional fields appear that are specific to the custom rule. For details about the fields available for scheduled action rules, see Defining Settings for Scheduled Action Rules.
Defining Messages for Security and Validation Rules
When the qualifier for a security or validation rule is met, the operation attempted by the user is automatically rejected. You are only required to enter a message that appears for users when the operation is rejected. If the operation is approved, the rule does not display a message to the user.
Keep the following points in mind when writing messages for rules:
- The message may not only help the user understand what to do, but it may also help you identify which rule was triggered when users are having difficulties. For example, you may include a reference number that identifies the rule.
- If you do not specify a message, a generic message box is shown to users. Make sure to include a message that is descriptive and includes a possible solution for the user.
- Messages are limited to 2000 characters. If you type more characters than that, the extra characters will be truncated without warning.

To specify a denial message for a security or validation rule
- Open the Action tab of the rule whose message you want to specify.
- Enter a message in the Message when Action is rejected field.
For example:
You must include an Attorney and a Main Assignee to save this Litigation record. - Click Save to save the message as part of the rule.
Defining Actions for Pre-population Rules
When a pre-population rule is triggered, the rule uses its template to prepopulate specific fields or child records. For more information about creating templates for an object definition, see Using Templates.
To be able to specify a template, you must create at least one template defined for use with rules. If you do not specify a template, no fields are prepopulated.
To specify the template used by a pre-population rule
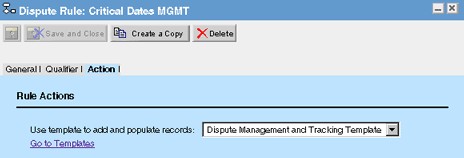
- Open the Action tab of the pre-population rule whose template you want to specify.
- From the Use template to add and populate records drop-down list, select the appropriate template.
If no list appears, no templates have been defined to be used with rules for the object definition. - Click Save to associate the template with the rule.
The following image shows the Action tab when no templates are available for the object definition. No Item Selected appears as read-only text and the Go to Templates link allows you to open the Templates tab of the object definition.
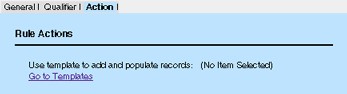
For more information about templates, see Using Templates.
Defining Actions for Approval Rules
When defining the action of an approval rule, Use the Action tab to perform the following actions:
- Select the route that the approval rule follows when the qualifier conditions are met.
- Specify a Process Manager. The user group that you specify as Process Manager must contain at least one active user.
- Specify settings, either at the route level or stop level, for the rule as follows:
- Whether or not to allow the record to be sent for review.
- The expiration action at the route level or for each individual stop, such as automatically approve, automatically reject, or send to Process Manager.
- How to handle approvers who appear at multiple stops.
- Who may update the record while it is pending approval.
The settings available for the approval rule action depend on whether you want to set route-level parameters or stop-level parameters.
About Process Managers
Note: Although this documentation discusses Process Manager as if it were a single person, a Process Manager is always defined via a user group. You cannot assign an individual user to the Process Manager role. All members of the assigned group receive email related to work flow requests, and all have equal authority to perform Process Manager tasks. A task requires only one group member to complete it; whoever handles it first handles it for the entire group.
An approval rule always requires a Process Manager. The default value for Process Manager is the group "Workflow Process Manager." You may wish to change the default to some other user group when editing the rule. The Process Manager becomes responsible for monitoring approval processes triggered by that rule on the My Workflows screen. The Process Manager may perform the following actions:
- Reject the requested operation by returning it to the user who triggered it.
- Restart the approval process at the first stop of the route.
- Reassign any current approval requests to any TeamConnect user.
- Reassign the approval request to approvers in the current stop who rejected the requested operation.
About Route-level versus Stop-level Parameters
The main difference between Stop-level versus Route-level parameters is that for Stop-level parameters, you may set specific options, such as allowing approvers to create an impromptu reviewer list, allowing stop members to update records (pending approval), and setting the approval time limit and expiration action on a per stop basis. If you choose Route-level parameters, those options are available, but applied universally to all stops for that route.
To define the action settings for an approval rule
- Open the Action tab of the approval rule.
- Select the route of approvers that you want this rule to follow from the drop-down list. For details about routes, see Creating Routes.
- Type or select the rest of the settings as described in the Action Tab on Approval Rule Screens tables for Stop-level Parameters Selected or Route-level Parameters Selected.
- Click Save to save the settings as part of the approval rule.
For details about how approval rules function, see Approval Rules. For more details about routes, see Creating Routes.
![]()
The following table describes the fields in the Action tab of approval rule screens when using stop- level parameters.
Action Tab on Approval Rule Screens
(Stop-level parameters selected)
|
Field |
Description |
|---|---|
|
Approval route |
Select an existing route from the drop-down list to specify the users who must authorize the request. If this area displays (No Items to Select), then you must first create a route. For details, see Creating Routes. |
|
Process Manager |
Select a user group from the drop-down list. (You may first need to define a new group and/or add users to a group, as explained in "Account Administration" chapter of the TeamConnect Administration Guide.) The group must contain at least one active user. When you add a Process Manager, any user in that group may reassign processes, restart processes, or return requests to requestors for the following statuses: Action on reject - Send to Process Manager (see below in this table) Expiration action - Send to Process Manager (see below in this table) |
|
Action on reject |
Select one of the following:
|
|
Action on return to requestor |
This field is used when the previous field, Action on Reject, has the option "Return to Requestor" selected. If Action on Reject has a different option, the setting in this field is ignored. Select one of the following:
|
|
If the same Approver is at multiple stops |
Select one of the following:
Notes: This option only applies to actual approver action and does not apply if stop members are auto-approved via an expiration date. Also, if a stop member approves under this option, and later, a process manager assigns the same user to a stop, the stop member must manually approve the new assignment and approval automation will not overwrite the previously-automated approval. |
|
Use Stop-level parameters |
If you select the Use Stop-level parameters option, you may define workflow approval behavior per stop. |
|
Options available prior to approval |
You may select one or more of the following for each route stop:
|
|
Options available upon approval |
You may select the following for each route stop:
|
|
Approval time limit |
You may set the number of days approvers in each stop have to respond. This number is converted into exact hours. For example, entering 5 gives the approvers five days, or 120 hours, to make a decision concerning the action. So if the rule is invoked on October 15, 2008 at 3:00 pm, the approvers have until October 20, 2008 3:00 pm to approve the action. The countdown starts when the operation is first attempted by the user. You must use a value other than zero when specifying the length of an approval process. Otherwise, the approval period expires almost immediately. |
|
Expiration action |
You may select one of the following for each route stop:
|
|
Email Actions |
The Allow approval/rejection via email field is a check-box you select if you want users who receive approval requests during the stop to receive an email from which they can approve or reject the request. This setting also allows them to enter internal comments and comments to the requestor after approving or rejecting through email. |
|
Email Template |
The drop-down contains all email templates you can select as the approval request email users receive during this stop. If you do not select a template, TeamConnect uses a default email template. You can design an approval request email from the Notifications page of Admin Settings. See Notification Settings for more information. |
|
Hold Conditions |
Hold conditions allow you to ensure approvals on a certain stop are contingent on meetin predetermined stipulations. Use the Hold Condition message entry field to provide users with detail on why the approval is blocked. For more details, see Hold Conditions. Note: Feature only available in TeamConnect 4.0.8+. |
![]()
The following table describes the fields in approval rule screens when using route-level parameters.
Action Tab on Approval Rule Screens
(Route-level parameters selected)
|
Field |
Description |
|---|---|
|
Approval route |
Select an existing route from the drop-down list to specify the users who must authorize the request. If this area displays (No Items to Select), then you must first create a route. For details, see Creating Routes. |
|
Process Manager |
Select a user group from the drop-down list. When you add a Process Manager, any user in that group may reassign processes, restart processes, or return requests to requestors for the following statuses: Action on reject - Send to Process Manager (see below in this table) Expiration action - Send to Process Manager (see below in this table) |
|
Action on reject |
Select one of the following:
|
|
If the same Approver is at multiple stops |
Select one of the following:
Notes: This option only applies to actual approver action and does not apply if stop members are auto-approved via an expiration date. Also, if a stop member approves under this option, and later, a process manager assigns the same user to a stop, the stop member must manually approve the new assignment and approval automation will not overwrite the previously-automated approval. |
|
Use Route-level parameters |
This option applies a general set of workflow approval settings across all stops for the selected route. See more details below. |
|
Options available prior to approval |
You may select the following for the route:
If the new approver approves the request, the request continues to the original approver. If the new approver rejects the request, the specified Action on Reject occurs. |
|
Options available upon approval |
You may select the following for the route:
If the new approver approves the request, the request continues to the next stop. If the new approver rejects the request, the specified Action on Reject occurs. If the rule uses a route with conditions, this settings does not appear on your rule. |
|
Updates to records pending approval |
If you select Use Route-level parameters, you may select one of the following:
Note: If the Route Stop has been set to require all members to approve, and this option is selected, the stop members will not be able to update the record.
|
|
Approval time limit |
(Optional) Enter the number of days approvers have to respond. This number is converted into exact hours. For example, entering 5 gives the approvers five days, or 120 hours, to make a decision concerning the action. So if the rule is invoked on October 15, 2001 at 3:00 pm, the approvers have until October 20, 2001 3:00 pm to approve the action. The countdown starts when the operation is first attempted by the user. It does not reset each time a route stop is completed. |
|
Expiration action |
You may select one of the following:
|
|
Internal auto- reject comment |
(Optional) If the Auto-reject option was selected above, then you may type a comment that will be displayed to the requestor, such as the reason for rejection. The maximum length is 250 characters. |
Specifying Actions for Custom Action Rules
When a custom action rule is triggered, its action is specified by one of the following:
- JavaScript file
- Java class file
- Template defined in the object definition for use by rules
For information about defining custom actions using JavaScript or Java classes, see Writing Automated Actions. For details about creating templates for an object definition, see Using Templates.
Specifying a Class or JavaScript File
To specify an automated action, you must upload at least one class or JavaScript file to the following folder in the Documents area:
/System/Object Definitions/objectName/Rules/Automated Actions/
Note: The Action tab of the custom action rule screen provides a link to the Automated Actions folder for the object definition (see the Action Tab Displaying an Error with a Custom Action image).
To specify the Java class or JavaScript file used by a custom action rule
- Open the Action tab of the custom action rule.
- Select the Use automated action radio button.
The Use automated action drop-down list appears. - From the Use automated action drop-down list, select the appropriate file.
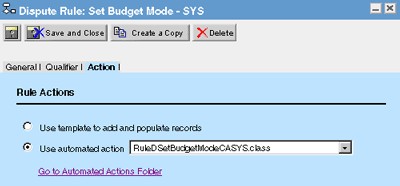
If No Item Selected appears as read-only text, that means no Java class or JavaScript files have been uploaded to the Automated Actions folder for the object definition. - Click Save to associate the action with the rule.
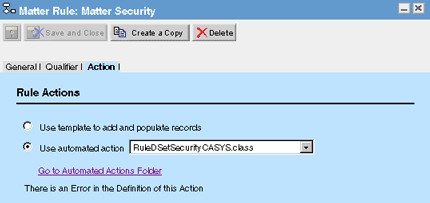
If TeamConnect detects errors while instantiating the selected class file (in relation to the object definition and its other classes), it displays the following error on the Action tab:
There is an Error in the Definition of this Action
Specifying a Template
Templates allow you to define specific fields or child records to populate when your qualifiers are met. You may access or create templates from the Templates tab of the object definition.
When used with templates, custom action rules have the same functionality as pre-population rules. However, the execution order of custom action rules is after pre-population, validation, and approval rules. This may be useful for some business cases, such as running approval workflow before populating a record.
To be able to specify a template for a rule, you must create at least one template for use with rules.
Note: You cannot specify a template for a custom action rule for the User or the Group object definition.
To specify the template used by a custom action rule
- Open the Action tab of the custom action rule whose template you want to specify.
- Select the Use template to add and populate records radio button.
The Use template to add and populate records drop-down list appears. - From the Use template to add and populate records drop-down list, select the appropriate template.
If No Item Selected appears as read-only text, no templates have been defined to be used with rules for the object definition. - Click Save to associate the template with the rule.
The following image shows the Action tab when no templates are available for the object definition. No Item Selected appears as read-only text and the Go to Templates link allows you to open the Templates tab of the object definition.
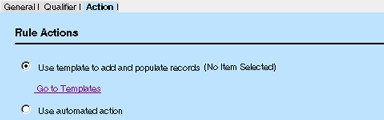
For more information about templates, see Using Templates.
To specify the template used to send notification
- Open the Action tab of the custom action rule whose template you want to specify.
- Select the Use template to send notification radio button.
- From the Use template to send notification drop-down list, select the appropriate template.
- From the To/CC/BCC drop-down list, select the type of email to be sent to the recipient: A regular email, a carbon copy email, or a blind carbon copy email.
- From the Recipient drop-down list, select the location of the recipient. Notification emails will be sent to the default email address of a user or contact.
- Select Path and click the Navigator
 icon to open Object Navigator, and then select an attribute. For details, see Using Object Navigator.
 - Select Group to send the notification to all members of a defined group.
- Select Address Book to send the notification to users in an address book.
- Select Contact Object Collection to send the notification to users in a defined object collection, such as All Contacts, Recently Created, Recently Modified, etc.
- Select Email String to send the notification to an email address.
- Select Path and click the Navigator
- (Optional) Select the Track in History check-box if you want a history record to be created every time a notification is sent out. A drop-down list appears.
From the Location drop-down list, select which level you want the history record to be saved in: Record, Object, or System. Record will not be available if the rule triggering event is Delete. - Click add more to continue adding notification recipients if necessary, or click Save to save the custom action rule.
Important: Notification templates that contain an object link or object link display string will not display these items correctly in the notification email for Custom Action rules that use the Create triggering event. This is because the object link has not yet been created when the Create triggering event occurs. To avoid this issue, use the Post Commit rule type instead of the Custom Action rule type.
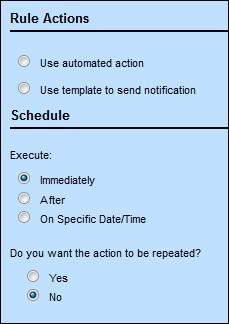
Defining Settings for Scheduled Action Rules
Scheduled action rules have a set of fields on the Action tab where you must do the following actions:
- Select the file that is executed or the template that is used according to the schedule that you specify.
- Specify when, and how often, the action is executed after the rule has been triggered.
To specify an automated action, you must upload at least one class or JavaScript file to the following folder in the Documents area:
/System/Object Definitions/objectName/Rules/Automated Actions/
To define the action settings for a scheduled automated action rule
- Open the Action tab of the scheduled action rule.
- Select the Use this Automated action radio button, then select the custom action Java or JavaScript file that you want the rule to execute from the Use this Automated action drop- down list.
If No Item Selected appears as read-only text, that means no Java class or JavaScript files have been uploaded to the Automated Actions folder for the object definition. - Type or select the rest of the settings as described in the Action Tab on Scheduled Action Rule Screens table.
- Click Save to save the scheduled action settings as part of the rule. For more details about scheduled action rules, see Scheduled Action Rules.
To define the action settings for a scheduled notification action rule
- Open the Action tab of the scheduled action rule.
- Select the Use template to send notification radio button.
- From the Use template to send notification drop-down list, select the appropriate template.
- From the To/CC/BCC drop-down list, select the type of email to be sent to the recipient: A regular email, a carbon copy email, or a blind carbon copy email.
- From the Recipient drop-down list, select the location of the recipient. Notification emails will be sent to the default email address of a user or contact.
- Select Path and click the Navigator
 icon to open Object Navigator, and then select an attribute. For details, see Using Object Navigator.
 - Select Group to send the notification to all members of a defined group.
- Select Address Book to send the notification to users in an address book.
- Select Contact Object Collection to send the notification to users in a defined object collection, such as All Contacts, Recently Created, Recently Modified, etc.
- Select Email String to send the notification to an email address.
- Select Path and click the Navigator
- Click add more to continue adding notification recipients if necessary.
- Type or select the rest of the settings as described in the Action Tab on Scheduled Action Rule Screens table.
- Click Save to save the scheduled action settings as part of the rule.
The following table describes the fields in Scheduled Action Rule screens.
Action Tab on Scheduled Action Rule Screens
|
Field |
Description |
|---|---|
|
Use this Automated action |
Select the Java or JavaScript file that defines the action that is executed according to the schedule. This same action is executed for each repetition that you specify in these parameters. This drop-down list contains documents that have been uploaded to Top Level/System/ObjectDefinitions/ObjectName/Rules/Automated Actions and have the document type JavaClass or JavaScriptCode. To open the folder where Automated Action files for this object definition are stored, click Automated Actions Folder hyperlink. |
|
Use template to send notification |
Select the email notification template that is to be sent according to the schedule. This same notification template is sent for each repetition that you specify in these parameters. |
|
Track in History |
(Optional) Select whether a history record will be created every time a notification is sent out. A drop-down list appears when the Track in History check-box is selected. From the Location drop-down list, select which level you want the history record to be saved in: Record, Object, or System. Record will not be available if the rule triggering event is Delete. |
|
Execute |
Specify when the automated action or notification is to be executed.
|
|
Do you want the action to be repeated? |
Select whether the action is repeated. If you select Yes, then additional options appear, where you specify how often and how many times the action is repeated. The default option is No. |
|
Repeat |
Specify the period of time between rule action repetitions after the initial execution after the rule has been triggered. Additional options will appear depending on the selection in the Repeat drop-down list.
|
|
End |
Specify when the rule action repetitions will stop.
|
Important: Actions that are scheduled to repeat monthly on the 29th, 30th, or 31st day of the month will not occur in months that do not have those dates. To avoid this issue, use the Last option for the last day of the month.
Defining Actions for Audit Rules
When the qualifier for an audit rule is met, details about the operation that triggered the rule are automatically logged in a history record. Audit rules are designed to capture information about events, but you may define what is captured and how it is displayed.
The Action tab of an audit rule allows you to specify:
- A location for the history records.
- The description of the event.
- A category and custom fields to separate information about the event.
The first thing to consider when you want to audit an event is the target location to create the history record. For example, you may select a contact record as the target location to record a contact name every time it is updated. When the rule is triggered, an audit history record is created, and afterwards, you may view the contact record's History tab to track the events.
Next, you need to define the description for the event to be recorded. This description populates the Description field of the history record that is created when the rule is triggered. There is already a default description, depending on the triggering event; however, you may customize your own using a batch screen, if you need more specific information.
Finally, you may separate details about the event into specific custom fields for reporting purposes. To accomplish this, you must select a History category and populate its custom fields. When the rule is triggered, in addition to the Description field's contents, the custom fields that you defined are populated for the appropriate category on the Details block of history records.
To define the action settings for an audit rule
- Open the Action tab of the audit rule.
For a description of the fields on an audit rule's Action tab, see the Action Tab on Audit Rule Screens table. - From the Location drop-down list, select a target where the history record will be created when the audit rule is triggered.
- Define a description for the triggering event to populate the Description field of the history record.
- (Optional) From the Category drop-down list, select a History category and define its custom fields to capture event details.
- Click Save to save the settings as part of the audit rule.
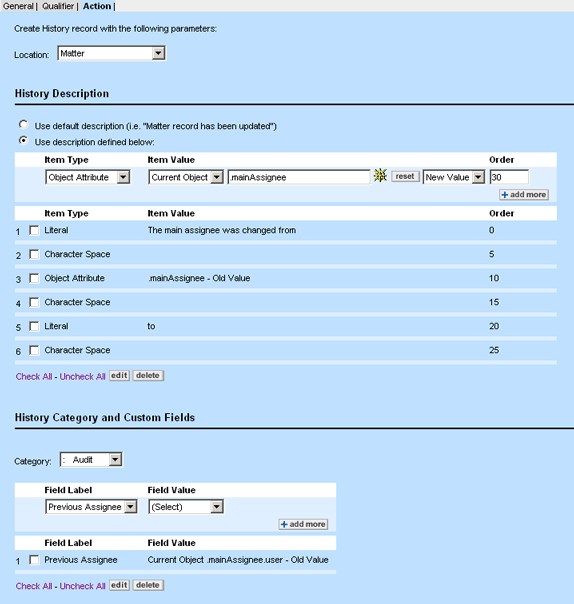
The following images show the Action tab of an audit rule screen. The action settings for the rule in this image creates a history record in the affected matter record with a custom description that states, for example, "The main assignee was changed from Jake Ashby to Larry Finch." It will also populate a custom field called "Previous Assignee" in the Audit category on the Details block of the history record.

The following table describes the items on the Action tab.
Action Tab on Audit Rule Screens
|
Field/Button |
Description |
|---|---|
|
Location |
Select the target location for storing the history record that is created when the audit rule is triggered. Depending on the object that you are defining, this drop-down list may include some or all of the following options:
|
|
Use default description (i.e. "Matter record has been updated") |
Select this option if you want TeamConnect to insert a default description of the event that triggers the audit rule in the history record's Description field. The default description combines the object type, record name, and triggering event to form a description such as "Matter Simmons vs. Acme Auto Rental has been updated." |
|
Use description defined below |
Select this option if you want TeamConnect to insert a custom description of the event that triggers the audit rule in the history record's Description field. This is the default option, and you must use the associated batch screen to define a custom description. For more information on whether you need a default description or a custom description, see Audit Default Description. |
|
Item Type |
Select an item from this list to build the description for the history record. Depending on the option that you select in this field, different settings appear for the Item Value:
|
|
Item Value |
Define a value to build the description for the history record.
|
|
Old Value or New Value |
Select Old Value or New Value for the attribute. This drop-down list only appears if the Item Type is an object attribute. The old value refers to the attribute's value in the TeamConnect database before the record is changed and updated by an action. The new value refers to the attribute's value after the record has been updated and saved. Tip: This may be useful in building the history record's description by capturing information that might not exist in the record after it is modified and saved. |
|
Order |
Enter an integer to indicate the Order of the item you defined to place it correctly within the entire description statement. |
|
Item List |
Displays the items that are already added to be used in the custom description. Select the check-box of an item and click edit or delete to make changes. |
|
Category |
Select a category from this list to be automatically added to the history record. This list shows all the categories available in the History object definition. Make sure that you have created descriptive categories in the History object definition and defined custom fields within these categories that you plan to populate with the audit rule. For details, see Configuring History Object Definition for Audit Tracking. If you do not select a different category, the Root category is automatically used. After you select a category, you may use the Field Label and Field Value fields to define the content that will populate the category's custom fields. |
|
Field Label |
Select the label of the custom field that you want to use in the history record. This drop-down list contains the labels for the custom fields in the History object definition. The values available in this list depend on the History category selected in the Category field. These field labels appear on the Details block of the history record that is created when the rule is triggered. This field is not available for the User and Group object definitions. |
|
Field Value |
Select Current Object or Current User, click the Navigator You must select whether you want the field to be populated with the Old Value or New Value. Make sure you have defined any necessary custom fields for the category you want to use in the History object definition. Make sure to match the field type to the attribute type, such as matching a date field to an object attribute that stores a date value. This field is not available for the User and Group object definitions. |
Rule Administration
When you have finished defining all of the necessary rule specifications for your system, you must perform the actual administration of rules in Designer. This involves tasks such as creating, deactivating, modifying, deleting, and troubleshooting rules. This section describes these procedures in detail so that you may work with your own rules in TeamConnect.
Defining User Interface Rules
The following procedure describes the process of creating rules with predefined actions within TeamConnect. Security, validation, and approval rules may be created using these instructions. To create rules using Java class files or JavaScript for their qualifiers or actions, see Creating Automated Qualifiers and Actions.
Before creating a rule, be sure that you create the correct rule type. For descriptions of security, validation and approval rules, see Rule Types.
To create a rule
- In the Designer window, from the Go to drop-down list select Object Definitions.
- Select the appropriate object definition and then click the Rules tab.
- Click New.
- The corresponding General tab appears with blank fields.
- Set the General Rule Information. For details, see Setting General Rule Information.
- Click the Qualifier tab and create all of the necessary qualifier conditions. For details, see Rule Qualifiers.
- Click the Action tab and define all of the necessary Rule Action information. For details, see Rule Actions.
- Click the General tab.
- Select the This rule is Active check-box to activate the rule.
- Click Save.
The rule is immediately active and is triggered when a user attempts to perform the operation that is selected as the trigger.
Deactivating Rules
You may easily deactivate rules that are currently active. For example, you may want to temporarily deactivate a rule so that it does not interfere with the behavior of a particular rule that you are testing. You may also want to deactivate a rule because you are replacing it with a different rule.
To deactivate a rule
- Open the rule that you want to deactivate.
For details about accessing rules, see Accessing the Rules Screen. - On the General tab, clear the This Rule is Active check-box.
- Click Save.
The rule has been deactivated and will no longer be triggered. However, it still appears in the list of rules for the Object Definition.
Points To Remember
When deactivating a rule, consider the following points:
- For all rule types, as soon as the rule is deactivated, it ceases to be triggered on the triggering events. For example, when users click Save on a new record, a deactivated rule with a Create trigger is not triggered.
- When you deactivate a rule, you may re-activate it later as needed. It remains in the rule list for the object definition.
- When you deactivate an approval rule, approval processes that have already been started are not affected when you deactivate the rule.
- When you deactivate a scheduled action rule, actions that have already been scheduled by the rule are not affected when you deactivate the rule. If you want to cancel actions that have already been scheduled, you must delete them using the Scheduled Actions Monitor.
Modifying Rules
You may modify an existing rule when necessary. If the rule is active, the changes immediately take effect and may be observed the next time the rule is triggered. If the rule is inactive, the changes may be observed when the rule has been activated and then triggered.
You may modify existing rules for any of the following reasons:
- To modify existing qualifier items.
- To add or delete qualifier items.
- To change the message when the rule is triggered.
- To change the order in which the rule is executed.
- To change the rule trigger(s).
- To change the route for an approval rule to a different route, or modify other information on the approval rule's Action tab.
- Approval processes that have already been started are not affected if you modify the approval rule's action settings or select a different route for the rule.
- To change the scheduling of a scheduled action rule.
- Actions that have already been scheduled are not affected by modifications to any of the rule's action settings. The changes only affect actions that are scheduled by the rule after you save the changes to the rule.
- To change the file being used as the action for a custom action or scheduled action rule.
- Actions that have already been scheduled by a scheduled action rule are not affected if you select a different file for the rule's action. The change only affects actions that are scheduled by the rule after you select the new file for the rule.
- To deactivate the rule (see Deactivating Rules).
Note: Some modifications to rules may require you to click the Refresh button to see the modified information reflected in the list of rules.
Deleting Rules
You may need to delete a rule during the design phase of your TeamConnect implementation, or because you are sure that the rule is not necessary.
You may delete active and inactive rules. When you delete an active rule, the rule immediately stops taking effect. Users are able to perform the corresponding operation, such as creating, modifying or posting records, without the previous constraints of the rule.
However, rules that have already been triggered are not affected when you delete a rule. For example, if you delete an approval rule that has already been triggered and the approval request has already been routed, then the approval process is not affected by the deletion of the rule.
Tip: If you want to keep the rule for future use or future reference, but you do not want the rule to continue to be triggered, you may deactivate the rule. For details, see Deactivating Rules.
To delete a rule
- Click the Rules tab of the appropriate object definition.
- Click the name of the rule you want to delete. The General tab of the rule opens by default.
- Click Delete at the top of the screen and confirm that you want to delete the rule. The rule has been deleted and will no longer be triggered by user operations.
Troubleshooting Rules
To assist you with creating rules, this table provides a quick troubleshooting guide of common problems and their solutions.
Rule Troubleshooting Tips
|
Possible problem |
Possible solution |
|---|---|
|
An error message appears for a rule that must not be triggered in the situation you are testing. |
Check for the following issues:
Note: You may have another rule being triggered with the same error message, especially if you used the Create Copy button to create this rule. |
|
A rule is not being triggered. |
Once you create any rules, test them to see whether modifications are needed to get a rule to trigger in the correct situations. If your rule is not being triggered, check for the following issues:
If at least one of the qualifier conditions or the logic that you have defined is not met, the rule is not executed. |
|
My Approval rule is not being triggered at the right time. |
Check for the following issues: Is the rule active? Is a route selected? Does the route have members? Note: If a group is the only stop member in the selected route and there are no active users added to the group, there is no indication that the rule was triggered, because the approval request was not sent to any users.
If at least one of the qualifier conditions or the logic that you have defined is not met, the rule is not executed. |