
TeamConnect Administrator Tools
Scheduled Actions Monitor
Use this tool to observe and control actions that are scheduled to execute at specific times in the future.
Note: The right to this tool must be assigned before the tool is visible to a user. The right is found under System Rights, User Rights, Scheduled Action.
All actions pending execution that have been scheduled by Scheduled Action rules, or by Custom Action rules that utilize the Scheduled Actions API, automatically get listed in the Scheduled Actions Monitor. You can use this page to view and delete pending actions when necessary.
For example, the system's Scheduled Action rules may be set to automatically create tasks for a user, but those tasks might no longer need to be created because of other circumstances. As the Administrator, you can delete the scheduled actions that are going to eventually create these tasks on the scheduled dates.
You can also create entirely new scheduled actions on an as-needed basis.
Accessing the Scheduled Actions Monitor
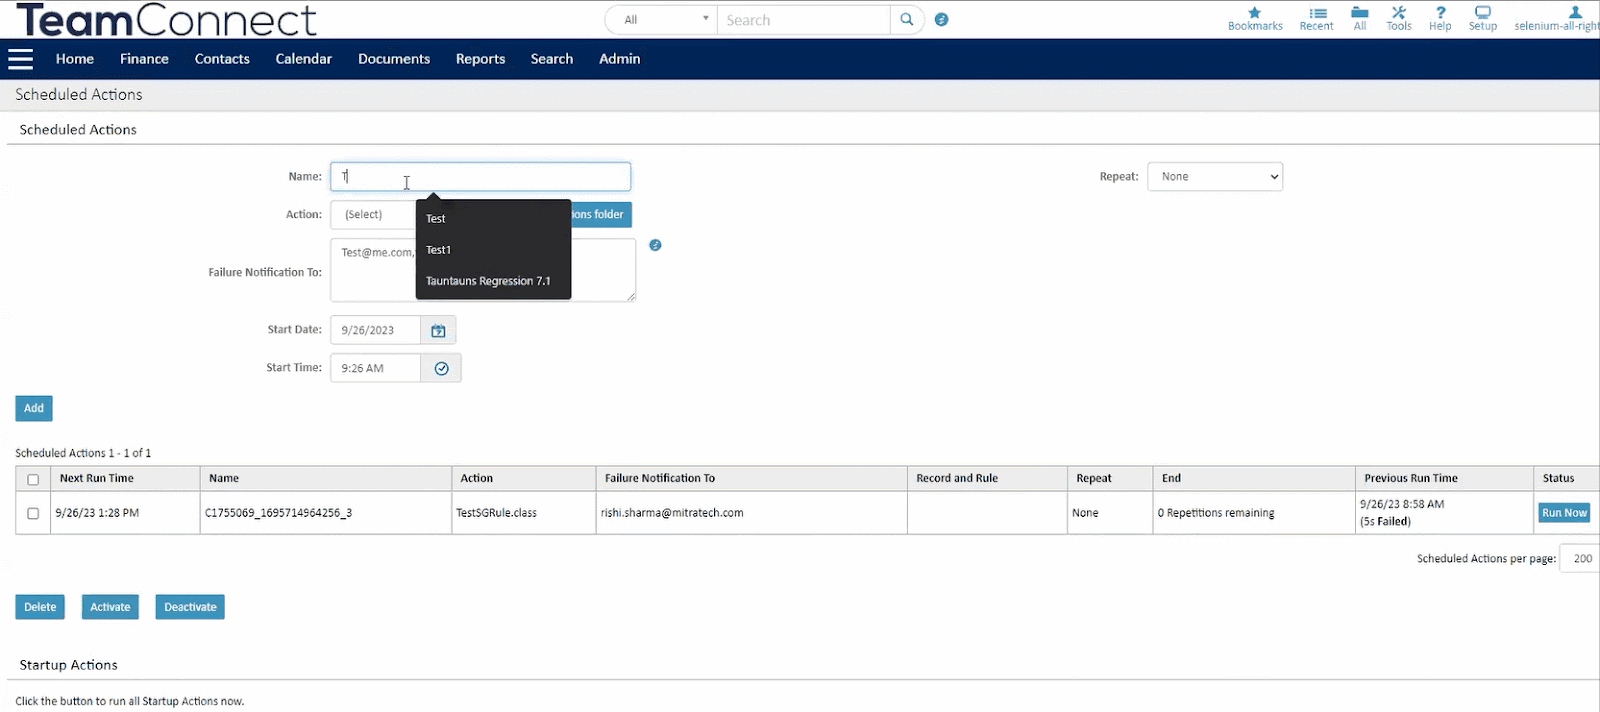
To access the Scheduled Actions Monitor, select Scheduled Actions from the Tools link. The Scheduled Actions Monitor opens, as shown in the following image. You must have the appropriate rights to access and view the Scheduled Actions Monitor.

You can refresh the information on this screen at any time by using your browser's Refresh button.
Tasks Available from the Scheduled Actions Monitor
From this page you can do any of the following tasks:
- Create a New Scheduled Action
- Actions Against the Table
- Activate Scheduled Actions
- Delete Scheduled Actions
- Run a Scheduled Action
Creating a New Scheduled Action
Create a new scheduled action by entering values in the fields at the top of the page, then clicking Add. The new scheduled action is in active status and will run at the time you specified. The following table describes these fields.
Scheduled Actions Monitor - Creating a New Scheduled Action
|
Field or Column |
Description |
|---|---|
|
Name |
Enter a name that describes the action. |
|
Repeat |
If this action will execute only once, keep the default value of None in this drop-down list. If this action will be executed repeatedly, choose the time interval from the list of choices. Specify the period of time between rule action repetitions after the initial execution after the rule has been triggered. Additional options will appear depending on the selection in the Repeat drop-down list.
|
|
End |
Specify when the scheduled action repetitions will stop.
|
|
Action |
This drop-down list contains all the executable actions that have been uploaded to the Top Level / System / Scheduled Actions folder in Documents. Choose which action (usually a Java class file) should be associated with the new scheduled action that you are creating. The link View Scheduled Actions Folder opens this folder in Documents so that you can work with its contents, if necessary. |
|
Start Date and Start Time |
These two fields specify the first time that the new scheduled action should be run. For actions that are repeated, this time becomes the basis for all the future repetition intervals. If you enter a date and time that are in the past, and this is not a repeating action, an error message is shown. |
Important: Actions that are scheduled to repeat monthly on the 29th, 30th, or 31st day of the month will not occur in months that do not have those dates. To avoid this issue, use the Last option for the last day of the month.
Performing Actions Against the Table
The table in the lower portion of the Monitor shows which scheduled actions have run and which are pending. You can take several actions by using this table and its adjacent buttons. Here are the elements of the table:
Scheduled Actions Monitor Screen
|
Field or column |
Description |
|---|---|
|
Next Run Time |
All actions have a next run time, except startup actions and actions that have been deactivated. If something prevents an action from running at the scheduled time - for example, if TeamConnect itself has an outage - this time will remain unchanged. |
|
Name |
This is an optional, user-friendly name that describes the action. |
|
Action |
This is the actual file that will be run when the action runs. |
|
Record and Rule |
Many scheduled actions are the result of a scheduled-action rule running against a specific record. In this case, the name of the record appears here as a hyperlink. Clicking the name will open the record. The name of the scheduled-action rule also appears here. |
|
Repeat |
Indicates the time interval in which the action is scheduled to repeat. If it is a one-time action, this field contains none. |
|
End |
For repeating actions, describes the condition under which the repetitions will end. See "Repeat" in the Scheduled Actions Monitor table for details. |
|
Previous Run Time |
Shows the last date/time this action was run, and duration of the run. If an action failed during its last run, a failure message is shown here. For one-time actions, this field will always be empty. |
|
Status |
Inactive for actions that have been deactivated. Running for actions that are currently running. Otherwise, the Run Now button appears. Clicking the Run Now button causes the action to run immediately. Such a run does not count towards the number of repetitions before the end, if a number had been configured for this action. |
Deactivating Scheduled Actions
If you deactivate a scheduled action, it remains pending but does not execute.
To deactivate a scheduled action
- Select the check-box next to the scheduled action that you want to deactivate. You may select more than one check-box at once.
- Click Deactivate.
The selected scheduled action(s) is deactivated and the Monitor refreshes to reflect this. The value in field Status now says "Inactive".
Activating Scheduled Actions
If you activate a scheduled action that had been inactive, it will run at its next scheduled date and time. If that date and time are already past, it will run immediately.
To activate a scheduled action
- Select the check-box next to the scheduled action that you want to activate. You may select more than one check-box at once.
- Click Activate.
The selected scheduled action(s) is activated and the Monitor refreshes to reflect this.
Deleting Scheduled Actions
If you have the appropriate rights, you can delete scheduled actions to prevent them from being executed.
To delete a scheduled action
- Select the check-box next to the scheduled action that you want to delete. You may select more than one check-box at once.
- Click Delete and confirm that you want to delete the selected scheduled action. The selected scheduled action(s) is deleted and the Monitor refreshes to reflect this.
Running a Scheduled Action
The Run Now button, if visible in the Status field for a scheduled action, can be clicked to cause the action to run immediately, notwithstanding its next scheduled run date. This button is not visible if the action has been deactivated.
Things to Remember
If a scheduled action is configured to end after a certain number of repetitions, that number is decremented each time the action is run. Even if the action fails due to an internal error or some external reason (e.g., database server is down), the number is decremented. However, running the action via the Run Now button does not decrement the number of repetitions remaining.
If an action is scheduled to run at a certain time interval, but then is deactivated, and is not re- activated until after that next scheduled run time, the action will run immediately. It will then revert to its regularly scheduled time interval.
Scheduled Actions Failure Email
How to pre-populate the Email ID(s) for Scheduled Action Failure Notifications?
Note: Introduced in TCE 7.1 version.
The user can pre-populate the Email ID(s) for Scheduled Action Failure Notifications, so that they can avoid manually entering email addresses every time they create a new scheduled action.
Note: Make sure that the user login with the group rights equivalent to TeamConnect Admin group.
Below are the steps to follow
- Login TeamConnect with all the right users.
- Go to Admin > Admin Setting > Notification.
- Enter the user email address and Click Update.

Note: The user can add multiple email IDs. But if a duplicate email ID is entered then an error popup is displayed.

- Go to Tools > Click Schedule Action.
- The user can see the email address as default in the “Failure Notification to” block under Tools > Scheduled Actions window.

Important: It should be noted that when the user creates a new schedule action, the email ID will be pre-populated in “Failure Notification to” block under Tools > Scheduled Actions window and will not be taken as default email ID for the existing/or newly created schedule actions.
How to create Scheduled Action Failure Email Notifications?
Note: Introduced in TCE 7.1 version.
Once the user has pre-populated the Email ID(s) for Scheduled Action Failure Notifications, while creating a scheduled action the user has an option for an email field so that the user is notified when the scheduled action fails.
Below are the steps to follow:
- Login to TeamConnect and navigate to Tools > Scheduled Actions.

- A new field with the caption “Failure Notification to” will be displayed.

- The user can create action on multiple bases in the Repeat section.
- In the Scheduled actions table, there will be a new column called “Failure Notification to”.
Note:
- When the user enters invalid email address format and clicks on Add, an Error Message will be displayed by the system saying as "Invalid Email ID".

- Also, when the valid email addresses are entered multiple times along with required details and clicked on Add, an error is displayed as, “Please remove the duplicated emails from the email field.
- Following emails have been duplicated: <List of Duplicate email addresses>" will be displayed.

- When the user hover over on
icon, a message will be displayed as "Schedule Actions Email Notification Help". When clicked, the user will be directed to the CSC help page in a new tab.
- In the Scheduled Actions page, enter the email ID or multiple email addresses with comma separator and add the scheduled action such that it fails.
- Run the scheduled action by uploading the attached class file in the action tab. Scheduled action will be failed.
- The emails will be triggered to the email IDs configured.
Important: The user should note that only the failed schedule action will be notified through email and not the success i.e, if the individual schedule action against which the emails are added in “Failure Notification to” column fails, only those emails will be notified.
- This email notification includes the name of failed action and time App server timezone appended to it.
- The email address of the sender for this email will be the same as set in the REPLY-TO ADDRESS field in admin email configuration.


Note: The user must inject and configure the SMTP in order to trigger the email notification.
