Rule Triggers
Triggering Events
For a full list of which triggering events are available for each object type and rule type, see the Rule Triggers table.
- Activate—The rule is triggered when an account is activated.
- Assign—The rule is triggered when a task is assigned.
- Check In—The rule is triggered when a document is checked in.
- Check Out—The rule is triggered when a document is checked out.
- Create—The rule is triggered when an object is created.
- Rules for the Contact object that use the Create trigger apply when users are creating contacts through a search module. For example, if you make the Date of Birth field required, users will be unable to create a contact record through the search module because there is no Date of Birth field in the search module.
- Rules that use the Create trigger for objects that have wizards are executed when the user reaches the end of the wizard and the system attempts to save the new record. If the rule requires that a field be populated, make sure that the user is able to enter a value and knows that the field is required.
- Deactivate—The rule is triggered when an account is deactivated.
- Delete—The rule is triggered when an object is deleted.
- Deposit—The rule is triggered when a budget amount is deposited into an account.
- Phase Change—The rule is triggered when a project's phase is changed. When the Phase Change trigger is selected, checkboxes and drop-down lists with further options appear.
- From—The rule is triggered when a project's phase is changed from the selected phase in the drop-down list.
- To—The rule is triggered when a project's phase is changed to the selected phase in the drop-down list.
- Transition—The rule is triggered when the selected phase transition in the drop-down list occurs. This is the default option when the Phase Change trigger is selected.
- Post—The rule is triggered when an expense, invoice or task is posted.
- Transfer From—The rule is triggered when a budget amount is transferred from an account.
- Transfer To—The rule is triggered when a budget amount is transferred to an account.
- Update—The rule is triggered when an object is updated.
- User Invoke—The rule is triggered when a user with the appropriate rights selects the rule from the More Actions button in an object definition.
- Void—The rule is triggered when an expense, invoice or task is voided.
- Withdraw—The rule is triggered when a budget amount is withdrawn from an account.
Points To Remember
Keep the following points in mind when creating rule triggers:
- Each rule type may be used with almost all triggers (see the Rule Triggers table), so base your choice of rule type on your business requirements, not the trigger.
- A rule can use more than one trigger. If more than one trigger is associated with a rule, it is possible that the rule will fire more than once for the same event. For example, the Account object custom action rule type has an available trigger named Withdraw, and it also has the Update trigger that is found in all object definitions. If you define a custom action rule that uses both of these triggers, and a Withdraw event occurs, the monetary amounts in the Account record will change, which causes an Update event. So the rule will execute twice, once as a result of the Withdraw trigger and once as a result of the Update trigger.
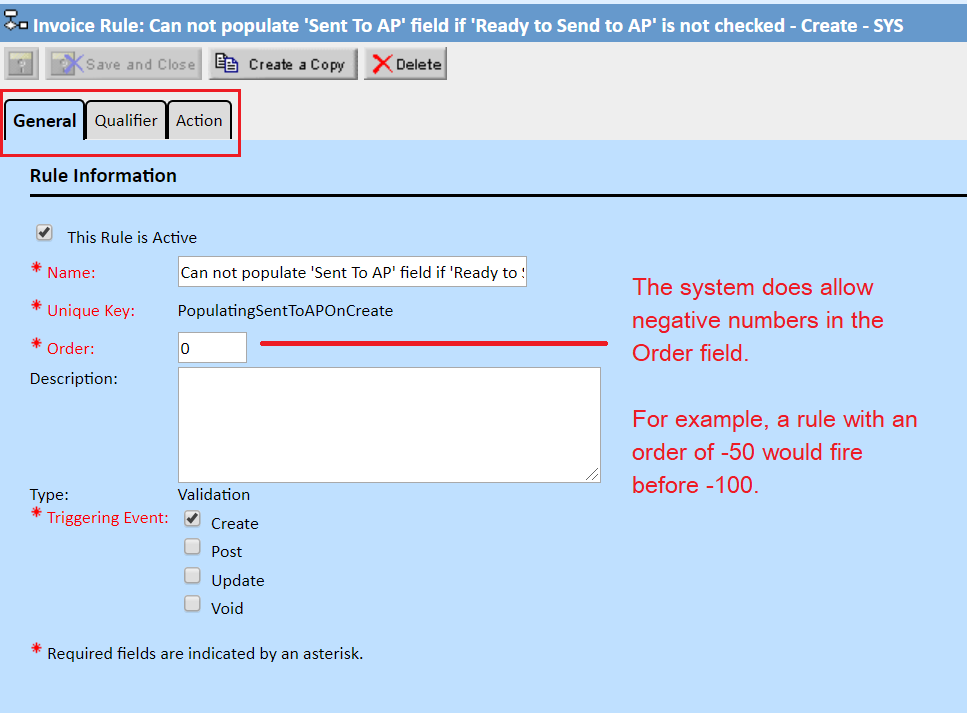
- Each rule of the same type is executed according to the value of their Order fields. For example, after all security rules are executed, validation rules are executed, starting with the rule that has the lowest order. Rules of the same type that have the same values in their Order fields are executed in the order in which they were created.
- It is possible to configure Custom and Validation rules to have the same trigger (for example - Update).
Execution Order
A rule can use multiple triggers as long as they don't conflict with each other. If an operation applies to multiple rules, the rules types are executed according to type.
Pro Tip: If you'd like to configure multiple triggers, try writing out the logic before you configure it and save it in TeamConnect.
The following execution order is indicated on the General tab of a new rule that has not yet been saved:
- Security: Security rules will ALWAYS fire first regardless of the order (see the How-To section below for further detail)
- Pre-population
- Validation
- Approval
- Custom Action
- Scheduled Action
- Audit
- Post Commit
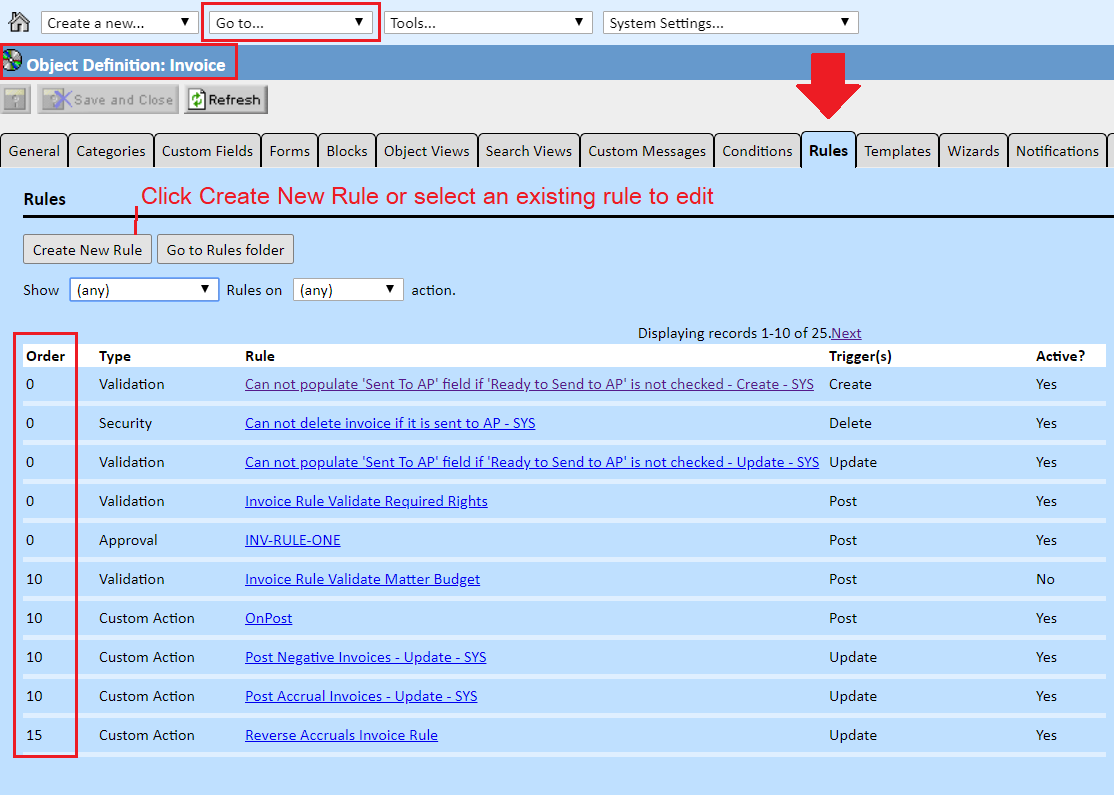
Each rule has an order field (far left column). Rule with the lowest order will trigger first. As mentioned in the list above, security rules will always fire first regardless of their order. All security rules fire together and will respect the order of the other security rules. After the security rules fire, then the system will work its way down the order in the list above.
So, if you have a Security rule with Order 100 and a pre-population rule with Order 50, the Security rule will still fire first.
Examples:
Two rules can have the same trigger. For example, Custom and Validation rules can both be configured to trigger on Update.
Two rules can have different triggers. For example, Validation rule is triggered on Update and Custom Action rule is triggered on Phase Change.
The result is: the Custom Action rule will execute before the validation rule on the basis of the trigger.
How to set up the execution order:
System administrators can access the tool used in these instructions. Contact your system admin if you do not have access to this area.
- Navigate to Setup Tool > Go To... (dropdown) > Object Definition > Select an object > Rules Tab.
- Click New Rule or click on an existing rule to edit.

- Use the General, Qualifier, and Action tabs to configure the rule's name, order, validation, triggers, logic, and outcomes.
- Click the Save icon when finished.
- Log out of TeamConnect and log back in to solidify the changes.

Rule Triggers
The following table lists the triggers that are available for each type of rule.
|
Object |
Trigger |
Security |
Pre-population/ Validation |
Approval |
Custom/ Scheduled Action |
Audit |
Post Commit |
|---|---|---|---|---|---|---|---|
|
All Objects |
Create (Save, Save & Close, Save & Preview, or Save & New on a new record) |
x |
x |
x |
x |
||
|
Update (Save, Save & Close, Save & Preview, or Save & New on a new record) |
x |
x |
x |
x |
x |
||
|
Delete |
x |
x |
x |
x |
x |
||
|
User Invoked |
x |
x |
|||||
|
Account |
Activate |
x |
x |
x |
x |
x |
x |
|
Deactivate |
x |
x |
x |
x |
x |
x |
|
|
Deposit |
x |
x |
x |
x |
x |
x |
|
|
Transfer From |
x |
x |
x |
x |
x |
x |
|
|
Transfer To |
x | x | x | x | x | x | |
|
Withdrawl |
x |
x |
x |
x |
x |
x |
|
|
Document |
Check In |
x |
x |
x |
x |
||
|
Check Out |
x |
x |
x |
x |
|
x |
|
|
Expenses |
Post |
x |
x |
x |
x |
x |
x |
|
Void |
x |
x |
x |
x |
x |
x |
|
|
Group |
Create |
|
x |
|
x |
x |
x |
|
Delete |
x |
|
|
x |
x |
x |
|
|
Update |
x |
x |
|
x |
x |
x |
|
|
User Invoked |
|
|
|
x |
|
x |
|
|
Invoice |
Post |
x |
x |
x |
x |
x |
x |
|
Void |
x |
x |
x |
x |
x |
x |
|
|
Project |
Phase Change |
x |
x |
x |
x |
x |
x |
|
Task |
Assign |
x |
x |
x |
x |
x |
x |
|
Post |
x |
x |
x |
x |
x |
x |
|
|
Void |
x |
x |
x |
x |
x |
x |
|
|
User |
Create |
|
x |
|
x |
x |
x |
|
Delete |
x |
|
|
x |
x |
x |
|
|
Update |
x |
x |
|
x |
x |
x |
|
|
User Invoked |
|
|
|
x |
|
x |

