
Object Views
The Designer interface uses "tab" to signify a page in the end-user interface. However, switching between pages in that interface is accomplished by clicking on links in the left pane, not by clicking on tabs. In general in this section, a tab corresponds to a left-pane link.
System object views are the predefined record pages created for TeamConnect objects (both system and custom). You can see what each system view includes, but you cannot change, delete or add new system views.
Custom object views are the pages that you, as the TeamConnect solution developer, create for your organization to meet its specific needs or individual preferences. In other words, you can create your own custom views, change, and delete the existing custom views, as necessary.
If different groups are going to see different object views, assign each view to the appropriate groups with their Group Account pages.
If the rest of the TeamConnect users who do not have a default group set in their user accounts are going to see the same custom view, assign it globally in the System Settings screen.
By default, all object views that appear to the TeamConnect users are set on the Default Object Views tab of the System Settings screen, where all objects have their system views automatically selected as their default views. To change these settings, you have to first create your desired custom views for the necessary objects and then assign them as default one for the whole system.
Note: If you decide to keep the system object views, you do not have to create or define object views. If you decide to create and define custom object views, continue through the sections that follow.
Object View Names
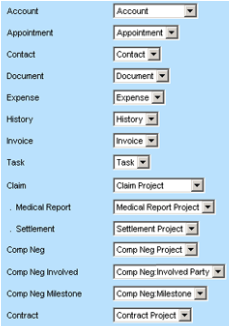
The following image shows a Designer example of system object views as they appear on the Default Object Views tab in the System Settings screen.
There are certain object view naming conventions that are followed when system views are created for all objects. This makes it easier for you to distinguish between the system and custom views of the system and custom objects.
- All system views of the system objects have the same name as the objects themselves, for example account, contact, and so on.
- All system views of the custom objects have the name of the object with the word "Project" after it, for example Claim Project, Policy Project, Litigation Project, and so on.
- All custom views of all objects have the names you, as the solution developer, assigned to them when creating them. See Creating Object Views.
The following image shows a Designer example of system object views as they appear on the Default Object Views tab in the System Settings screen.
To open an existing object view
- In the Designer window, from the Go to drop-down list, select Object Definitions.
- Select the appropriate object definition and then select the Object Views tab.
The corresponding Object Views screen appears.
- Click the required object view to open its Setup screen.
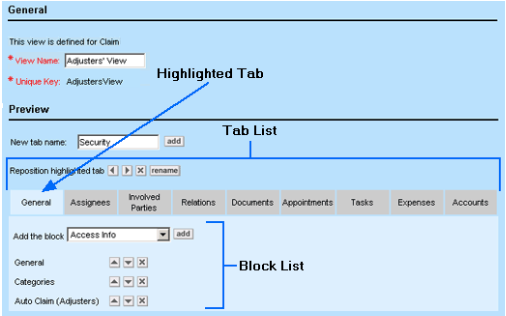
The Object Views screen is divided into two sections:- General, which displays the name of the view, the object to which the view is assigned, and the object view's unique key.
- Preview, which displays the tabs in the object view and the order of the tabs, and allows you to add blocks to the highlighted tab.
Object View Screen
|
Field or control |
Description |
|---|---|
|
View Name |
Enter a name to identify the object view. This name should specify the group for which this view is intended. Maximum 250 characters long. Note: When first naming a view, you must Save the view to display other sections of the screen. |
|
Unique Key |
Enter an alphanumeric combination to identify the object view within the object definition. The unique key must be 50 or fewer characters in length, cannot contain spaces, underscores, commas, punctuation marks, or any special characters. Once you save the object view the first time, you cannot change its unique key. Object views within the same object definition cannot have the same unique key, but object views belonging to different object definitions can have the same key. |
|
New Tab Name |
Enter the name of a new page you would like to add to the object view. Click add to add the page. |
|
Repositioned highlighted tab |
|
 |
Click to reposition the selected tab to the left or right of its current position. Note: Click a tab to select it. The selected tab does not have a border color; tabs that are not selected have a gray border around them. |
 |
Click to delete the selected tab, then click OK in the confirmation dialog box. |
|
rename |
Click, enter a name in the pop-up window to rename the selected tab, and then click OK. |
|
Tab List |
Lists all tabs present in the object view, and their current order. Note: Click a tab to select it. The selected tab does not have a border color; tabs that are not selected have a gray border around them. |
|
Add the block |
Select a block to add. Note:
|
|
Block List |
Lists all blocks present on the selected tab, in the current order. Note: Click the up and down arrows next to the block name to reposition the block above or below its current position, or click delete next to the block name. |

Defining Object Views
Defining custom object views is the last step in the process of customizing what information different users or groups see in TeamConnect.
Custom object views typically consist of the system blocks and custom blocks. Before creating and assigning object views, you should consider the following questions:
- Have you defined all categories necessary for the object?
All custom fields and blockes are category-specific, which means thay can be generated and displayed by category only. For information on defining categories, see Using Categories. - Have you created all custom fields necessary for the object?
Custom fields are the central component of object views, as they are used to store information specific to your organization, and are used in blocks. For information on defining custom fields, see Creating Custom Fields. - If you are going to use custom blocks, have you created all custom blocks you need for the object view?
Blocks are sets of information that are included into different object views created for different groups of users. For information on defining blocks, see the Screen Designer Help.
If you answered yes to all questions that apply to your needs, you are ready to create your own custom object views. After you have defined your object views, you must assign them to the appropriate groups or the entire system.
Creating Object Views
To create an object view, you need to name the view, add all necessary tabs to it, and lay out the blocks on each tab in the proper order.
Tip: Make a list of tabs you would like to include in the object view you are creating and a list of blocks that you want to include on each tab.
To create a custom object view
- Open the Object Views tab of the appropriate object definition.
- Click New.
You can also create a copy of an existing object view by opening the appropriate object view of the displayed object definition, and then clicking Create a Copy.
The General section of the new object view appears. - In the View Name field, type a name for the new object view.
- In the Unique Key field, type a name or value that will uniquely identify the view within the object definition.
An object view's unique key cannot contain spaces, underscores, punctuation marks, or any special characters. - Click Save.
The Preview section of the new object view appears. - On the New tab name field, type the name the tab that you would like to create in your custom object view, and click add.
- In the Add the block drop-down list, select a block that you would like to add to the selected tab, and click add.
The selected block appears under the selected tab in the Preview section. - Repeat step 7 for as many blocks as you would like to add to the selected tab.
- Position the blocks you have added in the desired order by clicking the up and down arrows (
 ) next to each block.
 - Repeat steps 6 and 9 for all tabs you would like to add to your custom object view.
- Position the tabs you have added in the desired order by selecting the appropriate tab and clicking the right and left Reposition highlighted tab arrows ().
- Click Save.
To see your new object views in the displayed list, click Refresh.
To allow users to view and use your object views you must assign them to the designated groups or set the view as default in the system settings. See Assigning Object Views.
Points to Remember
Consider the following when creating custom object views:
- The more blocks you add to a tab, the longer it takes to open it.
- Each tab that you create appears in the end-user interface only when at least one block is added to the tab.
- Blocks for related objects are not displayed in the record until the user saves it first.
- The General block must be always added to the custom object view, as it typically contains the required system fields. Make sure to include all required fields in every custom object view.
- Because all custom components of an object view are category-specific, make sure you add the Categories block to the object view. Otherwise, the users are unable to add categories and consequently see their custom fields.
Task and Expense do not have the Categories block. Instead, there is a field called Default Category in their General block.
The Contact object presents its category-related custom field values in the Details page, not in the General page. - If you want child or embedded object records to be displayed in the selected object's records, you must add the corresponding blocks to a tab in the object view and name it accordingly.
These blocks are automatically created when the child or embedded custom objects are created.
For example, if you want each parent Policy object record to have its child Claim records and its embedded object Coverage records displayed on the same tab, you must create this tab (for example, called Claims and Coverages) in the custom object view in the Policy object definition and add the blocks called Claim and Coverage to that tab.
Important: If you want system object records, such as appointments, accounts, tasks, and expenses, to be displayed in a project, you must create tabs or sections with the appropriate names and add the corresponding system blocks.
Assigning Object Views
By default, all users see the system views for all objects as specified on the Default Object Views tab of the System Settings screen. After a custom object view is created, you must assign it either to a group or to the entire system before users are able to use that object view.
The object views that are set in the System Settings screen are going to be displayed for a user who:
- Does not belong to a user group
- Has no default group selected in his or her user account
- Has the (Select a View) option displayed next to the custom object in default Object Views tab of his or her default group.
Note: The default object views set in group accounts always take precedence over the system settings.
To assign object views to the system:
- In the Designer window bar, in the System Settings drop-down list select Default Object Views.
- Scroll to the object to which you want to assign a view and do one of the following actions:
- o If you want to set a certain custom view created for the object as default for the system, select the name of that view in the drop-down list next to the object.
- o If you want to set the system view of the object as default for the system, select that view in the drop-down list next to the object. For details on how to identify a system view in the list, see Object View Names.
- Repeat step 2 for all objects to which you want to change default views.
- Click Save.
The selected settings take effect immediately, and the users who do not have a default group set in their user accounts see the object views assigned to the system.
Troubleshooting Object Views
The following table presents common object view problems and their solutions.
Custom Object View Troubleshooting Tips
|
Possible problems |
Possible solutions |
| The custom view that I created is not displayed |
Check the following information:
|
|
My custom blocks are not displayed in my object view. |
Check the following information:
See also Points To Remember. |
|
Not all of my tabs appear on the page. |
Make sure that each missing tab has at least one block added to it. |
|
The blocks for related objects are not displayed in the record. |
Save the record first and then check again. |
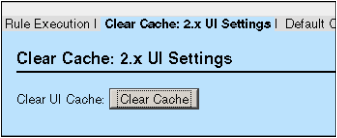
Clearing Custom Blocks Cache
TeamConnect has a user interface caching mechanism that stores page designs and other user interface data accessed by the application. You should clear the cache whenever you make changes to blocks and object views, and after making other changes to the Main user interface.
Important: If you make a change that requires clearing the cache but you do not clear the cache at that time, users do not see the change.
To clear the custom blocks cache
- In the Designer window, from the System Settings drop-down list, select Clear Cache 2.x UI Settings.
- On the displayed tab, click the Clear Cache button.
The cache has been cleared and you can close the System Settings screen and continue with your work.
Customizing Invoice Line Item Views
For invoice records, there is an additional capability of defining two views for invoice line items. Unlike other custom views, this capability is limited to a number of system fields that will be displayed in a predetermined layout, which means that you do not have to create any XML files or define custom object views. All you can do is to select the fields for each view, specify their default values, if any, and allow their values to be copied to new line items.
Note: If your organization has a custom tool for creating additional custom fields for invoice line items, you may have additional capabilities that are out of scope of this documentation.
You can customize the appearance of the Line Items block which can be placed in any Invoice Object View's tab. Users can also customize the location of the Line Item Block inside the Invoice Object View through the end-user interface in the Invoice Object Definition View. Here, users can create a new tab for the line item block or place the line item block in the General tab.
You can customize the fields that appear in the Line Items block on the user interface. Users have the ability to set field defaults and can make the view as similar to their business practice as necessary.
The following table describes the items in the Line Items customization tab.
Line Items Customization Tab
|
Field or coloumn |
Description |
|---|---|
|
Field |
The name of the field that appears on the Line Items tab in an invoice. |
|
Required |
Specifies whether the field is required. Select the check-box for the Activity and Timekeeper fields to make these fields required for Tasks. Important: If you have upgraded from a previous version of TeamConnect, leave the Timekeeper check-box selected to ensure backward compatibility with existing invoice records. |
|
Line Item Entry |
For each field, select whether to show it or hide it in the Line Item Entry screen. |
|
Table Display |
For each field, select whether to show it or hide it in the Table Display screen. |
|
Task Adjust |
For each field, select whether to show it or hide it in the Batch Adjust screen. For information on hiding certain fields in the In-Line & Bulk Adjustment screen, see Customizing Invoice Line Item Views for In-Line & Bulk Adjustment. |
|
Expense Adjust |
For each field, select whether to show it or hide it in the Batch Adjust screen. For information on hiding certain fields in the In-Line & Bulk Adjustment screen, see Customizing Invoice Line Item Views for In-Line & Bulk Adjustment. |
|
Default Value |
Select a default value for each field. |
|
Copy Capability |
For each field, select the check-box to indicate that the value of the field is copied from the previous line item to the new line item when a user clicks the Copy icon in the Action column. |
Customizing Invoice Line Item Views for In-Line & Bulk Adjustment
The behavior of line item views is different for the In-Line & Bulk Adjustment screen.
In the In-Line & Bulk Adjustment screen, the Date field will not honor the Line Items Customization settings and will always display.
Additionally, the Type, Category, and Timekeeper fields will display in the In-Line & Bulk Adjustment screen unless both Task Adjust and Expense Adjust are set to Hide for each respective field.
Search Views
There are two search views of the Line Items block that you can use to view line item details—All Line Items and Line Item Warnings. Users have the ability to toggle between these two views, set one as default, and can make the two views as similar or different as necessary. For more information on line item views, see the User Guide.