
Custom Fields
However, your organization might need to include information that is specific to your industry and business methods.
For example, if your organization shipped packages, you might need to store the number of packages shipped to a particular client, the total weight of the packages, and the type of delivery. The default installation of TeamConnect does not include such fields, but you could create custom fields for the purpose. To define each of these fields, you need to know the following information:
- What kind of information it should contain so that you can label it accordingly, such as Total Shipping Weight.
- What field type it must be to store the necessary information properly, such as Number, List, or Text fields.
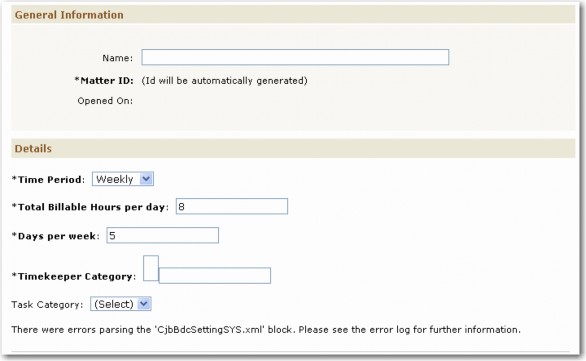
After you enter this information on the Custom Fields tab of the appropriate object definition, the users with the appropriate rights see the fields on their pages, as shown in the following images.

To have your custom fields displayed on the page, you have to include them in blocks. These elements provide a layout for custom fields on the page and allow you to add certain formatting attributes to their tags.
Where To Use Custom Fields
You create custom fields to capture and display your organization-specific information and then assign the appropriate object views. The following table lists the areas and features that use custom fields to capture information or to implement the desired workflow. The table also indicates where to find additional information.
Where Custom Fields May Be Used in Team Connect
|
Feature |
Description |
For details, see |
|---|---|---|
|
Wizards |
Custom fields may be added as individual components or within blocks to gather initial information when a record is being created |
|
|
Search Views |
Custom fields may be used as search criteria and search results display keys |
|
|
Rules |
Custom fields may be used as qualifiers in user interface rules, as well as in actions in custom action rules |
|
|
Auto Generated Letters and Documents |
Custom field values may be used by the Document Generator to automatically create letters and other documents |
|
|
XML Layer |
Custom field values may be used for data conversion and integration with other applications |
XML Layer Reference |
Points To Remember
Consider the following points about custom fields:
- Custom fields are category-specific. That is, they can be created and accessed only through their respective categories.
- Access and display of custom fields is controlled by the user's rights to each category and its respective custom fields and whether the category is active.
- If you inactivate categories, users are prevented from selecting them from the corresponding object's records and the associated blocks of custom fields are not displayed. For more information about inactivating categories, see Inactivating Object Categories.
- To reference a custom field, in most cases, you need to know its field name (not label), the full tree position of the category under which it is created, and the field type.
- In the database, object model, XML Layer, and API, tables, tags, and interfaces that deal with custom field definition or value information typically have the word "Detail" as part of their name (for example, Y_OBJ_DETAIL_FIELD, <Detail/>, or EnterpriseEntity). Hence, you may also come across references to custom fields as "detail fields."
Custom Fields Tab in Object Definitions
All custom fields for an object may be created, viewed, modified, or deleted using the Custom Fields tab of the corresponding object definition screen.
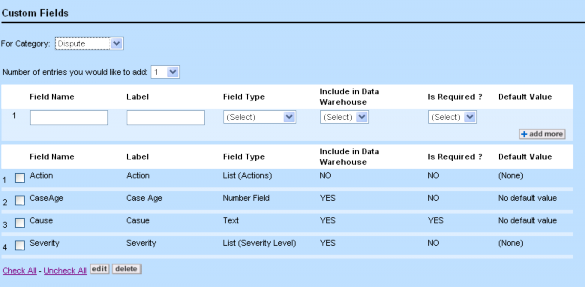
The following table describes the fields on the Custom Fields tab.
Custom Fields Tab
|
Field |
Description |
|---|---|
|
For Category |
Select the category to which you would like to add custom fields. All custom fields are category-specific, which means they can be created and viewed by category only. Categories are organized in a hierarchical way in object definitions. Only the top five levels of the hierarchy (inclusive of the first node) can be used when creating custom fields. In system objects, this node is known as Root, while in custom objects this node has the same name as the object itself—such as Dispute for the Dispute object. |
|
Field Name |
Enter an alphanumeric name to uniquely identify the field. This name is used to reference the custom field in blocks, letters, XML Layer, and reports. Field names must be unique within each category and use specific naming conventions. See Custom Field Name Requirements. The field name is only editable when a custom field is being defined for the first time. It can never be modified after the field is created. Tip: Try to spell out the entire word rather than making abbreviations so that other solution developers can easily understand exactly what the field is created for. |
|
Label |
Type the field label as you would like it to be displayed on the page. If the field will be included in Data Warehouse, the field label must not exceed 35 characters. Otherwise, the field label can include up to 50 characters. Tip: If you need to use different labels for the same field in different blocks (for example, intended for different groups of users), create more custom fields of the type Label Only in the Custom Field Types table. |
|
Field Type |
Select an option from the drop-down list to specify the type of custom field. For more information about each type, see Field Types. |
|
Include in Reporting |
Determines whether a field will be processed by Data Warehouse. Select YES if you are going to run reports and you want to include the information entered in the custom field for your reports. For information on Data Warehouse, see Data Warehouse Requirements for Custom Fields and Using Data Warehouse. |
|
Is Required? |
Select YES to make the custom field required for everybody. If you need to make this field required only to certain users, select NO and create the appropriate rules. For more information, see Required Fields. By default, required fields are indicated by an asterisk on the page. |
|
Default Value |
(Optional) Enter or select a value to be displayed as default for the custom field on the page. For example, a check-box can be displayed as either checked or unchecked. |
|
Exclude from Custom Search |
Choose NO (the default) or YES. If you choose YES, this field will not appear to the end user in custom search screen dropdown lists for criteria or result fields. Specifying Yes can help you simplify searches for the end user by making dropdown lists shorter and less confusing. Note: A Yes value causes the field to disappear from the dynamically-generated section of the dropdown list that starts below category names. In the uncommon case that you explicitly define this field as a criterion or result field in a custom search template, then the field will still appear in the dropdown list, in the section above the category names, where all the explicitly defined fields are located. |
|
Custom Field List |
Displays the custom fields of the selected object. Select or clear the corresponding check-boxes next to the field and click edit or delete to change or delete the appropriate custom fields. |
Custom Field Name Requirements
Custom field names must uniquely identify their custom fields and are used in a number of back-end operations to reference those fields.
Aside from making a field name, make sure that each field name meets the following conditions:
- A unique alphanumeric combination
- Unique within its specified category
- Begins with a letter
- Does not include spaces, punctuation, or special characters, that is, a field name must be created from A through Z, a through z, and 0 through 9
- Is no more than 30 characters long, unless it is of the type Involved, then it must be no more than 26 characters long
- Is not a reserved word in your database server. (There are dozens of such words; refer to your database documentation for a list.)
Data Warehouse Requirements for Custom Fields
This section explains Data Warehouse's requirements for custom fields.
The Include in Reporting or Include in Data Warehouse option adds a custom field to a Data Warehouse table for use in reports. All the values of custom fields of a single category that are specified to be included in Data Warehouse are stored in one Data Warehouse table. When you design categories and their reportable fields, you must not exceed Data Warehouse's limits.
Data Warehouse requirements vary depending on whether your system uses an MS SQL Server or an Oracle database. Unless stated otherwise, the following requirements apply to both MS SQL Server and Oracle:
- A category name must be unique within its object if it has any custom fields included in Data Warehouse.
If a category name is NOT unique within its object, all the corresponding Data Warehouse tables will be created. However, Business Objects create only one class for all the Data Warehouse tables that have the same category name. If the objects within that class mix data from the Data Warehouse tables that have the same category name, the report may include incorrect data. - Field labels must be unique within a category.
If a field label is NOT unique within its category, the corresponding Data Warehouse table will be created. However, Business Objects will add only one column to the corresponding class in the universe for all the non-unique field labels, and the report may include incorrect information because Business Objects use the data from only one of the fields that has a non-unique field label within one category. - If a custom field is to be included in Data Warehouse, its field label must NOT exceed 35 characters.
If a field label exceeds 35 characters, its Data Warehouse table can be created, but Business Objects may not create the necessary object, so reports cannot include the custom field.
The TeamConnect limit for field labels is 50 characters, regardless of whether the field is included in Data Warehouse. - For objects of the type Involved, the length of custom field names must NOT exceed 26 characters.
TeamConnect limits the length of custom field names to 30 characters. However, Data Warehouse scripts add a four-character suffix to the custom field names of objects of the type Involved, so the additional four characters could cause field names to exceed the 30-character limit. If the limit is exceeded, creation of the Data Warehouse table fails and an error is logged in the Data Warehouse log file. - Custom field names must NOT equal any of the words that are reserved for use by your database server. Refer to your database documentation regarding column names for a list of those words.
Oracle Limitations
Data Warehouse tables in Oracle support a maximum of 1000 columns. They do not have a per-row data length limit. That is, in a single category, you can include up to 1000 custom fields in Data Warehouse, regardless of the field type. You must design your categories and reportable fields so that the 1000 column limit is not exceeded.
MS SQL Server Limitations
In MS SQL Server, Data Warehouse tables support a maximum of 8060 bytes per row. You should design your categories and reportable fields so that the 8060 byte limit cannot be exceeded. The following table lists the bytes allocated per column for each field type. These amounts are subtracted from MS SQL Server's maximum allocation of 8060 bytes per row.
For example, if there are 30 custom fields of the type Text within a single category, the Data Warehouse table has 30 columns that use 250 bytes each. Altogether, 30 custom fields of the type Text use 7500 bytes of the 8060-byte allocation, which only leaves 560 bytes for other field types in that category.
Bytes Allocated for each Field Type (MS SQL Only)
|
Field type |
Bytes allocated |
|---|---|
|
Check-Box |
4 bytes |
|
Custom object/ Involved |
4 bytes |
|
Date |
8 bytes |
|
List type |
50 bytes |
|
Memo |
16 bytes Note: The 16 bytes is for a pointer to the TeamConnect table with the original memo text data, which can contain up to 1 GB in MS SQL Server. |
|
Number |
8 bytes |
|
Text |
250 bytes |
Important: When run with MS SQL Server, Data Warehouse has a 250-byte limit for custom fields of the type Text. If a user enters data in excess of this 250-byte limitation, the Data Warehouse scripts truncate the text when populating the table.
TeamConnect limits data entry in custom fields of the type Text to 2000 characters. However, when the Data Warehouse scripts are run with MS SQL Server, any text that exceeds the 250-byte limitation is truncated.
In addition, some Non-ASCII characters use two bytes per character of the 250-byte data length limitation. To make sure that users do not exceed the 250-byte limit, which results in truncated data in reports, choose one or more of the following options:
- Use memo text fields instead of custom fields of the type Text if users might exceed the 250- byte limit.
- Develop rules in TeamConnect to enforce the 250-byte limit for each custom field of the type Text.
Data Warehouse tables in MS SQL Server support a maximum of 1024 columns as long as the number of bytes for all fields in the category does not exceed the 8060 byte limit. For example, if a category has 1000 check-boxes and 24 memo text fields included in Data Warehouse, MS SQL Server supports all of the fields because the total allocation is less than 8060:
(1000 * 4 bytes) + (24 * 16 bytes) = 4384 bytes
MS SQL Server does not limit the creation of Data Warehouse tables with a large number of columns, although it displays a warning in the Data Warehouse log file about the 8060 byte limit. If a user attempts to insert data into a table in excess of the 8060 byte limit, MS SQL Server displays an error, the system cannot access the Data Warehouse table, and the data cannot be transferred to the Data Warehouse table.
For more information on Data Warehouse, see the Data Warehouse Help.
Required Fields
A field is considered required if the user cannot save a record without entering a value in that field. If a user attempts to save a record without populating a required field, TeamConnect displays a message that the field is required.
By default, the labels of all required system fields and custom fields (set as required when they were created) appear in boldface with an asterisk next to them, in the end-user interface. However, fields are not automatically displayed this way if they are required as a result of rules, or if another field uses its value. It is easier to require such fields when creating them than to modify the way they appear.

How To Make Fields Required
You may make a field required in one of the following ways:
- By creating a custom field in an object definition and setting it as required for everybody. These fields are automatically displayed as required.
- By creating rules to make system or custom fields required under certain conditions. These fields are not automatically displayed as required.
Fields may also become required (though not marked as such in the user interface) as a result of certain design decisions that you may make. For example:
- If you add an object attribute to the unique identifier (ID) pattern in custom object definitions, the corresponding field becomes required.
- If you make a custom object definition contact-centric, the corresponding contact field becomes required.
- If you set a parent custom object definition as required, the corresponding parent project field in all child projects becomes required.
Practical Tips
Keep these tips in mind while working with required fields:
- If you include attributes in a naming pattern for custom object records, consider making the corresponding fields required. This action ensures that these fields are populated and that the resulting descriptions in the Name field are more consistent.
- If you make certain fields required in contact records, the users may not be able to add contacts through the contact search module window.
- Use the tag attributes,
notUseRequiredFieldStyleorirequiredto control whether custom field labels appear as required when including them in blocks. - Make sure you include all required fields into wizards that you may be creating for that object. Otherwise, the user is unable to save the record after using the wizard.
Field Types
Based on the type of data that each field can store and the field's functionality in the user interface, all system and custom fields in TeamConnect may be one of the seven types listed in the following table.
Custom Field Types
|
Field type |
Description |
Resulting field in the end- user interface |
|---|---|---|
|
Check- Box |
Stores boolean values, when you need to provide the user with options that might or might not be selected. |
|
|
Date |
Stores date values that appear in the format specified in system settings and user preferences. By default, each date field provides the user with a pop-up calendar window that appears when the user clicks in the field. The date and time fields are related. To create a date field with a time field, use the appropriate tag attribute with this field when including it in a form or block file. See Date Field Tag Attributes. When creating a custom field of type Date, a checkbox labeled "Time Zone Independent" appears. You should check this box if the field always contains the same value for any user, viewing it in any time zone in the world. For example, a person's birth date would be time-zone-independent, so the box should be checked. However, the date and time of a telephone conference call would be dependent on time zone, so the box should not be checked. Note that you can only make this choice once, when first creating the custom field. You cannot edit the field later and change this attribute. |
|
|
Memo Text |
Stores large amounts of text, up to:
To specify the desired display size for a memo text field, use the appropriate tag attribute with this field when including it in a form or block file. See Memo Text Field Tag Attributes. |
|
|
Text |
One-line field that can store up to 2000 characters in both MSSQL and Oracle databases. To specify the desired display size for a text field or the maximum number of characters it can accept, use the appropriate tag attribute with this field when including it in a form or block file. See Text Field Tag Attributes. Tip: For alphanumeric fields, use a Text field. |
|
|
Number |
Stores fixed and floating-point numbers in the following formats:
Do not enter any special characters, such as $, %, and so on, as part of default values for this field type. For details on available tag attributes that can be used when including a number field in a form or block file, see Number Field Tag Attributes. Tip: For alphanumeric fields, use a Text field. |
|
|
Label Only |
The label only field type is available only for custom fields. It allows you to create:
In either case, you are able to change the section heading or field label in one place, by using a label only field, instead of modifying each individual XML file. It is far more efficient and leaves little room for human error. This field is created like any other custom field. For details, see Creating Custom Fields. |
N/A |
|
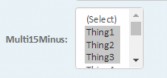
List |
Displays a list of options from which the user can select one, which are provided by a custom lookup table associated with the field. For more information, see List Field Type and Adding Custom Lookup Tables. The example shows a drop-down list. Lists may also be option (radio) buttons. |
|
|
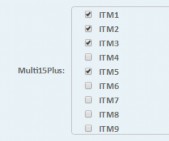
Multi-value List |
Displays a list of options from which the user can select one or more, which are provided by a custom lookup table associated with the field.
For more information, see List Field Type and Adding Custom Lookup Tables. |
|
|
Search Module |
Allows the user to search and select the desired contact or project record. Search modules allow users to open a selected record directly from the field. There are two types of custom fields that appear as search module fields in the user interface, of type:
|
|


List Field Type
Fields of the type List allow the user to select one out of multiple options. In the user interface, they may be displayed as drop-down lists (default display option) or option (radio) buttons.
Important: To create a field of type List, you must first create a custom lookup table to associate with the field.
Custom lookup tables are specific to your design and intended to provide lists of options for custom fields of the type List. Typically, each List field has its own custom lookup table that was created for it. For information about custom lookup tables, see Adding Custom Lookup Tables.
Depending on your design, some lookup tables may be re-used in several custom fields—even in different object definitions. For example, a table providing the Yes/No/Unknown options for a list of option buttons can be reused for many different fields.
You can change the contents of a custom lookup table by adding, editing, or deleting items to create useful lists that are customized for your design.
Points To Remember about List Fields
Keep the following points in mind when working with List fields:
- Each List field must be associated with a custom lookup table.
- To create a list of option buttons, create a regular List field and use the type="radio" tag attribute when including it in a form or block file. For details, see List Field Tag Attributes.
Involved Field Type
Create custom fields of the type Involved to allow users to quickly add involved parties, such as claimant, insured, to a project record. Involved field values can also be used in the auto naming patterns for projects.
In the end-user interface, this field appears as a contact search module field in the edit mode, and as a hyperlink in read-only mode. By clicking the hyperlink, the user is linked directly to the selected contact record.


Points To Remember
Keep the following points in mind when working with Involved fields:
- Fields of the type Involved can be created only for custom objects.
- To create a custom field of type Involved, you have to select a specific involved role. This is the role of the contact that the user selects in this field.
When you select this field type on the Custom Fields tab of an object definition, another drop- down list appears that lists all roles (categories) from the associated Involved object definition. - When defining an Involved custom field, you can also associate a specific search view with the field. This search view appears when the user opens the search module for this field to select a contact.
- When the user selects a contact in this field in the end-user interface, the following changes occur:
- On the Involved tab of the project, a new Involved record is automatically added for this contact.
- On the Involvement tab of the selected contact record, an entry is added. This tab lists all projects in which the contact is involved.
Search Views for Involved Custom Fields
When defining a custom field of type Involved, you have the option of setting a specific search view to be displayed when the user opens the search module for the field. The search views available for you to select are those search views which are marked as available for use in search modules in the Contact Object Definition, including both Person and Company Search and Company Search Only search views. For details about these settings, see Defining General Search View Information.
The way that the search module for your custom field of type Involved appears to your users depends on your settings as a solution developer:
- If you want users to always use the same search view in the custom field, then select that search view when defining the custom field.
- If you want users to be able to select which search view to use in the search module for the custom field, you must do the following actions:
- Select None in the Search View field when defining the custom field. This option is selected by default.
- Ensure that each contact search view that you want users to have available in search modules is set accordingly (see the General Tab on Search View Screens table).
The available search views are listed in the user's search module in the Current View drop- down list, sorted according to each search view's Order.
- If only one contact search view is available for use in search modules, then the available search view is used automatically in the search module. Also, users do not have the option to select a different search view.
In TeamConnect Enterprise (TCE) 7.0 and later, Contact search views used for Involved fields can also be configured with a Person Only Search behavior.
When an Involved custom field uses a Contact search view that is configured for Person Only Search:
- The type-ahead search for that Involved field returns only Person contacts.
- Additional qualifiers defined on the Filter Display tab of the Contact search view (for example, Category) are applied to the results. This allows you to restrict Involved selections to Person contacts that meet specific criteria (such as Internal > Attorney) as shown in the image below:

To use this behavior:
- Configure a Contact search view for Person Only Search in Setup or TeamConnect Designer, see Designing Search Views for details.
- On the Custom Fields tab for your custom object, define a field of type Involved and select that Contact search view in the Search View field.
This field is created like any other custom field. For details, see Creating Custom Fields.
Custom Object Field Type
Fields of the type Custom Object allow you to establish a non-hierarchical relationship between the current object definition, which can be system or custom, and another custom object definition. Hence, the name of the field type—Custom Object. This field type allows the user to select a related project record directly in the currently displayed record.
In the end-user interface, Custom Object fields appear as project search module fields or drop-down lists in the edit mode. See the Custom Field Types table for examples of these field types.
In the read-only mode, Custom Object fields appear as hyperlinks. By clicking the hyperlink, the user is linked directly to the identified record.

Points To Remember
Keep the following points in mind when working with Custom Object fields:
- The Custom Object field type is available when creating custom fields for both system and custom object definitions.
- You cannot select system object definitions or embedded custom object definitions when defining fields of the type Custom Object.
- Whether a Custom Object field appears as a search module or a drop-down list in the end-user interface depends on the Default Selection Mechanism specified on the General tab of the selected custom object definition.
The display format of the field may also be determined by the display tag attribute in the block file. For details, see Custom Object Field Tag Attributes. - To limit the available records in a Custom Object field so that a user can select only related records, records in a certain phase, records with a certain default category, and so on, you must add a qualifier in the definition of the field. For more details, see Qualifiers for Custom Object Fields.
- If the field is to be displayed as a search module, you can select a specific search view to be displayed in the search module. Or, you can provide users with the ability to select which search view they want to use in the search module. For more details, see Search Views for Custom Object Fields.
- To specify the desired size for a Custom Object field, you have to use the size tag attribute with this field when including it in a form or block file. For details, see Custom Object Field Tag Attributes.
Data Entry Fields for Custom fields of the type Custom Object
|
Field |
Description |
|---|---|
|
Field Type |
Select Custom Object to define a custom field of type Custom Object, which allows users to select a project record belonging to the specified custom object definition. |
|
Custom Object List |
Select the custom object definition whose records users must be able to select in this custom field. |
|
Search View |
This field is only available if the custom object selected in the Custom Object List has search module set as its default selection mechanism on General tab of its object definition. Select the search view that you want users to use in the search module for this field. For details about your other options, see Search Views for Custom Object Fields. |
|
Qualifier |
If necessary, define an expression in this field to filter the records available to users. You can define the qualifier by doing one of the following actions:
This field is limited to 256 characters. |
|
Add Path using Object Navigator |
Select this check-box to add paths to your qualifier expression with the help of Object Navigator. When this check-box is selected, several additional fields and buttons appear. For details, see Creating Qualifiers Using Object Navigator. |
To define a custom field of type Custom Object
- In the Field Type column on the Custom Fields tab of the appropriate object definition, select Custom Object.
Several additional fields appear, as shown in the following image.

- In the drop-down list which lists custom objects, select the custom object whose records the user must be able to select in the custom field.
- If you want users to always use the same search view in the custom field, select that search view in the Search View drop-down list.
- If you want users to be able to select which search view to use in the search module window for the custom field, then you must do the following actions:
- Select None in the Search View field when defining the custom field. This option is selected by default.
- Ensure that each search view that you want users to have available in search modules where they select this type of project is set to be available in search modules (see the General Tab on Search View Screens table).
The available search views are listed in the user's search module in the Current View drop-down list, sorted according to each search view's Order.
- If necessary, create a qualifier to filter the available records from which the user can make a selection. You can create the qualifier in one of two ways:
- In the Qualifier field, manually type the appropriate code to create a complete expression. For more details, see Qualifiers for Custom Object Fields.
- Select the Add Path using Object Navigator check-box. This gives you the option to use Object Navigator for each side of the expression. You will have to manually type the operator in the middle of the expression. For more details and instructions, see Creating Qualifiers Using Object Navigator.
For more details on creating custom fields, see Creating Custom Fields.
Search Views for Custom Object Fields
If the default selection mechanism of the custom object selected in the definition of your custom field of type Custom Object is search module, you can select a specific search view to be displayed to users in the search module.
The search views available for you to select are those search views which are marked as available for use in search modules in the Object Definition for the selected custom object. This is an option in the definition of the search view (see Defining General Search View Information).
The search views available in the search module for your custom field of type Custom Object depend on your settings as a solution developer. You can do either of the following operations:
- Select a specific search view that is always displayed in the search module window.
- Allow users to select from multiple search views in the Current View drop-down list, as they typically do in search pages.
If only one search view for the selected custom object is available for use in search modules, then the available search view is used automatically in the search module. Also, users will not have the option to select a different search view.
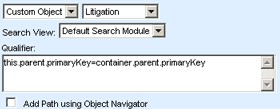
Qualifiers for Custom Object Fields
When creating custom fields of the type Custom Object, you can define qualifiers to filter records of the custom object definition selected for the field. For example, you might want to limit the user's options to records in a certain phase, with parent records of a specific type, and so on. This is done by writing a qualifier expression in the Qualifier field on the Custom Fields tab of an object definition, as shown in the following image.

Essentially, in a qualifier expression, you specify a condition to be met in order for records of the selected custom object to be displayed in the custom field. This condition is determined by the business needs of your organization.
Creating a qualifier for a Custom Object custom field is optional; however, it can narrow down the list of records available for selection, which can save users time and prevent invalid selections.
Important: Creating qualifiers for custom fields of the type Custom Object requires a good understanding of the TeamConnect object model and its attributes. Familiarity with the logic of creating qualifiers in search views and rules is also helpful.
Points To Remember
The following are the basic points about qualifiers for custom fields of the type Custom Object:
- The code that you provide in the Qualifier field must be a complete expression, consisting of two sides that each identify a data value, separated by an operator (such as =). The expression compares two values. For details about the available operators, see Data Types.
- You can create the qualifier either by typing it manually in the Qualifier field or with the help of Object Navigator. If you use Object Navigator, you still need to put the various parts together correctly, as described in Creating Qualifiers Using Object Navigator.
- You can use multiple qualifier expressions in the Qualifier field by separating them by semicolons (;). They are treated as logical AND statements. In other words, only records that meet the conditions specified by all of the expressions in the Qualifier field are returned and available for the user to select.
- When you create qualifiers for custom fields of the type Custom Object in embedded object definitions, in the end-user interface, the condition or conditions specified in the qualifier only take effect when the user adds the embedded project and saves its parent first.
- The more complex your qualifier is, the longer it may take for the available records to be displayed when a user wants to make a selection in this custom field.
Whether you decide to create your qualifier by typing it manually or with the help of Object Navigator, you must familiarize yourself with the information in the following sections: - Qualifier Syntax and Data Types
- Creating Qualifiers Using Object Navigator
- Examples of Qualifiers for Custom Fields of the Type Custom Object
Example
Let's have a look at a specific example of a qualifier in a field of type Custom Object:
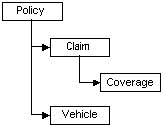
Suppose your design consists of several custom object definitions: Policy, Claim, Coverage, and Vehicle. They have the following relationships: Policy is a parent of Claim and Vehicle, Claim is a parent of Coverage (see the following figure).
In the Coverage object definition, you create a field of type Custom Object and select the Vehicle object in the custom object list (the Data Entry Fields for Custom Field of the Type Custom Object image). In the end-user interface, this means that Coverage records will have a Vehicle field where the user selects a Vehicle record.
If you do not write qualifiers for the Vehicle field, all Vehicle records in the database are available for selection in this field. You want to limit the choice of Vehicle records only to those records that have the same Policy parent record, as the Claim record, which is the parent of the Coverage record that has the Vehicle field.
The following qualifier limits the choice of Vehicle records as desired, by comparing the primary keys of the parent records:
this.parent.primaryKey=container.parent.parent.primaryKey
In this qualifier expression:
- Keyword this refers to the Vehicle record in the Vehicle field.
- Because Policy is a parent of Vehicle, the parent attribute on the left is the parent Policy record of the Vehicle record.
- Keyword container refers to the Coverage record where the Vehicle field is located.
- Because Claim is the parent of Coverage, and Policy is the parent of Claim, the first parent attribute on the right is the parent Claim record of the Coverage record that contains the field, and the second parent attribute is the parent Policy record of the Claim record.
If the parent record of a Vehicle record is the same as the "grandparent" record of the Coverage record, the Vehicle record is available for selection in the Vehicle field.
Qualifier Syntax and Data Types
There are certain conventions which must be followed in order to construct a valid, complete qualifier expression for a custom field of type Custom Object. In order to create your own qualifier, you must understand both the syntax and the possible data types for an expression.
Syntax
The following points describe the syntax of expressions for qualifiers in custom fields of the type Custom Object:
- The syntax for paths is the same as in the fields where paths are created with Object Navigator, such as rule qualifiers added through the user interface. Namely, the expression you write in the Qualifier field essentially consists of object attributes, separated by periods.
- The Qualifier field is case-sensitive. Object attributes must be typed exactly as they appear in Object Navigator (see Using Object Navigator) or using the reference tables in Object Model: Read This First plus the tables it points you to. Also, custom field names must be typed exactly as they are defined in the Custom Fields tab of the object definition.
- There are two keywords that can be used when writing qualifiers. Always start a path with one of these keywords:
this
Refers to the project the user selects in the custom field of type Custom Object. The left side of your expression always starts with this.container
Refers to the record where the custom field of type Custom Object is located. Typically, the right side of your expression starts with container, unless you need to type in a literal value rather than identify an object attribute.
- System fields are identified with the use of a path that identifies the object attribute, like this:
this.parent.parent.primaryKey
For complete examples of system fields in paths, see the Examples of Qualifiers for Custom Fields of the Type Custom Object table. - Custom fields are identified with the use of a path that includes the category tree position and custom field name in parentheses, like this:
this.detailList(FullTreePosition).detailNumbValueList(FieldName).detailValue
where FullTreePosition is the full tree position of the category under which the custom field is created, and FieldName is the name (not label) of the custom field itself.
Important: Make sure to type the full category tree position, NOT the name, of the category.
- When identifying custom field values with a path, you must use the correct path based on the field type, as shown in the Syntax for Identifying Custom Field Values in Paths table. This is because the path changes slightly depending on the type of value you are identifying (number, date, list, and so on), as indicated in bold in the table.
For detailed examples of custom fields in paths, see the Examples of Qualifiers for Custom Fields of the Type Custom Object table.
Syntax for Identifying Custom Field Values in Paths
|
Custom field type |
Path syntax to identify custom field value |
|---|---|
|
Text |
|
|
Memo Text |
|
|
Number |
|
|
Date |
|
|
List (lookup items) |
|
|
Custom Object |
Important: detailValueFID is the primary key of the project record selected in the identified custom field. |
|
Check-Box |
Important: Values for custom fields of the type check-box are stored as numbers, where checked=1 and not checked=0. |
|
Involved |
Important: This path identifies the primary key of the contact selected in the Involved custom field. |
Data Types
When constructing an expression for a qualifier, you must ensure that the type of data identified by the path on each side of the expression is the same. For example, you cannot compare a name and a number or a primary key, a string and a decimal, a date and a complex type, or object.
The Data Types and Operators for Custom Fields of the Type Custom Object table lists the types of data that you can use in the Qualifier field of a custom field of type Custom Object. It also lists the operators that you can use in the expression for each data type. To find out the data type of a specific attribute, see Object Model: Read This First plus the additional reference tables this reference points you to.
It is important to understand that each side of your expression must identify one of these simple types of data values. Specifically, you cannot compare attributes marked as "bridges" in Object Model: Read This First (and the additional reference tables it points to). These values identify other records, rather than simple data values. For example, parent, createdBy, mainAssignee, and project are all bridges rather than simple data values.
Therefore, when you need to compare records, you must use one of the attributes of the record that is a simple data type and that uniquely identifies it. For example, if you want to compare a parent record to another parent or grandparent record, compare their primary keys. Similarly, if you want to compare a user to another user, compare the username (a text value). For other examples, see the Examples of Qualifiers for Custom Fields of the Type Custom Object table.
Data Types and Operators for Custom fields of the type Custom Object
|
Data type |
Operator |
Values |
Examples |
|---|---|---|---|
|
Text |
= |
|
|
|
Number |
= < > <= >= |
|
|
|
Date |
For dates, > means after today and < means before today. |
|
|
| Lookup table item (from a system or customer lookup table) | = |
For an explanation of how tree positions of lookup items are formed for custom lookup tables, see Custom Lookup Tables. |
|
| Boolean (true/false values) | = |
Path that identifies a boolean value
|
|
Creating Qualifiers Using Object Navigator
You can use Object Navigator to assist you in constructing the paths on either side of your qualifier expression for a custom field of type Custom Object. This allows you to rely on the internal structure of TeamConnect to guide you in identifying attributes, rather than having to type them.
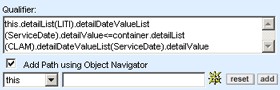
While Object Navigator helps you construct a path, you must also make the correct selections and type literal text in the Qualifier field where appropriate. For example, the following qualifier is constructed using Object Navigator where necessary (currentPhaseType), while a specific value also had to be typed into the field (name.Validation):

To take advantage of this option, select the Add Path using Object Navigator check-box when defining the custom field, as shown in the following image.
Even if you decide to use Object Navigator to assist you, you must understand the concepts outlined in the following sections:
- Qualifiers for Custom Object Fields
- Qualifier Syntax and Data Types
- Examples of Qualifiers for Custom Fields of the Type Custom Object
The following table describes the fields for adding paths to define data entry fields for custom fields of the type custom object.
Fields for Adding Paths Using Object Navigator
|
Field or button |
Description |
|---|---|
|
Add Path using Object Navigator |
Select this check-box to add paths to your qualifier expression with the help of Object Navigator. When this check-box is selected, several additional fields and buttons appear. |
|
this/container |
Select the appropriate keyword to begin the path you are creating: this—Select when creating the path on the left side of the expression. container—Select when creating the path in the right side of the expression, unless you need to type the literal value you are looking for. These keywords are also described in Syntax. |
|
Object Navigator icon and field
|
Click the icon to open Object Navigator and build a path. For details on how to use Object Navigator, see Using Object Navigator. Once you have created a path and clicked ok in the Object Navigator window, the path appears in the Object Navigator field on the Custom Fields tab. |
|
reset |
Click to clear your selections in the fields specific to creating a path with Object Navigator. |
|
add |
Click to add the path you have defined using Object Navigator to the Qualifier field. If you have already added any parts of the expression to the Qualifier field, the path is added to the end of the string. |

Points To Remember
The following points are important to understand about using Object Navigator for defining qualifiers:
- You must begin paths by first selecting either this or container, depending on from which record your path must originate (see the Fields for Adding Paths Using Object Navigator table).
- You may not need to use Object Navigator for both sides of your expression. Often, you need to type the particular text or numeric value you may be looking for, such as a phase name or the tree position of a lookup item, on the right side of the expression.
- If both sides of the expression you need to write require you to build a path, you may need to click the Object Navigator icon twice—first to build one path and again to build the other path, one on each side of the operator.
- You must manually type an operator after adding the left side of the expression and before adding the right side of the expression. For details, see Data Types.
- When you build a path and click add, the path that you have created is added to the Qualifier field.
To build an expression using Object Navigator
- After specifying the type of the custom field and selecting the desired custom object, select Add Path using Object Navigator.
The screen refreshes to display new fields, as shown in the Fields for Adding Paths Using Object Navigator image. - Select this.
- Click the Object Navigator icon.
Object Navigator opens in a new browser window. - Navigate to the appropriate object attribute and click ok. For details about using Object Navigator, see Using Object Navigator.
The path you created appears in the Object Navigator field. - Click add.
The path, starting with this., is added to the Qualifier field. - Place your cursor at the end of the path in the Qualifier field and type the appropriate operator. For details, see Data Types.
- If the right side of your expression needs to be a literal value (such as the name of a phase or the tree position of a lookup item), type this literal value after the operator.
Your qualifier has been defined. You can continue to set the other values to define the custom field, as described in the Custom Fields Tab table. - If instead, the right side of your expression needs to identify an object attribute:
- Select container.
- Repeat steps 3 and 4.
- Click add.
Your qualifier has been defined. You can continue to set the other values to define the custom field, as described in the Custom Fields Tab table.
The following examples are typical expressions used in a Qualifier field for a custom field of type Custom Object. You can use these as models for your own qualifiers.
Examples of Qualifiers for Custom fields of the type Custom Object
|
What you want to do |
Qualifier expression |
What this expression says |
|---|---|---|
|
Ensure that projects available for selection in the custom field and the record that contains the custom field have the same parent. |
|
The primary key of the parent of the project record selected in the field equals the primary key of the parent of the record where the field is located. |
|
Filter project records available in the custom field by their phase. Only those records whose current phase is Open can be selected in the field. |
|
The name of the current phase of the project record selected in the field equals Open. |
|
In a record where there are two custom fields of the type Custom Object, and the records selected in these fields have a parent- child relationship, filter project records available in one field to only show children of the record selected in the other field. |
|
The primary key of the parent record of the project record selected in the field equals the primary key of the project record selected in another field of type Custom Object in the same record. |
|
Ensure that the projects available for selection in the custom field have the same person in a custom field of type Involved as the person identified in the contact- centric field of the record that contains the custom field. |
|
The primary key of the contact who is identified in the ReportedBy custom field in the project record selected in the field equals the primary key of the contact who is selected in the contact-centric field in the record where this field is located. |
|
Ensure that only projects with the specified default category are available for selction in the custom field. |
|
The tree position of the default category of the project record selected in the field is CLAM_LIAB. |
|
Ensure that only projects with a particular value selected in a custom field of type List are available for selection in the custom field. |
|
The tree position of the item selected in a custom field in the record selected in the field is LOSS_ROOT_VDRE. |
|
Ensure that projects available for selection in the custom field were created within the past 30 days. |
|
The createdOn date of the record selected in the field is within 30 days of today or equal to today's date. |
|
Ensure that projects available for selection in the custom field meet three conditions:
|
|
This qualifier contains three expressions, separated by semicolons (;). See the descriptions for similar expressions in this table. |
Creating Custom Fields
To use blocks for your custom pages, you must first create the necessary custom fields.
To create desired custom fields
- Analyze your organization's specific information that needs to be captured in the selected object, in addition to the default fields provided within TeamConnect.
- Decide which custom fields you need to create to capture this information.
Tip: Make a list of the labels for these custom fields and their field types.
- Make sure the custom lookup tables are created for the custom fields of the type List.
- Because all custom fields are category-specific, decide to which categories in the object definition you want to add your custom fields.
- Make sure the desired object categories are added to the object definition.
- Add your custom fields to the appropriate category in the object definition. See Adding Custom Fields.
- Include your custom fields into the blocks, depending on your needs and design.
To add a custom field to an object definition
- In the Designer window, from the Go to drop-down list select Object Definitions.
- Select the appropriate object definition from the displayed list.
- Open the Custom Fields tab of the displayed object definition.
- Select the Number of entries you would like to add from the drop-down list.
- For each data entry row, enter the values in the appropriate fields as described in the Custom Fields Tab table.
- If you want to continue adding custom fields, click add more. Otherwise, click Save on the toolbar.
TeamConnect automatically saves the custom field information and adds the fields to the system block called Details. - Create the appropriate components for the object view—that is, custom blocks.
Points To Remember
Custom fields can be created and displayed by category only. Because of this category dependency, you must carefully plan for which categories to create the desired custom fields, taking into consideration the following:
- For all categories and custom fields you add in an object definition, associated access rights are automatically created. They must be assigned to the appropriate users and user groups in order for the users to be able to view the categories and their custom fields.
- The root-level category in both custom and system objects is always automatically added to the object records to provide access to other categories (unless you do not intend to use categories and custom fields in your design at all). This means that all custom fields created for this category are automatically displayed in all records for all users.
- Always arrange your custom fields so that you do not have to replicate the same fields for different categories.
This improves performance and also prevents possible confusion if the custom fields of two categories are used in the same object record. - A category name must be unique within its object if it has any custom fields included in Data Warehouse. For more information, see Data Warehouse Requirements for Custom Fields.