
Designing Search Views
The procedure for creating a search view is described in detail in Creating Search Views.
When you are ready to create search views for an object, first determine the following characteristics for each search view you want to create:
- Where the search view should be available, for example, from multiple user-interface locations or a separate search view for each location. The available locations are:
- Related objects
- Portal panes
- Search modules
- Links in the left pane (for search views that are designated as collections)
In addition, one search view can be set to display Global Search results for the object.
- Whether to display search results automatically when the user selects the search view (Auto Search).
- Which fields are available as search criteria.
- Which qualifiers are invisible, so that records are filtered by certain invisible criteria in addition to the criteria entered by the user.
- Which section titles are needed for the Filter tab (the search criteria section).
- Which fields appear on the Results tab (the displayed records section for records found by the search) in addition to the object link.
- If the search view is for a contact or appointment, whether you want to use the predefined Card or Calendar display types.
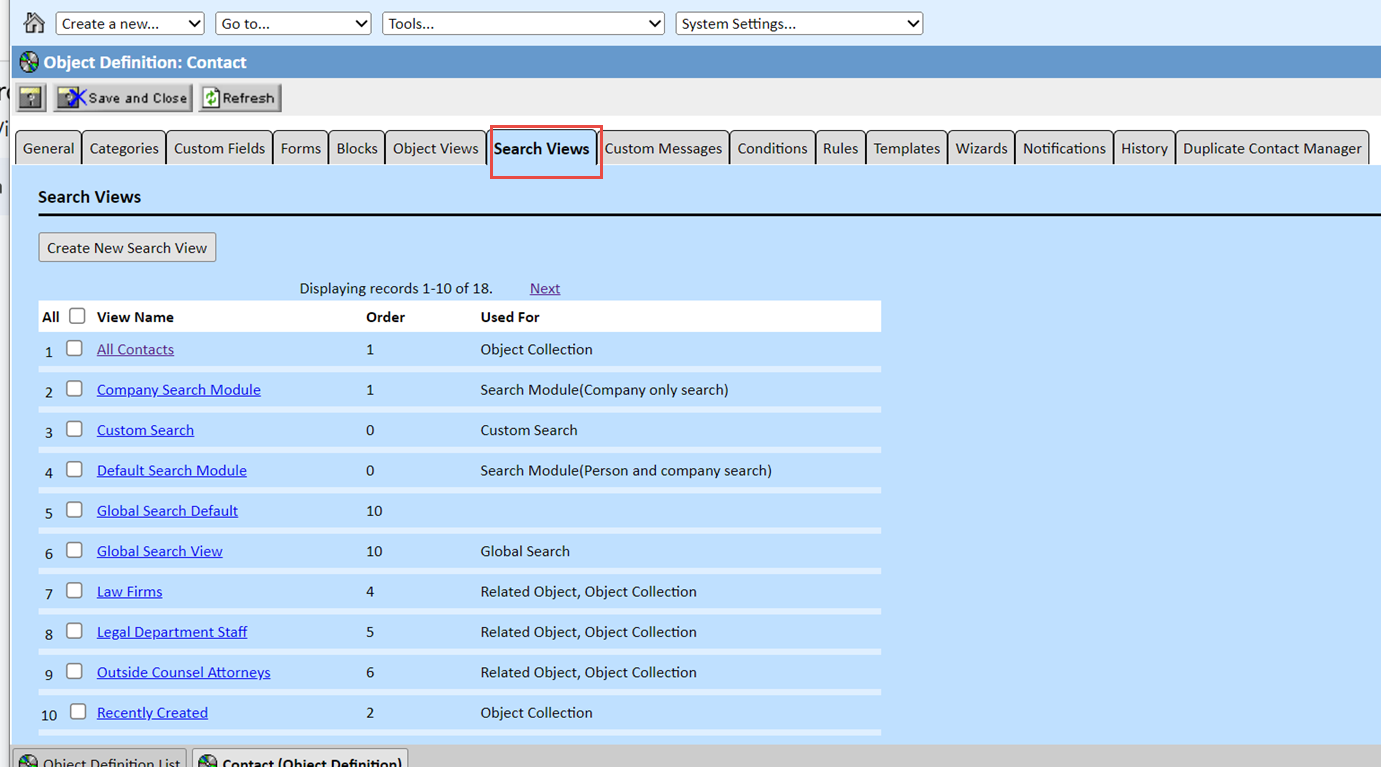
All search views are created within the Designer object definition area for their objects in TeamConnect. Search views may be created, viewed, and modified in the Search Views screen, which contains the following tabs:

- General—Contains general information about the search view, such as the name, view type, locations in TeamConnect where it is available, and whether it is set to auto search. For more details, see Defining General Search View Information.
- Filter Display—Contains the qualifiers defined for the search view with which users can conduct a search. This tab also includes invisible qualifiers that automatically limit all search results, to help you control which records users can access. For more details, see Search View Filter Display.
- Results Display—Contains the settings that determine how the search results appear for the user in the displayed records section or the Results tab of the search screen. For more details, see Search View Results Display.
Accessing the Search View Screen
To open a search view screen
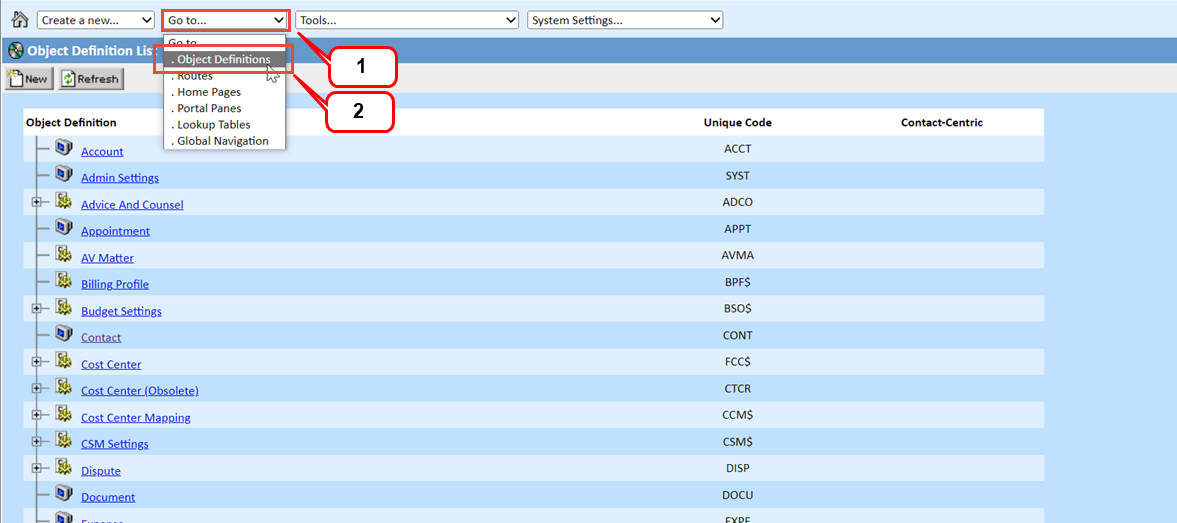
- Open the appropriate object definition, and then click the Search Views tab.
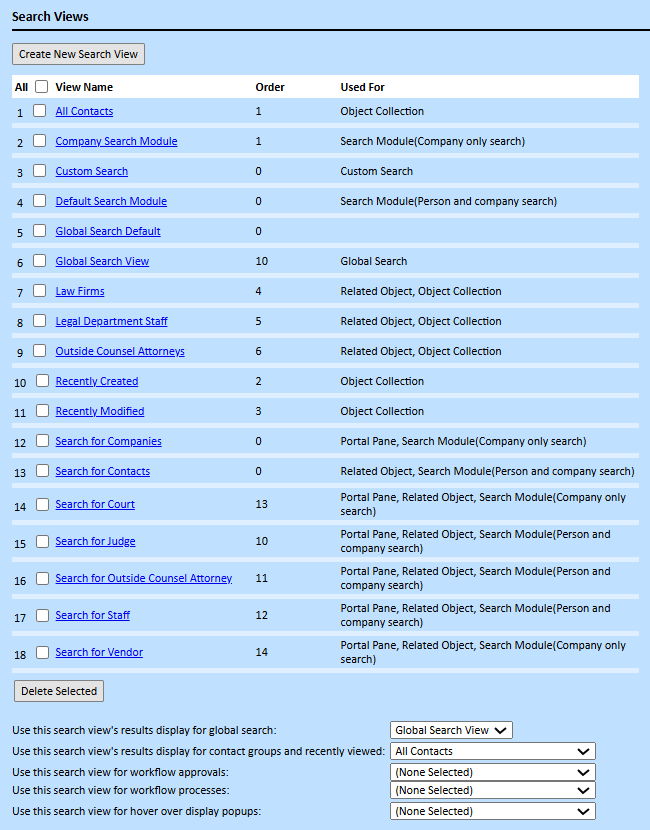
A list of all existing search views for the object appears, as shown in the following image.
This example is on the Contact Object.
- Click the hyperlink of the search view you to want to open, or click new to create a new search view for the selected object definition.
The corresponding search view screen appears with its General tab (see the General Tab on Search View Screens image) displayed by default. - Click the tab you need to open.
The following table describes the items in the Search Views tab.
Search Views Tab Screen Elements
| Field or Column | Description |
|---|---|
|
Create Search View: |
Click new to create a new search view. This displays a new Search View screen. |
|
View Name |
Displays the name of each search view as a hyperlink. Click the name of the search view to open it. |
|
Order |
Displays the display order in which all search views for this object appear in the Current View drop-down list on the search screen. The first search view in the list is the search view that appears by default when a user first accesses a search screen. For details about setting the display order, see the General Tab on Search View Screens table. |
|
Used For |
Displays all areas where the search view is available, such as search modules, custom search, and portal panes. Not all objects allow search views to be used in all areas. For details about where search views can be used, see the General Tab on Search View Screens table. |
|
Check All - Uncheck All |
To delete a search view, select a single check-box next to the search view or click Check All to select all the search views on the page, and click delete. Click Uncheck All to deselect all the search views. |
|
Use this search view's results display for search across objects |
Select a search view from the drop-down list to display Global Search results. For system objects, the default search view is Global Search Default. For custom objects, TeamConnect uses the search view with the lowest display order. If more than one search view shares the same sort order, TeamConnect uses the first search view in alphabetical order. |
|
Use this search view's results display for static object collections and recently viewed |
Select a search view from the drop-down list as the default to display static object collections. (See Object Collection in the General Tab on Search View Screens table) This search view's results display is also the display used for Recently Viewed records for this object. Recently Viewed is one of the available collections in the left navigation pane of the user interface. When working with search views for the Contact object, the label for this check-box will instead say "Use this search view's results for contact groups (Address Books) and recently viewed." A Contact Group is a form of static object collection. |
|
Use this search view for workflow approvals |
This field is visible for all objects that can have approval rules. Select a search view from the drop-down list to display on the Requests to Approve page of My Approvals and the Active Requests page of My Requests. The fields under the Filter Display tab of the search view display as the fields you use to enter search criteria. The fields under Results Display of the search view display as the columns in the table with the search results. |
|
Use this search view for workflow processes |
This field is visible for all objects that can have approval rules. Select a search view from the drop-down list to display on the Attention Required and In Progress pages of My Workflow Processes. The fields under Filter Display of the search view display as the fields you use to enter search criteria. The fields under Results Display of the search view display as the columns in the table with the search results. |
|
Use this search view for hover over display popups |
Select a search view here to display when items within the object are hovered over with the mouse. For more information on this field and setting up custom hover pop- ups, please see Custom Hover Popups. |
Creating Search Views
The following instructions for creating a search view provide a general overview of the entire process. This process includes several general steps that are broken down into greater detail in other instructions, as indicated in the appropriate step.
To create a search view:
- Open the appropriate object definition, and then click the Search Views tab.
- Click New.
The General tab appears. - Enter all general information about the search view on the General tab. For details, see Defining General Search View Information.
- Click the Results Display tab and do the following actions:
- If you want users to be able to access records directly from the search results, create the Object Link.
For details, see Defining Object Links. - Design the other display columns for the results screen of the search view. For details, see Creating Results Display Columns.
- If you want users to be able to access records directly from the search results, create the Object Link.
- Click Save to save the search view. This allows you to add qualifiers.
- Click the Filter Display tab and do the following actions:
- Create all desired section titles for the search view. For details, see Creating Section Titles.
- Create all desired search qualifiers for the search view. For details, see Creating Search View Qualifiers.
- Click Save.
The search view is now available in the appropriate screens in the Current View drop-down list. After you save a search view, you may edit it as necessary.
Creating Search Views for Home Pages
You can use a search view that you have created to display useful information to users in their TeamConnect Home page, such as the tasks to which they are assigned, their daily appointments, and projects for which they are the main assignee.
Search views that are created for use in home pages have several requirements:
- The Portal Pane check-box on the search views General tab must be selected. If this check- box is not selected, then the search view is not available in the Content section of the Portal Pane screen.
- Qualifiers with predefined values are required in order for the search view to display properly in the portal pane. If no search qualifiers are defined on the Filter Display tab of the search view, then the portal pane lists all available records in the database for that object. If desired, the qualifiers can be invisible.
For example, you might want the portal pane to list the current user's tasks to which they are assigned, rather than the tasks for all users. - You should also take into consideration which extra qualifiers you want to have available when the user clicks Edit Filter in the portal pane, and make these qualifiers visible qualifiers.
For example, you might want to give the user the ability to further limit the Tasks that appear according to the date which they are due. - You must ensure that each search view has an object link display key in order for users to have direct access to records from the search view.
Card and Calendar display types for the Contact and Appointment objects are not available for search views in home pages.
The following steps describe how to create a search view that you can use in a portal pane. To learn more about using search views in portal panes, see Adding Search Views.
To create a search view that can be used for home pages:
- Open the appropriate object definition, and then click the Search Views tab.
- Click new.
The General tab appears. - On the General tab, do the following actions:
- In the Used For list of check-boxes, select Portal Pane.
- Enter all other general information about the search view on the General tab.
For details, see Defining General Search View Information.
- Click the Results Display tab and do the following actions:
- Create the Object Link.
This is a necessary element for search views in portal panes in order for users to be able to access records displayed in the portal pane. For details, see Defining Object Links.
Do not confuse this with the Object Link type of portal pane content. - Design the other display columns for the results screen of the search view.
For details, see Creating Results Display Columns.
- Create the Object Link.
- Click Save to save the search view. This allows you to define qualifiers.
- Click the Filter Display tab and do the following actions:
- Create all desired section titles for the search view. The section titles appear when the user clicks Edit Filter in the Home page.
For details, see Creating Section Titles. - Create all desired invisible qualifiers with predefined qualifier values for the search view. Invisible qualifiers automatically filter the records that appear on the user's Home page in the portal pane.
For details, see Visible and Invisible Qualifiers. - Create all desired visible qualifiers for the search view. Visible qualifiers are available when the user clicks Edit Filter in the Portal Pane.
For details, see Visible and Invisible Qualifiers.
- Create all desired section titles for the search view. The section titles appear when the user clicks Edit Filter in the Home page.
- Click Save.
The search view that you have created for the current object definition is now available for use when creating portal panes. For more details, see Adding Search View Object Links.
Creating Custom Hover Popups
TeamConnect designers are able to create custom pop-up views for items on an object when hovered over. When creating these custom views, it is important to note that the hover is built entirely from the Results Display tab. Please see the walkthrough below for further detail.

To create a custom hover:
Note: Existing search views can be used for custom hovers.
- Click the Setup link in the upper-right corner of TeamConnect.
- From the Go to... drop-down list, select Object Definitions.
- Click the desired object for the custom hover. The custom hover can be applied to any system or custom object. Select the Search Views tab.
- Create a new Search View.
- From the General tab, ensure that none of the checkboxes under Used for: are selected. Enter in the desired name and unique key.
- Click the Results Display tab. Add the desired system or custom fields to be viewed by entering column name, selecting the appropriate item from the dropdown, and adjusting the order as desired. More details can be found on Search View Results Display. Further sorting details can be adjusted from the Sort by: dropdowns at the bottom of the screen.

- After saving, navigate to the Search Views page. Select the created view for the Use this search view for hover over display popups.

Specifying Search Views Used by Global Search
The Global Search feature in TeamConnect's user interface allows users to search for specific object types, All object types or across All Projects. Global Search searches all of the applicable fields for the user's search string, so you do not have to configure any search criteria for Global Search.
However, Global Search uses the Results Display configured for each object's search view.
When searching across All or All Projects, Global Search uses the search view specified in the following drop-down list on the object's Search Views tab to display its results: Use this search view's results display for search across objects
For system objects, the default global search view is Global Search Default. For custom objects, Global Search uses the search view with the lowest display order. If more than one search view shares the same sort order, Global Search uses the first search view in alphabetical order.
Global Search does not use the search view's Filter Display. Instead, it searches all of the objects' fields that are supported by Global Search. Memo text fields are also searched For full-text searching, see Full-Text Search Requirements.
To specify a search view for Global Search:
-
Open the appropriate object definition, and then click the Search Views tab. A list of all existing search views for the object appears.
- Select the desired search view from the Use this search view's results display for search across objects drop-down list.
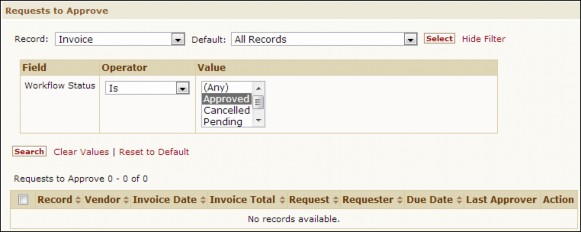
Creating Searches for Approvals, Requests, and Workflow Processes
You can use a search view that you have created to add a search filter to the following pages in TeamConnect:
- Requests to Approve of My Approvals
- Active Requests of My Requests
- Attention Required of My Workflow Processes
- In Progress of My Workflow Processes
When you select a search view for these pages, the fields under the Filter Display tab of the search view display as the fields you use to enter search criteria. The fields under the Results Display tab of the search view display as the columns in the table with the search results.
To create search views for Approvals, Requests, and Workflow Process Pages:
- Open the appropriate object definition.
- Click the Search Views tab.
A list of all existing search views for the object appears (see the Sample Search Views Tab Screen image). - Depending of the pages where you want to add the search view, select a search view from one of the following drop-down lists:
| Page in TeamConnect | Search Views Drop-Down List |
|---|---|
|
Use this search view for workflow approvals |
|
Use this search view for workflow processes |
Search View Requirements for Full-Text Searching
Full-text searching allow users to find records even if they lack the name or number of a record. For example, the name of a city might be mentioned in the notes of the record. To find the record, the user would search by the content of the corresponding field or use Global Search.
To find a document that has been uploaded to the Documents area, users can search for specific text strings, such as a person's name that is mentioned in the document.
To allow users to search the contents of the following areas of TeamConnect, you must add the corresponding search qualifiers to your search views:
- Notes system field in system object records
- Custom fields of type Memo Text
- Description system field in History records
- Content of text-based documents that are uploaded to TeamConnect, such as:
- Microsoft Word®, Excel®, PowerPoint®
- Novell/Corel WordPerfect®
- Adobe Acrobat® (PDF)
- ASCII text files
- HTML files
- Other file types supported for text queries by Oracle Text or SQL Server Full-Text. For a detailed list, see your database server documentation.
Note: Global Search does not support document searches. For more details, see Specifying Search Views Used by Global Search.
Full-Text Search Requirements
To provide content searching capability to users, the following requirements must be met:
- You must configure and enable Oracle Text (Oracle interMedia) or SQL Server Full-Text Search on your TeamConnect installation. This ordinarily happens by default during installation.
- You must add the corresponding fields in search views as qualifiers, as explained in Adding Document Content Searching to Search Views and Adding Field Content Searching to Search Views.
Adding Document Content Searching to Search Views
If you want to give users the ability to perform document content searching, you must provide a search view with this feature.
By default, a search view for the Document object definition, called Content Search, is provided with TeamConnect. However, you can also add the capability of searching by document content to your own custom search views, using the system field called Document Body as a search qualifier.
To add content search qualifiers to a document search view:
-
Open the Document object definition and click the Search Views tab.
- Do one of the following actions:
- To change an existing search view, click the name of the search view to open it.
- To create a search view, click new and do the following actions:
- Complete the General tab.
For details, see Defining General Search View Information. - On the Results Display tab, add at least one column to the results display.
This allows you to save the search view. For details, see Search View Results Display. - Click Save.
After the search view is saved, you can define search qualifiers.
- Click the Filter Display tab and create a search qualifier using the system field Document Body.
This field appears on the Filter tab or the search criteria section of the object's search screen so that users can enter the text content that they are seeking. For details, see Creating Search View Qualifiers. - If you are using Oracle as your database server and want the Score field to be displayed on the Results tab or the displayed records section of the object's search screen, click the Results Display tab and select the system field Document Body.
- Click Save.
The content search qualifier is now available in the search view.
Adding Field Content Searching to Search Views
To allow users to search according to the field contents, you can specify the following fields as search qualifiers on the Filter Display tab of a search view:
- Description field in history records
- Notes field in system records
- Custom fields of type Memo Text
Content search fields will be displayed in the search criteria section of the search screen so that users can type the text that they are seeking. A question mark (?) hyperlink displayed next to such fields allows users to select search operators.
You can also add the content search fields on the Results Display tab so that users can see the entire contents of the fields in the results. For details about field types and their storage sizes, see Field Types.
To add a search qualifier for record content searching:
-
Open the appropriate object definition and click the Search Views tab.
- Do one of the following actions:
- To change an existing search view, click its name to open it.
- To create a search view, click new and do the following actions:
- Complete the General tab.
- On the Results Display tab, add at least one column to the results display.
- Click Save.
Once you save the search view, you can define its search qualifiers.
- Click the Filter Display tab and create a search qualifier using the following:
- Notes system field in a system object
- Description system field in the History object
- Custom fields of the type Memo Text in a system or custom object
To verify that a custom field is a Memo Text field, locate it on the Custom Fields tab of the object definition and check its field type.
- (Optional) Click the Results Display tab and add the field that you selected as the search qualifier.
- Click Save.
The content search qualifier is now available in the search view.
Defining General Search View Information
General search view information includes the name of the search view, the object for which it is defined, and other general details. These settings are found on the General tab of search view screens and determine which search view for an object appears by default in various screens.
To define general search view information:
-
Open the appropriate object definition, and then click the Search Views tab.
- Select the appropriate search view, or click new to create a search view.
The General tab of the search view appears.
- Complete the fields in the General tab as described in the General Tab on Search View Screens table.
You cannot save the search view until you create a results display, unless Card or Calendar is selected in the Results Display Type drop-down list for a contact or appointment search view.
Once you specify the general information for the search view, you can create the results display. See Search View Results Display.
General Tab on Search View Screens
| Field | Description | |
|---|---|---|
|
Entity Name |
Automatically displays the name of the object for which this search view is defined. |
|
|
View Name |
Enter a descriptive name for the search view as you want it to appear in the left pane of the corresponding search screen (maximum 250 characters). Note: It is recommended not to create a name that includes special characters. For example: ?, \, /, |, :, <, >, *, %, %, #, &, (, ), {, }, [, , _, ". If the view is enabled for IMAP synchronization (IMAP Search), then special characters will be replaced by hyphens in the IMAP Client folder names. See Enabling IMAP Search for Custom Object Search Views. |
|
|
Unique Key |
Enter an alphanumeric combination to uniquely identify the search view. Search views within the same object definition cannot have the same unique key, but search views belonging to different object definitions can have the same key. The unique key must be 50 or fewer characters in length and cannot contain spaces, underscores, commas, punctuation marks, or any special characters. After you save the search view, the unique key appears as read-only text and you cannot change it. |
|
|
Results Display Type
|
(Contact and appointment search views only) Select the type of results display for the search screen. The results display type only affects the way the search results appear, not search criteria. Most search views display the search results in the form of a list (also known as a tabular display), with a Results tab or a displayed records section that contains the list of results and a Filter tab or search criteria section that contains the search criteria. Contact and appointment search views support the following additional display types:
The Appointment object, when invoked from the tab bar in the end user interface, will automatically determine which of its search views uses the Calendar results display type. It will open the Appointments page using that search view. You cannot design display columns for the Card or Calendar views. However, you can specify how many contact cards appear on a page of results as a system-wide setting. |
|
|
Used For |
Custom Search |
Select this to make the search view a template for a custom search. In a custom search, the user determines which fields (out of the fields available in the search view) are used as criteria. There are several special considerations for a custom search template - for details, see Custom Search Templates. |
|
Calendaring Application |
The use of calendaring applications is not currently supported in TeamConnect. |
|
|
Integration |
Select to make the search view visible in another application, such as Microsoft Outlook, allowing the user to select an individual record from the list of search results. |
|
|
Related Object |
Select to make the search view available for searching from within a related object record. In these situations, the object for which you are creating the search view is considered to be a related object. This option is available in search views for all objects except for Contact. If your Filter Display tab uses the search criterion Parent Project, you cannot use this Related Object feature in the same search view. Tip: Create a search view with only Related Object selected and set the search view to Auto Search. This allows users to quickly see records related to the record they are working with, as the search is performed when they first access the block or tab. |
|
|
Portal Pane |
Select to make the search view available to be included in portal panes within home pages. For details, see Creating Search Views for Home Pages. Card and Calendar results display types cannot be displayed in portal panes. Therefore, when one of these is selected as the Results Display Type in a contact or appointment search view, the Portal Pane option is removed from the General tab. |
|
|
Search Module |
(Account, Contact, Project, and User search views only) Select to make the search view available in the search module for the object. For more details, see About Search Views in Search Modules. Contact search views display two additional options when you select Search Module:
|
|
|
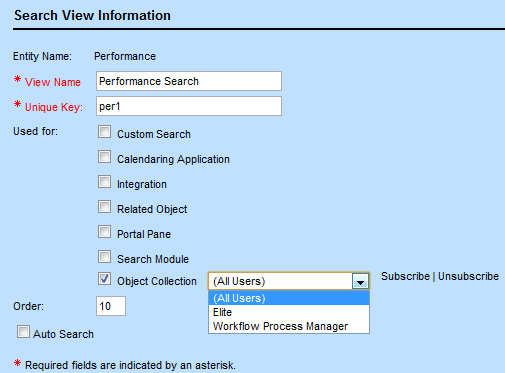
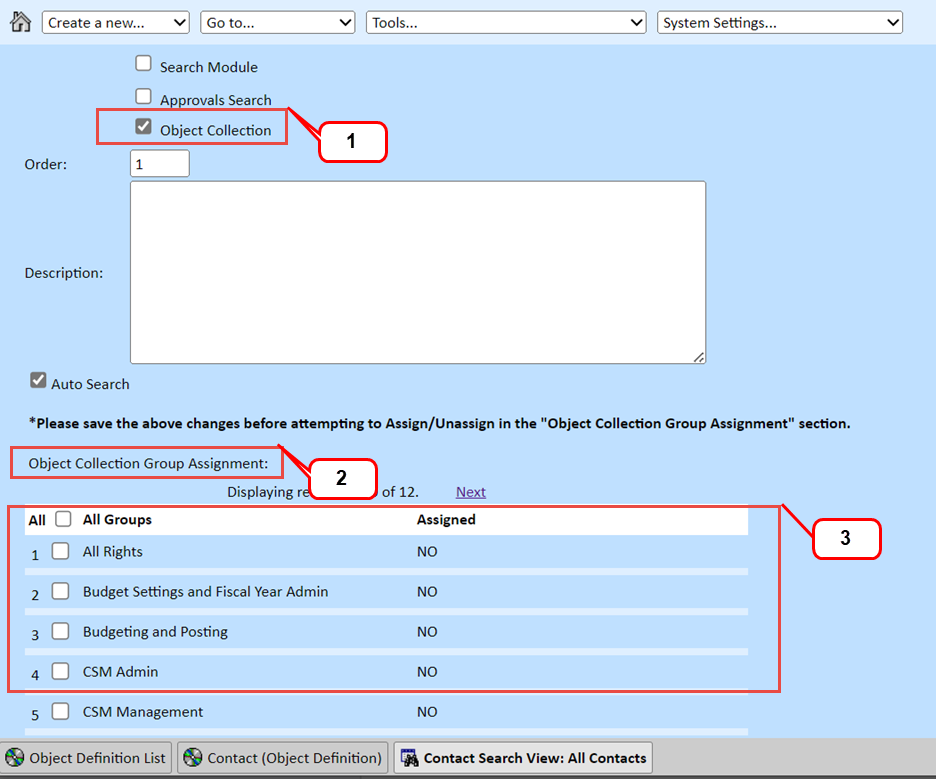
Object Collection |
Select to make the search view available as one of the Collection links in the left navigation pane of the application's user interface. When regular users are looking at collections of records, this search view will be one of the links available to them. Clicking on the link will launch this search view. Users do not ordinarily get access to a collection unless they manually subscribe to the collection. However, you can give users access to an object collection as explained in the process Subscribing and Unsubscribing for Collections. |
|
|
Order |
Type an integer to specify the display Order in which you want this search view to appear in the Current View drop-down list on the search screen, relative to other search views defined for the selected object. The search view with the lowest order is the first search view in the list, and appears when the user first opens the search screen. This is also the search view used by Global Searches for specific object records. If search views have the same display Order (for example, they are all set to 0), they are sorted alphabetically in the Current View drop-down list. |
|
|
Auto Search |
Select this check-box to automatically do a search and display search results based on predefined criteria on the Filter Display tab. For more details, see About Auto Search. |
|

Assigning and Unassigning for Collections
When a search view's Used for field value is Object Collection, you may subscribe users to that collection. As shown in the General Tab on Search View Screens image, when subscribing, you can choose to subscribe all users, or to subscribe users from a specific user group from a drop-down list.
Click the Assign link to apply your selection. You may also click the Unassign link to remove the selected groups from that collection's subscription.
You can select multiple groups at the same time in the drop-down list when you are subscribing or unsubscribing. Additionally, if you add new members to a group, they are automatically subscribed to all assigned search views.
When you select All Users and then click a link, you get a warning that subscribing or unsubscribing all users might take a long time. Click OK in the warning box to continue the subscription process.
New User Interface Block in TeamConnect Setup for Search Views
NOTE: This feature is available in TCE 7.1 and higher versions.
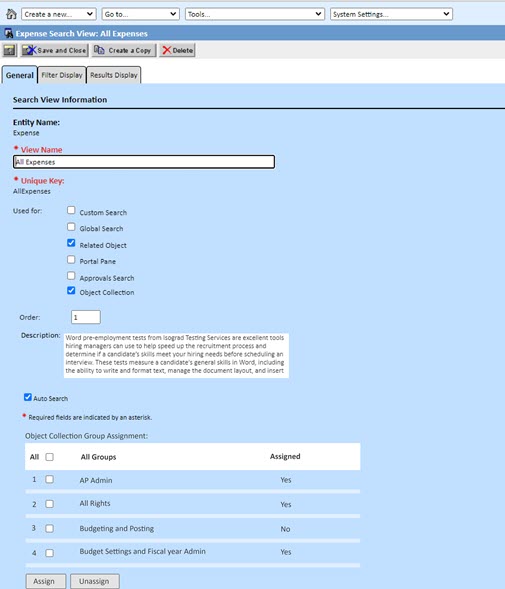
When a search view is designated for Object Collections, a user interface section named "Object Collections Group Assignment" becomes visible on the screen. This section includes a table listing all available user groups along with the status of their assignment to the search view.
The number of groups displayed per page in the table can be configured through the "Records per results page" settings under search results in Admin Settings.
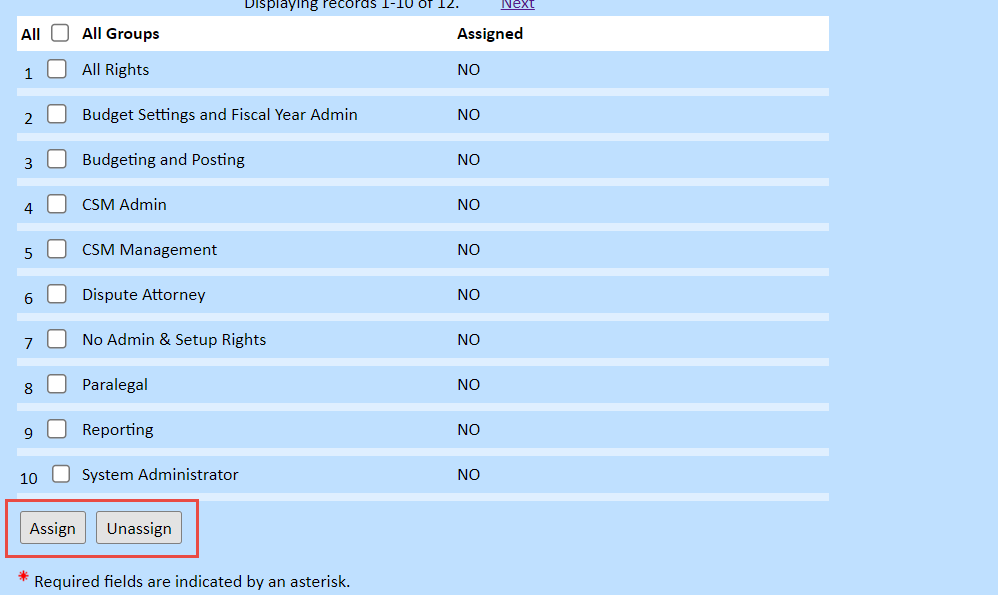
Administrators have the authority to assign and unassign search views to user-related groups. They can also verify the assignment status (Yes or No) of search views to user groups in the "Assigned" column within the tables.
Here are the steps to follow to assign or unassign search views for any user-related groups:
-
On the TeamConnect homepage, click the “Setup” icon at the top right side of the screen.
-
The TeamConnect Setup screen will open in a new window. From there, select "Object Definition." This will display a screen listing various objects.
-
Choose any object from the list (such as Contact, Project (Dispute/Matter/Any custom object), Invoices, Accounts, Appointments, Documents, Tasks, History, or Expense) and click on the search views tab.
- On the search views screen, a list of available search views will appear. Select the desired search view according to your preference.
-
Under the General tab of the search view Information screen, admins are required to select "Object Collection" in the "Used For" field.
-
A user interface block called "Object Collection Group Assignment" will appear, containing a list of all groups. At the bottom, the table features two buttons: "Assign" and "Unassign."
-
To assign or unassign groups to a search view, users can check the corresponding group's checkbox and then click the button.
Cascade Unsubscribe from Setup for Admins
NOTE: This feature is available in TCE 7.1 and higher versions.
Whenever users move or update the order of the group's assigned search views on the Contact's object, a new copy of those search views will be created in Manage Collections. If the user doesn’t have the required system rights they cannot unsubscribe from these copies.
In this scenario where the user does not have the required system rights to unsubscribe a search view, the administrator needs to unsubscribe the search view by selecting the user group. If an admin unassigns a group from the search view, the action will cascade to all users within that group at both the user entry and group entry levels.
Search View Order Propagation TeamConnect Setup to TC User Interface.
NOTE: This feature is available in TCE 7.1 and higher versions.
Admins can now manage order of search views on the UI through Setup. The order value provided by the admins on the Setup will be propagated back to Manage Collections. Order value will appear as per following scenarios:
-
Order value given by admin will be the default order for search view when it appears for the first time on Manage Collections block for users (for both group assigned and Manually subscribed search views)
-
For Group assigned search views, any change done by admin in order on setup will be reflected on the UI as well for users.
-
For Manually subscribed search view, changes done by admins in order on setup will not be reflected on the UI. Users will have to manually update the order on the Manage Collections block.
Creation of New User Copy on Updating Order & Moving group assigned Search Views inside folders.
NOTE: This feature is available in TCE 7.1 and higher versions.
A new user copy will be created in the database and it is Manually subscribed to the users, when they update order value (or) move a group assigned search views inside the folders. For these updated search views, the Allow Unsubscribe column on the Manage Collections table will be updated to Yes meaning Users can unsubscribe from these user copies and revert back to the group assigned entry.
For search views with updated order value:
If the user selects a new user copy and clicks on the Unsubscribe button, the search view will be unsubscribed and the group assigned copy of the search view will display in the Manage Collections table.
For search views moved inside folders:
If the user selects a new copy and clicks on the Unsubscribe button, the search view will be unsubscribed and the group assigned copy of the search view will appear in the Manage collections table on the root level.
About Auto Search
Auto Search automatically displays results when the user selects the search view. If the search view is the first in the Current View drop-down list (according to the display order of the object's search views), the search results appear as soon as the user accesses the search screen.
Note: Auto search has no effect on search views that have Used For values equal to Custom Search. Such search views will always pause for user edits and wait for the user to click the Search button. An end user, when saving a custom search, can choose whether or not to automatically execute the saved search when it is retrieved.
Auto search is useful for creating search views that always use the same qualifiers. For example, when a user is working with a project record and wants to see all related expense records, it is helpful to provide a search view that automatically displays the Expense records.
Tip: Using auto search is not recommended if there is typically a large number of results for the type of search, because the user cannot take any further action until the search is complete.
Auto search can be useful in the following areas:
- For the default search view of an embedded object.
- For the default search view of a child object.
- For a search view that appears in a portal pane on a home page.
- For a search view that appears in a search module window.
About Search Views in Search Modules
You can set a search view for Contact, Account, User, or any Custom Object (except for embedded Custom Objects) to be available in search module. These are the only objects whose records can be selected in search module fields. Making the appropriate search views available in a search module provides the user with the most helpful options for finding the necessary record.
To make a search view available to the user in search module fields, select the Search Module check-box on the General tab of the search view.
The following are important points about search views in search modules:
- Search views that you use in search modules should be designed with the needs of the user in mind when he or she is selecting a record in those particular fields. For example, in custom fields of type Involved (which display Contact search views), it may be very important that the user is able to search by contact categories.
- Certain fields must be added as search qualifiers on the Filter Display tab when a search view is made available in the search module. This is because these fields are used when a user performs a quick search directly from the search module field.
The following text strings are the search qualifiers required for search views in each type of search module: - Contact Person and Company Search: First Name Upper, Last/Company Name Upper
- Contact Person Only Search: First Name Upper, Last/Company Name Upper
- Contact Company Only Search: Last/Company Name (or) Last/Company Name Upper
- Project: Name Upper, Number
- Account: Name
- User: First Name Upper, Last Name (of contact)
In addition to the existing Person and Company Search and Company Only Search behaviors, Contact search modules also support a Person Only Search behavior.
It is configured on the General tab of the Contact search view (Search Module options) and refined through qualifiers on the Filter Display tab.
When a Contact search view is configured for Person Only Search:
- Search results contain only Person contacts (no Company contacts).
- The search view uses the same quick-search qualifiers as Person and Company search:
- First Name Upper
- Last/Company Name Upper
- Additional visible or invisible qualifiers on the Filter Display tab can further limit which Person contacts appear (for example, by Category).
The Person Only Search behavior is often used when users must select only Person contacts from fields that use Contact search modules, such as custom fields of type Involved.
Example: Restricting an Involved custom field to Person contacts
You can use a Person-only Contact search view to restrict an Involved custom field so that users can select only Person contacts that meet specific criteria (for example, Internal > Attorney).
| Steps to Follow | Screenshot for Reference |
|---|---|
| 1. In Setup or TeamConnect Designer, go to Object Definitions → Contact → Search Views. | 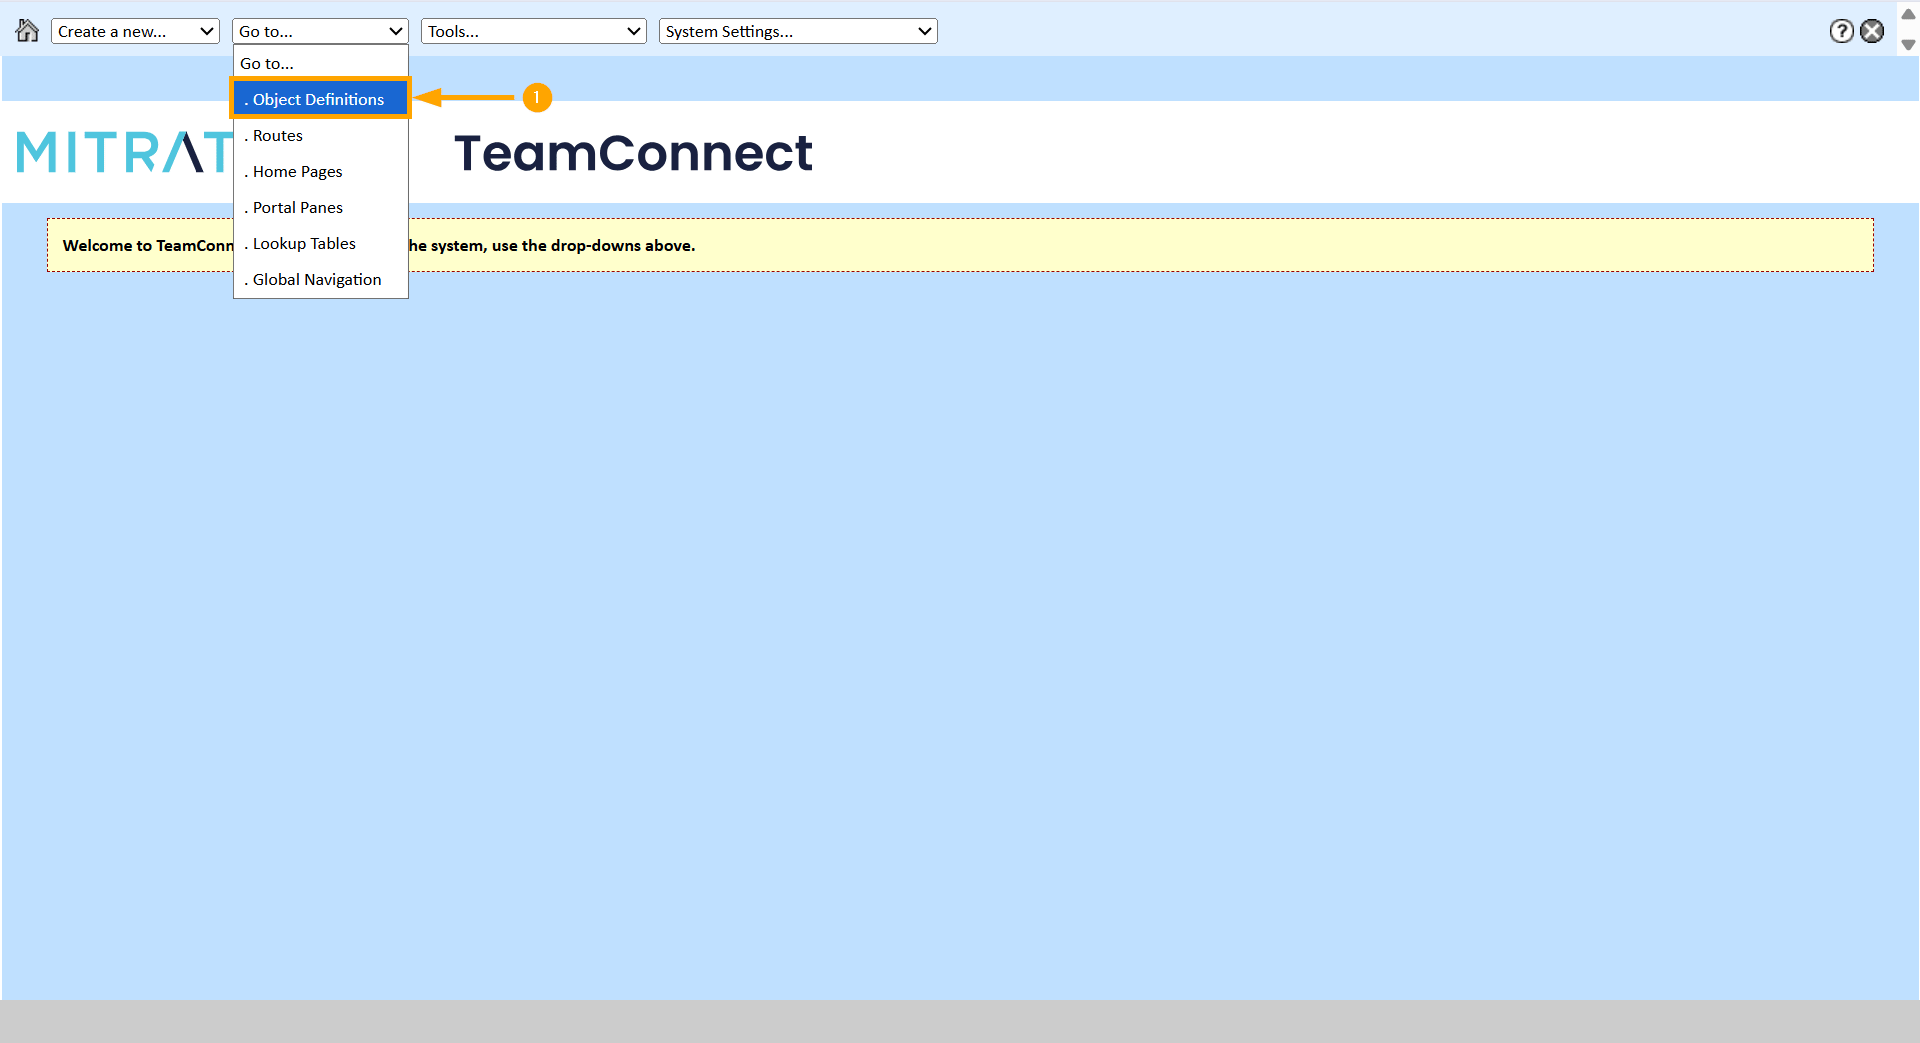 |
2. Create a new Contact search view or open an existing one, and on the General tab:
|
 |
3. On the Results Display tab:
|
 |
4. On the Filter Display tab:
|
 |
| 5. Save the search view. | |
After you create the Person-only search view, you can associate it with an Involved custom field in the Custom Fields configuration. When that Involved field is used in the TeamConnect UI:
- Type-ahead search returns only Person contacts.
- If you configured a category qualifier, results are further filtered to the allowed category values (for example, Internal > Attorney).
- You cannot nest search modules within search modules. Search views in search modules must not have qualifiers which appear as search module fields, because TeamConnect does not display a search module from within another search module.
For example, you cannot add the Vendor field to the Filter tab or search criteria section of an account search view in a search module, because it is a contact search module field.
Tip: To verify that your search view is not displaying any search module fields, open the search module and select your search view, and look for any fields with the magnifying glass and folder icons next to them. These are search module fields.
- In search views for Contact that are available in the search module, you can display the add person and add company buttons, which allow the user to add contacts directly through the search module. For details, see Search Module Actions in Contact Filter Display.
- The user search module displays search views that you define for the User system object, not the Contact object.
- System fields that appear as search module fields, such as the Contact field in an Involved record, display available search views to the user in the following manner:
- If you make multiple search views available for use in the search module for an object, they become available in the Current View drop-down list of the search module for the user. The search views are sorted according to their Order. The first search view in the list appears in the search module by default.
- If you only make one search view for an object available in the search module, then it appears automatically in the search module window where users access it through system fields.
- You cannot specify a particular search view to be displayed for each individual system field.
- In custom fields that appear as search module fields, you have the following options:
- You can specify that only one specific search view appears.
- You can allow the user to select from all available search views in the Current View drop- down list, if desired.
For details about using search views in custom fields, see: - Search Views for Involved Custom Fields
- Search Views for Custom Object Fields
Enabling IMAP Search for Custom Object Search Views
Email messages can be shared between IMAP clients and TeamConnect Documents folders for custom object records (such as Dispute attachment folders in the Documents area). You must enable an IMAP Search option for a custom object definition's search views before corresponding TeamConnect-IMAP Mail folders for that search view's results become available in the IMAP client.
Tips: Keep the following tips in mind when enabling IMAP search for custom object search views:
- Only custom object search views may be configured to display IMAP folders.
- If a custom object has no search views with IMAP Search enabled, the corresponding custom records will not display as TeamConnect-IMAP Email folders from the IMAP client or TeamConnect views.
- If a custom object search view with IMAP enabled returns no record results, the record's TeamConnect-IMAP Email folder still displays.
- The current user only sees results from a custom object search view corresponding to records that the user has rights to see.
- Special characters (?, \, /, |, :, <, >, *, %, #, &, (, ), {, }, [, ], _, ") in custom object search view names or Record Number fields are replaced with hyphens (-) in the IMAP client view when IMAP Search is enabled.
- When using Lotus Notes as an IMAP client, do not to use underscores (_) in search view names, project numbers, or IMAP subfolders because Lotus Notes removes the first underscore from the folder names.
To enable IMAP Search for Custom Object search views:
- From the Go to drop-down list, select Object Definitions.
- Click the custom object (for example, Dispute).
- Select the Search Views tab.
- Click the Search View for which to create an IMAP folder.
- From the General tab, under Used for, check IMAP Search.
- Click Save.
The result from the IMAP client view is that users who have rights to view records for that custom object are able to view IMAP folders for the record's search views in the following format:
\AccountName
|----\ObjectType
|----\ViewName
|----\RecordNumber:PrimaryKey
Where:
- AccountName is the TeamConnect IMAP account name.
- ObjectType is a custom object type, for example Disputes.
- ViewName is the name of a Search View, for example MyDisputes.
- RecordNumber:PrimaryKey is the format of the record ID, for example DISP_0007:57 or DISP_0010:58.
Projects and Third-party Calendars
Information about appointments and projects can be shared between TeamConnect and third-party calendaring applications, for example, Microsoft Outlook. When a user creates a TeamConnect appointment from a third-party calendaring application, the appointment first needs to be associated with a TeamConnect project.
From the TeamConnect project object definition, you must enable a search view type, Calendaring Application. Afterward, the project becomes available for selection from the third-party calendaring custom form for TeamConnect appointments.
To publish TeamConnect projects to Third-party Calendaring Applications:
- From the Go to drop-down list, select Object Definitions.
- Click the custom object (for example, Dispute).
- Select the Search Views tab.
- Click the Search View to use to filter available projects for association with appointments created in 3rd party calendaring applications.
- From the General tab, under Used for, check Calendaring Application.
- Click Save.
- The result from Microsoft Outlook is when users create appointments using the custom TeamConnect form, they are able to select TeamConnect projects to associate with the appointments.
Custom Search Templates
Any search view can be designated as a custom search template by setting its Used For value to Custom Search. This allows an end user to retrieve the template's information and use it to design an individualized search at runtime.
TeamConnect automatically creates a custom search template at the moment that a newly created object definition is saved. This default template contains most system fields, plus most of the custom fields that belong to the object definition's default category. If you change an object definition later to include more custom fields, you should revise the custom search template to contain the new fields that you want to allow to be searched.
It is strongly recommended that there be only one custom search template in existence at one time for a given object definition. When more than one template exists, and a user requests a custom search, the template that was created earliest will be chosen. If you wish to designate a search view as a template, and there is already an existing template, it is recommended that you first edit the search view that corresponds to the existing template, and uncheck every option in the "Used for" field of the General tab. That search view then will not be visible to custom search or any other operations. Then you may designate the new search view as a custom search template.
When a search view is used as a template, it is required that all of the "Used for" options, except Custom Search, be unchecked.
Columns that are defined in the Filter tab have an extra option, the Include by Default check-box. If checked, this means the column will appear as one of the choices that may be used as a criterion in a custom search. The end user may override this setting at runtime.
Columns that are defined in the Results Display tab have an extra option, the Include by Default check-box. If checked, this means the column will appear in the results of a custom search. The end user may override this setting at runtime.
A search view used as a template does not need, and will not use, Section Title information that is entered in the Filter tab of the search view definition.
Note: For Custom Search templates, it is important that each column in the Filter tab, and each column in the Results Display tab, has a unique value in its "order" attribute. For example, if you give two Filter columns the same value in "order", only one of those columns will appear at runtime to the end user.
Search View Results Display
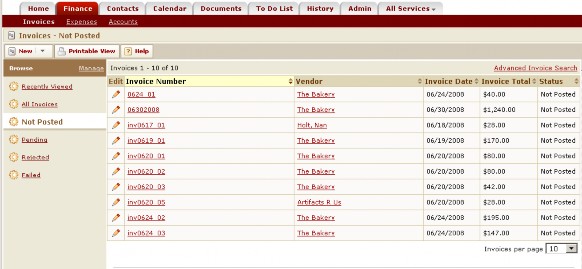
The Results Display tab of the Search View screen allows you to specify how an object's search results appear to users. The displayed records section or Results tab can display the content of fields from each record that meets the search criteria. For example, search results could display each record's name, number, and the main assignee, as shown in the Displayed Records Example image.
You can set search results to display as vertical columns or as horizontal columns that span the width of the results display. You cannot set all columns to span - at least one column must remain vertical.
Note: The Results Display tab is not visible for search views whose Used For selections (in the Filter Display tab) are limited only to "Filter".
Search results provide links to the listed records. The link that users click to open each record is called the object link. One record is listed on each line of results.
The object link always appears automatically in the search results. On the Results Display tab of the search view, you specify the layout of the other columns (not rows) that display the information for each record, as shown in the following image.

Note: If the search view is for the Contact or Appointment object and you have selected Card or Calendar in the Results Display Type drop-down list on the General tab, you cannot modify the way results appear.
The appearance of search results is also affected by system-wide settings and each individual user's Preferences settings.
The following table describes the items on the Results Display tab.
Results Display Tab
| Field or Column | Description |
|---|---|
|
Column Header |
Type a label (maximum 250 characters) that describes to the user the record information that appears. This label appears at the top of the column in the displayed records section or the Results tab of the object's search screen. |
|
Column Width (%) |
Enter the percentage for this column out of the total width of the results display. If the total of all column widths of the defined results display columns does not equal 100 percent, then you no longer have control over the column widths. They are resized automatically based on their contents, browser behavior, and other factors. To allow the columns to be sized automatically according to the contents, leave this field blank when defining all columns in the results display. |
|
Display Columns List |
Displays a list of all columns that have been defined for the search view results. To edit or delete display column definitions, select the check-boxes next to the display column definitions and click edit or delete. Items in the Display Key column cannot be edited. If the qualifier was selected with Object Navigator, the first 90 characters of the Object Navigator path appear in the Attribute column. For details on paths, see Using Object Navigator. |
|
Display Key |
Select system or custom fields as display keys for the results of the search screen. Display keys help users identify records returned by the search. The values in these fields are pulled from the database and appear in the search results on the object's search screen, giving users a summary or "preview" of each record. To specify a display key, select one of the following elements:
When you select a custom field of type Custom Object or Involved, an Object Navigator field appears. You can use it to add custom fields from other custom objects or Involved records as display keys. For example, if Claim is a child of Policy, you can use Policy custom fields from any category as display keys in a Claim search view.
After you select an object, click the Object Navigator If you want users to access records directly from the search results, one of the display keys must be defined as an object link. See Defining Object Links. |
|
Format |
Specify a format for number, category, or date fields that appear in the search results. When selecting a date field, you can select Date and time or Date only. If you do not select a date format, the date appears in date only format. When selecting the Default Category, Categories, Default Role, or Roles field, Category Description is the default format, which means the category or role name appears in the search results (for example, L110). If you specify Category Full Hierarchy, the full hierarchy of the category or role appears in the search results (for example, Outside Counsel Fees > Litigation Code Set > L100 > L110). When selecting a field that displays a number, you can specify Currency, Decimal, or Percent. If you select None or make no selection, the number appears without any formatting. Important: The Currency format uses the symbol for the system default currency to display the number values in the search results, even if a particular numeric value is actually in a different currency. |
|
Order |
Type an integer for the order in which this column is to be displayed, lowest to highest being displayed from left to right, in the search results. Warning: If multiple columns have the same display order value, only one will appear at runtime. Be sure to use unique values for Order. Tip: If you set the display Order for your columns in increments of 5, you can then easily make slight modifications to the order when necessary without having to recreate the order structure. |
|
Span? |
If checked, the selected column is displayed as a horizontal field that spans the width of the results display. The appearance of spanned columns depends on the information in the column. The span feature applies to the search result pages for the following:
Note: You cannot set all columns to span—at least one column must remain vertical. Additionally, if you need to sort information in a results display, spanned columns are not included in the sort. |

Displayed Records Section Examples
Object Search Screen
The display column definitions shown in the Results Display Tab with a Display Column List under Display Key image produce the displayed records section of the object's search screen, as shown in the following image. The Results Display tab also contributes to the following parts of the image:
- The column headers and display order of the columns.
- The object links that allow the user to link directly to each record that matches the search criteria.
- Display keys that translate into specific information about each record that helps the user to identify it.
Results Display with Spanned Columns
Defining Object Links
The object link is an essential component of search views that is designed to provide users access to records. It provides a hyperlink on the displayed records section that allows users to link directly to records that are retrieved by the search. Without an object link, records appear on the displayed records section of the object's search screen, but users cannot access them.
However, object links are not necessary in search views that are designed for the purpose of creating reports. For example, you might want to use a search view for creating a list of all currently open Matter records, and you do not need a link to records in the resulting list.
Object links appear as the name, description, or number for the record, depending on the object. See the following table for a complete list of which field appears as the object link for each object.
Object Links in Search Views
| Object | field displayed as object link | |
|---|---|---|
|
Account |
Name |
|
|
Appointment |
Subject and Location |
|
|
Contact |
Person |
Last name, First name |
|
Company |
Company Name |
|
|
Contact Group (Address Book) |
Group name |
|
|
Document |
Name |
|
|
Expense |
Description |
|
|
Group |
Group Account |
|
|
History |
Description |
|
|
Invoice |
Invoice number |
|
|
Project (custom object) |
Name, Number, or both, depending on the setting of the Auto Numbering Pattern on the Unique ID tab of the object definition. |
|
|
Task |
Subject |
|
|
User |
Last name, First name [of contact record] |
|
Creating Object Links
To create an object link for a search view
- Open the appropriate object definition, and then click the Search Views tab.
- Select the appropriate search view.
- Open the Results Display tab.
- Select System.
- In the drop-down list, select Object Link.
- Complete the rest of the fields as indicated in the Results Display Tab table.
- Click add more.
The object link is added to the Display Columns List. - Click Save to save the object link for the search view.
The next time a user opens the search view in a search screen, this object link appears on the displayed records section or the Results tab of the object's search screen.
Creating Results Display Columns
To create display columns for a search view
- Open the appropriate object definition, and then click the Search Views tab.
- Select the appropriate search view.
- Open the Results Display tab.
- Select the Number of entries you would like to add from the drop-down list.
- For each data entry row, complete all appropriate fields as described in the Results Display table.
- Click add more to add the columns to the list and continue adding more display columns. Otherwise, click Save.
The next time a user opens this search view, the display columns appear on the displayed records section or the Results tab of the search screen.
Behavior of saved custom searches when results display columns are deleted
When you run a saved custom search that uses a results display column that has been deleted from the search view, TeamConnect now checks for another column that uses the same underlying field. If a matching column exists, TeamConnect automatically uses that column in the saved search and does not show a warning. A warning appears only when all columns that use that field have been removed from the search view.
Search View Filter Display
Search qualifiers appear as criteria on the Custom Search page to allow the user to enter search criteria when conducting a search. You need to create a qualifier for each field you want to include in the search view's search criteria. The more qualifiers you add when creating a search view, the more types of information users are able to search by to find the records they need.
You can define search qualifiers and the appearance of the Custom Search page on the Filter Display tab of the search view.
You can add the following items to the search view on the Filter Display tab:
- Visible qualifiers (see Visible and Invisible Qualifiers)
- Invisible qualifiers (see Visible and Invisible Qualifiers)
- Section Titles (see Creating Section Titles)
Note: If no qualifiers are specified in the search view, then no records are filtered out of the search results. Instead, all records for the object are listed.
Visible and Invisible Qualifiers
Search qualifiers are usually displayed as search criteria fields on the Filter Display tab of the search view. These qualifiers are called visible qualifiers, and are available to the user. For example, in a search view for Invoice records, a user could search by Invoice Date, Posting Status, Invoice Number, and the Service Date of a line item. To make a qualifier visible, select the Visible check- box when defining the qualifier on the Filter Display tab of the search view.
However, in certain search screens, you might want to limit the scope of the user's search results using qualifiers that are not available on the Custom Search page. This is done by creating invisible qualifiers. Invisible qualifiers cannot be accessed by the user, because they are not displayed in the search criteria. An invisible qualifier is applied to all searches performed with this search view.
For example, you might want users who search for Matter records to see only records they are assigned to in the search results. This would require creating an invisible qualifier that has the field name assigneeList_User and the condition value Current User (see the search qualifier listed in the Filter Display Tab on Search View Screens image). Only records that are assigned to the user who is currently performing the search appear in the search results.
The qualifier with the label Created this month in the Filter Display Tab on Search View Screens image is another example of an invisible qualifier. This qualifier automatically limits the search results so that only records that have been created during the last 30 days appear on the Results page of the user's search.
To make a qualifier invisible, clear the Visible check-box when defining the qualifier on the Filter Display tab of the search view.
Important: If no condition value is entered, an invisible qualifier has no effect.
Qualifier Conditions
Qualifier conditions are composed of two parts: an operator and a value.
- The operator lets the user specify what kind of limit to use when searching. For example, operators for a date field include More Than X Days Ago and Between Dates.
- The value is used with the operator. For example, you can enter 5 for the number of days in a date field search.
When creating a search view, the Condition fields on the Filter Display tab give you the ability to select which operator should appear by default when the user accesses the search criteria of the object's search screen. You might use this function, for example, when you want the Contains operator to be displayed by default for a Text custom field.
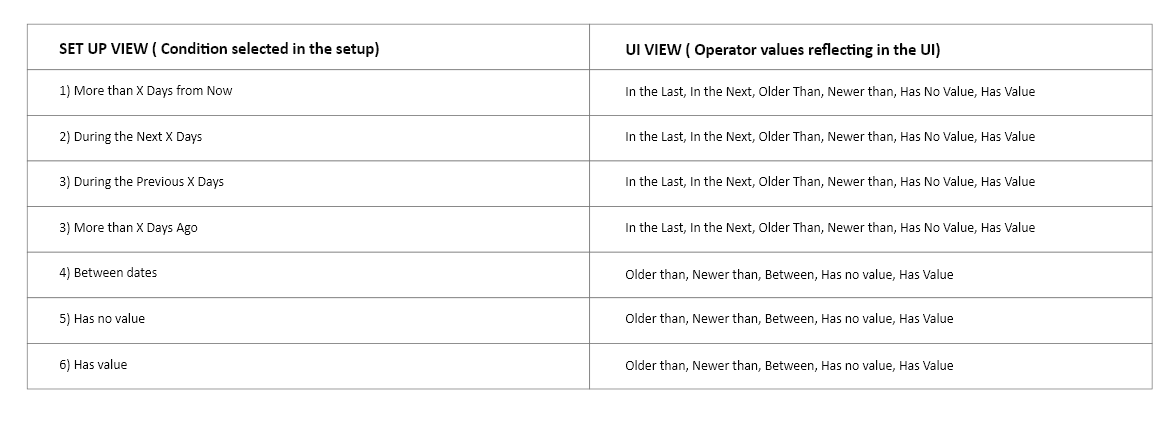
Note: Based on the condition selected (for Date custom field) in Setup menu, the dropdown options for the user to filter the search results are displayed in User Interface as below.
If needed, you can also select a default value for the operator, such as the name of a user, a number of days, or a dollar amount. Typically, you need to select a condition value only when creating an invisible qualifier. However, you can provide default selections in a visible qualifier as well. If you select a default operator or value for a visible qualifier, then the user is able to make different selections if desired. The following image shows examples of conditions.
Filter Display Tab on Search View Screens
| Field or column | Description |
|---|---|
|
Label |
Type a name (maximum 250 characters). This name appears as a label for the field on the Filter tab or search criteria section of the search screen. It indicates to the user what information to enter in the field for the search criteria. Note: A colon (:) is automatically placed after the label text in the search view. |
|
Field |
Do one of the following to select a field that will appear on the Filter tab or search criteria section of the search screen as a search qualifier:
Related Object—Allows you to select a related, child, embedded, or sub-object from the drop-down list. Then, use Object Navigator to select a field from that object as a qualifier. Caution: If the search view is set to be available in the search module, do NOT add search qualifiers that also use the search module, such as certain custom fields of type Custom Object or Involved. These fields will not be displayed properly in the search module window. For more details, see About Search Views in Search Modules. |
|
Condition |
If desired, create a default condition for the qualifier. For most fields, you can select an operator only, or an operator with a value. If you do not specify an operator or value in the condition, and the Visible check-box is selected for the qualifier, then the default operator appears in the search criteria of the object's search screen. The user is able to set the operator and value as desired. |
|
Row Order |
Type an integer for the Row Order in which the qualifiers appear. Qualifiers are listed vertically in the search criteria of the object's search screen, using the order you specify. The display order should be useful for users when they are entering search criteria. Warning: If multiple qualifiers have the same row order, only one will appear at runtime. Be sure to use unique values for Row Order. |
|
Column |
Select the column in which the search qualifier will be listed in the search criteria of the object's search screen. Choose Column 1 to display the qualifier in the left column of the screen; choose Column 2 to display the qualifier in the right column of the screen. The ability to choose which column the search qualifier filter will reside in gives you greater control of the screen elements and offers the ability to manipulate the layout of the object's search screen. |
|
Visible |
Select whether the qualifier for the search view is visible. If the qualifier is not visible, users do not see the field and are unable to enter criteria in this field on the Filter tab or the search criteria section of the object's search screen. Important: Invisible qualifiers must have a condition value. For details, see Visible and Invisible Qualifiers. |
|
Search Qualifiers List |
Displays a list of existing qualifiers for the search view. Select the check-box next to a search qualifier and click edit or delete to modify any of its items—except for the Field column, which cannot be edited. If the qualifier was selected with Object Navigator, the first 90 characters of the Object Navigator path appear in the Attribute column. For more details on paths, see Using Object Navigator. |
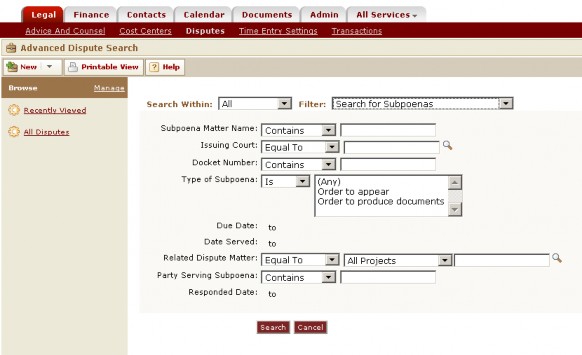
Filter Tab Example
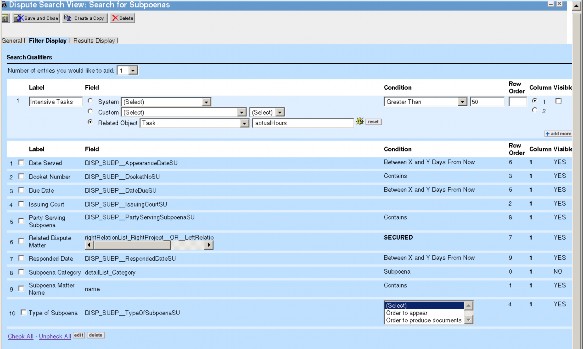
The search qualifiers shown in the Filter Display Tab on Search View Screens produce the Filter tab or the search criteria section of the object's search screen, as shown in the following image. Notice the section titles and the vertical display order of the search qualifiers. Also notice that the invisible qualifiers are not displayed.
When list fields that are associated with a lookup table are added as search qualifiers, the fields appear as combo list boxes to allow for multiple selections.
Search Module Actions in Contact Filter Display
The contact search module provides users the ability to add a new contact directly through the search module window. If you want users to create contacts this way, you can indicate this by using the settings in the Search Module Actions section on the Filter Display tab of the contact search view, as shown in the following image.
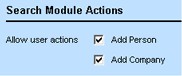
The Actions section is only displayed if you have indicated on the General tab that the search view should be available in the search module. It appears below the Search Qualifiers section (as shown in the Filter Display Tab on Search View Screens image) and provides the options for displaying the add person and the add company buttons.
If Company Search Only is selected on the General tab of the search view, then you do not have the option of displaying the add person button to the user. The search view is available to users only through the Company field of a contact record, which is intended for finding and selecting only company contacts.
If you provide the capability to add a contact through the search view in the search module, consider the following information:
- The add person and add company buttons appear for the user only when the search view appears in the search module. If the search view is set to be available in other areas, such as search modules or portal panes, the buttons do not appear when the search view appears in those areas.
- When a user adds a contact through the search module, only certain values that the user can provide on the Filter tab or the search criteria section of the object's search screen are saved in the new contact record, even if additional fields are available on the Filter tab or search criteria section. For details on adding contacts from search modules, see the User Guide.
- If there are any required custom fields for contacts, users will not be able to add contacts through the search module when the category for those custom fields is indicated as the default category of the contact they want to add.
- Any rules that are triggered on the creation of a contact record will also be triggered when the user clicks add person or add company.
The following table describes the items in the Search Module Actions section on the Filter Display tab of the contact search view.
Search Module Actions Section of Contact Search View
| Field | Description | |
|---|---|---|
|
Allow user actions |
Add Person |
Select to add the Add Person button to the Contact search screen. This button allows users to add a person's contact record using the values entered on the Filter tab or the search criteria section of the search screen. If Company Search Only is selected on the General tab of the search view, then this option is not available on the Filter tab or the search criteria section of the search module. |
|
Add Company |
Select to add the New Company button to the Contact search screen. This button allows users to add a Company contact record using the values entered on the Filter tab or search criteria section of the search module. |
|
Creating Search View Qualifiers
Before creating search view qualifiers for your search screen, make sure to plan which qualifiers you want to include in the search view, including visible qualifiers, invisible qualifiers, and section titles. This helps you set the correct display order for each qualifier.
Search views return all subcategories in the hierarchy of a category search. Because child categories contain their parent's category, a search that returns a parent category shows all of its child items as well.
To create search view qualifiers:
- Open the appropriate object definition, and then click the Search Views tab.
- Do one of the following actions:
- To change an existing search view, click the name of the search view to open it.
- To create a search view, click new and do the following actions:
- Complete the General tab. For details, see Defining General Search View Information.
- On the Results Display tab, add at least one column to the results display. This allows you to save the search view. For details, see Search View Results Display.
- Click Save to save the search view.
After the search view is saved, you can define search qualifiers.
- Click the Filter Display tab.
- In the data entry rows, enter the appropriate information as described in the Filter Display Tab on Search Views Screens table.
- Click add more to continue adding qualifiers. Otherwise, click Save to save the qualifier as part of the search view.
You have added search qualifiers to the filter display of the search view. The next time a user opens the search view in a search screen, these search qualifiers appear on the Filter tab and/or the search criteria section of the object's search screen.
Creating Section Titles
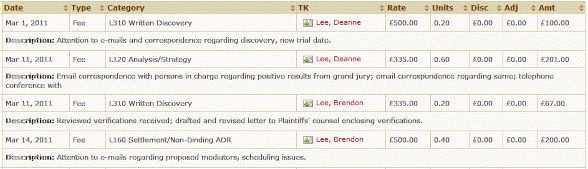
You can use section titles to label groups of the search qualifiers in your search views. For example, if you have a lot of qualifiers for date fields in the search view, you can organize your qualifiers into two sections entitled "General Record Information" and "Matter Record Dates," as shown in the following image.

Note: Section titles are ignored for search views that are used as custom search templates.
By default, section titles appear in size 10 black font, but users can set their formatting preferences in their Appearance settings.
To create a section title in the filter display
- Open the appropriate object definition, and then click the Search Views tab.
- Do one of the following actions:
- To change an existing search view, click its hyperlink to open it.
- To create a search view, click new and do the following actions:
- Complete the General tab. For details, see Defining General Search View Information.
- On the Results Display tab, add at least one column to the results display. This allows you to save the search view. For details, see Search View Results Display.
- Click Save to save the search view.
After the search view is saved, you can create a section title
- Click the Filter Display tab.
- In the data entry row, in the Label field, enter the text of the section title.
- From the System drop-down list, select (Section Title).
- In the Row Order field, enter the display order of the section title.
Tip: Place the section title in the correct order in relation to the fields for which it is a heading. For example, if the Row Order is set to 5, then the qualifiers you want displayed below it must have display orders 6, 7, 8, and so on. For an example, see the Filter Display Tab on Search View Screens tab image.
- Under Column, check the column (or screen location) where the search qualifier will reside in the Filter tab or the search criteria section of the object's search screen:
- Choose Column 1 to display the qualifier in the left column of the screen.
- Choose Column 2 to display the qualifier in the right column of the screen.
- Check the Visible check-box so that the section title appears in the search screen.
- Click add more to continue adding search qualifiers or click Save to save the section title as part of the search view.
The next time a user opens the search view in a search screen, this section title appears on the Filter tab or the search criteria section.
Tips for Working with Qualifiers
This section provides more information about how selected search view qualifiers behave in TeamConnect.
Parent Project
When working on a search view for a child object, the qualifier Parent Project is available, except when the Used for general option in the search view includes the Related Object choice.
Assigned On, Unassigned On, and Main Assignee Assigned On
These three qualifiers appear in the System drop-down list in the Filter Display tab of a search view definition. You can use these qualifiers when building search views against objects that have lists of assignees.
These qualifiers accept values that are date ranges. The behavior of date ranges for Assigned On and Unassigned On varies, depending on whether the search request also specifies an assignee user ID:
- If you select a specific assignee, then the date ranges will only look at assigned and unassigned dates for that specific assignee.
- If you do not select a specific assignee, then any assignee whose assigned and/or unassigned dates match your date ranges will cause the record to qualify the search results. (If nine out of ten assignees do not qualify based on the date ranges, but the tenth one does qualify, the record will qualify for the search results.)
- If a single assignee appears twice in a record's assignee list, in two different roles, both roles' dates will be examined to see whether either of them qualify to be included in the search results.
The behavior of the date range for Main Assignee Assigned On varies, depending on whether the search request also specifies a main assignee user ID:
- If you select a specific main assignee, only records matching that main assignee will be considered, and the date range will only look at assigned dates for those records.
- If you do not select a specific main assignee, then any main assignee whose assigned date matches your date range will cause the record to qualify for the search results.
It is important to remember that TeamConnect only checks dates for the current main assignee. If there was a different main assignee in the past, that information is not known to the search filter. Also, the assignment date for the main assignee is the date that the person was first added to a record. If you added someone as a regular assignee at first, then promoted them to main assignee one month later, the Main Assignee Assigned On Date will be considered the earlier date, not the one a month later.
As an example, if you specify a main assignee of "Margaret Thatcher", then use an Assigned On date range of August 1st through August 31st, and leave the regular assignee drop-down list set to ANY, you will get all records for which Margaret Thatcher is the main assignee, and for which anyone was assigned during August. This does not necessarily mean that Margaret Thatcher was assigned during August-she could be assigned to a record in June and, if someone else was assigned during August, the record would qualify for inclusion. If you want to make your filter more specific, and find records where Margaret Thatcher is main assignee and she was assigned in August, you must use the Main Assignee Assigned On date range, not the Assigned On date range.
Searching the Documents of an Individual Project (Custom Object) Record
When using the Search button from within a specific record's Document screen, the qualifier Search in Folder presents several choices in a drop-down list. The only choice that is valid for a search inside a specific record is Current Folder.
If you are already within a subfolder of a record's documents when you launch such a search, the search results will be limited to that subfolder.
Searching History Records of a Specific Project or a Specific Custom Object Type
Qualifier Parent Project, a choice in the System drop-down list in the Filter Display tab, can restrict history searches to a specific custom object type and/or a specific project name or number.
- When you add the Parent Project qualifier to a new or existing search view, the Condition drop-down list will show a list of all custom object definitions to which you have "read" authority.
- If you want to restrict this history search to a specific custom object type, choose that type from the drop-down list. Otherwise, choose ANY.
When end users choose a search view that contains this qualifier, the field Parent Project accepts the number or name of the desired project, and:
- Search results will be filtered to include only projects that match the name or number that the end user enters in that field.
- If the user leaves the field empty, search results will not be filtered by project name or number.
- If you, the developer, chose a specific custom object type when you specified the Parent Project qualifier in the search view, search results will be filtered to include only that custom object type, no matter what value the end user puts in Parent Project.
Search results will only show records to which the user has at least "read" authority.
For example, assume that you create a search view that includes the Parent Project qualifier, and you specify custom object type Matter while defining that qualifier. When an end user runs that search view and enters "Turnstone Incorporation" as a value for that qualifier, then only Matter records that match that name will be searched, even if there are other types of custom object records that have the name "Turnstone Incorporation". If, on the other hand, the end user runs the search view but does not enter any value for Parent Project, the search will still be filtered to include only Matter records, regardless of what other qualifiers might be used in the search.
Searching by Workflow Status and Workflow Action
Possible values for the Workflow Status qualifier include the value Any (Workflow status will not be considered when filtering search results) or one of the several possible end states of a workflow, such as Rejected, Error, Pending, Approved, or Canceled.
Field Workflow Status is available for the results display for a search view to show the status of specific records. Workflow Status lists specific values, such as Pending Approval, Approved, Rejected, Error, and Canceled. This field may be blank if a record has not been submitted to workflow.
Workflow Action
The Workflow Action qualifier presents a list of values that vary by object type. Any workflow action that can be defined in an Approval Rule for an object will also appear in the Workflow Action qualifier drop-down for that object. For example, the Invoice object allows actions of Post, Void, and Delete. In addition to the actions that are specific to an object type, the qualifier drop-down includes the value Any, which means that the qualifier is ignored in the current search.
For example, using this qualifier means that you could limit an Invoice search to searching only for records that are pending approval for posting, not pending approval for void or deletion.
Field Workflow Action is available for the results display for a search view to show more detailed status of specific records.
For example, without the Workflow Action field the results of an invoice search might show the workflow status of Pending. With the inclusion of the Workflow Action field the results could say Pending and Void.
This field may be blank if a record has not been submitted to workflow.
Note: In cases where there may be multiple work flows open against a single record, only the work flow that was initiated most recently will be evaluated against these qualifiers.