
Portal Panes
Depending on the needs of your users and their job responsibilities, you may select which portal panes are viewable from different home pages. You may either create new portal panes or select the portal panes included with TeamConnect by default.
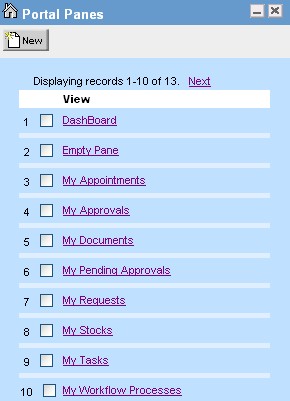
Default Portal Panes
The following portal panes are included with TeamConnect and available for use in home pages:
- My Appointments—Displays appointments scheduled for the user.
- My Documents—Displays links to files contained in the logged-in user's document folder.
- My Reports—Displays a specified report on the user's homepage. From the My Reports section, click Edit Parameters and select a Report from the drop-down list. You can also specify the Chart Width and Chart Height.
- My Pending Approvals—Displays the user's pending approvals.
- My Approvals—Displays the user's pending approvals.
- My Requests—Displays the user's requests in progress.
- My Workflows—Displays the processes that the user is responsible for monitoring. This portal pane only appears to Process Managers.
- RSS Feeds—Displays the selected RSS Feed content (for example news feeds).
- My Stocks—Displays stock information and links to various companies on the Yahoo Finance page.
- My Tasks—Displays tasks assigned to the user.
Opening Portal Panes
To open a portal pane
- In the Go to drop-down list, select Portal Panes.
The Portal Panes screen displays a list of portal panes, which include the default portal panes and all previously created portal panes.
- From the portal pane list, click the hyperlink of the desired portal pane.
The General tab of the portal pane you selected appears.
The General tab of the Portal Pane screen has the following sections:
- Portal Pane Settings—From this section, you may modify general information such as the title and background color of a portal pane. See Portal Pane Settings.
- Portal Pane Contents—From this section, you can modify the content that defines how a portal pane functions from a home page. See Portal Pane Contents.
Portal Pane Settings
The Portal Pane Settings section of the General tab allows you to:
- Identify the portal pane by giving it a title and a unique identifying key.
- Set the background color of the portal pane.
- Give users specified controls to the selected portal pane.
The following table describes the items in the Portal Pane Settings section.
Portal Pane Settings
| Field | Description | Comments |
|---|---|---|
|
Title |
Enter a name (maximum 250 characters) that uniquely identifies the portal pane. This name appears in the following locations:
In TeamConnect 8.0, the Title field accepts only the following characters:
Characters that are not allowed include, but are not limited to:
If you include any other characters and then select Save, TeamConnect displays a modal warning dialog and does not save the changes. Remove or replace disallowed characters so that only letters and numbers remain before saving again. The following image shows the warning dialog that appears when you save a portal pane name that contains disallowed characters.
|
As long the Editable by user check-box is selected, the title bar of the portal pane appears for the user-- even if the Show title bar check-box is not selected. |
|
Unique Key |
Enter an alphanumeric combination to uniquely identify the portal pane content. After you save the settings, you can edit this field only if it is blank. The unique key cannot contain spaces, underscores, punctuation, or any special characters and cannot exceed 50 characters in length. |
|
|
Background Color |
(Optional) Click the Color Picker icon next to the filed and select the desired color from the pop-up window that appears. If no background color is specified for the portal pane, the background color will be the normal background color defined in System Settings. |
Search View content items always use the background color defined in System Settings. Custom Content items always use the background colors defined in their Java class files. |
|
Show title bar |
Select this check-box to display the title bar of the portal pane. For example:
If the appropriate options are turned on, it also displays buttons so that users can edit, move, resize, or delete the portal pane. You can choose which options to turn on. |
Changes made by one user from their own home page, do NOT affect the same home page of another user. |
|
Editable by user |
Select this check-box to allow users to edit the contents of the portal pane within their home page. The edit button is available from the portal pane title bar. |


Updating existing portal pane titles (TeamConnect 8.0)
If your environment was upgraded to TeamConnect 8.0, some existing portal panes might use characters that are no longer allowed in the Title field. To avoid save failures and warning dialogs when editing these panes:
-
In the Go to list, select Portal Panes.
-
From the portal pane list, open each portal pane you plan to maintain.
-
In the Portal Pane Settings section, review the Title field for disallowed characters, such as:
-
Spaces
-
Punctuation and symbols (for example, `. , : ; ? ! - _ @ # & / \ ( ) [ ] ' " ~ \` ^ | { } < >`)
-
Accented or non‑ASCII characters (for example, `é`, `ñ`, `ü`)
-
Replace disallowed characters so that only letters (A–Z, a–z) and numbers (0–9) remain.
Select Save and confirm that the portal pane saves without warnings.
Portal Pane Setting Dependencies
How the settings of your portal pane take effect depends upon the settings of the home page on which that portal pane appears. The following table shows all the possible combinations of portal pane and home page settings, along with the resulting portal pane functionality:
Home Page and Portal Page Setting Combinations
|
Home page settings |
Portal pane settings |
Results |
||||
|
For the portal pane, user can |
||||||
|
See title bar |
Edit |
Move |
Resize |
Remove |
||
|
|
|
|||||
|
|
X |
|||||
|
|
X |
X |
||||
|
|
X |
X |
||||
|
|
|
|||||
|
|
X |
X |
X |
|||
|
|
X |
X |
X |
X |
||
|
|
X |
X |
X |
X |
||
|
|
|
|||||
|
|
X
|
X
|
X
|
X
|
||
|
|
X
|
X
|
X
|
X
|
X
|
|


Portal Pane Contents
To specify what a portal pane displays, you select a content type. The content type determines the information that the user will access (such as tasks) or the action that they will perform (such as scheduling new appointments).
Portal pane content provides users with quick access to important company announcements, various tasks, search results, reports, Web sites, and so on.
The kinds of information that are added to portal panes are referred to as content types. The following table lists the various content types that you can include in a portal pane, along with a description and usage of each.
Portal Pane Content Types and Their Usage
| Content Type | Description | Use To |
|---|---|---|
|
Action Link |
Allows users to create new records from their home page or to access a TeamConnect user tool from their home page. When a user clicks an action link from a portal pane, the result is the same as selecting the corresponding options from either the Create a new or Tools drop-down lists in the user interface. The portal pane titled "Home Owner Claims" in the Administrator End-User Home Page Components image is an example of an action link. For more details about action links, see Adding Action Links. |
Create the following records with or without a wizard:
Access the following tools:
|
|
Object Link |
Allows users to open specific records or to search for specific records from their home page. When a user clicks an object link from a portal pane to search for a specific record, the result is the same as selecting the corresponding options from the Go to drop-down list in the user interface. The portal pane titled "Important Contacts" in the Administrator End-User Home Page Components image is an example of an Object Link portal pane. Also, allow users to open specific search screens from their home page. For details, see Adding Search View Object Links. Important: Search View object links function differently from the Search View content type. Search View object links are essentially links to a Filter tab of a search screen, whereas content items of the type Search View display the results of a search within the portal pane. For more details, see Adding Object Links. |
Create links to access the following:
|
|
Search View |
Allows users to view specific search results that appear within their portal pane. Search views in portal panes are the same search views defined for each object within TeamConnect. You can include any existing search view in a portal pane--provided that the Usable in Portal Panes option is selected when you create the search view. Tip: Create separate search views for portal panes. To learn more about Search View qualifiers, see Search View Filter Display. The portal pane titled "My Upcoming Appointments" in the Administrator End-User Home Page Components image is an example of a search view. For more details, see Adding Search Views. |
Display search results for a specific search view within the portal pane in one of the following ways:
|
|
Report |
Allows users to see a report's results, or to link to a report. The reports must already have been designed and tested. A report is implemented in a portal pane through the use of the tc:report tag or the tc:reportLink tag. Details about these tags are found in Using Tags to Embed Reports in Blocks. |
Display report results in one of the following ways:
|
|
Text |
Serves both of the following purposes:
Important: You must specify a target attribute. If you do not, the network location opens in the same window as TeamConnect.
The portal pane titled "ClientGuard Messages" in the Administrator End-User Home Page Components image on page 306 is an example of a portal pane displaying text. For more details, see Adding Text. |
|
|
Web URL |
Links to Web sites outside of TeamConnect. When a user clicks a Web URL link in a portal pane, the specified URL is passed directly to the Address field of a new browser window. Web URL links can be set based on what is necessary for the users to access and view. The portal pane titled "Important Web Links" in the Administrator End-User Home Page Components image is an example of a Web URL portal pane. For more details, see Adding Web URLs. |
Access Web sites through hyperlinks. |
|
Custom Content |
Displays customized content and formatting through use of Java class files. The portal pane titled "My Stocks" in the Administrator End-User Home Page Components image is an example of a Custom Content portal pane. Note: To create a Custom Content portal pane, you need extensive experience with the Java programming language. For more details, see Adding Custom Content. |
Access specialized content that is created with Java class files, such as TeamConnect publications, weather, stocks, and so on. |
|
Web Intelligence URLs |
(WebIntelligence only) Link to WebIntelligence reports. Important: You must have System Preferences set appropriately. |
Access WebIntelligence software through hyperlinks. |
Adding Action Links
To add an action link to portal pane content
- Open the appropriate portal pane.
- In the Portal Pane Contents section, select Action Link from the Content Type drop-down list.
- Fill in the appropriate fields as described in the Portal Pane Content of Type Action Link table.
- Click add more to add more content. If you are finished adding content, click Save.
The action link is added to the portal pane. You will see your changes when you add the portal pane to a home page.
Portal Pane Content of Type Action Link
| Field | Description |
|---|---|
|
Label |
Enter a label (maximum 250 characters) that uniquely identifies the action link. The label you enter appears as a link within the user's portal pane. Tip: Start your label with a verb that identifies the action that the user can perform. For example, "Create a contact", "Schedule an appointment", or "Generate a document". |
|
Unique Key |
Enter an alphanumeric combination to uniquely identify the portal pane content. After you save the settings, you can edit this field only if it is blank. The unique key cannot contain spaces, underscores, punctuation, or any special characters and cannot exceed 50 characters in length. This is an optional field. |
|
Links to |
Select the action that should occur when the user clicks the link from the portal pane. The action will either be to create a new record or to open a tool. Caution: If you link to a user tool to which a user is not granted rights, the hyperlink still appears in the user's portal pane. However, the user will not be able to access the tool. |
|
Custom Object Type |
Select the specific custom object definition whose records you would like the user to create from the portal pane. This field appears when New Custom Object is selected from the Links to drop-down list. |
|
Icon Image File |
(Optional) Select an appropriate icon to display next to the action link within the portal pane. Icon image files are in the following location: //Top Level/System/Icons.
|
|
Wizard |
(Optional) Select the wizard that the user will access when clicking the action link in the portal pane. The wizards defined for the object selected in the Links to field are available for you to select. |
|
Order |
Enter an integer to indicate the display order of the action link within the portal pane. If a portal pane contains more than one content item, they will be displayed in the order specified in this field, lowest number first. Note: Items with the same display order are sorted and displayed alphabetically. |
|
Alignment |
Select either Left, Center, or Right, to position the action link accordingly in the portal pane. |

Adding Object Links
To add a record object link to portal pane content
- Select Portal Panes from the Go to list. The Portal Panes screen appears.
- Open the appropriate portal pane.
- In the Portal Pane Contents section, select Object Link from the Content Type drop-down list.
The Object Type and Object fields appear in the Portal Pane Contents section.

- Fill in the appropriate fields as described in the Portal Pane Content of Type Object Link table.
- Click add more to add more content. If you are finished adding content, click Save.
The object link is added to the portal pane. You will see your changes when you add the portal pane to a home page.
The following table describes the object link items in the Portal Pane Contents section.
Portal Pane Content of Type Object Link
| Field | Description |
|---|---|
|
Label |
Enter a label (250 characters max) that uniquely identifies the object link. The label appears as a link within the portal pane. |
|
Unique Key |
Enter an alphanumeric combination to uniquely identify the portal pane content. After you save the settings, the unique key appears as read-only text and cannot be deleted or modified. The unique key cannot contain spaces, underscores, punctuation, or any special characters and cannot exceed 50 characters in length. This is an optional field. |
|
Links to |
Select the desired object. The appropriate records are filtered in the Object field. |
|
Object |
Select an existing record from either a search module or a drop-down list. Users will link to the record from the portal pane. The options in the Object field vary depending on the item you selected from the Links to drop-down list.
Note: Only Global Forums are accessible through portal panes.
Selecting Search View from the Links to drop-down list requires further explanation. For more information, see Adding Search View Object Links. |
|
Order |
Enter an integer to indicate the display order of the object link within the portal pane. If a portal pane contains more than one content item, they will be displayed in the order specified in this field, lowest number first. Note: Items with the same display order are sorted and displayed alphabetically. |
|
Alignment |
Select either Left, Center, or Right, to position the object link accordingly in the portal pane. |
Adding Search View Object Links
A Search View object link provides the user with a link to a search view in the portal pane, which is different from displaying the search view itself in the portal pane, as described in Adding Search Views.
Whether the Filter or Results tab appears when the user clicks a Search View object link depends on the search view's settings:
- If the Auto Search check-box is selected in the search view, then the Results tab appears. This is useful when the search view has search conditions predefined in the Filter Display tab.
- If the Auto Search check-box is not selected in the search view, then the Filter tab appears. The user can then enter the appropriate criteria.
For more details about search view settings, see Creating Search Views.
To add a search view object link to portal pane content
- Open the appropriate portal pane.
- In the Portal Pane Contents section, select Object Link from the Content Type drop-down list.
- Fill in the appropriate fields as described in the Portal Pane Object Link of Type Search View.
- Click add more to add more content. If you are finished adding content, click Save.
The search view object link is added to the portal pane. You will see your changes when you add the portal pane to a home page.

The following table describes the object link items of type Search View in the Portal Pane Contents section.
Portal Pane Object Link of Type Search View
| Field | Description |
|---|---|
|
Label |
Enter a label (maximum 250 characters) that uniquely identifies the object link to the search view. The label you enter appears as a link within the user's portal pane. |
|
Unique Key |
Enter an alphanumeric combination to uniquely identify the portal pane content. After you save the settings, you can edit this field only if it is blank. The unique key cannot contain spaces, underscores, punctuation, or any special characters and cannot exceed 50 characters in length. This is an optional field. |
|
Links to |
Select Search View from the list. |
|
Search Object Type |
Select the object in which the user will search for records from the portal pane. When selecting Project, the Custom Object drop-down list appears. |
|
Custom Object |
Select the specific custom object for which you would like the user to search. This field appears when Project is selected from the Search Object Type drop-down list. |
|
Search View |
Select the search view that the user will see in the portal pane. The options in this drop-down list display the search views of the object selected in the Search Object Type drop-down list, which can be used in the Portal Pane. For more details about search views, see Creating Search Views. |
|
Order |
Enter an integer to indicate the display order of the Search View object link within the portal pane. If a portal pane contains more than one content item, they will be displayed in the order specified in this field, lowest number first. Note: Items with the same display order are sorted and displayed alphabetically. |
|
Alignment |
Select either Left, Center, or Right, to display the Search View object link accordingly in the portal pane. |
Adding Search Views
To add a search view to portal pane content
- Open the appropriate portal pane view.
- In the Portal Pane Contents section, select Search View from the Content Type drop- down list.
- Fill in the appropriate fields as described in the Portal Pane Content of Type Search View table.
- Click add more to add more content. If you are finished adding content, click Save.
The search view is added to the portal pane. You will see your changes when you add the portal pane to a home page.

Portal Pane Content of Type Search View
| Field | Description |
|---|---|
|
Label |
Enter a label (maximum 250 characters) for the search view results that appear within the user's portal pane. Tip: Use the search view name. |
|
Unique Key |
Enter an alphanumeric combination to uniquely identify the portal pane content. After you save the settings, you can edit this field only if it is blank. The unique key cannot contain spaces, underscores, punctuation, or any special characters and cannot exceed 50 characters in length. This is an optional field. |
|
Object Type |
Select the type of records for which you would like the user to search from their portal pane. If you select Project, the Custom Object drop-down list appears. |
|
Custom Object |
Select the specific custom object definition for whose records you would like the user to search. |
|
Search View |
Select the search view to display in the user's portal pane. This drop-down list includes only search views for the selected object which are specifically set to be available in home pages. For more details, see Creating Search Views for Home Pages. |
|
View Type |
Specify how the results of the search view appear in the user's portal pane by selecting either:
Note: In the present version of TeamConnect, regardless of which choice you specify, the tabular view will be used. |
|
Max Search Results |
Enter the maximum number of search results that you want returned to the portal pane. If the search finds more results than the maximum number that you allot, a More link appears in the user's portal pane on which they can click to view the additional results. Caution: It is recommended that the Maximum Search Results not exceed 1000. Specifying a larger number may affect performance. |
|
Order |
Enter an integer to indicate the display order of the search view within the portal pane. If a portal pane contains more than one content item, they will be displayed in the order specified in this field, lowest number first. Note: Items with the same display order are sorted and displayed alphabetically. |
|
Alignment |
Select either Left, Center, or Right, to position the search view accordingly within the portal pane. |
Adding Text
To add text to portal pane content
- Open the appropriate portal pane view.
- In the Portal Pane Contents section, select Text from the Content Type drop-down list.
- Fill in the appropriate fields as described in the Portal Pane Content of Type Text image.
- Click add more to add more content. If you are finished adding content, click Save.
The text is added to the portal pane. You will see your changes when you add the portal pane to a home page.
Portal Pane Content of Type Text
| Field | Description |
|---|---|
|
Label |
(Optional) Enter a label (maximum 250 characters) for the text that appears within the user's portal pane. |
|
Unique Key |
Enter an alphanumeric combination to uniquely identify the portal pane content. After you save the settings, you can edit this field only if it is blank. The unique key cannot contain spaces, underscores, punctuation, or any special characters and cannot exceed 50 characters in length. This is an optional field. |
|
Text |
Enter plain text or HTML content that you want to display as a message within the user's portal pane (up to 2000 characters). Or, enter the following code to create a link to a network location:
Note: HTML code in text content can be fairly rich in functionality. For example, the code snippet below establishes a frame, within the portal pane, that acts similarly to a browser, displaying dynamic content:
|
|
Order |
Enter an integer to indicate the display order of the text. If a portal pane contains more than one content item, they will be displayed in the order specified in this field, lowest number first. Note: Items with the same display order are sorted and displayed alphabetically. |
|
Alignment |
Select either Left, Center, or Right, to position the text accordingly within the portal pane. |
Adding Web URLs
To add a web URL to portal pane content
- Open the appropriate portal pane view.
- In the Portal Pane Contents section, select Web URL from the Content Type drop-down list.
- Fill in the appropriate fields as described in the Portal Pane Content of Type Web URL table.
- Click add more to add more content. If you are finished adding content, click Save.
- The web URL is added to the portal pane. You will see your changes when you add the portal pane to a home page.
An alternate way of embedding a URL in a portal pane is to place HTML code into text content, as described in Adding Text.
Portal Pane Content of Type Web URL
| Field | Description |
|---|---|
|
Label |
Enter a label (maximum 250 characters) for the Web URL. The label you enter appears as a link within the portal pane. |
|
Unique Key |
Enter an alphanumeric combination to uniquely identify the portal pane content. After you save the settings, you can edit this field only if it is blank. The unique key cannot contain spaces, underscores, punctuation, or any special characters and cannot exceed 50 characters in length. This is an optional field. |
|
URL |
Enter the address of the Web site to which your users need access. If the URL that you enter does not begin with either http:// or https://, TeamConnect appends http:// to the URL. |
|
Order |
Enter an integer to indicate the display order of the Web URL within TeamConnect. If a portal pane contains more than one content item, they will be displayed in the order specified in this field, lowest number first. Note: Items with the same display order are sorted and displayed alphabetically. |
|
Alignment |
Select either Left, Center, or Right, to position the text accordingly within the portal pane. |
Adding Custom Content
To add custom content to portal pane content
- Open the appropriate portal pane view.
- In the Portal Pane Contents section, select Custom Content from the Content Type drop- down list.
- Fill in the appropriate fields as described in the Custom Portal Pane Content table, and then click add more.
The newly added custom content appears in a list at the bottom of the Portal Pane Contents section. - Click Save.
The custom content is added to the portal pane. You see your changes when you add the portal pane to a home page.
Custom Portal Pane Content
| Field | Description |
|---|---|
|
Label |
Enter a label (maximum 250 characters) for the custom content that appears in a user's portal pane. |
|
Unique Key |
Enter an alphanumeric combination to uniquely identify the portal pane content. After you save the settings, the unique key appears as read-only text and cannot be deleted or modified. The unique key cannot contain spaces, underscores, punctuation, or any special characters and cannot exceed 50 characters in length. This is an optional field. |
|
Class Name |
Enter the name of the Java class file that you would like to generate the HTML within the portal pane. The Java class file you specify must be uploaded to the Top Level/System/ Portal folder in the Documents area. In the end-user interface, portal panes with custom contents may have the Edit Parameters hyperlink, where the users may change the desired parameters through the interface. |
|
Order |
Enter an integer to indicate the display order of the custom content. If a portal pane contains more than one content item, they will be displayed in the order specified in this field, lowest number first. Note: Items with the same display order are sorted and displayed alphabetically. |
|
Alignment |
Select either Left, Center, or Right, to display the custom content accordingly within the portal pane. |
Adding WebIntelligence URLs
To add a WebIntelligence URL to portal pane content
- Open the appropriate portal pane view.
- In the Portal Pane Contents section, select WebIntelligence URL from the Content Type drop-down list.
- Fill in the appropriate fields as described in the Portal Pane of Type WebIntelligence URL table.
- Click add more to add more content. If you are finished adding content, click Save.
The WebIntelligence URL is added to the portal pane. You will see your changes when you add the portal pane to a home page.
Portal Pane Content of Type WebIntelligence URL
| Field | Description |
|---|---|
|
Label |
Enter a label (maximum 250 characters) for the WebIntelligence URL. The label you enter appears as a link within the portal pane. |
|
Unique Key |
Enter an alphanumeric combination to uniquely identify the portal pane content. After you save the settings, you can edit this field only if it is blank. The unique key cannot contain spaces, underscores, punctuation, or any special characters and cannot exceed 50 characters in length. This is an optional field. |
|
URL |
Enter the address of the WebIntelligence page to which your users need access. Note: The method of obtaining the link for a WebIntelligence report depends on the version of WebIntelligence you are using. Please see the Business Objects documentation for more information. |
|
Order |
Enter an integer to indicate the display order of the WebIntelligence URL within TeamConnect. If a portal pane contains more than one content item, they will be displayed in the order specified in this field, lowest number first. Note: Items with the same display order are sorted and displayed alphabetically. |
|
Alignment |
Select either Left, Center, or Right, to position the Text accordingly within the portal pane. |
Portal Panes with Multiple Contents
Depending on the tasks your users perform, you can create portal panes that are multi-functional by adding more than one type of content to the portal pane. By adding multiple content items to a single portal pane, you create a portal pane that functions as a specialized menu of your user's most commonly accessed tasks.
For instance, if you have a group of users that creates contacts, accesses projects, and views a particular Web site on a daily basis, you may want to create a portal pane that accomplishes all of these tasks.
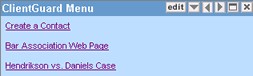
The following image is an example of the General tab of a multi-functional portal pane titled "ClientGuard Menu."
The following image shows how the "ClientGuard Menu" portal pane displays on a user's home page. Notice how the labels of the content items in the Multi-functional Portal Pane Settings in the Designer Interface image appear as links in the portal pane in the following image.
Keep in mind the usefulness and functionality of a portal pane. Creating a portal pane with a large number of content items could be confusing to your users. In most situations, it is best to create a few portal panes with a few content items rather than creating one portal pane that does everything.
Creating Portal Panes
There are two locations from which you can create portal panes:
- Portal Panes screen—When you create a portal pane from the Portal Panes screen, it is available to all users and you can add it to any home page.
- Home Page screen—When you create a portal pane from the Home Pages screen, it is only available on the specific home page from which you created it. It never appears in the list displayed on the Portal Panes screen. For details, see Creating Portal Panes from a Master Home Page.
To create a portal pane:
- In the Create a new drop-down list, select Portal Pane.
- In the Portal Pane Settings section, fill in the appropriate portal pane settings as described in the Portal Pane Settings table.
- Using the Portal Pane Content Types and Their Usage table, identify the content you would like to add.
Tip: Do not create a portal pane with too much content. Instead, split the content into multiple portal panes.
- In the Portal Pane Contents section, in the Number of entries you would like to add drop-down list, select the number of entries based on how many additional content items you want to add in this portal pane.
- Select the Content Type from the drop-down list.
Once you select a content type, an associated group of fields appears. - Complete all fields associated with the selected content type as follows:
- For action link content types, see the Portal Pane Content of Type Action Link table.
- For object link content types, see the Portal Pane Content of Type Object Link table.
- For search view content types, see the Portal Pane Content of Type Search View table.
- For text content types, see the Portal Pane Content of Type Text table.
- For Web URL content types, the Portal Pane Content of Type Web URL.
- For custom content types, the Custom Portal Pane Content table.
- For WebIntelligence content types, the Portal Pane Content of Type WebIntelligence URL table.
- Type the Order.
- Select the Alignment from the drop-down list.
- When you are done, click add more.
- If you are finished adding content click Save.
The newly created portal pane is saved and added to the list of existing portal panes in the Portal Panes screen.

To add the new portal pane to a home page, see Creating Home Pages.