
Customization Guidelines
Users can customize editable home pages and portal panes to which they have access. When you create new home pages and portal panes from the Designer interface, you can set various edit options so that users can customize particular home pages and portal panes to meet their own needs. For details about all home page and portal pane edit options, see Modifying Home Pages and Portal Panes.
New home pages, which you create by selecting Home Pages from the Go to drop-down list, are master home pages. When users customize their home page, they are actually modifying a copy of the master home page.
The same concept holds true for portal panes. When you create a new portal pane by selecting Portal Panes from the Go to drop-down list, you create a template. Users who are granted the ability, can modify copies of that portal pane template.
For details about creating and adding home pages and portal panes, see the following sections:
- About Master Home Pages and Portal Pane Templates
- Modifying Home Pages and Portal Panes
- Creating Home Pages
- Creating Portal Panes
- Adding Portal Panes to Home Pages
About Master Home Pages and Portal Pane Templates
It is important to understand the concepts of master home pages, portal pane templates, and copies. The concepts are best conveyed by the following diagram. It shows what happens to the portal pane template that is the original portal pane, created on the Portal Panes screen.

The following table explains details about each of the portal pane copies shown in the diagram.
Explanation of the Diagram
|
Home page |
Portal pane copy |
Explanation |
|---|---|---|
|
Master |
A |
When you add a portal pane template to master home page, you are actually adding a copy of that portal pane template. |
|
User |
A |
When users first view their own home page, they see the same master home page that you created--including the same copy of that portal pane template. |
|
User |
B |
As soon as a user clicks edit on a portal pane on his or her own home page, the template copy is copied and replaced with a revised version. In other words, the user has a copy of a copy posted on their home page, and portal pane A is no longer visible on their home page. The user only sees his or her customized version of the portal pane. |
|
User |
C |
If a user has the ability to add portal panes, they can click the Add Content link on their home page to add a copy of the original portal pane template to their own home page. |
In regard to home pages, users initially see an exact replica of the master home page. As soon as users view it, their home page becomes a copy. Therefore, any changes you make as the solution developer, your users cannot see if they have already viewed the home page.
However, there is an exception. If you have deleted a portal pane, then it is deleted from your users' home pages—unless a user has previously modified it. If that is the case, the user's copy of the portal pane that you deleted remains on their home page with their modifications.
Points To Remember
You can synchronize both copies of home pages and portal panes with their master. For details, see Adding Portal Panes to Home Pages.
What users do see is the sum of the master home page plus their own changes to either home pages or portal panes. For this reason, as stated previously, it is important NOT to set the following home page options until after you are finished designing and creating all of your home pages and portal panes:
- Visible
- Allow end users to edit layout only
- Allow end users to edit layout & content
In other words, the only home page setting that should be turned on when you are designing and creating home pages and portal panes is Do not allow end users to edit layout or content.
If you do choose one of the options listed in the table above before you are finished creating a home page or portal pane, you can synchronize your master home page and portal pane template changes with the home page and portal pane copies that have already been viewed by other users. For more details, see Adding Portal Panes to Home Pages.
Modifying Home Pages and Portal Panes
Users can modify their home page and portal panes if given the ability to do so. Solution developer changes and user changes both affect home pages and portal panes. If users modify their home pages and portal panes, the masters, templates, and users' copies will get out-of-sync with each other.
The good news is that as the solution developer, you have total control. If it is necessary at any time to synchronize the content or settings of a home page or portal pane—or both—you can click the Synchronize Content and Synchronize Settings hyperlinks to do so.
When you synchronize content or settings of home pages or portal panes, you overwrite all modifications that users made to their home pages. The users see the content and settings as they appear in the master home pages and portal panes.
Synchronizing Master Pages, Templates, and Copies
Part of the process of modifying home pages and portal panes is to synchronize your changes from the master home page and template portal panes with the copies that the users have of each.
Synchronizing also plays an important role in creating home pages (not portal panes). To activate a new home page, you must synchronize it. If you are in the process of designing a new home page, it is good practice to NOT synchronize settings or content until your design is final. That way, there is no concern about overwriting user's modifications, in case they decide to customize their home pages or portal panes.
The steps for synchronizing are included within the appropriate instructions in this documentation. It is a matter of clicking links (shown in the following figure), which are in the following locations on the Designer interface, at the top of the following screens:
- Home Pages screen
- Portal Panes screen
Important: You must save all your changes to the master home page BEFORE you synchronize settings or content.

About Modifying Home Pages
Let's say that you give your users the ability to modify home pages by selecting either the Allow end users to edit layout only or Allow end users to edit layout and content check-box when you create it. When you do NOT click the following synchronize hyperlinks:
- Any changes the user makes to the page settings take precedence over solution developer changes.
- If you, as a solution developer, add portal panes to a home page, the user will see that particular instance of that portal pane. Even if a user clicks the Add Content link from the Personalize menu to add a portal pane to a home page, and the solution developer adds the same portal pane to the same home page. As a result, the user sees both of those portal panes on their home page. The user can delete the duplicated portal pane, if desired.
- Modifications to home pages do not take effect immediately. Whether adding, deleting or modifying a home page, users must log off, and then log back on to see the changes.
What Happens to Modified Home Pages?
As a TeamConnect solution developer, it is important to be aware of the effects that both user and solution developer changes have on home pages.
You may modify home pages according to the following table:
Effects of Home Page Modifications
|
Type of user performing task |
Task |
Changes apply to |
Effects of synchronizing |
|---|---|---|---|
|
End |
Directly from a user's own home page, he or she can click Add Content or Edit Settings links, and click arrows located on portal panes' title bars to rearrange the layout (if the corresponding options are set appropriately). |
|
User's modifications are overwritten with master home page. |
|
Solution developer |
From Go to > Home Pages, open the appropriate home page. Click the Portal Panes tab. Click the arrows located on portal panes' title bars to rearrange the layout. |
|
All copies of this master home page are overwritten. |
About Modifying Portal Panes
The same theory that applies to modifying home pages holds true for modifying portal panes. If you give your users the ability to edit or move a portal pane by selecting the Editable by user or the Show title bar check-box when you create it, any changes the user makes take precedence over solution developer changes.
For example, if a user clicks edit on a portal pane and customizes that portal pane, the changes appear only on their home page. Any changes that you made to that same portal pane do not appear on the user's home page. Even if you delete that portal pane from the Designer interface, the user still sees their own edited version.
In short, the moment a user customizes a portal pane, those changes take precedence over any solution developer changes to that same portal pane. However, if a user does not edit a portal pane, then solution developer changes take precedence--including the deletion of a portal pane.
As a TeamConnect solution developer, it is important to be aware of the effects that both user and solution developer changes have on portal panes.
You may modify portal panes according to the following table:
Effects of Portal Pane Modifications
|
Type of user performing task |
Task |
Changes apply to |
Effects of synchronizing |
|---|---|---|---|
|
End |
Directly from a user's own home page, he or she can click edit in the appropriate portal pane. |
User's portal pane copy only. |
User's modifications are overwritten with portal pane template. |
|
Solution developer |
From Go to > Portal Panes, open the appropriate portal pane. |
Portal pane template only. |
All copies of this portal pane template are overwritten. |
|
Solution developer |
From Go to > Home Pages, open the appropriate home page, click the Portal Pane tab, and then click edit on the appropriate portal pane. |
Solution developer's copy of portal pane on master home page. |
All copies of this portal pane template are overwritten. |
The Relations between Master Home Pages, Portal Pane Templates, and Copies diagram shows the different ways in which users can modify editable portal panes, and the results of those modifications (without synchronizing).
To take the task of a user editing a portal pane further—if a user clicks edit on a portal pane of their own home page, modifies it, and saves the changes, your actions, as a solution developer, can affect the results. The following table shows the various actions that you might take and the results of those actions. Keep in mind that the results listed are what happens before you click Synchronize Contents or Synchronize Settings hyperlinks. After you synchronize, portal pane templates overwrite any of its copies.
What Happens when User and Solution Developer Edit Portal Panes
|
Solution developer and user actions |
Results |
|---|---|
|
None. |
|
|
From Home Pages > Portal Panes, you edit a copy of a portal pane template. User modifies their own copy of that template from their own home page. |
|
|
From Portal Panes, you edit a portal pane template. User modifies their own copy of that template from their own home page. |
|
|
From Home Pages > Portal Panes, a copy of a portal pane template. User modifies their own copy of that template from their own home page. |
|
The following table lists modifications to portal panes (of which the content and settings were synchronized) and when those changes take effect:
When Changes Take Effect in Portal Panes
|
Modification |
Effective |
|---|---|
|
Adding portal panes to home pages. |
When user clicks Refresh. |
|
Deleting portal panes that exist on a home page without prior edits by user. |
|
|
Deleting portal panes from the Home Page screen with prior edits by user. |
When user logs off, and then logs back in. |
|
Modifying portal pane from Home Page screen. |
Immediately. |
|
Modifying portal pane from the Portal Pane screen. |
When user logs off, and then logs back in. |
For each user who has access to an editable portal pane, a separate instance (or copy) of the portal pane template exists. Users with access to an uneditable portal pane, see the solution developer's copy of that portal pane on their home page. Changes to one portal pane copy do not affect another portal pane copy. Nor do the changes affect the portal pane template.
You can modify the following in a portal pane by changing the following settings in the Portal Pane Settings section or Portal Panes Contents section on the General tab of the Portal Pane screen:
- Title
- Color
- User options
- Contents
To modify a portal pane
- Access the portal pane you would like to modify. For more information see, Opening Portal Panes.
- Depending on your needs, do any of the following:
- Change the desired portal pane settings, such as whether it is editable by users.
- Add additional content to the portal pane using the data entry rows. For details see Portal Pane Contents.
- Edit or delete existing content items in the existing content list, as desired.
- Click Save.
Important: You must save all your changes BEFORE you synchronize settings or content.
- Click the Synchronize Settings and Synchronize Content hyperlinks. A message to confirm appears.
- Click OK.
All user copies of this portal pane are deleted and then replaced with the solution developer's updated copy, not the template.
You can delete portal panes in the following two places:
- Portal Panes screen—Not only deletes portal pane from the list of portal panes, but also from master home pages and users' home page to which it was added.
- An open master home page—Deletes portal pane from the open master home page and from all copies of that master home page (after clicking the Synchronize Layout and Synchronize Content hyperlinks).
To delete a portal pane from the portal pane list
- In the Go to drop-down list, select Portal Panes.
The Portal Panes screen appears with all existing portal panes.
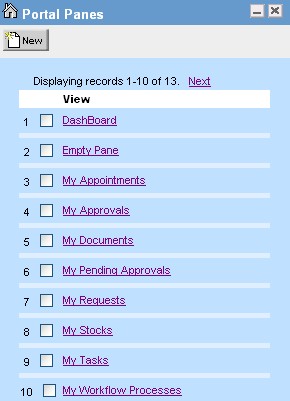
- In the Portal Panes list, select the check-box of the appropriate portal pane, and then click delete.
A message to confirm the deletion of this portal pane appears. - Click OK.
The portal pane is deleted from the system and you can no longer add it to a home page. For logged in users, this portal pane is deleted from their home page upon clicking Refresh, or upon logging out and then logging back in to TeamConnect--even if they have at one time or another modified it.
To delete a portal pane from a master home page
- In the Go to drop-down list, select Home Pages.
- Open the appropriate home page.
- Select the Portal Panes tab.
- On the title bar of the portal pane you want to delete, click the Remove Pane
 button.
A message to confirm the deletion of this portal pane appears. - Click OK.
The portal pane is deleted. - Click Save.
Important: You must save all your changes BEFORE you synchronize settings or content.
- Click the Synchronize Content hyperlink.
A message to confirm that you want to synchronize the master home page with user's copies of this home page appears. - Click OK.
All home pages are in synchronization with the master home page.
Modifying Master Home Pages
You can preview the layout of a master home page while you are modifying it.
You can view and edit existing portal panes that are already displayed on a particular home page. You can also add other existing portal panes from the Content tab of an existing home page. Further, you can create new portal panes directly from the master home page. For details, see Creating Portal Panes from a Master Home Page.
After clicking the Content tab, a layout preview of the selected home page appears, along with the Select Portal Pane drop-down list. All of the portal panes that appear on the Content tab function exactly as they would on the user's home page. You can modify the function, position, and size of these portal panes by clicking the buttons that appear in the Title Bar of each individual portal pane. These buttons will always be visible to you on the Content tab, even if they are not visible to the user on the user home page.
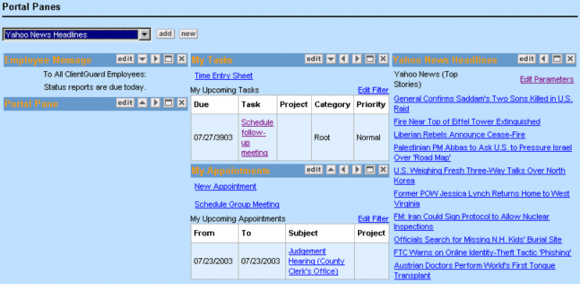
Home Page Content Tab with Portal Panes Added Home Page Content Tab with Portal Panes Added
|
Item |
Description |
|---|---|
|
Select Portal Pane drop-down list |
Select the desired portal pane you would like to add to the selected home page. All portal panes that were created from Portal Panes are listed. |
|
add |
Click to add the selected portal pane to the home page. If you are adding portal panes to a home page that is already available to a user, the additions are not displayed for the user until he or she clicks the Refresh hyperlink. |
|
new |
Click to create a new portal pane directly from the displayed master home page. Important: When you create a new portal pane by clicking this button, the portal pane that you create is not listed on the Portal Panes screen. It is created for this particular home page only. For details, see Creating Portal Panes from a Master Home Page. |
|
Selected Portal Panes |
These are the portal panes that have already been added to the selected home page. The way that they are arranged is the way the user will see them. |
|
Title Bars |
Click the appropriate buttons that appear on the title bar to modify the individual portal pane accordingly. |
|
edit |
Click to change the selected portal pane. Clicking this button opens the General tab of the selected portal pane where you can modify the settings of that portal pane. To learn more about modifying portal panes, see About Modifying Portal Panes. |
|
Move Pane |
Click the appropriate arrow button to move the selected portal pane to a different position on the home page. Depending on where the portal pane is positioned in the home page, you may have multiple arrow buttons in the title bar that point up, down, left, or right. |
|
Maximize Minimize |
Click to maximize the selected portal pane. After you click the Maximize Conversely, if the portal pane is already maximized, the Minimize |


Remove Pane Click the Remove Pane button to remove the selected portal pane from the home page.
The portal pane is removed after the user clicks the Refresh hyperlink in the Personalize menu.
Adding Portal Panes to Home Pages
Whether you are adding portal panes to a user's home page or editing portal panes that already exist in a user's home page remember the following:
- The user is unable to view the portal panes that you add until after they refresh their screen.
- Portal panes that you remove are still viewable by the user until after they refresh their screen.
- Changes made to a portal pane from the Portal Panes tab of the Home Page screen will take effect only for that specific portal pane within that specific home page. Other portal panes are not affected.
- When making changes to a portal pane template that already exists as a copy on a user's home page, the changes you make do not take effect until you synchronize the content and settings. For details, see When Changes Take Effect.
- If you change a portal pane that a user has previously customized, the user's changes take precedence. To learn more about solution developer and user customization, see Modifying Home Pages and Portal Panes.
After you save this new portal pane, you cannot reuse it. The portal pane that you created is only intended for this master home page and is not listed on the Portal Panes screen.
To add portal panes to a home page
- From the Content tab of the desired home page, select the appropriate portal pane from the Select Portal Pane drop-down list, and then click add.
- Repeat the previous step to add additional portal panes to the desired home page, if necessary.
- Click Save.
Important: You must save all your changes BEFORE you synchronize settings or content.
- Click the Synchronize Content hyperlink.
A message to confirm that you want to synchronize the master home page with user's copies of this home page appears. - Click OK.
- Click the Synchronize Settings hyperlink.
A message to confirm that you want to synchronize the master home page with user's copies of this home page appears. - Click OK.
The desired portal panes are added to the master home page and all copies are in sync with it.
Creating Portal Panes from a Master Home Page
To create a portal pane from a master home page
- In the Go to drop-down list, select Home Pages.
- On the Home Pages screen, select the home page to which you want to add a portal pane.
- Click the Content tab, and then click new.
A title bar of the new portal pane appears in the open home page. - Click Save at the top of the Home Page screen.
If you attempt to edit your new portal pane before you save your modified home page, a message appears, which prompts you to do so. - Click edit on the title bar of the new portal pane. The Portal Pane screen appears.
- Enter appropriate portal pane settings as described in the Portal Pane Settings table.
Tip: Do not select the Editable by user check-box until your new portal pane is finalized and exactly was you want it.
- Select the Number of entries you would like to add from the drop-down list, based on how many additional content items you want to add to the portal panes.
- For each data entry row, do the following actions:
- Select the Content Type from the drop-down list.
- Fill in the fields that display beneath the Content column.
For details about each field, see the appropriate content type in the Portal Pane Contents section:- For action link content types, see the Portal Pane Content of Type Action Link table.
- For object link content types, see the Portal Pane Content of Type Object Link table.
- For search view content types, see the Portal Pane Content of Type Search View table.
- For text content types, see the Portal Pane Content of Type Text table.
- For web URL content types, see the Portal Pane Content of Type Web URL table.
- For custom content types, see the Custom Portal Pane Content table.
- For WebIntelligence content types, the Portal Pane Content of Type WebIntelligence URL table.
Tip: Do not create a portal pane with too much content. Instead, split the content into multiple portal panes.
- Type the Order.
- Select the Alignment from the drop-down list.
- Click add more to add more content, or click Save if you are finished.
Important: You must save all your changes to the master home page BEFORE you synchronize settings or content.
- Click the Synchronize Content hyperlink.
A message to confirm that you want to synchronize the master home page with user's copies of this home page appears. - Click OK.
- Click the Synchronize Settings hyperlink.
A message to confirm that you want to synchronize the master home page with user's copies of this home page appears. - Click OK.
The newly created portal pane is saved and added to the displayed home page.