
Blocks
System and custom blocks display in the following different ways:
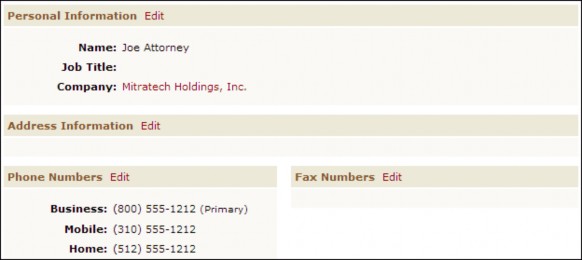
- System blocks are included by default in the system object views of TeamConnect. You cannot change, delete, or add new system blocks. For example, on the General page of a contact record, Personal Information, Address Information, and Phone Numbers are all system blocks.
- Custom blocks are XML files that might refer to Java classes and display sets of system or custom fields organized in sections on record pages or wizard pages.
Custom Blocks
You can use custom blocks to do the following operations:
- Display different system or custom fields for each group of TeamConnect users.
- Design new pages for a record or wizard page.
- Display multiple sets of fields on one record page or wizard page.
- Display custom fields associated with several categories in the same section.
Important: You must assign the applicable rights for the appropriate categories and details (custom fields) in order for users to be able to view custom blocks that include custom fields.
Custom blocks in records and wizards are different in the following ways:
Differences between Record and Wizard Custom Blocks
| In records | In wizards | |
|---|---|---|
|
Type of fields you can include in custom blocks |
System fields, Custom fields |
System fields, Custom fields, Wizard parameters |
|
How users view custom blocks |
Add the blocks to object views and assign appropriate rights. |
Add the blocks as components to wizard pages. |
Button styling
Buttons tags will not have any styling by default. Assign a class (e.g., btn-primary) for styling these objects.
When you create a screen with custom actions, you may need to create a custom Java block (CJB). The CJB uses the TeamConnect API to specify actions and properties for the custom block. The XML file, which includes the structure, layout, and contents of the custom block, references the Java class. If you are not creating custom actions for the block, you only need to create the XML file without the CJB.
Note: Do not use a CJB to construct arbitrarily complex JavaScript and HTML code for the custom block.
Creating Blocks
When you create a block, you create an XML file using regular HTML tags and formatting in addition to specific TeamConnect tags and attributes that display custom fields, wizard parameters, and their labels on the page. You may also use style sheets, if necessary.
You can edit an XML file for a block manually, using every available TeamConnect block tag. For blocks that are to become part of object views, you can also use the Screen Designer, which has a drag-and-drop GUI that lets you build blocks quickly. The set of block tags available to the Screen Designer is just a subset of all the available block tags in TeamConnect.
See the Screen Designer Help for information on creating custom blocks using the Screen Designer tool.
Note: As a time-saving feature you can start a block's XML file using the Screen Designer, then later edit that file manually to add extra block tags.
To plan and create a custom block using manual editing
- Identify the category whose custom fields you want to include in the block.
- For that category, identify what custom fields each user group has access to.
- When creating a block for a wizard page, identify the parameters you intend to include in the block and make sure they are defined and added to the appropriate wizard page or pages. For details, see Defining Parameters and Defining Page Components in Wizards.
- Verify that the desired object category is added to the object definition and the appropriate custom fields are created for the category.
- Decide how you want to arrange the custom fields (and wizard parameters, if there are any) in the block:
- Where the fields should be displayed on the page.
- What the background color of the page should be, if you do not want the system settings or users' preferences to apply.
- Create the appropriate XML file that contains the necessary fields and structure as explained in Understanding XML Files.
- Upload the XML file to TeamConnect.
- Upload any support files, such as scripts, images, or style sheets, to the Top Level/ HTTPRoot folder in the Documents area of TeamConnect.
- Associate the XML file with the appropriate object on the Blocks tab of the object as explained in Defining Blocks.
- If you are creating an object view, include the block in the desired custom object view of the appropriate object. For more information on object views, see Defining Object Views.
- If you are creating a wizard, add the block to the desired wizard page. For details, see Defining Page Components in Wizards.
Further editing for custom categories
At runtime, a block that was created using Screen Designer may display an error message if all of the following are true:
- The block is part of a custom object definition.
- The category chosen for the block is a custom category.
- The record currently being displayed has not had that custom category assigned to it. To guard against this possibility, you can do the following:
- Finish laying out the block using Screen Designer.
- Manually edit the resulting XML file, adding a tc:section tag that encapsulates the block and specifies the custom category used by the block.
Note: After this manual edit, the XML file cannot be reopened in Screen Designer, since Screen Designer is unable to parse the tc:section tag.
Page Element Reference
The table below explains Page Elements, and their properties, in more detail. Where the documentation refers to "expression", the syntax used is Java Expression Language (JEXL) unless otherwise stated.
Page Elements
|
Element |
Property |
Notes |
|---|---|---|
|
Field Column Layout |
See the detailed explanation of a layout in step 4. |
|
|
If Statement |
(tc:if) Conditions the display of any elements inside the if by evaluating an expression. |
|
|
test |
The expression to be evaluated. |
|
|
negate |
If YES, the expression must evaluate false for the contents inside the if to be displayed. If NO, the expression must evaluate true for the contents inside the if to be displayed. If this property is omitted, it is assumed to be NO. |
|
|
If-Else Statement |
When dragged to the layout, produces two If elements, the second of which uses property negate=YES. The same value of property test should then be entered in each of the two If elements. |
|
|
Java Class |
(tc:useClass) |
|
|
id |
Must be unique within the block. Can be referenced by CSS or Javascript |
|
|
name |
Required. The name of the Java class. The class file must be located in the same folder that contains the block XML file. |
|
|
Message |
(tc:message) Places text output on the page outside the boundaries of a Field Column layout. Unlike the similar out element, a message element is localized. |
|
|
key |
The full i18n key of the message text to be displayed. For information about i18n keys, see Creating Custom Messages. |
|
|
Message Parameter |
This element can only be dragged into an existing Message element. Some Message elements accept substitution parameters at runtime. For each such parameter in a Message, you need a Message Parameter element. |
|
|
value |
Text or expression to be placed in the body of the Message element. |
|
|
Out |
(tc:out) Places text output on the page outside the boundaries of a Field Column layout. Unlike the similar Message element, an Out element cannot be localized. |
|
|
value |
Text or expression to be rendered in the block. |
Creating Block XML Files
To create an XML file for a custom block, you need to know the following information:
- Basic HTML tags and structure and XML requirements.
- The following custom field and category information if you want to include custom fields in the block:
- Field name—Field names uniquely identify the fields within a category. You can locate them on the Custom Fields tab of the object definition for the block.
- The full tree position of the category for the custom field—The full tree position of a category is a combination of tree positions assigned to the category and all of its parent categories, starting with the root category and separated by underscores.
For example, if category B with partial tree position BBBB is created under category A with partial tree position AAAA in the Account object definition, the full tree position of category B is ACCT_AAAA_BBBB.
- Wizard parameter names if you are creating the block for a wizard and want to include parameters. The name of a wizard parameter uniquely identifies the parameter within a wizard. You can locate parameter names on the Page Components tab of the wizard page. Define parameters for the page that includes the new block.
Tip: To avoid duplicating parameters on the same page, select the Display in blocks only check-box for the parameters that you include in your blocks.
- The appropriate block tags and formatting.
- The tc:useClass tag with the name of the Java class file and an alias in the id= field to refer to the Java class.
Note: When creating an XML file, you should not hard code background and foreground colors or font type and size. Also minimize the use of JavaScript.
To create an XML file for a block
- Open the text editor of your choice.
Microsoft Notepad is a common choice, but other text editors can be used to create XML files. - Type the following lines at the beginning of the document:
<?xml version="1.0" encoding="UTF-8"?>

<tc:transform version="1.0" xmlns:tc="http://www.w3.org/1999/XSL/Transform"> - Refer to a Java class using the tc:useClass tag, as shown in the following line:
<tc:useClass id="cjb_alias" name="Java_class_name"/>
ForJava_class_name, enter the name of the Java class. Forcjb_alias, enter the name of the alias that you use in the XML file to refer to the Java class. - Type the contents of your block.
For a sample of the tags you should include, see Sample XML File. - Include the closing tag at the end of the document:
</tc:transform> - Save this new file on your hard drive, with an .xml extension (for example, salesInvolved.xml).
- Upload the XML file and the Java class to the Screens directory of the object for which you are creating the block. See Uploading XML Files.
Block Tags
Custom block files use several TeamConnect tags that allow you to display and organize custom fields and parameters within a block.
Team Connect Block Tags
|
Tag |
Description |
|---|---|
|
tc:include |
Displays a custom block in a custom block. |
|
tc:label |
Displays custom field labels in a block. |
|
tc:field |
Displays custom fields in a block. |
|
tc:blockTemplate |
Displays the title of a block. |
|
tc:wizardParameter |
Displays wizard parameter fields in a block created for wizards. |
|
tc:wizardParameterLabel |
Displays wizard parameter labels in a block created for wizards. |
|
tc:message |
Displays localized messages in a custom block. |
|
tc:messageParam |
Displays message parameter values. |
| tc:forEach | The for each tag is used to perform simple looping behavior. |
| tc:documentImage | The document image tag is used to show an image from a file uploaded to TeamConnect. |
| tc:if | The if tag is used to perform simple conditional logic. |
| tc:out | The out tag is used to output simple text. |
| tc:recordLink | Render a link to the current user's contact. |
| tc:useClass | The use class tag is used to access functionality from a custom block's class file(s). |
| tc:user | The user field tag is used to get/set users in custom blocks. |
For additional block tags that are related to reports, see in Using Tags to Embed Reports in Blocks.
In cases where this topic refers to an "expression" inside a tag, Java Expression Language (JEXL) is the syntax.
Caution: Do not type field labels or other field information directly in your block files. The formatting specified in the system settings and user preferences do not applied to them. You also have to manually update the labels in all files if the labels change.
tc:include
This tag displays a custom block within a custom block.
The <tc:include> tag:
- Must always be in lowercase.
- Must use the following attribute:
- The block attribute that references the block file in the current object definition.
- Uses the following syntax:
<tc:include block="BlockName" />- BlockName—The file name of the block you want to include. If the BlockName attribute does not have a file extension, TeamConnect looks for BlockName.xml, and then for BlockName.scr.xml.
For example, the following code would include and render a block with file name SampleFile.xml or SampleFile.scr.xml:
<tc:include name="SampleFile" />
- BlockName—The file name of the block you want to include. If the BlockName attribute does not have a file extension, TeamConnect looks for BlockName.xml, and then for BlockName.scr.xml.
tc:label
This tag displays the label of a custom field. You may use it in blocks created for object views and wizards. Insert tc:label before the tc:field tag to identify the field on the page. For certain field types, such as check-boxes, the label typically displays after the field.
The <tc:label> tag:
- Must always be in lowercase.
- Must use two attributes:
- The select attribute that references the field name of the appropriate custom field.
- The category attribute that references the tree position of the field's category.
- Uses the following syntax:
<tc:label name="FieldName" category="FullTreePosition" />- FieldName—The name (not label) of the field you want to include.
- FullTreePosition—The full tree position of the category for the field.
For example, the following code displays the label "Incident Date & Time" of the custom field with the name "LossDate," created for the root category of the Claim object definition with the unique code CLAM:
tc:label name="LossDate" category="CLAM" />
For attributes that you can use with field labels, see Label Tags.
tc:field
This tag displays the field, either blank or with its default value. You may use it in blocks created for object views and wizards.
The <tc:field> tag:
- Must always be in lowercase.
- Must use two attributes:
- The name attribute that references the field name of the appropriate custom field
- The category attribute that references the tree position of the field's category.
- Uses the following syntax for system fields:
<tc:field name="applicationEntity.FieldName" appropriate attributes/>
Uses the following syntax for custom fields:
<tc:field name="applicationEntity.FieldName" category="FullTreePosition"appropriate attributes/>- FieldName—The name (not label) of the field you want to include.
- FullTreePosition—The full tree position of the category for the field.
- appropriate attributes—The appropriate formatting attributes, if necessary.
For example, the following code displays two date fields, ClaimMade and LossDate, both created for the root category of the Claim object definition with the unique code CLAM. The LossDate field, however, appears with a time field next to it because of the showTime formatting attribute.
<tc:field name="ClaimMade" category="CLAM" />

        <tc:field name="LossDate" category="CLAM" showTime="true"/>
For attributes that you can use with tc:field, see Using Tag Attributes.
tc:wizardParameter
This tag displays the parameter field, either blank or with the default value specified for it. You can only use this tag in wizard blocks.
The <tc:wizardParameter> tag:
- Must always use the name attribute that references the parameter name.
- Should not be inside the <tc:section> tag, unless you want to display parameters only if the same section includes the custom fields for the category during record creation.
- Uses the following syntax:
<tc:wizardParameter name="ParameterName" appropriate attributes/>- ParameterName—the name (not label) of the parameter you want to include.
- appropriate attributes—the appropriate formatting attributes, if necessary.
For example, the following code displays two number fields, InjuredPersons and ClaimAmount. The ClaimAmount field, however, displays values with the dollar sign ($) before them because of the format attribute used with it:
<tc:wizardParameter name="InjuredPersons" />

        <tc:wizardParameter name="ClaimAmount" format="DOLLAR"/>
For attributes that you can use with tc:wizardParameter, see Using Tag Attributes.
tc:wizardParameterLabel
This tag displays the label for a parameter field. Insert tc:wizardParameterLabel before the tc:wizardParameter tag to identify the field on the page. For certain field types, such as check- boxes, the label typically displays after the field. If the wizard uses text prompts, you may not need to include the label. You can only use this tag in wizard blocks.
The <tc:wizardParameterLabel> tag:
- Must always use the name attribute that references the parameter name.
- Uses the following syntax:
<tc:wizardParameterLabel name="ParameterName" />- ParameterName—The name (not label!) of the field you want to include.
For example, the following code displays the label "Method used to report the claim" of the parameter of type List with the name "HowReported":
<tc:wizardParameterLabel name="HowReported" />
For attributes that may be used with field labels, see Label Tags.
- ParameterName—The name (not label!) of the field you want to include.
tc:blockTemplate
This tag displays the title of a custom block. TeamConnect defines the titles of system blocks.
The <tc:blockTemplate> tag:
- Must appear exactly as shown.
- Uses the following syntax:
<tc:blockTemplate blockTitle="title_text" />
tc:message
This tag allows localized messages to appear in custom blocks.
The <tc:message> tag:
- Uses the following syntax:
<tc:message key="messageKey" />- messageKey—Identification key for the corresponding value.
For example, the following code displays the value of a common custom key for welcome message text:
<tc:message key="custom.common.welcomeMessage" />
Note: Keys are defined in the Designer on the Custom Messages tab.
- messageKey—Identification key for the corresponding value.
tc:messageParam
This tag, used with the <tc:message> tag, supplies the value for a parameter.
The <tc:messageParam> tag:
- Must be nested inside a <tc:message> tag.
- Replaces parameters in the order of the <tc:messageParam> tag.
- May appear multiple times.
- Uses the following syntax:
<tc:message key="messageKey">
<tc:messageParam value="value" />
</tc:message>- value—Argument used to replace the parameter.
For example, if the defined custom.common value is welcome {0}, the code may appear as follows:
<tc:message key="custom.common.welcomeMessageWithUsername">
<tc:messageParam value="${cjb.currentUsername}" />
</tc:message>
Note: The Designer defines keys on the Custom Messages tab.
- value—Argument used to replace the parameter.
tc:forEach
The for each tag is used to perform simple looping behavior
The <tc:forEach > tag:
- Must use the following attribute:
- var: the loop item, stored in/retrieved from the class file.
- list : List of items to loop over, retrieved from the class file.
- Uses the following syntax:
<tc:forEach var="cjbClassFile.userLoop" items="${cjbClassFile.userList}">
<tc:out value="${cjbClassFile.userLoop.username}" /><br/>
</tc:forEach>
tc:documentImage
The document image tag is used to show an image from a file uploaded to TeamConnect.
The <tc:documentImage /> tag:
- Must use the following attribute:
- document : Actual image file document from TeamConnect
- documentFolder : Actual folder from TeamConnect to search in.
- documentPath: String path of image file document in TeamConnect.
- height: Image height.
- width: Image width.
- Uses the following syntax:
<tc:documentImage
documentPath="/Users/parhaum/smiley.JPG"
/>
tc:if
The if tag is used to perform simple conditional logic.
The <tc:if /> tag:
- Must always be in lowercase.
- Must use the following attribute:
- test : The condition being tested.
- negate : Whether or not to negate the condition.
- Uses the following syntax:
<tc:if test="${cjbClassFile.conditional}">
</tc:if>
<tc:if test="${cjbClassFile.conditional}" negate="true">
</tc:if>
tc:out
The out tag is used to output simple text. Please note that there is no implicit escaping mechanisms, so while this can be used to render HTML, it is therefore vulnerable
The <tc:out /> tag:
- Must always be in lowercase.
- Must use the following attribute:
- value: the string to output.
- Uses the following syntax:
<tc:out value="${cjbClassFile.out}"/>
tc:recordLink
The record link tag is used to show a link to an entity record in TeamConnect.
The <tc:recordLink /> tag:
- Must use the following attribute:
- entity: Entity record in TeamConnect.
- Uses the following syntax:
<tc:recordLink entity="${cjbClassFile.currentUserContact}" />
tc:useClass
The use class tag is used to access functionality from a custom block's class file(s).
The <tc:useClass /> tag:
- Must use the following attribute:
- id: The name we'll use to refer to the class file in our block.
- name: The name of the class file uploaded to the Screens folder
- Uses the following syntax:
<tc:useClass id="cjbClassFile" name="MyClassFile" />
tc:user
The user field tag is used to get/set users in custom blocks.
The <tc:user /> tag:
- Must always be in lowercase.
- Must use the following attribute:
- id:
- name: Bind name for this field. If none, use prefix of "UM__".
- value: Initial value of this field.
- forceEditable
- forceNotEditable
- size: Controls width of search box or length of select box.
- forceSearch: Forces this to show as a Search field regardless of the Admin Setting.
- forceSelect: Forces this to show as a Select field regardless of the Admin Setting.
- useUsername: If true, the value attribute is the username. If false, it's the primary key.
- Uses the following syntax:
<tc:user
name="blockValues['myUser']"
forceSelect="true"
forceEditable="true"
allowNullValue="true"
nullValueKey=""
nullValueDisplayString="-- Nothing --"
/>
Tags to Embed Reports in Blocks
You can use block tags to embed reports or links to reports within a block.
tc:report
This tag renders the report's chart output within the block. It does not render tabular results. The <tc:report> tag:
- Must always be in lowercase.
- Must use two attributes:
- The path attribute (required) that references the location and name of the appropriate report
- The width and height attributes (optional) that define how much visual space in the block to use for report output. Their default value is 500px.
- Can contain one or more <tc:parameter> tags nested inside the <tc:report> tag.
- Uses the following syntax:
<tc:report path="path to report" width="500px" height="500px" />- path to report—The location and name of the report you want to render. The path is based on the root folder for Reports in TeamConnect. Folders are delimited with the forward slash (/) character.
Even though each path starts with the name of the root folder, "Reports," the tag also supports omitting the string "Reports" from the beginning of the path and using just a forward slash to imply the root. This shortened form of designating the root folder is valid for all paths in all report tags. - 500px—The separate sizes for the width and height of the space for rendering chart output. 500 pixels is the default for both. The suffix "px" or "%" is required at the end of the value to determine the units of measurement. The suffix "px" means that the size is measured in pixels. The suffix "%" means that the size is measured as a percentage of the size of the block itself.
- path to report—The location and name of the report you want to render. The path is based on the root folder for Reports in TeamConnect. Folders are delimited with the forward slash (/) character.
For example, the following code sample renders chart output for report OC_Spending, which is found in subfolder ManagementReports beneath the root report folder. The default width and height for the chart output have been overridden with specific values:
<tc:report path="/ManagementReports/OC_Spending" width="650px" height="400px"/>
tc:reportLink
This tag renders a link within the block. When clicked, the link executes a report. The report appears in a new page, with a link on that page to return to the block that you had been viewing. The user interface of the new page is almost identical to that presented by the Reports page when you click on the name of one of the listed reports.
The <tc:reportLink> tag:
- Must always be in mixed case, as shown.
- Uses the following attribute:
- The path attribute (required) that references the location and name of the appropriate report.
- Can contain one or more <tc:parameter> tags nested inside the <tc:reportLink> tag.
- Uses the following syntax:
<tc:reportLink path="path to report"/>- path to report—The location and name of the report you want to render. The path is based on the root folder for Reports in TeamConnect. Folders are delimited with the forward slash (/) character.
For example, the following code sample renders a link to report OC_Spending, which is found in subfolder ManagementReports beneath the root report folder:
<tc:reportLink path="/ManagementReports/OC_Spending"/>
tc:reportFolderLink
This tag renders a link within the block. When clicked, the link opens a page as if the user had navigated to the Reports tab of the application and to the path specified in this tag. The section is equivalent to the section described in Using Report Folders. No reports run as a result of this link, but the user may then select one of the reports within the specified folder.
The <tc:reportFolderLink> tag:
- Must always be in mixed case, as shown.
- Uses the following attribute:
The path attribute (required) that references the location and name of the report folder. - Uses the following syntax:
<tc:reportFolderLink path="path to folder"/>- path to folder—The location and name of the report folder you want to display. The path is based on the root folder for Reports in TeamConnect. Folders are delimited with the forward slash (/) character.
For example, the following code sample renders a link to subfolder ManagementReports beneath the root Reports folder:
<tc:reportFolderLink path="/ManagementReports"/>
To link to the root Reports folder itself, use either syntax:
<tc:reportFolderLink path="/"/>

        <tc:reportFolderLink path="Reports"/>
- path to folder—The location and name of the report folder you want to display. The path is based on the root folder for Reports in TeamConnect. Folders are delimited with the forward slash (/) character.
tc:parameter
This tag supplies a value to a parameter that a report uses. This tag is only valid within the body of a <tc:report> tag or a <tc:reportLink> tag.
Note: If a report uses parameters, and a parameter is not specified within the <tc:report> tag or <tc:reportLink> tag, the parameter runs with the default value.
The <tc:parameter> tag:
- Must always be in lowercase.
- Uses the following attributes:
- The name attribute (required) corresponds to the parameter name that the report designer defines. If the name value is not resolved at report runtime, an error message appears.
- The value attribute (required) specifies the value associated with this parameter during the execution of the report.
The value attribute can contain a list of multiple values, separated by semicolons.
If the value(s) for this attribute are not resolved at report runtime, an error message appears.
Permissible values are dependent on the datatype of the parameter. Most datatypes allow the value of the parameter to be expressed as a string literal, as long as that string conforms to the datatype. For example, a date datatype accepts the string "2011-04-30" and a category datatype accepts the string "EXPE_ABCD". Datatypes that do not permit string literals include User, Project, Contact, Involved, and Account. For those five datatypes, you must use an attribute path expression.
Parameters of datatype Enum accept a string literal composed of one or more Java constant names. Multiple names are delimited by semicolons (;). For more information about Enum (enumerations) see Enumerations.
All datatypes, whether or not they permit string literals, accept an attribute path expression that references an object compatible with the datatype. Examples of attribute path expressions are ${cjb.startedOn} for a date parameter and ${applicationEntity.treePosition} for a lookup table parameter.
- Uses the following syntax (shown within a containing tc:report tag):
<tc:report path="path to report" width="500px" height="500px">

    <tc:parameter name="name" value="value"/>

    <tc:parameter name="name" value="value"/>

</tc:report>- path to report—The location and name of the report you want to render. The path is based on the root folder for Reports in TeamConnect. Folders are delimited with the forward slash (/) character.
- 500px—The separate sizes for the width and height of the space for rendering chart output. 500 pixels is the default for both. The suffix "px" or "%" is required at the end of the value to determine the units of measurement. The suffix "px" means that the size is measured in pixels. The suffix "%" means that the size is measured as a percentage of the size of the block itself.
- name—The name of the parameter that the report designer knows.
- value—The object or literal that contains a value to be associated with the parameter for this execution of the report.
For example, the following code sample renders chart output for report RejectedInvoices, which is found in subfolder ManagementReports beneath the root report folder. The default width and height for the chart output are overridden with specific values. A report parameter named "pastXdays" is assigned a value contained in the attribute path "limitDays":
<tc:report path="ManagementReports/RejectedInvoices" width="650px" height="400px">

     <tc:parameter name="pastXdays" value="${cjb.limitDays}"/>

</tc:report>
XML File Sample
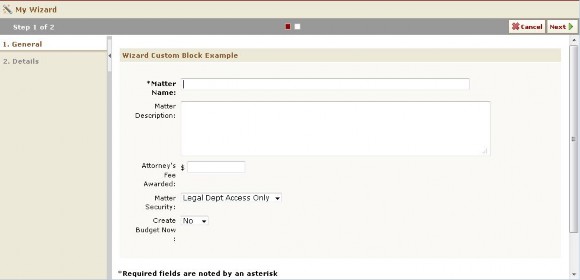
This topic contains an XML code sample that results in the General Subpoena block for the following wizard page.
Note: You can customize the tabbing order by adding a tabIndex attribute to each of the <tc:field> and <tc:wizardParameter> tags within an XML file. For details, see tabIndex.
The XML sample in this topic demonstrates how to include the following examples in an XML file:
- Using the
<tc:useClass>tag to refer to theMyCustomBlock.classfile. - Using the
<tc:blockTemplate>tag with the optionalblockTitleattribute. - Adding custom fields to a block. This custom field in this code sample are text, number, and lookup table fields.
- Using formatting tag attributes for the number field, such as
formatandsize. - Adding wizard parameters to a block. Because this XML sample contains parameters, you can only use it in wizards. To use the code sample in an object view, remove or comment out the parameters from the code.
- Specifying a custom JavaScript file to add styles to the CJB.
The custom block image shows the resulting block on a wizard page.
Code Sample
<?xml version="1.0" ?>
<tc:transform version="4.0" xmlns:tc="http://www.mitratech.com/schemas/2008/ custom">
<tc:section category="DISP">
<tc:blockTemplate blockTitle="Wizard Custom Block Example">
<!-- Use a custom java class -->
<tc:useClass id="cjb" name="MyCustomBlock"/>
<div class="bg_blockcolor">
<table cellspacing="10" width="100%">
<tr>
<td width="50%" align="left" valign="top">
<table cellpadding="3" width="96%">
<!-- System field -->
<tr valign="top">
<td align="right" class="tdlabel2">
<tc:label colon="true" required="true" key="custom.common.legal.matterName"></ tc:label>
</td>
<td>
<!-- Default value of field generated by custom java class -->
<tc:field maxLength="250" name="enterpriseEntity.name" size="77" value="${cjb.generateName}"></tc:field>
</td>
</tr>
<!-- Custom field of type text -->
<tr valign="top">
<td align="right" class="tdlabel2">
<tc:label colon="true" name="MatterDescriptionDI" category="DISP"></ tc:label>
</td>
<td>
<tc:note cols="80" category="DISP" name="MatterDescriptionDI" rows="5"></tc:note>
</td>
</tr>
<!-- Custom field of type number -->
<tr valign="top">
<td align="right" class="tdlabel2">
<tc:label colon="true" name="AttorneysFeeAwardedDI" category="DISP"></tc:label>
</td>
<td>
<!-- Number value formatted as currency -->
<tc:number name="AttorneysFeeAwardedDI" category="DISP" format="CURRENCY" size="12"></ tc:number>
</td>
</tr>
<!-- Custom field of type lookup -->
<tr valign="top">
<td align="right" class="tdlabel2">
<tc:label colon="true" name="MatterSecurityDI" category="DISP"></tc:label>
</td>
<td>
<tc:lookup nullValueDisplayString="(None Selected)" category="DISP" name="MatterSecurityDI" tableCode="SECE" allowNullValue="true"></tc:lookup>
</td>
</tr>
<!-- Wizard parameter -->
<tr valign="top">
<td align="right" class="tdlabel2">
<tc:wizardParameterLabel name="CreateBudgetNow" colon="true"></ tc:wizardParameterLabel>
</td>
<td>
<tc:wizardParameter name="CreateBudgetNow" wizardUniqueKey="DNDI"></tc:wizardParameter>
</td>
</tr>
</table>
</td>
</tr>
</table>
</div>
<!-- Include custom javascript uploaded to Top Level > System > HTTPRoot-->
<script src="./httproot/myjs.js" type="text/javascript"> </script>
</tc:blockTemplate>
</tc:section>
</tc:transform>
Uploading Custom Block Files
After you have created the required XML file and Java class you must upload them to the Screens directory of TeamConnect.
To upload CJB files to TeamConnect
- Log in to TeamConnect and Designer, then in the Go To drop-down list select Documents.
- Browse to the Screens directory of the required custom or system object for which you are creating the block.
For example, if the required object was named Claim, you would browse to Top Level \System\Object Definitions\Claim\Screens. - Click Upload Document
 on the toolbar.
 - From the Upload New File screen, choose one of the files to upload. Enter the File Name and File Type and click upload file. You can do the same for any other files.
The name of the file now appears on the File Name drop-down list on the Blocks tab of the system or custom object. To define the block in TeamConnect, see Defining Blocks.
Defining Blocks
After you have written the XML file that contains the structure and content of the desired block, you need to define it as a block for TeamConnect. You can do this by selecting the XML file on the Blocks tab of the appropriate object definition.
To add a block to an object definition
- In the Designer window, from the Go to drop-down list select Object Definitions.
- Select the appropriate object definition and then select the Blocks tab.

- Enter the appropriate values as described in the Blocks Tab table.
- If you want to continue adding custom blocks, click add more. Otherwise, click Save on the toolbar.
The blocks are now available for inclusion in custom object views or wizards for the selected object definition. To view a block on the screen, you must include it in an object view (for details, see Creating Object Views), or if it contains parameters, you must add it as a page component in a wizard (for details, see Defining Page Components in Wizards).
The following table describes the items in the Blocks tab.
Blocks Tab
|
Item |
Description |
|---|---|
|
Go to Screens folder |
Click this hyperlink to go to the Screens directory of the selected object. This directory is where you store all your XML files (blocks) for the selected object. |
|
File Name |
Select the XML file that contains the block information. Note: This drop-down list reflects the contents of the Screens directory of the selected object. |
|
Friendly Name |
Enter a name (or title) to identify the block. This name is used to reference the block when adding it to an object view or a wizard page, and it is best to reflect the contents of the blocks. The maximum length is 250 alphanumeric characters. Tip: Make the friendly name as descriptive as possible so other solution developers can easily understand what the block is created for. |
|
Block List |
Displays the blocks for the selected category. Select or clear the corresponding check-boxes on the left to change or delete the appropriate blocks. |
Friendly Names
Friendly names are distinguished by objects, so you cannot use the same name twice for the same object, but you can use the same name for other objects. For example, you can use the friendly name "Assignees" in all objects, except for custom objects and the Task object because they already use the Assignees name.
The following table includes the words that you cannot use as friendly names for custom blocks.
Friendly Names You Cannot Use
|
Objects |
Words You Cannot Use |
|---|---|
|
All Objects |
|
|
Accounts |
|
|
Appointments |
|
|
Contacts |
|
|
Documents |
|
|
Invoices |
|
|
Involved Parties |
|
|
Projects |
|
|
Tasks |
|
Troubleshooting Custom Blocks
Custom Block Troubleshooting Tips
|
Possible problem example |
Possible solutions |
|---|---|
|
The time fields do not appear in date fields. |
Make sure you are using the correct formatting tags and set their values properly. See Using Tag Attributes. |
|
Numbers do not display with correct currency symbols, percentages, or decimal points. |
|
|
Option buttons and search modules appear as drop-down lists. |
|
|
Fields are too wide or too narrow. |
|
|
Fields and labels do not appear on the page. |
Check the following:
|
|
The layout of the entire block does not display properly. |
Make sure the |
|
Nested tables do not display properly. The background color is broken. |
Make sure each nested table is enclosed between the |
|
The system displays a message about parsing errors. |
Troubleshoot the XML file. See Understanding XML Files. |
|
The system displays a message about block errors and refers to an error log. |
Check the error log for more information. |
|
The block does not reflect changes to an XML file. |
Make sure you have checked out and checked in the XML file properly in the Documents area. |
|
The uploaded XML file fails to appear on the page. |
Check for the following:
|
|
Required custom fields do not display in red (or another specified color). |
Check for the following:
|