
Creating Templates
To create a template, you must have the following information:
- Object for which you want to create a template.
- System and custom fields you want the template to automatically populate with default values, such as Name, Opened On. For more details on fields, see Adding Fields to Templates.
- Sub-objects you want the template to automatically add and populate with default values, such as Categories, Assignees, and Relations. For more details on sub-objects, see Adding Sub-objects to Templates.
- Related objects you want the template to automatically create, such as Tasks, Accounts, History, and Appointments. For more details on related objects, see Adding Related Objects to Templates.
When you have all this information available you are ready to create your template.
To create a template
- Select Object Definitions in the Designer window, from the Go to drop-down list.
- Select the appropriate object definition.
- Select the Templates tab.
- Click new.
The General tab of a new, blank template screen appears. - In the Name field, type a name to identify the template.
- In the Unique Key field, type a name or value that uniquely identifies the template within the object definition.
A template's unique key may not contain spaces, underscores, punctuation marks, or any special characters. - In the Default Document Folder drop-down list, select the folder with contents that you want to automatically populate the Documents tab of each record created from the template.
- Click Save.
- Click the Records tab.
The objectName > General folder of the Records tab appears by default. - Depending on your template design, add and define the appropriate elements, depending on the following conditions:
- If you need to define system fields in the template, click the General folder (if it is not already displayed).
See Adding Fields to Templates. - If you need to add categories to the template, click the Categories folder displayed on the Records tab.
See Adding Categories to Templates. - If you need to add sub-objects to the template, click the corresponding folder displayed on the Records tab.
See Adding Sub-objects to Templates.
- If you need to add related objects to the template, click the corresponding folder displayed on the Records tab.
See Adding Related Objects to Templates.
- If you need to define system fields in the template, click the General folder (if it is not already displayed).
- Click Save.
- Link the template to the appropriate wizard, and when the wizard design is complete, test them both.
Defining Values in Templates
The process of defining template fields, sub-objects, and related objects essentially consists of assigning certain default values to their respective attributes. These attributes usually represent the actual fields in the end-user interface. The values you specify in your template automatically appear in the corresponding fields in the user interface when the user creates a new record based on your template.
Templates use three basic types of field values: Literal (or "static"), Attribute, and Formula, which may be a combination of Literal, Attribute, and operator values. For more information on field values, see Field Value Types. For the explanation of different operators, see the Operator Options for Different Attribute Types table.
To define fields in a template
- Make a list of all fields that you want to be automatically prepopulated with the help of the template you are creating.
- Decide which default values to assign to each field.
- Make sure no field definitions in the template conflict with the settings in the selected object definition, for example, Names for custom objects.
For more details, see Points To Remember. - Decide which fields also require that their corresponding sub-objects must be defined and prepopulated first, for example, Categories or Assignees.
- Open the Records tab of the appropriate template.
- Depending on the value type you want to assign to each field, proceed to the following instructions:
Adding Fields to Templates
Templates allow you to define certain fields in an object record to be automatically prepopulated with specified values in each new record created through any wizards or rules to which the template is linked.
Prepopulated fields may include record names, descriptions, amounts, dates, default categories, and so on. For example, every time a user creates a task based on a 30-Day Review Task template, you may want the following fields to be automatically populated with specified values such as:
- Subject
- Due on
- Priority
- Default Category
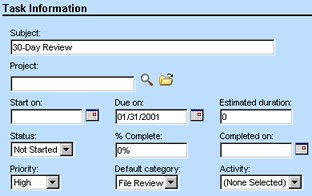
To accomplish this kind of action using a template, define the following default values to be populated in each record:
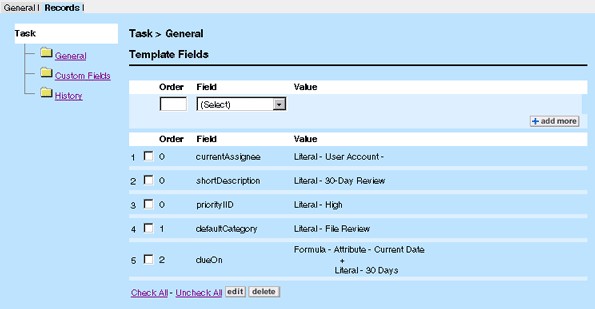
Sample Template Values
|
Field label in the user interface |
Field |
Value |
Default value inserted |
|---|---|---|---|
|
Subject |
shortDescription |
Literal > 30-Day Review |
30-Day Review |
|
Due on |
dueOn |
Formula > Attribute > Current Date + Literal > 30 > Days |
Depends on the date of creation. |
|
Priority |
priorityIID |
Literal > High |
High |
|
Default Category |
defaultCategory |
Literal > File Review |
File Review |
The following image illustrates the values in the Sample Template Values table.
You may define fields on the Records tab of the template screen in the object definition. For instructions on this operation, see Adding Fields to Templates.
For details on attributes, field value types, and paths, see Field Value Types. For details on operators, see the Operator Options for Different Attribute Types table.
Points To Remember
Keep the following points in mind when adding fields to templates:
- There are certain fields, such as Default Category or Main Assignee, that you populate only if the corresponding category or assignee is added to the record. This means that in your template, you have to define the corresponding sub-objects first (in this case, a category and an assignee), before setting the corresponding default fields. See Adding Sub-objects to Templates.
- When defining fields for custom objects, keep in mind that the name and number attributes may or may not be available for selection, depending on the properties defined in the object definition, under the following conditions:
- If the project name or number are set to be manually entered by the user in the Name and Unique ID tabs of the corresponding object definition, the corresponding attributes are available in templates.
- If the project name or number are set to be automatically generated based on the selected pattern in the Name and Unique ID tabs of the corresponding object definition, the corresponding attributes are not available in templates.
- Depending on your wizard or rule design, all values assigned to the fields of the main record and any of its sub-objects and related objects may be overwritten by your specified wizard or rule actions.
Field Value Types
Regardless of whether you are defining template fields, sub-objects, or related objects, you must specify a field value that is automatically populated when the user creates a new record. As shown in the following table, these field values may be:
- Literal: static
- Attribute: dynamic
- Formula: static-dynamic
Field Value Types
|
Literal |
Attribute |
Formula |
|---|---|---|
|
Values that users manually enter or select, also known as "static" values. For example, the value for the Default Category in a claim record is manually set to Category 1, which is set to Auto. |
Values that are based on a value entered or selected in another field and defined using Object Navigator, also known as "dynamic" values. For example, the value for the sub-object Assignee 2 is set to the user who created the record. |
Values that are derived from a combination of static and dynamic values, also known as "static-dynamic" values. For example, the value for the Due On date of the related object Task 1 is set to be 7 days (static value) after the date when the record is created (dynamic value). |
You may use pre-population rules in combination with a template to automatically populate text and memo text fields with static values, dynamic values, or string concatenation.
Usually, fields must be populated by a value of the same type. For example, a number field must be populated by a number. You may prepopulate text and memo-text fields with the following types of values:
- Boolean—Populate the field with Yes or No according to the boolean value (Boolean values are generally shown in the end user interface as check-boxes)
- Date—Populate the field with the system date and time formats
- Number—Populate the field with a number as text
- Record—Populate the field with the display string of the record (its name or number)
You may use pre-population rules in combination with a template to automatically populate number fields using the following calculations:
- Addition
- Subtraction
- Multiplication
- Division
- Percentage of a number
- Ratio between two numbers
- Total values from multiple child records, such as the sum of the Amount field from all line items of an invoice
- Number of items in a list, such as the total number of assignees for a matter record
Defining Fields with Literal Values
To define a field with a static value in a template
- In the Designer window, from the Go to drop-down list select Object Definitions.
- Select the appropriate object definition.
- Select the Templates tab, and then select a template.
- Open the Records tab.
- Select the General folder.
- Enter the Order of the field.
The order is important only when the value of one field depends on the value from another field you are defining. - From the Field drop-down list, select the field you want to define.
- From the Value drop-down list, select Literal.
- Enter or select the appropriate value in the Literal field.
For specific instructions and examples of how to enter a static value for different field types, see the following table. - Click add more.
Static Value Examples for X Fields
|
Attribute type |
Instructions |
|---|---|
|
Date |
Enter the appropriate date manually or select it from the Pop-up Calendar. Note: The format depends on the selected preferences. |
|
Text |
Enter the appropriate text string. |
|
Number |
Enter the appropriate integer or real number. |
|
Custom Object |
Search for the appropriate record and select it using the search module. |
|
Lookup Tables |
Select the necessary item from the drop-down list. |
|
Users |
Select the necessary user from the drop-down list. Note: Depending on the selected preferences, this field may be displayed as a user search module. |
|
Check-Boxes |
Select or clear the check-box. |
|
IID |
Select the item from the drop-down list. |
Defining Fields with Attribute Values
Attribute values are based on a value entered or selected in another field. They are also known as "dynamic" values. You may define dynamic values using Object Navigator.
To define a field with a dynamic value in a template
- In the Designer window, from the Go to drop-down list select Object Definitions.
- Select the appropriate object definition.
- Select the Templates tab, and then select a template.
- Open the Records tab.
- Select the General folder.
- Enter the Order of the field.
The order is important only when the value of one field depends on the value from another field you are defining. - From the Field drop-down list, select the field you want to define.
- From the Value drop-down list, select Attribute.
Another drop-down list appears with applicable values, such as Current Object. - Click the Object Navigator
 icon to create the appropriate attribute path. For details, see Using Object Navigator.
 - Click add more.
Defining Fields with Formula Values
Formula values are derived from a combination of static and dynamic values. They are also known as "static-dynamic" values. You may define formula values using Object Navigator, Literal values, and operators such as & or +.
To define a field with static-dynamic values in a template
- In the Designer window, from the Go to drop-down list select Object Definitions.
- Select the appropriate object definition.
- Select the Templates tab, and then select a template.
- Open the Records tab.
- Select the General folder.
- Enter the Order of the attribute.
The order is important only when the value of one field depends on the value from another field you are defining. - From the Field drop-down list, select the field you want to define.
- From the Value drop-down list, select Formula.
Formulas are only available for fields where a formula makes sense. For example, the activityItem field does not support a formula.
A set of drop-down lists appears including Literal, Attribute, and available operators to create the appropriate static-dynamic value. - Select the appropriate values from the drop-down lists to define the appropriate field.
Additional fields appear to allow you to select or enter the appropriate Literal or Attribute values. - Click the Object Navigator
 icon to create the appropriate attribute path. For details, see Using Object Navigator.
 - Click add more.
Adding Sub-objects to Templates
To automatically populate sub-objects using of wizards or rules, you may add the corresponding sub- objects to your template, such as categories, assignees, contact addresses, and so on.
Each sub-object consists of a set of fields that allow specific values to be assigned to them to create a valid record.
To add a sub-object
- In the Designer window, from the Go to drop-down list select Object Definitions.
- Select the appropriate object definition.
- Select the Templates tab, and then select the appropriate template. The General tab of the template screen appears.
- Select the Records tab.
If no sub-objects have been defined in the selected template, only their main folder is available. That is, no subfolders have yet been defined. - Select the appropriate sub-object folder in the left pane.
If the sub-object supports a default value, such as a default Fax Number in a Contact template, you may define it in the Set Default section using Literal and Attribute values. - Depending on the value type you want to assign to the default value, perform one of the following instructions:
- If you want to add additional, non-default values, enter a text value in the Friendly Name field and click add more to create a subfolder.
The value of the Friendly Name field is only used within the template. It does not appear in the resulting record. - If you have defined a Friendly Name, select its new subfolder.
- Depending on the value type you want to assign to each field, perform one of the following instructions listed in step 6.
- Click Save.
Adding Categories to Templates
To specify a category in a template
- On the Records tab, click the Categories folder.
- Select the appropriate default category from the Category list.
- Click add more.
The category has been added to the template and are added to records created by the wizard or rule that uses the template.
You may now add custom fields of that category to the template.
To prepopulate the default category of object records, specify the default category with a static value in the template.
To specify the default category in a template
- On the Records tab, click Categories.
- Select the appropriate default category from the Category list.
- Select the check-box next to the appropriate category in the list.
- Click set as default.
The default category has been specified in the template and is added as the default category in records created by the wizard or rule that uses the template.
Adding Assignees and Attendees to Templates
You may use pre-population rules in combination with a template to automatically populate the following elements:
- Task assignees
- Project assignees
To populate these elements, you must specify a user, group, contact, or contact group (Address Book). When specifying assignees or attendees, it is best to select a user instead of contacts or contact groups, because only contacts that are active users are assigned or included as an attendee. Adding contacts that are not active users does not cause an error to be displayed, but no assignee or attendee is added.
When users manually enter assignees in a task or project record, the system sets some assignee values automatically, such as Status and Assigned On, so you do not need to specify them in your template.
You must define any required values in your template, which users "manually" enter, if you want to create a valid sub-object definition. For example, you must include the user's name and role.
Important: In order for a sub-object to be valid you must define its required values. You may define assignees in a template and then set one as the default assignee.
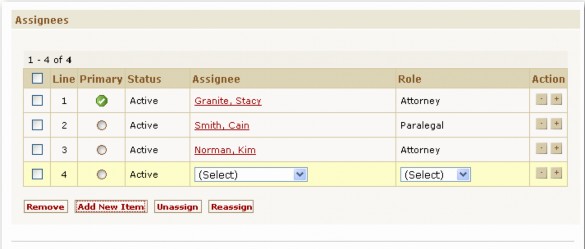
To define an assignee in a template
- Open the Records tab of the appropriate template.
- Select the Assignees folder.
Although Assignee is a sub-object of the Task object, task templates do not display a separate Assignee folder. You may define the Assignee field in the main General folder of task templates. - Enter a text value in the Friendly Name field and click add more to create a subfolder.
The value of the Friendly Name field is only used within the template to name the subfolders. It does not appear in the resulting record. - Select the new subfolder.
- Enter a value in the Order field.
The order is important only when the value of one field depends on the value from another field you are defining. - From the Field drop-down list, select appropriate field name, such as user.
- From the Value drop-down list, select Literal. Another drop-down list appears with applicable values.
- Select User Account.
Another drop-down list appears with available usernames. If there are more than 100 users, a search module appears. - Select the appropriate username.
- Click add more.
- To assign a role to the assignee, select type from the Field drop-down list.
- From the Value field, select Literal.
Another drop-down list appears with applicable values. - Select the appropriate role from the list.
- Click add more.
Once you have defined at least one Assignee value in a template, you may select one as the default assignee.
To define the default assignee in a template
- Open the Records tab of the appropriate template.
- Select the Assignees folder.
- In the Set Default Assignee section, select Literal.
- From the drop-down list to the right of the Literal value, select the friendly name you specified for the folder with the appropriate assignee.
- Click add more.
Deleting Sub-objects from Templates
Do not delete sub-objects that were added for the following reasons:
- To make custom fields created for a category (other than Root) accessible in a wizard.
- To prepopulate certain types of fields in the template that require a sub-object, for example, Main Assignee or Default Category.
To delete a sub-object from a template
- In the Designer window, from the Go to drop-down list select Object Definitions.
- Select the appropriate object definition.
- Select the Templates tab, and then select a template.
- Select the Records tab.
- Select the sub-object's folder in the left pane.
- Select the check-box next to the sub-object's Friendly Name field.
- Click delete.
The sub-object definition is removed from the template.
Adding Related Objects to Templates
Related objects are those objects whose records may be associated or linked to another object record and may be accessed directly from that object record. For details on the TeamConnect objects and their default relationships with one another, see About Objects.
Related objects in templates are associated with the main object in the following hierarchical ways:
- Child-parent
- Involved object
- Embedded object
Non-hierarchical related objects are not available on the Records tab of templates.
The Records tab of template screens displays a folder for each related object in the object definition. For example, a Dispute (custom object) template includes folders for the following related objects:
- Involved
- Task
- Appointments
- Expenses
- Accounts
- Embedded projects
- Child projects
- History
You may use templates to specify which related object records to create and which of their fields to populate with values.
Note: Although Document is a related object to projects, you may not define documents on the Records tab of the template screen. For more information, see Default Document Folder in the General Tab on Template Screens table.
Points To Remember
Consider the following points when defining related objects in a template:
- You have to add a separate related object for each associated record you want to be automatically created every time a new record is created. For example, if you need one account, one history record, five involved records, and five task records to be created, you must add twelve related objects in your template.
- You have the option of either creating a separate template for each related object or defining it within the main template.
- If you need to define only a few default values for certain fields in a related object, you may want to do this within the main template, such as the Due Date and Description for a task.
- If you need to define a more complex related object, with sub-objects, you have to create a separate template for it and the link it to the main template, for example, an account with its default category, posting criteria and a set of child accounts.
- You may also define a default document folder for each new record that is created based on the template. See Default Document Folder in the General Tab on Template Screens table.
- You may define sub-objects on the Records tab of the template screen in the appropriate object definition.
To add a related object to a template
- Make a list of all associated records you want to be created and linked to each record created based on the object template you are creating.
- Decide which related objects you need to define for each associated record.
- Decide what default values you want to be assigned to each attribute.
- Decide for which related objects you might need to create separate templates.
See Points To Remember. - Create the necessary separate templates to be linked to the selected related objects in the template you are creating.
- Open the Records tab of the appropriate object template. See Using Template Features.
- Select the appropriate related object folder in the left pane.
- Enter a text value in the Friendly Name field and click add more to create a subfolder.
The value of the Friendly Name field is only used within the template to name the subfolders. It does not appear in the resulting record. - Select the new subfolder.
- Do one of the following actions:
- Select Use an existing template if you want to use the fields and sub-objects that are already defined for the selected object within an existing template.
- Select the General subfolder of the friendly named folder if you want to define fields and sub-objects that are already defined for the selected object within an existing template.
The process of defining values for this option is the same as defining individual fields on the Fields tab of a template. The only difference is that you may not define fields that require sub-objects (for example, assignees). In this case, you must create a separate template for the related object and select the Use an existing template option to link it to the current template.
- If you select the General subfolder option, perform to the following instructions, depending on the value type you want to assign to each attribute:
Adding Involved Objects
You may define Involved object values in a template to automatically add an involved party record and populate its Contact field. To do this, you must specify one of the following values:
- An active group or user as a dynamic value
- A group as a static value (the group must include at least one active user)
- A user's contact as a static value
- A contact group (Address Book) as a static value (the contact group must include at least one active user's contact record)
- A dynamic value ending with the following object attributes:
- assigneeList(role).user
- assigneeList(Any).user
Note: Only active assignees may be used.