
Creating Wizards
The following general procedure summarizes the process that is necessary for creating a wizard and refers to other sections in this guide for details:
- Create a wizard specification document and complete all the prerequisites outlined in Designing Wizards.
- Determine whether you are going to use a template with your wizard. See Whether to Use Templates.
- If necessary, create the appropriate templates. See Defining General Wizard Information.
- In the Designer window, from the Go to drop-down list select Object Definitions.
- Open the appropriate object definition.
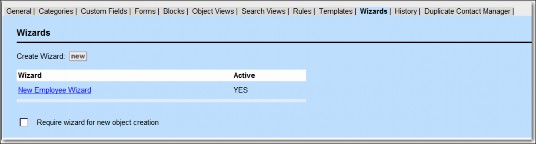
- Click the Wizards tab, and then click New.
- Define the general wizard information as described in the General Tab on Wizard Screens table.
- Click the Pages tab and add all appropriate pages as described in Adding Pages to Wizards.
- Click the Page Components tab. Define and add all wizard page components to each page as described in Defining Page Components in Wizards.
- Click the Actions tab and define any actions for the appropriate wizard pages as described in Using Actions in Wizards.
- Click the Page Transitions tab and modify the default page transition order by adding page transition rules to the appropriate wizard pages as described in Defining Page Transition Logic.
- Click the General tab and select the This wizard is active check-box and/or the Require wizard for a new object definition check-box if necessary.
- Save the wizard and thoroughly test it. See Testing and Troubleshooting Wizards.
Opening the Wizard Screen
To open the Wizard screen from an object definition
- Select Object Definitions, in the Designer window, from the Go to drop-down list.
- Select the appropriate object definition.
- Open the Wizards tab.
The Wizards tab opens with a list of existing wizards defined for the selected object (if any).
- Do one of the following actions:
- To open an existing wizard, click the respective link.
- To create a new wizard, click new.
The corresponding Wizard screen opens with its General tab displayed by default.
The Wizard screen consists of the following tabs:
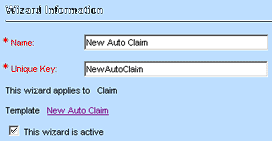
- General—Displays the name of the wizard, the object it is defined for, and its template (if any). You can also activate the wizard and specify that users may only create objects of this type using a wizard. See Defining General Wizard Information.
- Pages—Allows you to view and create all the pages for the wizard. See Adding Pages to Wizards.
- Page Components—Allows you to view and define the contents of each page in the wizard. See Defining Page Components in Wizards.
- Actions—Allows you to define the necessary actions you may want for the selected wizard pages. See Using Actions in Wizards.
- Page Transitions—Allows you to check what page follows the currently selected page and to define the appropriate page transition rules. See Defining Page Transition Logic.
Defining General Wizard Information
The General tab of the Wizard screen displays:
- The wizard's name
- The unique key of the wizard within the object
- The name of the object it is defined for
- The name of the template it is associated with (if any)
- Whether the wizard is active
- Whether to provide only a wizard to create objects of this type
To define general wizard information
- Access the General tab of the wizard screen by following the instructions in Opening the Wizard Screen.
The General tab of the wizard screen opens by default. - Define the information on the General tab according to the information in the General Tab on Wizard Screens table.
The following table describes the items on the General tab of the Wizard screen.
Note: The fields in the table below are the default fields that appear for all object definitions. You may see additional fields that only apply to the selected object definition.
General Tab on Wizard Screens
|
Item |
Description |
|---|---|
|
Name |
Enter a name that uniquely identifies the wizard and describes its purpose. This name appears to the users when they start to create a new record. |
|
Unique Key |
Enter an alphanumeric combination to uniquely identify the wizard within the object definition. It must be 50 or fewer characters in length and must not contain special characters such as spaces, underscores, or punctuation marks. After you save the wizard, the unique code appears as read-only text and you cannot change it. Wizards within the same object definition cannot have the same unique key. However, wizards belonging to different object definitions may have the same key. |
|
This wizard applies to |
Automatically displays the name of the object that the wizard is created for. |
|
Template |
Select one of the available templates you want to use in the wizard (if applicable). Note: If you intend to use a template with the wizard you are creating, make sure you create and define the template first. See General Template Information. |
|
This wizard is active |
Select this check-box to activate the wizard. Clear the check-box to deactivate the wizard. This field is available only after at least one page is added to the wizard. Until then, instead of this field, the following message appears: "The wizard is currently inactive. To be able to activate it, please add a page." Caution: Even when the check-box appears, do not activate the wizard until it is completely finished and ready for testing. |
|
Require wizard for new object definition |
Select this check-box if you want users to only have the option to create a record using a wizard. When users click the New button, the wizard opens automatically. Clear the check-box if you want users to have the options to create a record using a wizard and create a record manually using a blank record. This field is only visible if at least one active wizard is defined for this object. |
Adding Pages to Wizards
Wizard pages are represented by separate web page screens in the end-user interface. To create wizards, you add pages, define their individual contents, and specify page transitions. Each page may have a number of fields and may include a Next button, a Back button, a Cancel button, and a Finish button.
All of the necessary wizard pages must be added on the Pages tab of the corresponding wizard screen in Designer. You must define the order in which the pages must follow each other by default.
Depending on the number of alternative flows in the wizard and their page transitions, you may need to define more than one final page, as described in Identifying Wizard Flow and Page Transitions.
To add a page to a wizard
- Open the appropriate wizard screen and select the Pages tab.
The Pages tab opens.
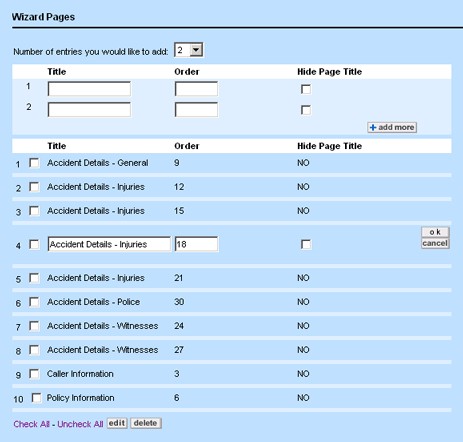
- Select the Number of entries you would like to add from the drop-down list.
- For each data entry row, define the page title, its order, and whether the page title must be hidden in the wizard as described in the Wizard Pages Tab table.
- Click add more and repeat step 3 until you've added all of the wizard pages.
For each page that you define, you must add the fields and blocks that you want to appear on each page. Click the Page Components tab to define the appropriate components for each page of the wizard. For instructions, see Defining Page Components in Wizards.
The following table describes the items on the Pages tab of the wizard screen.
Wizard Pages Tab
|
Item |
Description |
|---|---|
|
Title |
Enter a name for the page, This name appears at the top of the wizard page as its heading. See the Wizard Page image for an example. |
|
Order |
Enter a number to specify the default order in which the page is to appear in the wizard. Tip: When defining the page order, you may want to skip a few numbers before each page (for example, use 3, 6, 9, 13, 18, and 21, ) in case you need to insert a few additional pages later if your wizard design changes. This is also the order in which the names of the pages you are creating appear in Current Page drop-down list of the Page Components, Actions, and Page Transitions tabs and in the left pane when users are using the wizard. The default order that you create for the wizard pages may be modified through the appropriate page transition rules (Defining Page Transition Logic). |
|
Hide Page Title |
Select this check-box if you want the page title to be hidden. By default, this option is not selected. If you applied a block template to custom blocks, and your custom blocks have their block titles specified in the XML, this option prevents the title from being displayed twice. |
|
add more |
Click to add the defined page to the page list. |
|
Page List |
Displays all pages added to the selected wizard page. Select the check- boxes next to the components that you want to delete or edit and click the appropriate command button at the bottom. |
Defining Page Components in Wizards
You may define the contents of each wizard page on the Page Components tab of the wizard screen, which provides the following types of components:
- Text
- Block
- System Field
- Custom Field
- Parameter
To use the Page Components tab, you must first create wizard pages.
Note: If duplicate contact checking is enabled and you have created a wizard that creates contacts using the Contact search module (Create New Contacts pop-up window), under certain conditions certain contacts may not be created. See the Contacts for more information.
To define a page component in a wizard
- Open the appropriate wizard and select the Page Components tab.
- Select the wizard page you want to add components to from the Current Page drop-down list.
- From the Component list, select the component you want to add to the selected page.
The available components and their values are described in the Wizard Page Component Value Fields table. - In the Order field, enter an integer to indicate the order in which the component must appear in the wizard page.
- In the Value area, enter or select the appropriate values for the selected component. Different fields appear based on the Component that you selected.
- Click add more.
- Repeat steps 3 through 6 to add other components to the selected page and click Save.
Repeat steps 2 through 7 for each page in the wizard.
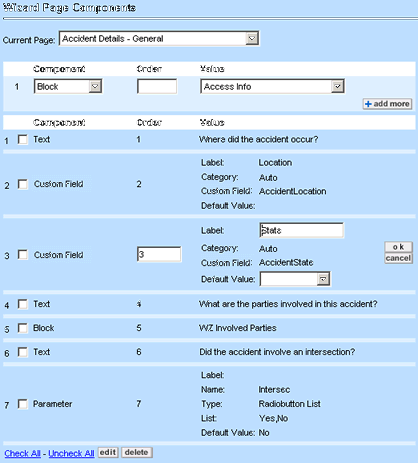
For an example of how the components shown in the Wizard Page Components Tab image appear in the resulting wizard page, see the Wizard Page Component Value Fields table.
The following image describes the fields in the Page Components tab.
Wizard Page Components Tab
|
Field or button |
Description |
|---|---|
|
Current Page |
Select the wizard page you want to define components for. All pages in this field are listed in the order assigned to them on the Pages tab. If no pages have been created for the wizard, (No Item Selected) appears in read-only text. |
|
Component |
Select the component you want to add to the selected wizard page. |
|
Order |
Enter an integer to indicate the order in which the components must follow each other when displayed in the wizard page. Tip: When defining the order, you may want to skip a few numbers before each component (for example, 3, 6, 9, 13, 18, 22, and so on.) in case you may need to insert a few additional components later, for example, if your page design changes. |
|
Value |
Enter the appropriate values in the corresponding fields displayed in the Value column. The number and type of fields varies depending on the component selected and the type of field it is represented by on the wizard page. The Default Value is not a required field in most of the cases, because it depends on the user input. For details on various Value fields for different components, see the Wizard Page Component Value Fields table. |
|
add more |
Click to add the new item to the list of page components. |
|
Page Component List |
Displays all components added to the selected wizard page. Select the check-boxes next to the components you want to delete or edit then click the appropriate command button at the bottom. |
The following table describes the component values available on the Page Components tab.
Wizard Page Component Value Fields
|
Component
|
Description
|
|
|---|---|---|
|
Text |
Type the Value text that you want to appear in the wizard page, for example, text prompts for the user. (optional) For localization purposes, enter a Unique Key that you want to assign to this text field. Tip: You may also want to use this component instead of field labels. |
|
|
Block |
Select the system or custom block that you want to appear in the selected wizard page. The contents of this drop-down list vary depending on the object you are creating the wizard for. For more details on blocks in TeamConnect, see Blocks. |
|
|
System Field |
Complete the following steps to add a system field from the object for which you are creating the wizard:
The Default Value field varies depending on the attribute selected. Labels for fields are optional because they may be self- explanatory or explained by the wizard prompts and questions. You may add only the system fields of the main object whose records are created through the wizard—not those of related objects. If you associate a template with the wizard and add a sub- object to it, you may select its main assignee or default category. |
|
|
Custom Field |
Complete the following steps to add a custom field from the object for which you are creating the wizard:
The Default Value field varies depending on the custom field selected. You may add the custom fields created for the object's root category only. However, if you associate a template with the wizard and add categories other than Root, then their respective custom fields are also available for you to add to the wizard. For details on adding a category to a template, see Adding Sub-objects to Templates. |
|
|
Parameter |
Parameters allow you to add items that you may need to use as qualifiers for page transitions or to perform certain actions on the object attributes. Parameter data is not stored in the database and is only used within the wizard. Complete the following steps to add a parameter to the wizard page:
|
|
|
System Field Custom Field Parameter |
of type String (Text Fields) |
For system fields, custom fields, and parameters represented by a Text Field in the wizard page, there are two additional fields in the Value column:
These two values allow you to specify how many characters the text field may display (Field Size) and how many characters it may contain (Maximum Length). |
|
of type Long String (Memo Text Fields) |
For system fields, custom fields, and parameters that are represented by a Memo Text Field in the wizard page there are two additional fields in the Value column:
These two values allow you to specify the size of the memo text box vertically (Rows) and horizontally (Columns). |
|
Defining Wizard Parameters
Parameters allow you to add items to be used as qualifiers for page transitions or to perform operations on the object attributes. Parameter data is not stored in the database and is only used within the wizard. Parameters may be simple, such as Number, String, or List, or use functionality that is stored in the database.
For each parameter that you add on the Page Components tab of the wizard definition, you may enter:
- A Label (required)
- The Type (required)
- A unique Name (required)
- Custom Lookup Table (required for check-boxes, radio buttons, and drop-down lists)
- The Default Value (optional)
The unique name is used in the following locations in the wizard screen:
- On the Qualifier tab of the page transition rules in the drop-down list for the Left Argument
- In the Right Argument if you select Attribute
- On the Actions tab in the Parameter drop-down list
- In the name attribute of the <
tc:wizardParameter name> and <tc:wizardParameterLabel name> tags, when the parameter is included in a custom block. For details, see Block Tags.
Caution: When you are including a parameter in a custom block that also contains custom fields, the parameter names and field names must be unique. Otherwise, errors may occur in page transition rules.
If you plan to include the parameter in a custom block, make sure to select the Display in blocks only check-box, or it appears twice on the wizard page.
Database Parameters
Complex parameter values are stored in TeamConnect's database. The following parameter types used in wizard page components are mostly system lookup tables that appear in drop-down lists in the wizard:
- Activity Item
- Address Type
- Area Item
- Category
- Check-Box List
- Contact Relation Type
- Country Item
- Drop Down List
- Email Type
- Fax Type
- Group
- Internet Address Type
- Invoice Rejection Reason
- Integration Message Queue
- Phone Type
- Project Relation Type
- Radio Button List
- Resource Type
- Skill Type
- String
- Territory Type
- User
Depending on system and user preferences, these items may also appear in an applet. The User parameter type may appear in a search module.
If you select any of these parameter types, the Default Value field in the Value column on the Page Components tab appears a drop-down list with the corresponding lookup table items so you may select a default value. In the resulting wizard page, the selected parameter is represented by the same drop-down list, applet, or search module with its respective items.
The following parameter types used in wizard page components are used to create a corresponding search module field, where the user may select the necessary record:
- Account
- Contact
- Custom Object
Transient Parameters
The following parameter types used in wizard page components have transient values. That is, they are not stored in the database and are created within the wizard itself:
- Simple types—Depending on the type of user input, select the appropriate parameter to create the corresponding type of field in the wizard page.
- Boolean
- Date
- Date&Time
- Decimal
- Integer
- Memo Text
- (Text) String
- List types—Add list parameters to present the user with simple options on the wizard page, such as Yes, No, or Unknown.
- Check-Box List
- Drop Down List
- Radio Button List
To define simple list type parameters
On the Page Components tab of the wizard definition, select an option in the Custom Lookup Table drop-down list.
Tip: Automated actions may populate a list parameter with values retrieved from records in the database. For example, you might display a list of outside counsel with certain rates and skills next to corresponding radio buttons.
Points To Remember
The following list summarizes wizard parameters:
- All parameters have transient values that exist only within the wizard in which they are defined.
- Parameter data is not stored in the TeamConnect database.
- Use its value to perform certain actions or as a qualifier for page transitions.
- Parameter values may be used in the wizard page for which you defined it and a any of the subsequent pages in the wizard for actions or page transitions.
For example, if you add a parameter of type Integer to page 3 to obtain the number of days required to complete a task, on page 6, you may use its value to create an action to set the Due On date for the task. - Parameters types are listed in the Type drop-down list in the Value column of the Page Components tab.
- Like custom fields, you may include wizard parameters in custom blocks to control their layout on the page.
You may do this by using the<tc:wizardParameter>and<tc:wizardParameterLabel>tags. For details, Block Tags.
Important: If you intend to use a parameter in a custom block, make sure the Display in blocks only check-box is selected. Otherwise, the parameter appears twice on the page, in the block and as an individual field.
Using Actions in Wizards
Wizard actions are operations that allow you to create appropriate behavior in a wizard, such as creating additional records, inserting values, accessing other records, or performing calculations to assign values to object attributes. Depending on your wizard design, applying actions to wizard pages is optional.
All wizard actions may be classified into the following groups based on:
- When they are executed
- Initial Actions—Executed when a wizard is started by the user but before the first page opens and may not be defined as a simple action.
- Page Actions—Executed when the user clicks next on wizard pages for which they are defined and may be defined as a simple or automated action.
- How they are defined
- Simple actions—Defined through the user interface and are limited to a predefined set of operators
- Automated actions—Defined in Java class or JavaScript files and may perform any operations on record values without limitation
The following table summarizes the relationships between the four types of wizard actions:
|
Wizard Action |
Simple |
Automated |
|---|---|---|
|
Initial |
X |
|
|
Page |
X |
X |
Important: You may only use one initial action file per wizard and only one automated page action file per page. However, you may define several simple actions for a page.
To define an initial action for your wizard or to add an automated action to a page, you must first create each page, and upload the Java class or JavaScript file to the appropriate document folder for the object.
To define a simple page action, see Defining Simple Actions.
Applying Automated Actions
Automated actions may perform any operations on record values without limitation. In wizards, these actions include initial actions and page actions.
You must define automated actions in their respective Java class or JavaScript files and upload them to the appropriate directory in the Documents area. Otherwise, they are not available on the Actions tab of the wizard screen.
Although automated actions may perform simple operations, you may use them to create more complex logic that may not be defined through the user interface, such as:
- Validating or verifying information entered by the user
- Opening existing records at the end of a wizard
- Inserting values in parameters of the type List.
Note: When you insert values in these parameters, you insert data gathered through the wizard into the appropriate screens of the object record. By default, duplicate contact checking is not performed when custom Java code creates or updates contacts. See the ContactService.readDuplicateContacts() method in the API Javadocs to use duplicate contact checking functionality.
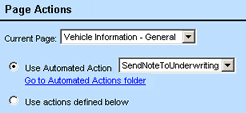
To apply an automated action to a page in a wizard
- Upload the Java class or JavaScript files to the Automated Actions folder.
- Open the Actions tab in the appropriate wizard.
- In the Page Actions section, select the wizard page you want to apply the action to in the Current Page drop-down list.
- Select the Use Automated Action radio button. The Use Automated Action drop-down list opens.
- From the Use Automated Action drop-down list, select the file with the action you want to be applied to the selected wizard page.
- Click Save.
Points To Remember
- You may use only one automated action file per page.
- Automated actions are optional.
- The Automated Actions folder location in the Documents area is:
Top Level/System/Object Definitions/objectName/Rules/Automated Actions/
For information on how to create automated actions, see Writing Automated Actions.
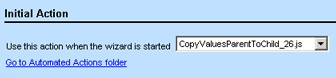
Specifying Initial Actions
Initial actions are used to run an initialization routine when a wizard is started by the user but before the first page of a wizard opens. For example, these actions may compute the values inserted from the template associated with the wizard.
To specify the initial action for a wizard
- Make sure the necessary files are uploaded to the Automated Actions folder of the object definition.
- Open the Actions tab in the appropriate wizard.
- In the Initial Action section, from the Use this action when the wizard is started drop- down list, select the file with the action that you want to be executed.
- Click Save.
Points To Remember
- Initial actions are optional and depends on your wizard design.
- Initial actions must be defined as automated actions.
- You may only define one initial action per wizard.
See also Execution and Population Order.
Defining Simple Actions
Simple actions are operations, such as calculations, string concatenation, and so on, that allow you to assign specific values to object attributes. These actions are always defined through the user interface and are limited to the number of the predefined operators available for each value type.
You may assign values to object attributes belonging to the object's related or child objects— provided you have defined the objects in a template and associated the template with the wizard. Once defined in the template, the sub-objects are listed in the Object drop-down list of the Actions tab.
You may assign the following types of values:
- Static values
- Values of wizard parameters
- Values of other attributes using a path in the object model Use simple actions in a wizard when:
- You want to populate certain fields in the main record or its associated records with the values of parameters.
- When you want to overwrite the values assigned in a template with the ones specified on the Actions tab.
- You are not planning to use templates with your wizard, yet need to have certain fields of the main record prepopulated with default values.
Important: Without a template you may not assign values to related objects or sub-objects.
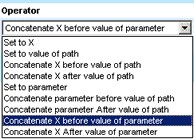
Simple actions are performed with the help of operators preselected for each value type. Depending on the attribute type, these operators may include the values shown in the following image and listed in the Operator Options for Different Attribute Types table.
To define a simple action for a page in a wizard
- Open the Actions tab in the appropriate wizard screen.

- In the Page Actions section of the Actions tab, select the appropriate pa ge from the Current Page drop-down list.
- Select the Use actions defined below radio button.
The screen refreshes to display data entry fields necessary for defining a simple action. - In the Order field, enter a number to indicate the order in which the action must be executed.
- From the Object drop-down list, select the appropriate object for which this action is being defined.
If you have associated a template with the wizard that defines child objects, these objects are listed in the Object drop-down list. They are numbered the same way as they are in their respective template screens, for example, Task 1, Task 2.

- From the Attribute and Operator drop-down lists, select the appropriate attribute and the operator.
Depending on the attribute type, operators may include a set of operators listed in the Operator Options for Different Attribute Types table, in addition to another set of the same operators using the value of a parameter. For example, instead of Path or X, the operators could be Set to Parameter, Set to Value of Parameter, Subtract X from Value of Parameter. - Depending on the field value type of the selected attribute, enter the appropriate values for X, Parameter, or Path.
To learn more about setting a path, see Paths. - Click add more.
- Repeat steps 4 through 7 to add other actions to the selected page, if necessary, and click Save.
The following table describes the Action options on the Actions tab.
Simple Actions Options on Wizard Actions Tab
|
Field or button |
Description |
|---|---|
|
Current Page |
Select the wizard page from which you want to define actions. Note: All pages in this field are listed in the order assigned to them on the Pages tab. |
|
Use Automated Action |
Select this option to apply an automated action to the selected wizard page. The Page Actions section refreshes to display a list of available automated actions created for the selected object (for example, the Automated Action Option on Wizard Actions Tab image). For more details, see Applying Automated Actions. |
|
Use actions defined below |
This is the default option. Select it to define your own simple actions. The Page Actions section refreshes to display data entry fields where you may assign appropriate values to the selected fields through their respective attributes. For details, see Defining Simple Actions. |
|
Order |
Enter an integer to indicate the order in which the actions must take effect in the wizard page. Tip: When defining the order, you may want to skip a few numbers before each action (for example, 3, 6, 9, 13, 18, 22, and so on) in case you may need to insert a few additional actions later, for example, if your design changes. |
|
Object |
Select the object for which you want to define a simple action. The objects displayed in this drop-down list include:
These objects are numbered the same way as they are in their respective template screens, for example, Assignee 1, Assignee 2, Category 1, Task 1, Task 2, and so on. |
|
Attribute |
Select the attribute of the field in the user interface to which you want to assign a value. |
|
Operator |
Select the appropriate operator, depending on the operation you want to perform on the attribute value. For examples, see the Operator Options for Different Attribute Types table. Note: Along with the operators in the Operator Options for Different Attribute Types table, there is a set of the same operators available. These operators use the value of a Parameter instead of Path or X, for example, Set to Parameter, Set to Value of Parameter, Subtract X from Value of Parameter, and so on. |
|
Path |
This field and the reset button appear when you select a dynamic or static-dynamic option from the Operator drop-down list. For examples of the operators, see the Operator Options for Different Attribute Types table. Click the Object Navigator |
|
reset |
Click to clear the Path field and start adding the path again. |
|
add more |
Click to add the new item to the list of page actions. |
|
Page Action List |
Displays all simple actions added to the selected wizard page. Select the check-boxes next to the actions that you want to delete or edit and click the appropriate command button at the bottom. |
The following table lists possible options for different attribute types and examples of how they might be used.
Operator Options for Different Attribute Types
|
Attribute type |
Operator |
Value type |
Description |
Example |
|---|---|---|---|---|
|
Lookup Table Check- Box Object IID |
Set to X |
Static |
Assigns the value entered or selected in the X field. |
The Main Assignee for the claim is the assignee with the role Adjuster. |
|
Set to value of path |
Dynamic |
Assigns the value of the path specified in the Path field. Note: For check-boxes, the value of path may be another check-box. For lookup tables, the value of path must be the same lookup table in another record. |
None |
|
|
Date |
Set to X |
Static |
Assigns the value entered in the X field. |
The Due On date of a task is set to the date entered in the X field, for example, '07/01/02'. |
|
Set to value of path |
Dynamic |
Assigns the value of the path specified in the Path field. |
A task is due the same day as the date the claim is created. If the claim is created on 07/01/02, the Due On date for the task is set to 07/01/02. |
|
|
Add X days to value of path |
Static-Dynamic |
Adds the number of days entered in X to the value of the path. |
The task '30-Day Review' is due 30 days after the date the claim is created. If the claim is created on 07/01/02, the Due On date for the, '30-Day Review' task is set to 07/31/02. |
|
|
Subtract X days from value of path |
Static-Dynamic |
Subtracts the number of days entered in X from the value of the path. |
The Progress Report for a claim must be printed 2 days before the, '30-Day Review' meeting. If the, '30-Day Review' meeting is scheduled for 07/31/02, the due date for the Progress Report is 01/29/01. |
|
|
Text (Strings) |
Set to X |
Static |
Assigns the value entered in the X field. |
The value of the Short Description field for a task is set to the string entered in the X field, for example, '30-Day Review'. |
|
Set to value of path |
Dynamic |
Assigns the value of the path specified in the Path field. |
The value of the Name field of the account is set to the name of the claim. For example, 'Allison McDonald Auto Accident'. |
|
|
Concatenate X before value of path |
Static-Dynamic |
Include the value entered in X before the value from the Path. |
The value of the Short Description field for a task is set to the string `30-day review for' entered in the X field + the name of the claim. For example, '30- day review for Allison McDonald Auto Accident'. |
|
|
Concatenate X after value of path |
Static-Dynamic |
Include the value entered in X after the value from the Path. |
The value of the Short Description field for a task is set to the name of the claim + the string `- 30-day review' entered in the X field. For example, `Allison McDonald Auto Accident - 30- day review'. |
|
|
Number |
Set to X |
Static |
Assigns the value entered in the X field. |
The value of the Allocation Limit field of an account is set to the number entered in the X field, for example, `1,000,000.00'. |
|
Set to value of path |
Dynamic |
Assigns the value of the path specified in the Path field. |
The value of the Allocation Limit field of an account is equal to that of the Allocation Limit of its parent account. If the Allocation Limit of the parent account is set to `250,000', then the Allocation Limit of the account is set to `250,000'. |
|
|
Add X to value of path |
Static- Dynamic |
Adds the number entered in X and to the value of the path. |
The value of the Allocation Limit field of an account is the sum of `50,000' and the Allocation Limit of the parent account. If the Allocation Limit of the parent account is set to `250,000', then the Allocation Limit of the account is set to `300,000'. |
|
|
Subtract X from value of path |
Static- Dynamic |
Subtracts the number entered in X from the value of the path. |
The value of the Allocation Limit field of an account is the difference of `50,000' and the Allocation Limit of the parent account. If the Allocation Limit of the parent account is set to `250,000', then the Allocation Limit of the account is set to `200,000'. |
|
|
Multiply the value of path by X |
Static- Dynamic |
Multiplies the value of the path by the number entered in X. |
The value of the Allocation Limit field of an account is 25% of the Allocation Limit of the parent account. If the Allocation Limit of the parent account is set to `250,000', then the Allocation Limit of the account is set to `62,500'. |
|
|
Divide X by the value of path |
Static- Dynam ic |
Divides the number entered in X by the value of the path. |
None |
|
|
Divide the value of path by X |
Static- Dynamic |
Divides the value of the path by the number entered in X. |
The value of the Allocation Limit field of an account is half of the Allocation Limit of the parent account. If the Allocation Limit of the parent account is set to `250,000', then the Allocation Limit of the account is set to `125,000'. |
|
|
User |
Set to X |
Static |
Assigns the value selected in the X field. |
The value of the Assignee in a claim is set to the user selected in the X field, for example, Jane Smeeth. |
|
Set to value of path |
Dynamic |
Assigns the value of the path specified in the Path field. |
The value of the Assignee field in a claim is set to the user who created the claim. If Jane Smeeth is a claim associate who created the new claim, she is automatically set as the assignee for the claim. |
|
|
Set to user with role X in project of path |
Dynamic |
Assigns the user with the specified role in another project. |
The value of the Assignee field in a claim is set to the user who is specified as the Underwriter for its parent policy. If Mathew Anderson is the Underwriter for the parent policy, he is automatically set as the assignee for the claim. |
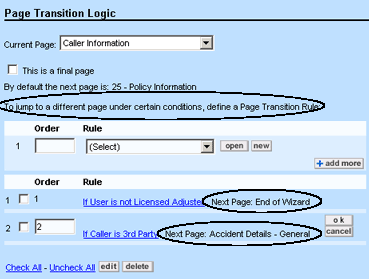
Defining Page Transition Logic
Page transition logic is the sequence in which the wizard pages follow each other. Depending on user input, this sequence may be linear (all wizard pages following each other), may skip pages, or may branch into alternative flows.
You can also allow users to end a wizard on any page by adding a Finish button. This allows users to choose where they want to stop the wizard, and then use the record's additional pages to add more information at a later time.
You must plan your page transition logic and create the wizard pages before specifying the necessary page transition rules. By default, the Order numbers you assign to each page defines the sequence of pages in a wizard.
To define page transition logic
Note: This procedure assumes that the wizard is open to its tabbed pages.
- Click the Page Transitions tab for the appropriate wizard.
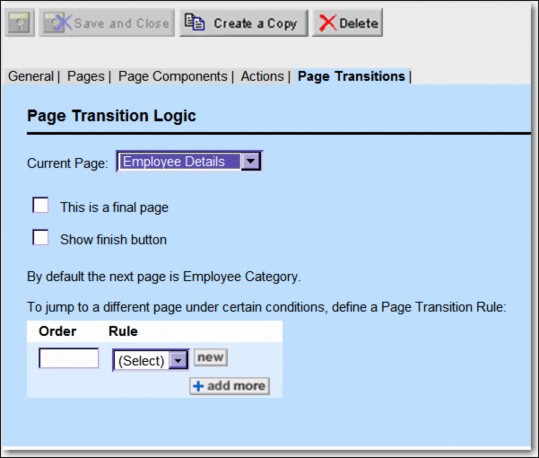
- From the Current Page drop-down list, select the page for which you want to define the transition logic.
- Complete the following information:
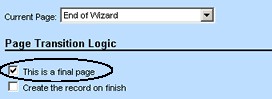
- If the selected page is the last page of the wizard, click the This is a final page check- box.
Caution: If you select the This is a final page check-box, the Create the record on finish check-box appears. If you do not check the Create the record on finish check-box, when you reach the end of the wizard, all of the information may be discarded.
- If you want to add a Finish button to the selected wizard page, click the Show finish button check-box.
- If the selected page is the last page of the wizard, click the This is a final page check- box.
- In the Order field, enter a number to indicate the order in which the rule must take effect in the wizard page.
- Select one of the following options:
- To select an existing rule, click the appropriate rule in the Rule drop-down list.
You may view the details of a rule by selecting it and clicking Open, which displays the Rule screen where the qualifier and action are defined.
- To create a new rule, see Creating Page Transition Rules.
The newly created rule is now displayed in the Rule drop-down list.
- To select an existing rule, click the appropriate rule in the Rule drop-down list.
- Click add more.
The selected rule is added to the list of rules defined for the page. - Repeat steps 2 through 6 to add other rules to the page, if necessary, and then click Save.
To display another wizard after a user completes the first wizard
Note: You can only add another wizard to wizards for custom objects.
- From the Page Transition tab of a wizard, place a checkmark in the This is a final page checkbox.
The Pick Wizard to launch on finish options appear. - Select the Object Definition with the second wizard.
- Select the wizard name from the Wizard drop-down list.
The following table describes the items on the Page Transitions tab.
Page Transitions Tab
|
Field or button |
Description |
|---|---|
|
Current Page |
Select the wizard page for which you want to view or define page transitions. Note: All pages in this field are listed in the order assigned to them on the Pages tab. |
|
This is a final page |
Select this check-box if the selected page is the last page that users will see, regardless of the flow that they select. The screen refreshes to display the Create the record on finish check-box and the Post Wizard to launch on finish options. |
|
Show finish button |
Select this check-box if you want to add a Finish button to the selected page of the wizard. You can add a Finish button to any page of the wizard. |
|
Create the record on finish |
Select this check-box if you want to create the record when the user clicks the Finish button. If you clear the check-box, all the information collected throughout the wizard may be discarded. |
|
Order |
Enter an integer to indicate the order in which the page transition rule takes effect in the selected wizard page. |
|
Rule |
Select the page transition rule you want to apply to the selected wizard page. |
|
new |
Click to create a new page transition rule for the selected page. |
|
add more |
Click to add the selected rule to the page transition rule list at the bottom of the screen. |
|
Pick Wizard to launch on finish |
If you want another wizard to display after the user completes this wizard, select the following options:
These options only appear when you select the This is a final page check-box. |
Creating Page Transition Rules
Page transition rules allow you to specify alternative flows in response to user input and other qualifiers, so the wizard displays the appropriate pages to the user. Otherwise, all pages follow each other in the order specified on the wizard's Pages tab.
Page transition rules are similar to TeamConnect rules located on the Rules tab of an object definition screen. However, page transition rules are wizard-specific, so you may only create and access them from the Page Transition tab of the corresponding wizard screen.
Page transition rules have the following tabs:
- General—General information about the rule, including its name, whether it is active, and its trigger. The rule's Type field has the value Wizard Page Transition, which cannot be changed.
- Qualifier—Allows you to define the qualifier that must be met in order for the rule to take effect. Wizard parameters may serve as qualifier items.
- Action—Allows you define which page comes next, if a specified condition exists.
When the user clicks next, page transition rules display the appropriate page based on the specified conditions. Like validation rules, they may check the values entered in certain fields, check who the user is, and so on.
Wizard parameters that you add on the Page Components tab of the wizard screen become available on the Qualifier tab of the page transition rule screen. That way, user entries in the wizard may be used as qualifiers in the rule.
To create a page transition rule
- Open the Page Transitions tab of the appropriate wizard.
- In the Current Page drop-down list select the wizard page for which you want to define the rule.
- In the rule column click New.
The General tab of the wizard page transition rule screen opens.
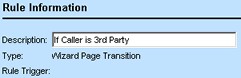
- In the Description field, enter a self-explanatory name for the rule.
- Click Save to allow you to add qualifiers.
- Select the Qualifier tab.
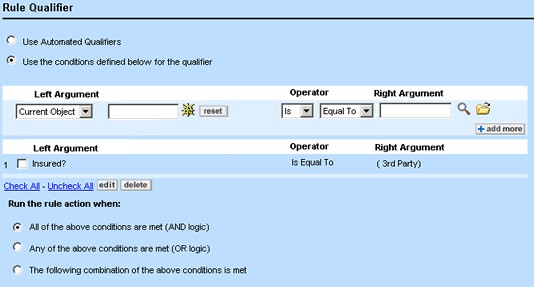
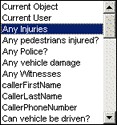
- Select the appropriate Left Argument, Operator, and Right Argument for the rule you are creating.
The Left Argument list includes all parameters that have been added to the wizard. - Click add more.
- Select the Action tab.

- From the Next Page When Condition Verified field, select the page that is next if the qualifiers are met.
- Click Save.
The rule is now available in the Rule list on the Page Transitions tab.
Points To Remember
Keep in mind the following important information about page transition rules:
- Page transition rules are executed on a per-page basis—that is, when the user clicks next in the wizard, not on Create when the user clicks finish.
- The Action tab of a page transition rule allows you to specify the page to which the wizard must direct the user, if the conditions on the Qualifier tab is verified.
- When a user clicks next in a wizard page for which a rule is defined, page transition rules are executed on a per-page basis according to the Order numbers you assign to each rule.
- Page transition rules are wizard-specific and may be created and accessed only from the Wizard screen of the object for which the wizard is created, not from the object's Rules tab.
- To direct a user to a specific page depending on the rights of their user group, check the current user in the page transition rule. The Current User option is available from the Left Argument drop-down list on the Qualifiers tab.
- You may add wizard parameters as page transition qualifiers on the Qualifier tab. Select them from the Left Argument drop-down list. Parameters are also available when you select Attribute from the Right Argument list.
Page Transition Rule Example
Assume there are five pages in a wizard regarding view obstructions that a claimant and insured might have had. The user must provide the following information in each subsequent page depending on the answers:
Page Transition Rule Example
|
Page # |
Wizard question |
Field type |
Wizard page component |
Page transition |
|---|---|---|---|---|
|
1 |
Did the Insured have any view obstructions? |
Yes or No Radio buttons |
Parameter1 |
If yes, go to Page 2. If no, go to Page 3. |
|
2 |
Indicate the view Obstructions that the Insured had. |
Check-Boxes |
Block |
Go to Page 3. |
|
3 |
Did the Claimant have any view obstructions? |
Yes or No Radio buttons |
Parameter2 |
If yes, go to Page 4. If no and yes on Page 1, go to Page 5. If no and no on Page 1, go to Page 6. |
|
4 |
Indicate the view Obstructions that the Claimant had. |
Check-Boxes |
Block |
Go to Page 5. |
|
5 |
Provide a summary of the view obstructions that the Insured and Claimant had. |
Memo Text |
Custom Field |
Go to Page 6. |
|
6 |
Did the Insured receive any citations? |
Yes or No Radio buttons |
Parameter3 |
For example, to create a rule to skip to Page 6 from Page 3 when neither Insured nor Claimant had any view obstructions, you have to do the following actions:
- On the Qualifier tab of the rule, you must specify the following conditions:
- Select Parameter1 in the Left Argument drop-down list and set it equal to No.
- Select Parameter2 in the Left Argument drop-down list and set it equal to No.
- On the Action tab of the rule, you must select Page 6.
Checking Page Order in Wizards
To determine the page order, alternate flows, and final pages in a wizard, refer to the Page Transitions tab of the corresponding wizard screen.
The Page Transitions tab does not list all page transitions at once. Instead, you select each wizard page in the Current Page drop-down list to determine which page follows it, based on the default page transition order or the selected page transition rules.
To check the page order in a wizard
- Open the Page Transitions tab in the appropriate wizard.
- From the Current Page drop-down list, select the wizard page for which you need to check the page order.
The screen either displays the page that follows the selected page, or informs you that the selected page is a final one, as shown in the following images.
- Repeat the previous step for all wizard pages you need to know the transition order for and write down the page transition sequence for each.
- Make any necessary changes and close the wizard screen when you are done.
You may use the list of page transitions to help you avoid breaking wizard flows when making changes to the page transitions.