
Using Categories
In custom pages, all custom fields, and custom blocks are tied directly to categories, that is, they are created and displayed by category only. For details, see Custom Fields.
Note: The word details is sometimes used to signify a block of custom fields, in the end-user interface, that are specific to one category. Since many categories may be assigned to a single record, it is also possible for details to represent a collection of many such blocks.
When granting user groups access to information on custom pages, you must give them the rights to the categories for which the custom fields were created.
Points To Remember
Consider the following points when working with categories:
- Based on categories, you may create and display custom fields, and blocks.
- When users delete categories from records, any data in the associated fields is lost.
- If you delete a category from an object definition, the fields associated with the category and any data in the fields are lost.
- Access to all categories in the end-user interface is controlled by the rights assigned to user group accounts.
- The categories for the Involved object are called Involved Roles and appear in the Involved block of each custom object record.
- When you create a category, you specify a four-character alphanumeric combination to uniquely identify it in the TeamConnect database. For more details, see Category Tree Positions.
- A category name must be unique within its object if it has any custom fields included in Data Warehouse.
Viewing Categories
You can view lists of categories through the Categories tab in a specific object definition.
In the end-user interface, categories appear in the Categories page of each object record (except for Tasks and Expenses), where users can select them from the Category hierarchical list.
To view an object's categories
- In the Designer window, select Object Definitions from the Go to drop-down list.
The Object Definition List appears. - Click the appropriate object definition.
The General tab of the object definition appears - Click the Categories tab.

- In the Show items in node list, select the appropriate node where you want to view categories.
- Do one of the following actions:
- To add categories, see Adding Object Categories.
- To edit categories, see Editing Object Categories.
- To inactivate categories, see Inactivating Object Categories.
- To delete categories, see Deleting Object Categories.
The following table describes the items in the Categories tab.
Categories Tab
|
Field or control |
Description |
|---|---|
|
Show items in node |
Select the appropriate node (hierarchy level) where you want to add the category. |
|
Item Name |
Enter a name for the category. The maximum length is 50 alphanumeric characters. |
|
Order |
Enter an integer to indicate the order in which the category appears in the Category drop-down list in the end-user interface. Categories with the same Order appear in alphabetical order. Tip: It may be helpful to enter orders in increments of five. If you ever have to add more categories, you have leeway as to where you insert them. |
|
Tree Position |
Enter a four-character alphanumeric combination to identify the category. This combination is the category's partial tree position. The full tree position of a category must include the partial tree positions of its parent categories all the way up to the root category. For more details, see Points To Remember. Although you can enter the tree position in uppercase or lowercase, it is saved in uppercase letters in the database. |
|
Category List |
Displays a list of categories created for the object. Select or clear the corresponding check-boxes on the left to delete or edit categories. |
|
edit |
Click to change the name of the selected category. For more details, see Editing Object Categories. |
|
delete |
Click to delete the selected category. Caution: Deleting categories can cause the loss of associated data. If you delete a node, all of its sub-levels and their data entries are also removed. If your system is in production, consider inactivating categories instead of deleting them. For more details, see Deleting Object Categories. |
|
inactivate/ activate |
Click to inactivate or activate the selected category. When you inactivate a category, users can see the item in all fields that reference the category, but they cannot select it. Inactivated categories appear differently than active categories. For more information, see Inactivating Object Categories. |
Locations of Categories in End-User Interface
Object Category Locations in the End User Interface
|
Category name |
Object type |
Section in end-user interface |
Field name |
|---|---|---|---|
|
Account |
System |
Categories |
Category |
|
Appointment |
System |
Categories |
Category |
|
General |
Default Category |
||
|
Contact |
System |
Categories |
Category |
|
Document |
System |
Categories |
Subject |
|
Expense |
System |
General |
Category |
|
History |
System |
General |
Default category |
|
Categories |
Category |
||
|
Invoice |
System |
Categories |
Category |
|
Line Item |
System |
General tab of Invoice > Line Items |
Category |
|
Involved (Role) |
System |
Project > Involved |
Default role |
|
Involved > Roles |
Role |
||
|
Project |
Custom |
Categories |
Category |
|
Task |
System |
Contact > Rates |
Task |
|
Task > General |
Default category |
Category Tree Positions
When you create a category on the Categories tab of the an object definition, you specify a four- character alphanumeric combination to uniquely identify it in the database. This is its partial tree position in the category hierarchy.
The full tree position of a category is a combination of partial tree positions assigned to the category and all of its parent categories, starting with the root category and separated by underscores.
For example, if category B with partial tree position BBBB is created under category A with partial tree position AAAA in the Account object definition, the full tree position of category B is ACCT_AAAA_BBBB.
On the Categories tab of the object definition, the full tree position is indicated by the selections you make in the Show items in the node drop-down list.
The top-level node is called the Root category. Its full tree position is the same as the "unique code" of the object definition, which are listed in the System Object Unique Codes table and appear in the following locations:
- General tab of the respective object definition
- Object Definition List screen
You may need a category's full tree position when creating custom blocks, automated actions and qualifiers, document generator templates, XML requests, and so on.
Each Involved and embedded object has its own root category that is independent of the custom object to which it belongs. Its full tree position is the unique code of the respective Involved or embedded object.
The following table lists the unique code (or Root category) of all system objects:
System Object Unique Codes
|
Object |
Unique Code |
|---|---|
|
Account |
ACCT |
|
Appointment |
APPT |
|
Contact |
CONT |
|
Contact Group (Address Book) |
CTGR |
|
Document |
DOCU |
|
Expense |
EXPE |
|
Fee |
FEE |
|
History |
HIST |
|
Invoice |
INVC |
|
Task |
TASK |
|
User Account |
USER |
|
Group Account |
GROU |
Likewise, the Root category of custom objects is the same as the object's unique code. For example, if the Dispute object has a unique code DISP, its top-level category would also be named Dispute, and its tree position would be DISP.
System Object Categories
By default the Categories tab of system objects displays the following information:
- Root as the only available node (hierarchy level), which you cannot delete or inactivate because it is needed to see other categories.
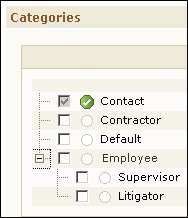
Important: Root is a concept only. The name of the root node never actually appears as Root in the interface. The root node adopts the name of the object itself. Thus the name of the root node for the Contact object is Contact, as shown in the figure below.
The tree position of the Root category is the same as the unique code assigned to the system object on the General tab of its object definition. - Default category, which you can delete after you add other categories.
As you add categories to a system object, they are added to the Show items in node drop-down list and displayed hierarchically. Subcategories are marked by the appropriate indentation. Children of the Root category appear at the same level as the Root category.
Custom Object Categories
By default, the Categories tab displays the name of the custom object as the only available node (hierarchy level), which you cannot delete or inactivate because it is needed to see other categories.
The tree position of the Root category is the same as the unique code assigned to the system object on the General tab of its object definition.
As you add categories to a custom object, they are added to the Show items in node drop-down list and displayed hierarchically. As in system objects, subcategories are marked by the appropriate indentation in the hierarchy. Children of the root category appear at the same level as the root category.
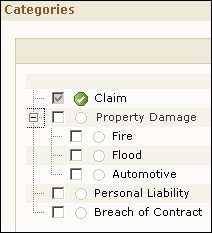
For example, Claim is the custom object name and root category in the following figure.
Adding Object Categories
You define new categories on the Categories tab of the respective object definition.
To add a category to an object
- Open the Categories tab of the desired system or custom object definition.
- In the Show items in node list, select the appropriate node where you want to add categories.
- Select the Number of entries you would like to add from the corresponding drop-down list.
- For each data entry row, fill in the appropriate fields as described in the Categories Tab table.
- If you want to continue adding categories, click add more. Otherwise, click Save on the toolbar.
The newly added categories appear in the list below the data entry fields. The categories are available immediately in the end-user interface.
Editing Object Categories
You can change category names and the order in which they appear in category lists. You cannot change the tree positions of a category unless you first delete the category and then recreate it.
To modify an object category
- Open the Categories tab of the desired system or custom object definition.
- In the Show items in node list, select the appropriate node where you want to modify object categories.
- Select the check-boxes next to the categories you would like to modify.
- Click edit.
The corresponding fields of the selected categories become editable. - Make the necessary changes to the Item Name or Order of the selected categories.
- Click Save.
The changes you made become effective immediately upon saving.
Inactivating Object Categories
You can inactivate categories so that users are prevented from selecting them from the corresponding records in the user interface. Inactivating categories allows you to prevent the use of unwanted values yet maintain existing data in records that include inactive categories.
Important: Before inactivating categories, read Points To Remember.
To inactivate an object category
- Open the Categories tab of the desired system or custom object definition.
- In the Show items in node list, select the appropriate node where you want to inactivate object categories.
- Select the check-box next to each category you would like to inactivate.
- Click inactivate.
If the selected categories do not have any child categories, they are inactivated, users cannot select them, and you are finished with this procedure.
If any of the selected categories have at least one child category, a message box with the following question appears:
Are you sure you want to inactivate these items? - Do one of the following actions:
- If you want to inactivate the items and all of their child items, select the check-box next to Include all child items and click ok.
- If you want to inactivate just the items within the selected node but not any of the child items, click ok.
- If you decide not to inactivate any items, click cancel.
Inactivated categories are indicated in the Active column of the Categories list of the object definition.
Important: Update the status of all inactivated categories so that this information is available if you ever need to convert your TeamConnect data.
Points To Remember
Consider the following points before inactivating categories:
- When you inactivate a category, its associated fields will continue to be displayed in records that already had the category assigned.
- Because an inactive category cannot be selected, its associated fields cannot be displayed in records that did not include the category prior to it being inactivated--even if users add an active child category.
- If an inactive category is assigned to a field via templates, rules, or the XML layer, an exception will be thrown to prevent the creation or update of the record. For example, if a template specifies the default category to be set on Create, but the category is deactivated, the record cannot be created.
- You cannot inactivate categories that are specified as the default category or associated with required custom fields. If you attempt to do so, you will receive an error.
- Inactivated categories are visible to end users in records where they were selected prior to being inactivated. In some circumstances, inactivated categories appear in gray. For example, the Show details for field displayed on the General tab of some project records will display any inactive categories in gray. If accessibility settings are enabled, (inactive) is appended to inactive category names and they are not displayed in gray.
- Users can specify inactivated categories as search criteria and report qualifiers. Inactivated categories appear in gray in search screens or (inactive) is appended to the category names.
- Existing records with inactive categories retain the associated custom field values. Users can edit records with previously selected inactivated categories and click save.
- If a user deletes an inactive category from a record and then clicks save, they cannot revert to the prior value unless a TeamConnect solution developer temporarily activates the category.
- Users can change an inactive category that was specified as the default category of a record (before it was inactivated) to a non-default category. However, once users save the change, they cannot set the inactive category as the default, despite its still being set in the record.
- If you ever need to convert your TeamConnect data, you must first activate all inactive categories and lookup table items. Once the data conversion is completed, you can restore the inactive items manually.
- When you inactivate categories, their status is recorded in the Active column of the Categories tab in the object definition.
- If a category has parent or child categories, you cannot readily determine their active status without navigating to each level in the hierarchy. Therefore, you should record the status of all inactive categories so that this information is readily available if you ever need to convert your TeamConnect data. Otherwise, you will have to manually search for any inactive categories.
- In the special case of the Line Item object definition, you cannot inactivate a category if that category is listed in the CSM Settings page, on the pages related to billing codes and to non- US tax codes, as being part of the default set of codes that are authorized for vendors. This includes task, fee, and expense codes. You must first de-authorize the code in that screen and de-authorize it in each vendor that has that code. Then you can inactivate the category.
Activating Object Categories
You can activate previously inactivated categories at any time so that users can select them from the corresponding object records in the user interface.
To activate object categories
- Open the Categories tab of the desired system or custom object definition.
- In the Show items in node list, select the appropriate node where you want to activate object categories.
- Select the check-box next to each category you would like to activate.
- Click activate.
If the selected categories do not have any child categories, they are activated, users can select them, and you are finished with this procedure.
If any of the selected categories have at least one child category, a message box with the following question appears:
Are you sure you want to activate these items? - Do one of the following actions:
- If you want to activate the categories and all of their child categories, select the check- box next to Include all child items and click ok.
- If you want to activate just the categories within the selected node but not any of the child items, click ok.
- If you decide not to activate any categories, click cancel.
Activated categories are indicated in the Active column of the Categories list of the object definition.
Important: Update the status of all activated categories so that this information is available if you ever need to convert your TeamConnect data.
Deleting Object Categories
If you need to delete a category or change its tree position, you can do so by deleting the category. Deleting a category removes all of its sub-categories and corresponding data entries, custom fields, and custom blocks.
Caution: You should only delete object categories during the design phase, when there are no corresponding object records in the database. Otherwise, loss of data from the associated fields will occur. Alternately, you can inactivate categories.
To delete an object category
- Open the Categories tab of the desired system or custom object definition.
- In the Show items in node list, select the appropriate node where you want to delete object categories.
- Select the check-boxes next to the categories you would like to delete.
- Click delete.
- When asked to confirm your action, click OK.
- Click Save.
The selected categories are permanently deleted from the system.