Custom Tools
- Invoice Validation Rule Settings—Allows you to activate or deactivate invoice validation rules. For more details, see the CSM Configuration Guide.
- Default Settings—Allows you to set the budgeting mode for the entire system.
- Map Service of Process—Allows you to map SOP actions, agents, and targets. For more details, see the SOP 1.0 Installation and Configuration Guide.
- Time Entry Tool—Allows you to manage timekeepers' entries.
The Month field references the Fiscal Period custom lookup table, which includes all twelve months. The default fiscal period is January.
Important: The month should be set before any dispute or transaction records are created.
Alternatively, the month can be set just before running the Fiscal Year Tool.
Default Settings
By default, all the following check boxes in the Budget for section are selected:
- Outside Counsel Legal Fees
- Outside Counsel Legal Expenses
- Expert or Other Vendors Fees
- Expert or Other Vendor Expenses
- Internal Expenses
- Settlements or Awards
- Internal Time
Each dispute or transaction record will have corresponding accounts automatically created for each item selected in the Budget for section.
By default, Do not budget by fiscal period is selected in the Extend budget level by section. Corresponding fiscal period accounts are created for each dispute or transaction record when the one of the following options are selected:
- Annually
- Annual+Quarter
- Annual+Month
For example, if Internal Time is selected in the Budget for section and Annual+Month is selected in the Extend budget level by section, the following corresponding accounts are created for each dispute or transaction record:
- Internal Fees
- Internal Fees : Annual (one for each fiscal year)
- Internal Fees : Monthly (twelve for each fiscal year)
Time Entry Tool
The Time Entry Tool comes with default settings that allow you to use it out of the box. You will need to configure rights for Users/User Groups and Contacts to enable rights to perform Time Entry Tool Administrator and User functions.
Important: You must set a default rate for each timekeeper or errors will occur when using the Time Entry Tool.
This section describes:
- Out-of-the-box default settings for the Time Entry Tool, as well as how to set up and customize the tool
- Administrator's usage of the Time Entry Tool
For more information, see information about using the Time Entry Tool from a user's point of view.
Editing Time Entry Tool Settings
You can customize the Time Entry Tool by changing the default settings that determine:
- Billing Period definition
- Daily Billable hours
- Timekeeper required categories
- Task Category
To edit Time Entry Tool Settings
You can edit the default settings that affect billing Time Period organization, the Time Entry Tool Available Hours value, that determine who can use the Time Entry Tool, and available Task Categories from the Time Entry Tool.
- From the Main menu, click the Go to drop-down list and select Time Entry Settings.
- Click the Time Entry Settings link.
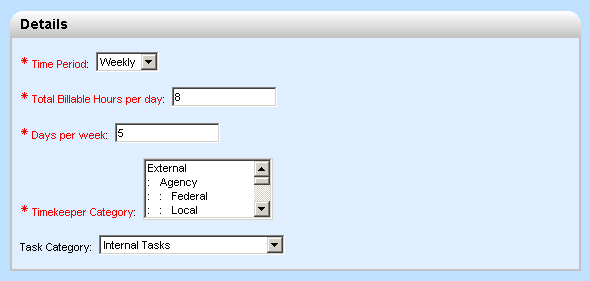
- Click Edit. The following fields are on the General tab, Details block.
- (optional) To change the Time Period, click the drop-down list and select Daily, Weekly (default), or Monthly. The period determines the time span for which Legal Administrators can define billing Time Periods and time spans for which users can enter time entries.
- (optional) If you selected Weekly for the Time Period above, type the billable Days per week.
Days per week only displays if the Time Period was set to Weekly. - (optional) Type the Total Billable Hours per day (default - 8). On the Time Entry Tool, this value is used to calculate the total Available Hours for a Time Period.
For weekly time periods, the Total Billable Hours per day value is multiplied by the Days per week value (described above) to produce the Available Hours (displayed on the Time Entry Tool). For example, for one week's time period, the default Available Hours could be (6 Days per week * 8 Total Billable Hours per day) = 48 hours.
For monthly time periods, Monday through Friday are considered billable (or there are 5 billable days per week). For example, Available Hours for the month of June (21 weekdays) would be (21 Days per month * 8 Total Billable Hours per day) = 168 hours. - (optional) Select one or more Timekeeper Categories. These values determine the default category required for a Matter Management contact to be authorized as a timekeeper (prerequisite to using the Time Entry Tool).
- To restrict the Task Category to describe a new record, click the drop-down list and select a category. In the Time Entry Tool, this value (and child categories) displays as an option from the Category drop-down list when adding time entries.
In the Time Entry Tool, only tasks (created from Disputes or Transaction Matter records) with the Default Category that is specified in the drop-down list as the current Task Category will display. For example, if a new task record with Default Category of Internal Tasks (default Task Category value in Time Entry Settings) is saved, then that task will display as a time entry in the Time Entry Tool. - Click Save.
Editing Default Time Entry Tool Fields
The Time Entry Tool has been created with default fields and field settings. For all fields, you can change the following settings:
- Column Label
- Column Order
- Column Display Width
- Required
By default, one field, Task Activity is hidden. You can activate this field or later hide it again. The existing default fields cannot be hidden.
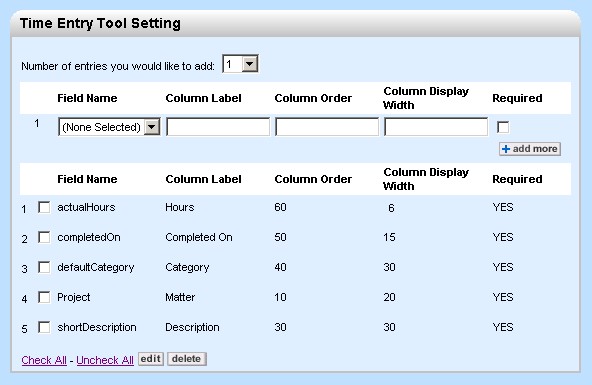
Note: This image displays default fields and related values for Column Label, Column Order, Column Display Width, and Required fields.
To edit default Time Entry Tool fields
You can change how Time Entry Tool fields display and whether the fields are required by users.
- From the Main menu, click the Go to drop-down list and select Time Entry Settings.
- Click the Time Entry Settings link.
- Click Edit. The following fields are on the General tab, Time Entry Tool Setting Block.
- To change the text that displays for default fields on the Time Entry Tool:
- Check the box(es) next to the existing Field Name and click edit.
- Type the new text to identify the field in the Column Label box.
- Click ok on that field row.
- To change the position of a Time Entry Tool field from left to right:
- Check the box(es) next to the existing Field Name and click edit.
- Type a numeric value in the Column Order box, where the lowest value displays furthest to the left and the highest value displays furthest to the right on the screen.
- Click ok on that field row.
- To change the maximum length for displaying the field's Column Label:
- Check the box(es) next to the existing Field Name and click edit.
- Type a numeric value in the Column Display Width box. This value determines the length of space allotted to display the corresponding Time Entry Tool field value. For example, for the actualHours field, the default Column Display Width of 6 would allow a Time Entry Tool user to enter a value like 100.25
- Click ok on that field row.
- To set whether an existing Time Entry Tool field is required by users to complete:
- Check the box(es) next to the existing Field Name and click edit.
- Clear the Required box to display the field but allow blank values, or check the Required box prevent saving this field with blank values.
- Click ok on that field row.
- To display the activityItem field on the Time Entry Tool:
- From the Number of entries you would like to add: drop-down list, select 1.
- From the Field Name drop-down list, select activityItem.
- Type a descriptive field label in Column Label box (for example, Task Activity).
- Type the field's Column Order (number).
- Type the Column Display Width.
- Set the Required check box. See field explanations above for more information.
- Click Save.
Creating Billing Time Periods
You can define Time Periods to organize billing periods in which timekeepers enter records for the Time Entry Tool. There are two sections from which you can create a Time Period. You can use the Create Next Fiscal Budget tool (found in the end-user interface in TeamConnect) to create Billing Time Periods that match corresponding budgets (for example, yearly periods), or you can define independent Time Periods from the Time Entry Settings area (for example, on a daily, weekly, or monthly basis).
You can create Time Periods to match corresponding budgets (using the Fiscal Year tool), or you can create autonomous time periods using the date fields in the Time Entry Settings. For more details, see Default Settings.
To create Time Periods from Time Entry Settings
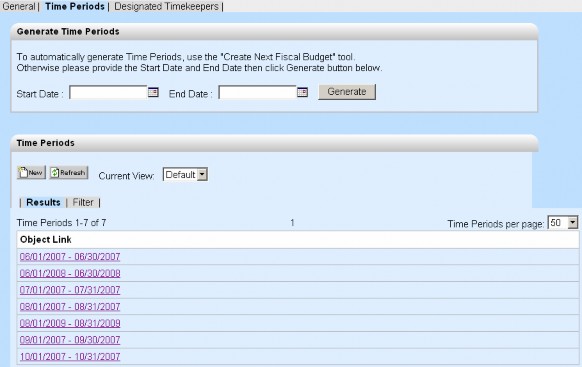
If you have already created billing Time Periods from the Create Next Fiscal Budget tool, you can skip this procedure. The Generate Time Periods section allows quick creation of multiple Time Periods. The Time Periods section allows creation of individual Time Periods and overriding the default Available Hours calculation.
- From the Main menu, click the Go to drop-down list and select Time Entry Settings.
- Click the Time Entry Settings link.
- Click Edit.
- Select the Time Periods tab.
- To create multiple Time Periods quickly, from the Generate Time Periods section, click the Calendar icon for Start Date and select a date. Click the Calendar icon for End Date and select a date.
If the date range spans multiple time periods, then multiple time periods will be created. For example, if the time period is monthly and the start date is 06/01/2007 and the end date is 08/31/2007, then three time periods will be created.- Click Generate.
- Click Save (for the Time Entry Setting Record).
It is recommended to create Time Periods from the Generate Time Periods section because the Time Entry Tool Available Hours will be automatically calculated based on the Billable Hours Per Day * (billable) Days in the Time Period.
- 6. To create individual Time Periods, from the Time Periods section, click New.
- Click the Calendar icon for End Date and select a date.
- Click the Calendar icon for Start Date and select a date.
- Type a number in Total Billable Hours (sets the Available Hours in the Time Entry Tool).
- Click Save.
Note: The default naming convention for new Time Periods is "Start Date"-"End Date". For example, 06/01/2007 - 06/30/07.
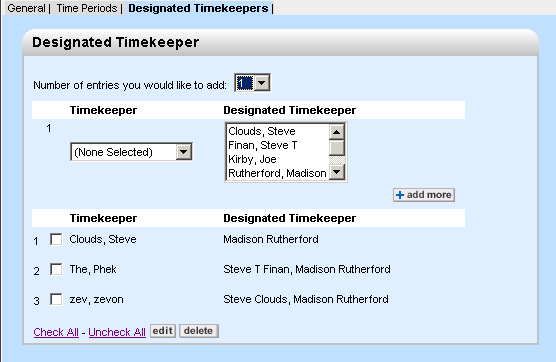
Managing Timekeepers
Members of Legal Administrator group have the authority to set up designated timekeepers. A designated timekeeper has the authority to enter another timekeeper's time entries.
Important: You must set a default rate in the contact record of each timekeeper or errors will occur when using the Time Entry Tool.
To delegate Timekeeping duties
Members of the Legal Administrator group can set up designated timekeepers. For example, if Ralph and Tim are timekeepers, Tim can be designated with the ability to enter Ralph's time entries in the Time Entry Tool.
- From the Main menu, click the Go to drop-down list and select Time Entry Settings.
- Click the Time Entry Settings link.
- Click Edit.
- Select the Designated Timekeepers tab.
- From the Number of entries you would like to add: drop-down list, select the number of timekeepers for which you want to delegate time entry actions.
- From the Timekeeper drop-down list, select the timekeeper to delegate time entry actions for. For example, if you would like Tim to be able to enter Ralph's time entries, select Ralph.
- From the Designated Timekeeper drop-down list, select one or more timekeeper delegates. The maximum number of designated timekeepers for a single Timekeeper is 3.
For example, if you would like Susan, Tim, and George to be able to enter Ralph's time entries, select Susan. Click the CTRL key and select Tim. Click the CTRL key and select George. - Click ok for new timekeeper-delegates rows.
- Click Save (for the Time Entry Setting record).
To update the designated Timekeepers list
You can add or remove delegated timekeepers to a Designated Timekeepers list.
- From the Main menu, click the Go to drop-down list and select Time Entry Settings.
- Click the Time Entry Settings link.
- Click Edit.
- Select the Designated Timekeepers tab.
- Check the box next to existing Timekeeper-Delegates rows to update.
- Select or deselect Timekeeper delegates.
- Click ok for updated Timekeeper-Delegates rows.
- Click Save (for the Time Entry Setting record).
To delete the designated Timekeeper-Delegate combinations
You can remove designated timekeeper combinations.
- From the Main menu, click the Go to drop-down list and select Time Entry Settings.
- Click the Time Entry Settings link.
- Click Edit.
- Select the Designated Timekeepers tab.
- Check the box next to existing timekeeper-delegates rows to delete.
- Click delete.
- Click Save (for the Time Entry Setting record).
Using the Time Entry Tool as Administrator
The Legal Administrator group can do the following:
- Review and verify the time entries for all timekeepers' entries in the Time Entry Tool.
- Change the phase of a billing time period.
- Add, change (edit, post, void), or delete time entries for other timekeepers. For more information, see the Legal Matter Management User Help.
Reviewing Time Entries
While reviewing timekeepers' entries in the Time Entry Tool or after the time period has ended, you can lock the corresponding time period. If the time period phase is locked, timekeepers will be prevented from entering, changing, posting, voiding, or deleting time entries from the Time Entry Tool.
To verify time entries for a Time Period
- From the Main menu, Tools drop-down list, select Time Entry Tool.
- For the Task For, select the time period to view by clicking the Calendar icon to select a date.
- If the time period is weekly, the corresponding week's time period is displayed.
- If the time period is monthly, the corresponding month's time period is displayed.
- From the Timekeepers drop-down list, select the timekeeper whose time entries to view.
Time Period Phases
A Time Period can have the following phases:
- Un-Lock—(default) Allows timekeepers to enter, change (edit, post, void), and delete time entries in the Time Entry Tool
- Lock—Prevents timekeepers from entering, changing (editing, posting, voiding), and deleting time entries in the Time Entry Tool. A Time Period in Locked phase can be changed to Un-Lock or Processed phases.
- Processed—Prevents timekeepers from entering, changing (editing, posting, voiding), and deleting time entries in the Time Entry Tool. After a Time Period is set to the Processed phase, you cannot change it to previous phases.
To change a Time Period's phase
- From the Main menu, click the Go to drop-down list and select Time Entry Settings.
- Click the Time Entry Settings link.
- Click Edit.
- Select the Time Periods tab.
- From the Time Periods section Filter tab, search for a Time Period.
- From the Results tab, click a Time Period name.
- From the (actions) drop-down list, select one of the following:
- Un-Lock—Only displays if the current phase is Lock
- Lock—Only displays if the current phase is Unlocked
- Processed
- From the confirmation dialog, click OK.
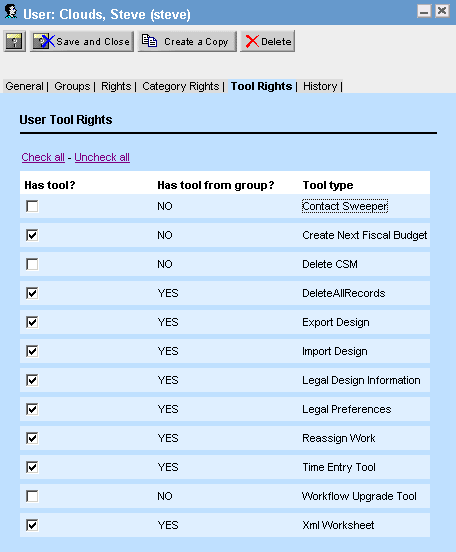
Tool Rights
You can set the tool rights on the Tool Rights tab of the group account screen:
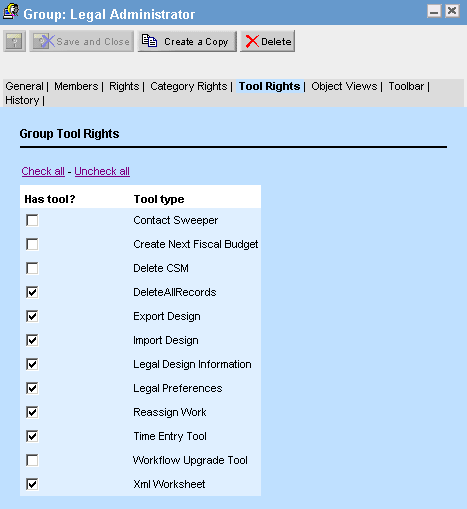
Alternatively, you can set the tool rights according to user on the Tool Rights tab of the user's account screen: