
Setting Up Invoices and Line Items
Options and default behavior across all invoices records and for invoice record - Line Items sections can be configured from the Object Definitions area.
Defining Non-US Tax Categories
If you use CSM, TeamConnect lets you define Non-US Tax categories to support e-Billing invoices that contain Non-US taxes (such as VAT or GST).
To define non-US tax categories
- In the Designer, click Go to, and then click Object Definitions.
- Click the Invoice object definition.
- Click the Non-US Tax Categories tab.
- In the Show items node drop-down list, select Fee or Expense.
- In the Item Name field, enter the a unique name for this item.
- In the Order field, enter a number to indicate the order in which this item appears to the user. Items with the same order number are sorted alphabetically.
- In the Tree Position field, enter a four-character alphanumeric code that is unique to any other code.
- In the Tax Code field, enter the name for the tax code that applies to this item.
Item Name, Tree Position, and Tax Code only need to be unique for items of the same type. - Click +add more.
- To add more items, click +add more and repeat steps 4 through 8.
- Click Save or Save and Close.
You will be able to create financial accounts in the TeamConnect user interface to track Non-US Taxes separately. The Non-US Tax category Item Name values appear in the Post Non-US Tax of Type drop-down list on the Accounts Posting Criteria page.
Setting up Invoice Duplicate Checking
A system setting will determine whether invoices will be checked for duplicates. For more information about invoice duplicates and versions, see Invoice Duplicates and Invoice Versions.
To set up invoice duplicate checking
- From the System Settings drop-down list, select Backward Compatibility Settings.
- Do one of the following actions:
- To allow duplicate invoices, select the Allow Duplicate Invoices (Same invoice number, invoice date year and vendor) check-box.
- To check for and prevent duplicate invoices, clear the Allow Duplicate Invoices (Same invoice number, invoice date year and vendor) check-box.
- Click Save.
Setting up Invoice Line Items
This section describes how to set up the ways users will work with Invoice Line Items.
Note: The terms "fee" and "task" are used interchangeably for Invoice Line Items. For example, in the user interface, Line Item types include Fee. In the developer's view for Line Item object definitions, Task Categories refer to categories for Fee Line Items.
Setting up General Invoice Line Items Behavior
General Invoice Line Items behavior includes:
- Setting up which Line Item fields display in Concise view
- Setting up which existing Line Item field values can be copied to a new Line Item
- Setting up whether Line Item discount adjustments are applied by flat-rate or as a percentage
To set up general Line Item fields behavior
- In the Go to drop-down list, select Object Definitions.
- Expand Invoices and click the Line Items link.
- Select the Line Items tab.
- To set up which fields display on an invoice General page, Line Items section area for line item entry (in edit-mode), do one of the following:
- For each field to display in the invoice Line Items section (for line item entry), from the corresponding Line Item Entry column drop-down list, select Show.
- For each field to hide in the invoice Line Items section (for line item entry), from the corresponding Line Item Entry column drop-down list, select Hide.
- To set up which fields display on an invoice General page, Line Items section area for existing line items (in edit-mode), do one of the following:
- For each field to display in the invoice Line Items section (table for existing line items), from the corresponding Table Display column drop-down list, select Show.
- For each field to hide in the invoice Line Items section (table for existing line items), from the corresponding Table Display column drop-down list, select Hide.
- For each Line Item field whose existing value to copy to a blank Line Item block using the Copy values from previous line link, check the corresponding Copy Capability check- box.
- Click Save.
Setting the Discount Application Type for Line Item Adjustments
When users adjust Invoice Line Items, an Original Discount amount can be applied in one of the following ways:
- As a flat amount
- As a percentage
By default, Discounts are applied to Line Item adjustments as flat amounts. The Original Discount value will be automatically copied to the Current Discount field (Batch Adjustment mode) or will be displayed in the Current Discount field of the Invoice - Adjust Line Items screen (Detail Adjustment mode) after invoice changes are saved.
When Discounts are applied as percentages, the percentage is calculated in the following way:
Discount % = (Original Discount) * 100 / [(Original Rate) * (Original Hrs/Units)]
Based on Line Item Object Definition settings, a Line Item can be adjusted using Current Rate, Current Hrs/Units, Current Disc (Batch Adjustment only), Current Amount.
The Current Discount will be applied as the percentage value only if Current Rate or Current Hrs/Units fields are adjusted.
The Current Discount is not applied as a percentage, if a Line Item is adjusted by any of the following methods:
- The Current Amount is manually adjusted.
- The Current Discount is manually adjusted.
- The Current Amount is indirectly adjusted by an Invoice Header adjustment.
For more information, see Adjusting Line Items with Discounts.
To toggle between setting adjustment discounts as a flat amount or percentage
- In the Go to drop-down list, select Object Definitions.
- Click the Invoices link.
- From the General tab, do one of the following actions:
- To apply the adjustment discount as a percentage, check Discounts are applied as percentage of the charge amount.
- To apply the adjustment discount as a flat rate value, uncheck Discounts are applied as percentage of the charge amount.
- Click Save.
Setting up Invoice Line Items Adjustment Behavior
Invoice Line Items Adjustment Behavior includes:
- Setting up whether Line Items can be adjusted in Batch Adjustment mode or in Detail Adjustment mode
- Setting up which Line Item fields will be read-only in Batch Adjustment mode
- Entering adjustment reasons
Invoice Line Items Adjustment Options
You may adjust invoice Line Items as follows:
- Detail Adjustment: (recommended for Invoices with few Line Items) For TeamConnect 2.4 SP3 and earlier, Line Items have been adjusted in this mode. When enabled adjusters must select each Line Item, adjust the Line Item, and save changes to individual Line Items separately.
- Batch Adjustment: (recommended for Invoices with many Line Items) When enabled adjusters can make all Line Items for an invoice adjustable with one button click, adjust the Line Items, and save changes to multiple Line Items with one button click. This option is helpful for tabbing through multiple Line Items.
- In-Line & Bulk Adjustment: (recommended for Invoices with many Line Items) Introduced in TeamConnect 3.4 SP1, this setting allows adjusters to make changes to multiple Line Items at a time, with improved screen navigation, the ability to add comments to Line Items directly from the In-Line & Bulk Adjustment (IBA) screen, and other additional features.
To select between Individual Invoice Line Items Adjustment, Batch Adjustment, or In-Line & Bulk Adjustment
- In the Go to drop-down list, select Object Definitions.
- Expand the Invoices link and click Line Item.
- Do one of the following actions:
- To adjust invoice record line items individually, from the Default Adjustment Mechanism drop-down list, select Detail Adjustment (default).
- To adjust invoice record line items in batch mode, from the Default Adjustment Mechanism drop-down list, select Batch Adjustment. This option allows you to adjust multiple Line Items simultaneously and save changes with one button click.
- To adjust invoice record line items in in-line & bulk mode, from the Default Adjustment Mechanism drop-down list, select In-Line/Bulk Adjustment. This option allows you to adjust multiple Line Items simultaneously and add comments to individual Line Items from the same screen.
- Click Save.
Setting Batch Adjustment Line Item Fields Read/Write Permissions
If Line Items are set to Batch Adjustment mode, you can restrict which Invoice Line Item fields can be used to adjust invoices by setting certain fields to read-only status.
Note: The following description only applies if you have set the Line Items Default Adjustment Mechanism to Batch Adjustment.
Fields that can be set to read-only include:
- Current Total
- Current Discount
- Current Qty
- Current Rate
To set Batch Adjustment Line Item fields to read-only
- In the Go to drop-down list, select Object Definitions.
- Expand the Invoices link and click Line Item.
- Select the Line Items tab.
- For each Line Item field (Current Total, Current Discount, Current Qty, Current Rate) to set as read-only when performing a batch adjustment, check the corresponding Read Only in Adjustment check-box.
At least one of the adjustable Line Item fields above needs to be left as non-read only. Users need to be able to adjust at least one field. - Click Save.
To access the Adjustment Reasons page
- In the Go to drop-down list, select Object Definitions.
- Expand the Invoices link and click Line Item.
- Select the Adjustment Reasons tab.
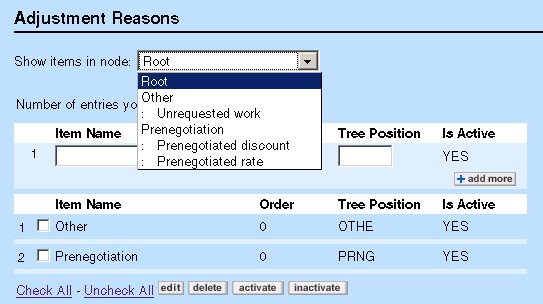
Adjustment reasons are organized in a parent-child hierarchy. Initially there is only one node, "Root", and any adjustment reasons that you enter become children of the "Root" node. If you want to enter reasons that are children of some other node, choose that node name from the Show items in node drop-down list, as shown below.
To work with Adjustment Reasons
- Choose a node from the Show items in node drop-down list.
- The adjustment reasons that are children of that node are shown.
- If you wish to delete an existing reason, click its checkbox and click delete.
- If you wish to inactivate an existing reason, click its checkbox and click inactivate. Inactive reasons won't appear to the end user who is doing an adjustment.
- If you wish to reactivate an existing reason, click its checkbox and click activate.
- To edit an existing reason, click its checkbox and click edit.
The Name and Order fields become editable and you can change their values. When finished, click OK. - To enter a new adjustment reason, begin typing in the editable fields above the existing items.
- Enter a Name for the adjustment reason.
- Enter an Order value. Order determines the sequence in which the reasons appear to the end user.
- Enter a Tree Key. This value must be unique, different from all other adjustment reasons.
- Is Active is presumed to be Yes when a reason is first entered. You can subsequently inactivate it after it is saved.
- When finished, choose one of the Save buttons at the top of the page. Clicking Add More will also save your work and present you with new editable fields for additional adjustment reasons.