
Using Duplicate Contact Manager
A Contact Sweeper Tool is provided allowing the tool users to select which duplicate contact records to keep and which contact records to remove from the system.
Contact Sweeper also allows for the redirection of existing pointers to duplicate contact records, to reference the contacts you choose to save. Duplicate Contact Manager may also be used to prevent end users from creating or updating contact records that are intentional duplicates.
Duplicate Contact Manager includes:
- A Contact Sweeper Tool that can identify potential duplicate contact records based on specified contact fields and sample contact data values.
- A duplicate contact checking option with a settings screen to select which contact fields should contain unique data across records. After duplicate contact checking is enabled, users will be warned when they create/update contacts with possible existing duplicate records.
Duplicate Contact Manager must be configured by a solution developer, but the Contact Sweeper can be invoked by any user who is granted the right to that tool.
Using Contact Sweeper
Contact Sweeper helps identify, replace, and remove contacts that are duplicates of other existing contacts. Since the contact attribute is found in a large number of database tables, the process of manually changing a contact throughout TeamConnect is complex. Contact Sweeper hides that complexity and makes the process faster and more reliable.
Prerequisites
Contact Sweeper is a system tool and, like other system tools, it requires the user running it to have sufficient authority. You must use caution when granting rights to this tool because its use may greatly alter the information in the database.
To give a user group rights to the Contact Sweeper tool
- Click Groups in the Admin tab of TeamConnect.
- Click on the specific group to give rights to the Contact Sweeper tool.
- Click the Tool Rights tab of the group's settings.
- Click the Edit button.
- Select the check-box for Contact Sweeper.
- Save the group's tool rights settings.
Note: If the Contact Sweeper window is prematurely closed before steps have finished running, all steps done in the session must be repeated.
It is essential that you back up your database before running Contact Sweeper. Contact Sweeper makes extensive changes to the TeamConnect database. After you have run the Fix References step in Contact Sweeper, the only way to reverse its effects is by restoring the database from the backup.
Important: Several prompts in Contact Sweeper may display in a pop-up window. If your web browser is configured to not allow pop-up windows, you must reconfigure it to allow pop-ups from the TeamConnect web server.
Using Contact Sweeper entails the following steps:
- Step 1 of 5 (Generate Report)—Specifies the conditions to be used in searching for duplicates, then performs the search and prepares an Excel spreadsheet containing the generated report, which you then save.
- Step 2 of 5 (Edit Report)—Indicates which duplicate contacts must be replaced by other contacts. Do this by editing the values in the generated report spreadsheet (offline step).
- Step 3 of 5 (Upload Report)—Uploads your edits to TeamConnect and makes them available for the following steps.
- Step 4 of 5 (Fix References)—Performs an optional preview and performs the actual replacement of references.
- Step 5 of 5 (Delete Duplicates)—Deletes the contacts whose references were replaced in the previous step.
You may do all of these steps, except step 2, using the Contact Sweeper tool window.
To start the Contact Sweeper tool
Select Contact Sweeper from the Tools drop-down list in Designer.
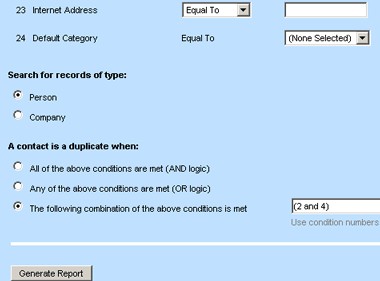
Generate Report (Step 1 of 5)
This step creates a report of all contacts that meet the conditions you specify. You may run this step repeatedly, specifying a different set of conditions each time. Contacts meeting your conditions appear in an Excel spreadsheet.
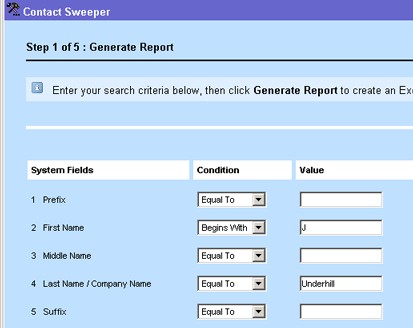
Contact Sweeper displays some of the possible criteria. All the possible criteria are available for your use in specifying conditions. Ordinarily, only some, not all, of the criteria are actually used. For example, your conditions may test for equality with a criterion, a partial string match, and other conditional expressions.
Option buttons specify whether to form a match using all conditions, any of the specified conditions, or some custom combination of conditions. In the previous example, a custom combination is used, specifying that condition 2 (First Name match) and condition 4 (Last name / Company Name match) must both be true.
The initial conditions that appear when you run this step are those that were used the last time you ran this step. However, you have the ability to change any condition that you wish.
Points To Remember
Keep the following points in mind when setting up Contact Sweeper reports:
- Criteria that are left blank will be ignored when generating the report.
- Try to keep your conditions restrictive, so a relatively small set of contacts is returned. You may wish to search on a last name plus postal code, or other such conditions that should yield a small number of results.
Note: You may be even more restrictive by searching on unique identifiers such as Social Security number or driver's license number. If your conditions are defined too loosely, many contacts will be returned, and it can be difficult to find the true duplicates.
- Some of the criteria may relate to attributes that have multiple values per contact. For example, a contact can have multiple addresses, multiple phone numbers, and multiple email addresses. When you use a criterion like these to specify a condition, be aware that only the default value for the contact is tested. Contact Sweeper does not search through all of the multiple values for the contact, just the default.
- Contact Sweeper understands the difference between a contact that represents a company and a contact that represents a person. One of the search conditions is whether you are looking for persons or companies.
For example, if your search involves the person name "Pierre Cardin", the company "Pierre Cardin" does not appear in the report on potential duplicates. Similarly, if you have asked to search for companies, but you have also specified conditions that apply only to persons (such as a First Name value), those conditions are ignored.
Generating a Report
Generating a report operates as follows:
- After you click Generate Report and Contact Sweeper performs its search, you are prompted to save the resulting "duplicate reference report" as an Excel spreadsheet. The default name of the report is DuplicateContactsReport.xls.
- Choose an easily remembered name and location for this file. It is possible to store many different sets of results by running this step repeatedly, using different conditions each time, and saving each resulting spreadsheet with a different name.
- In some web browsers, the spreadsheet may open automatically. If so, you must save it, using a name and location that you remember. Other browsers may download the spreadsheet automatically without prompting you. If nothing appears to happen after clicking the Generate Report button, check your web browser's default download location for DuplicateContactsReport.xls.
Edit the Report (Step 2 of 5)
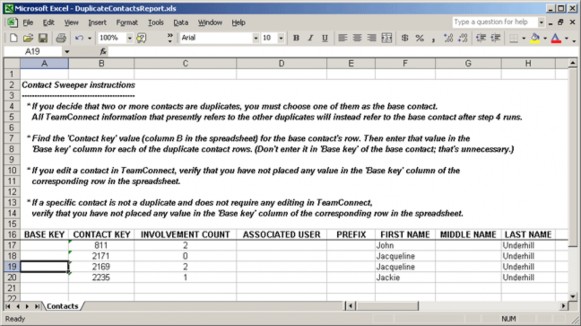
The spreadsheet produced by the Generate Report step contains one row per contact. Contact Sweeper has identified all the contacts in the spreadsheet as being potential duplicates of each other, because they all match the conditions you specified in step 1. Review these contacts and decide which ones are actual duplicates.
Review and edit the report as follows:
- If the spreadsheet from step 1 is not already open, open it now.
The spreadsheet contains blank cells in column A ("Base key"), the primary key of the contact in column B ("Contact key"), then a large number of contact information fields in the following columns. The columns "Involvement Count" (indicating how many projects or other objects refer back to this contact) and "Associated User" (indicating that this contact is related to a TeamConnect user) are useful in deciding which contacts to keep and which to replace.
If you decide that two or more contacts are duplicates, you must choose one of them as the base contact. All TeamConnect information that presently refers to the other duplicates will instead refer to the base contact after step 4 runs.
- Find the "Contact Key" value (column B in the spreadsheet) for the base contact's row. Then enter that value in the "Base key" column for each of the duplicate contact rows. (Don't enter it in "Base key" of the base contact; that's unnecessary.)
Note: Most of the cells in the spreadsheet are protected. Do not turn off this protection, or you may cause the spreadsheet to become unusable. Only the "Base Key" column of the spreadsheet is editable. You cannot move, insert, or delete rows and columns.
In the example shown above, the row with Contact Key 2169 is the base contact that will remain after Contact Sweeper completes. Therefore, you would type 2169 in the Base Key cell for contacts 2171 and 2235. Contact 811 is a completely different person, not a duplicate, so we make no entry in that row.
Note: Contacts where the column "Associated User" contains a value will not be replaced or deleted, even if you request this.
- Instead of replacing some of the potential duplicate contacts, you may want to edit them so that they do not appear as duplicates anymore. If you edit a contact in TeamConnect, rerun the report and verify that the contacts you edited are no longer present in the report.
- If a specific contact is not a duplicate and does not require any editing in TeamConnect, verify that you have not placed any value in the "Base key" column of the corresponding row in the spreadsheet.
- Save your changes to the spreadsheet.
Upload Report (Step 3 of 5)
When you have finished all your data entry from the previous step, upload the spreadsheet to TeamConnect as follows:
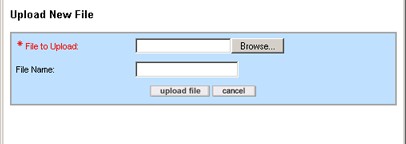
- Click the Upload button.
- In the resulting Upload New File window, type the full path and file name in the File Name field or use the Browse button to locate the file on your computer.
- Click upload file to move your spreadsheet into TeamConnect.
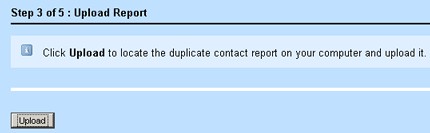
Now you are ready to run the Fix References step.
Fix References (Step 4 of 5)
The Fix References step provides you with the option to preview the database changes that are about to occur, then updates the TeamConnect database with the contact changes you requested in the spreadsheet.
Caution: Perform this step when there are no other active TeamConnect users work ing with your TeamConnect database. This step puts the database into an inconsistent state until it completes. It is strongly recommended that you back up your database before performing this step. The changes that are done in this step are not reversible, except by restoring a database backup.
Important: Custom rule processing could potentially interfere with the database updates done by this step. Deactivate all rules that relate to the Contact object before performing this step. When the step is complete, you may activate the rules again.
Preview the suggested changes and update the database as follows:
- Click Preview to display a pop-up window with text that describes the proposed database changes. No actual changes are done during Preview.
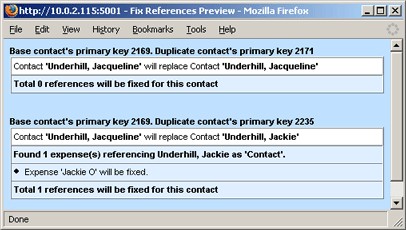
In the previous example, there were references in existence for each duplicate contact. However, it is possible to have duplicate contacts that have never been used as a reference in any other record.
- Click Fix References to apply the changes in the spreadsheet to the database. Read the confirmation pop-up window, determine if you wish to continue, and click OK to continue or Cancel to stop.
This step may take some time, depending on the number of duplicate contacts and references that must be replaced. When finished, the Contact Sweeper screen refreshes and a completion message will appear below the Fix References button.

Contacts can become references in several other types of TeamConnect objects. Contact Sweeper fixes the following kinds of references:
- Every contact-related role in every contact-centric custom object record.
- Contacts that appear in the Relations tab of other Contact records.
- Contacts that appear as "Vendor" or "Involved" in the Posting Criteria tab of an Account record.
- The "Contact" reference in an Expense record.
- The "Contact" reference in a Task record.
- The "Vendor" reference in an Invoice record.
- The "Vendor" and "Timekeeper" references in an Invoice Line Item record.
- The "Involved" references in a Project record.
By default, the changes made during the Fix References process are written to the system log at the Debug level. This level provides complete information about the changes that have been made.
It is possible that you have previously set the system logging level to some more restrictive level, such as Warn, using the System Preferences screens. If so, logging occurs at that more restrictive level, and some of the detailed information is lost. When you determine the level of logging you want during Contact Sweeper operation, verify that the system logging level setting is compatible with your needs.
Delete Duplicates (Step 5 of 5)
Click Delete to delete the contacts that have just been replaced by the base contact. Answer Yes to the confirmation pop-up message.

After the deletion operation, the Contact Sweeper screen refreshes, and a success message indicating the number of contacts deleted appears below the Delete button.
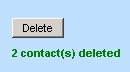
Note: The count reflects the actual number of contacts deleted. This number may be less than the number of contacts listed in step 4, if one or more of those contacts is associated with a user account. Such contacts are not deleted by Contact Sweeper. The system log notes such cases.
Note: If you click Delete without first doing Fix references, TeamConnect attempts to delete all the contacts for which you have entered a value in the "Base key" column of the spreadsheet. But since these contacts were not fixed yet, many of them may have references, such as being used in an "involved" role. In such cases, any contact with references is not deleted, and an error message is entered in the log file noting each case.
Preventing Duplicate Contacts
The Duplicate Contact Manager can perform day-to-day duplicate contact checking and prevent the creation or update of duplicate contact records. You must select which contact fields require unique field data across contact records and activate the duplicate contact checking setting.
Afterwards, when a user creates or updates a contact, TeamConnect compares the new contact's data against existing contacts to determine whether duplicates exist and warn the user.
If you activate the Duplicate Contact check for day-to-day usage, the following activities are affected:
- Creating a new contact from the Create a new Contact screen
- Updating an existing contact (person or company)
- Creating a new contact (person or company) from a Contact search module pop-up window
- Creating a new contact from a wizard using a contact search module (Search for Contacts pop- up window)
- Creating a new contact through the XML layer
Activating Duplicate Contact Checking
Consider the following before using the Duplicate Contact Manager and Contact Sweeper:
- Contacts that are updated or added through the actions of wizards, rules, and custom views are not automatically checked for duplicates. If you wish to prevent potential duplicates that result from these actions, you must modify your wizards, rules, and views. For wizards and custom views, one option is to add the Potential Duplicates block to your wizard or view. Also, the
ContactSerivce.readDuplicateContactsAPI method is available for use in your custom code. This method allows you to check for duplicates before committing a contact record. See Using Rules for more information. - Review the design of wizards, rules, and custom objects to verify that the criteria for identifying duplicate contacts is narrow enough not to prevent users from completing wizards successfully. You may need to modify existing rules and wizards to handle duplicate exceptions wherever a contact is created or updated.
- After you use the Contact Sweeper to remove existing duplicate contact records from TeamConnect, you should determine which contact fields should be required to create a contact and for day-to-day duplicate contact checking. For example, a person contact might require the First Name, Last Name, and Phone Number fields. This standard could be enforced by creating validation rules. Company contacts might require the Company Name, Phone Number, Street Address, and Postal Code fields.
The contact fields you set as Active from the Duplicate Contact Manager settings screen determine which contact fields require unique data when users create or update contact records (when duplicate contact checking is enabled).
Note: You may select one or more contact fields to use for search criteria.
The Duplicate Contact Manager settings screen determine which contact fields are used to find potential duplicate contact records.
To select a contact field to use for duplicate contact checking
-
From the Designer Go To drop-down list, select Object Definitions.
- Select the Contact object definition.
- Select the object definition's Duplicate Contact Manager tab.
- Select the far left check-box for the contact field to use for duplicate contact checking.
- Click edit.
- Select the Is Active check-box.
- Select the value-matching condition (for example, Equal To).
- Click ok.
In the following steps, you can:
- Select whether to enable day-to-day duplicate contact checking (and whether to enable a user override to allow creation of duplicate contact records)
- Select which contact fields to activate for comparison of a new contact's field data against existing contacts' data
- Select logic for combining multiple contact fields as duplicate record identifiers
To activate duplicate contact checking
- From the Designer Go To drop-down list, select Object Definitions.
- Select the Contact object definition.
- Select the Object Views tab.
- Choose an object view. On the General tab of the object view, ensure that the block
Duplicate Contacts is used by the object view. If it is not, add that block to the object view. - Optionally, repeat the previous step for as many object views as are affected by duplicate contact checking.
- Select the object definition's Duplicate Contact Manager tab.
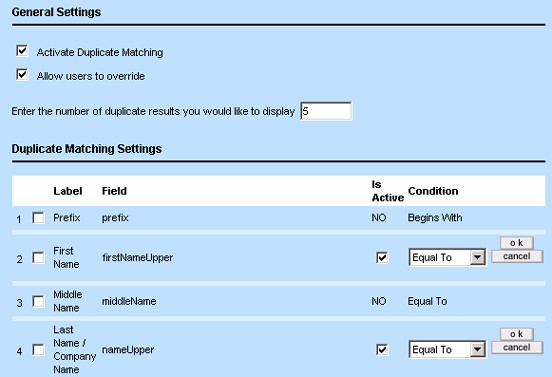
- To enable day-to-day duplicate contact checking, select the Activate Duplicate Matching check-box. If users try to create or update a contact that match existing duplicate contact records, a warning message will display.
To allow users to override duplicate contact checking and continue with the create or update operation, select the Allow users to override check-box. - To set the maximum number of potential duplicate contacts results that display during day- to-day duplicate contact checking, type the number in Enter the number of duplicate results you would like to display. The default value is 20.
If during a contact creation operation, the Duplicate Contact Manager finds more potential duplicate contacts than the maximum duplicate results value you set above, a warning message will display. For example, 25 possible duplicate(s) found. Displaying 20 of 25. - From the Duplicate Contact Manager tab, check one or more of the following Labels and click edit. Select the Is Active check-box, and select a Condition from the drop-down menu to use the corresponding contact field for duplicate matching. Click ok to save your selections for the corresponding contact field.
A full list of available items is described in the Duplicate Matching Settings table. Labels and Conditions marked with an asterisk are recommended for duplicate matching. - If you selected multiple contact fields above, select one of the following for A contact is a duplicate when:
- All of the above conditions are met (AND logic)—Detects duplicate contacts if the values of all selected fields above match between the contact records being compared
- Any of the above conditions are met (OR logic)—Detects duplicate contacts if the values of any selected fields above match between the contact records being compared
- The following combination of the above conditions is met—Type a custom logical rule for contact field. For example, to compare contacts by (First Name, Last Name, and Social Security Number) or (Default Postal Code and Phone number), type (2 and 4 and 12) or (17 and 20)
The field numbers you enter when using The following combination of the above conditions is met must refer to contact fields that are set as Active.
- Click Save.
|
Label |
Field |
Condition |
|---|---|---|
|
Prefix |
prefix |
Begins With *Equal To Contains Ends With Has No Value Has Value |
|
*First Name |
firstNameUpper |
Begins With *Equal To Contains Ends With Has No Value Has Value |
|
Middle Name |
middleName |
Begins With *Equal To Contains Ends With Has No Value Has Value |
|
*Last Name / Company Name |
nameUpper |
Begins With *Equal To Contains Ends With Has No Value Has Value |
|
Suffix |
suffix |
Begins With *Equal To Contains Ends With Has No Value Has Value |
|
Nickname/Alias |
aliasUpper |
Begins With *Equal To Contains Ends With Has No Value Has Value |
|
Company |
company |
Equal To |
|
Title |
title |
Begins With *Equal To Contains Ends With Has No Value Has Value |
|
ID |
numberStringUpper |
Begins With *Equal To Contains Ends With Has No Value Has Value |
|
*Driver's License |
driverLicense |
Begins With *Equal To Contains Ends With Has No Value Has Value |
|
*SSN / Tax ID |
SsOrTaxNumberString |
Begins With *Equal To Contains Ends With Has No Value Has Value |
|
*Birth Date |
birthDate |
*Equal To More Than X Days After During X Days After During X Days Before More Than X Days Before Between X and Y Days |
|
Street |
defaultAddress_Street |
Begins With *Equal To Contains Ends With Has No Value Has Value |
|
City |
defaultAddress_City |
Begins With *Equal To Contains Ends With Has No Value Has Value |
|
State |
defaultAddress_State |
Begins With *Equal To Contains Ends With Has No Value Has Value |
|
Postal Code |
defaultAddress_PostalCode |
Begins With *Equal To Contains Ends With Has No Value Has Value |
|
County |
defaultAddress_County |
Begins With *Equal To Contains Ends With Has No Value Has Value |
|
Country |
defaultAddress_CountryItem |
Equal To |
|
Phone |
defaultPhone_PhoneString |
Begins With *Equal To Contains Ends With Has No Value Has Value |
|
Fax |
defaultFax_FaxString |
Begins With *Equal To Contains Ends With Has No Value Has Value |
|
|
defaultEmail_EmailString |
Begins With *Equal To Contains Ends With Has No Value Has Value |
|
Internet Address |
defaultInetAddress_InetAddressString |
Begins With *Equal To Contains Ends With Has No Value Has Value |
|
Default Category |
defaultCategory |
Equal To |
Using AND/OR Logic
If AND logic or OR logic is selected, when a user is creating/updating contacts, the duplicate check only evaluates field criteria that apply to the type of contact being created/updated.
For example, suppose duplicate contact checking is enabled for First Name, Last Name/Company Name, and Social Security/Tax ID using AND logic. If a user creates a company contact, duplicate contact checking performs a comparison against existing company records using the Company Name and Tax ID fields (ignoring the First Name criteria).
If custom logic is enabled, for example, "(First Name, Last Name/Company Name, and Social Security Number/Tax ID) or (Default Postal Code and Phone Number)," when creating/updating a company contact, only "(Last Name/Company Name and Social Security Number/Tax ID) or (Default Postal Code and Phone Number)" is checked.
Creating Contacts in the Search for Contacts Pop-up Window
When users create contacts from a Search for Contacts pop-up window, duplicate contact checking only compares certain fields to existing contact records (for example, when an Involved record is added to a project).
For example, when a user creates a contact from the add person button, the following fields' values are compared to existing contacts: First Name, Last Name/Company Name, Title, ID, SSN/Tax ID, default Street Address, default City, default State, default Country, default Postal Code, and default Category field.
For another example, when a user creates a company contact from the add company button, the following fields' values are compared to existing contacts: Last Name/Company Name, SSN/Tax ID, default Street Address, default City, default State, default Country, default Postal Code, and default Category field.
As an example of a person from the contact screen, you might set up the Duplicate Contact Manager settings screen as follows:
- Activate Duplicate Matching has been selected.
- Allow users to override has been selected.
- Enter the number of duplicate results you would like to display is set to 5.

In this example, a user may try to create a contact (type person) with the following field data:
- First Name - Len
- Last Name - Marr
- Default Phone Number - 213-380-5512
In this case, when the user clicks Save, a message appears showing possible duplicates that have been found:
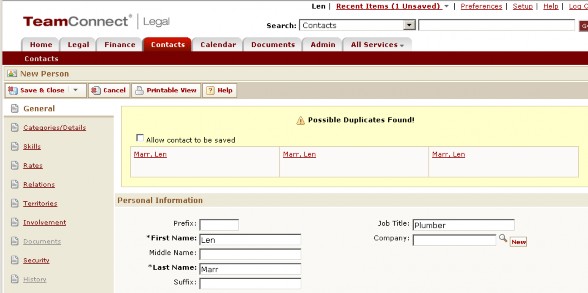
Note: A message like "Displaying 5 of 7" (not shown in this example) would indicate that the Duplicate Contact Manager was configured to display a maximum of 5 duplicate results but 2 additional possible duplicates were found and not displayed.
The user may perform one of the following actions:
- Override the duplicate contact check by selecting the Allow contact to be saved check-box and clicking Save.
- Click an existing contact link to verify that the contact is actually unique.
As an example of the contact screen, you might set the Duplicate Contact Manager settings screen as follows:
- Activate Duplicate Matching is selected.
- Allow users to override is selected.
- Enter the number of duplicate results you would like to display is set to 5.

In this example, the user may try to create a contact (type company) with the following field data:
- Company Name - Omnivision Private Investigators
- Postal Code - 90032
- Default Phone Number - 323-555-0770
In the same way as explained previously, when the user clicks Save, a message appears showing possible duplicates that have been found:
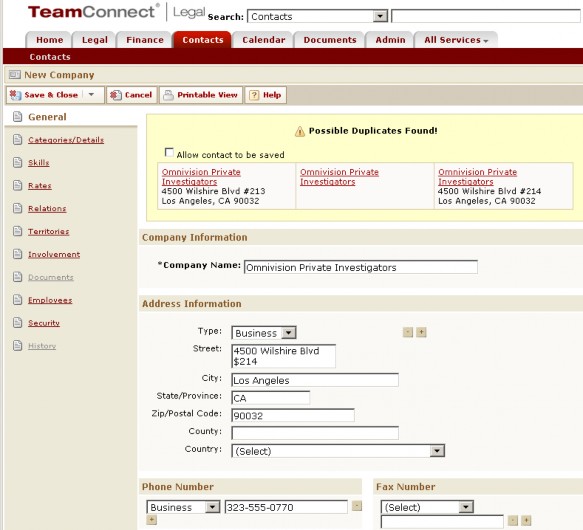
Notice that the duplicates differ slightly from each other. In some cases, the Duplicate Contact Manager found duplications in company name and phone number. In others, it found duplications in company name and postal code. Both kinds of cases were specified in the Manager, so duplicates of both kinds are reported.
In this situation, the user may take one of the following actions:
- Override the duplicate contact check by selecting the Allow contact to be saved check-box and clicking Save. This option is only displayed if you selected the Allow users to override check-box on the Duplicate Contact Manager Settings screen.
- Click an existing contact link to verify that the contact is actually unique.