
Contacts
Contacts may include vendors, outside counsel, claimants, injured parties, witnesses, agencies, and internal employees.
Types of Contact Records
TeamConnect contains two general types of contacts records:
- Persons - Individuals that are internal or external to your organization. All users will have a contact in addition to a user record
- Companies - Organizations, such as external agencies, outside counsel law firms, or internal subsidiaries of your company.
Categories can be used for defining the type of contact. For example, law firms can be identified with a Law Firm category. Categories are defined by your system administrator. Each contacts record may have multiple sets of contact information, and, for easy access, you can enter all of the information on the same record.
The following table shows how you can view, create, and edit contacts.
|
...Contacts |
How... |
|
|---|---|---|
|
Viewing |
||
|
Creating |
||
| Updating | ||
|
General Information |
||
|
Hourly Rates |
||
|
Related Contacts |
||
|
Skills |
||
|
Territories |
||
|
Security |
||
Best Practices for Contacts
- If you do not see any contacts when you click the Contacts tab, click the All Contacts link or any of the other page links in the left pane.
- To create a new contact for a company, make sure you click the New drop-down and select New Company.
- Add a contact to an address book from the address book, not the contact record.
Types of Contact Views
You can view contacts in a list view or card view. The default view is always the last view that you used to display contacts.
You can also view contact records in a collection or search for records. See Modifying a Collections Search and Searching for Specific Records.
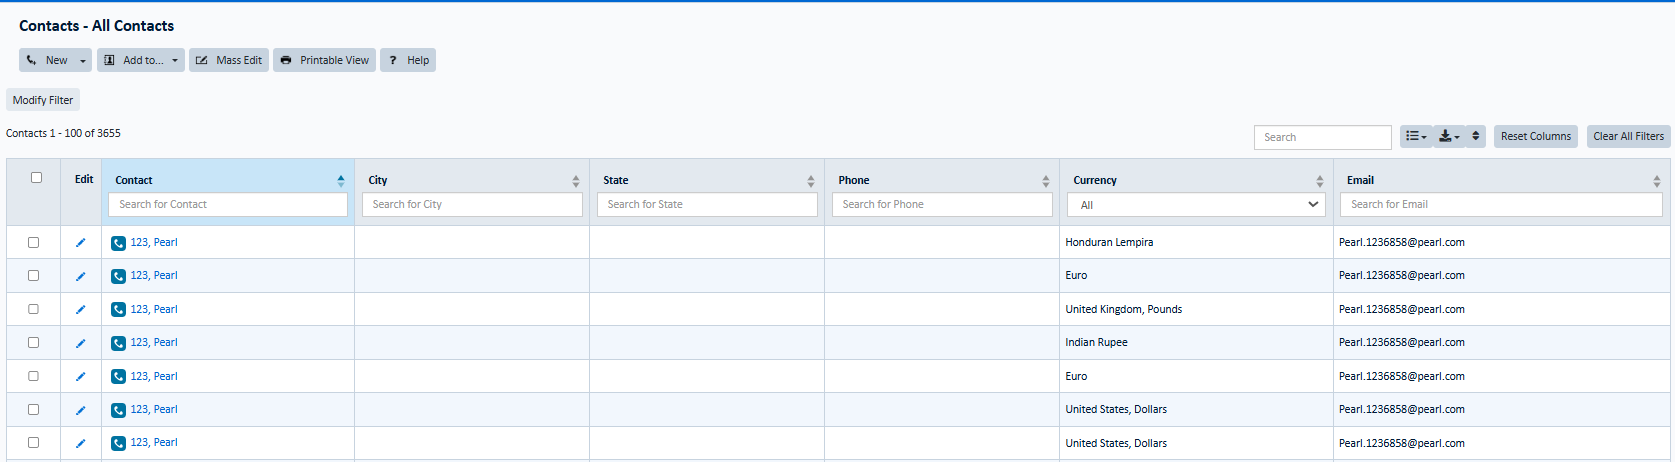
Contact List View
The contacts list view lets you view the contacts that you have the rights to view in a list format.
To view contacts in a list view
- Click the Contacts tab.
- If the list view does not appear by default, in the Display drop-down list, select List View.
Tip: If you use your mouse to hover over a contact in any view, a pop-up window displays the primary contact details. This function is customizable by administrators as detailed in Custom Hover Popups.
To view all of the contacts that you have the rights to view, click the All Contacts link in the left pane. The next time that you access projects, the list view defaults to the last collection that you opened.

For information about the specific areas in the Contacts list view, see User Interface.
To open contact records in other areas
You can open contact records in the following locations in TeamConnect:
- General page in the Access Information section—Click on the link in the Created by or Modified by fields. See General page field descriptions for more information.
- Projects—On the Assignees page for a project. See Viewing Users Assigned to a Project.
- Global Documents page or Documents page for a record—Any field on the General page that contains a user name, such as Record or Author. See Viewing or Editing General Information of a Document.
- Tasks—In the Tasks list view, click on a name in the Assignee column.
Creating a Contact
You can create a contact in one of many ways:
- Using a wizard—Your system administrator may provide one or more wizards to help you create new contacts using a guided, step-by-step process. If you click New and a wizard opens, complete the required fields on each page, and then click Next to progress to the end of the wizard. When you click Finish at the end of the wizard, the record is available in the list view.
Your company may only allow you to create a contact using a wizard, so the option to create a contact manually may not be available.
- Copying an existing contact—TeamConnect allows you to create a contact by copying an existing contact, which is useful if you have contact records that may have different names, but similar properties. See Copying a Record and Duplicate Contacts for more information.
- Entering new contact information from the General page—If you click New and the General page opens, enter contact record information, as shown in the following procedure.
Once you create a contact, with the appropriate rights, you can edit the information in the contact record. See Editing a Record for more information.
Note: Before you create a new contact, it is recommended that you perform a search to avoid creating duplicate contact records. See Searching for Specific Records.
To create a contact
- Click the Contacts tab.
The Contacts list view opens.
- Click the New drop-down, and then select New Person or New Company.

- Click the New drop-down, and then select New Person or New Company.
- On the Profile page, enter or edit the appropriate information. See the General page field descriptions for more information.
Fields with an asterisk are required and must be completed before you can save this record.

- To enter multiple addresses, phone, fax, web, and email addresses, select the + sign in the appropriate information block, and then enter the appropriate information.
If you are entering multiple addresses, phone, fax, web and email addresses, a Primary radio button appears. Click the radio button that indicates the main information for this contact. - Use the links in the left pane to access the contact-specific pages:
- Details—Enter or edit additional identification information, such as an employee ID, social security number, or Tax ID number.
Custom fields may also appear on this page based on the selections you make on the Categories page. See Setting Contact Details and Setting Category Details. - Rates—Enter or edit the fees charged by a vendor for services rendered to your company. Rates may be automatically referenced when you are working with tasks and invoices. See Setting Contact Rates.
- Skills—Enter or edit the skills that a contact possesses and indicate the level of expertise for each skill. See Setting Contact Skills.
- Territories—Enter or edit the geographic areas where the selected contact conducts business. See Selecting Contact Territories.
- Involvement—Add or edit a non-TeamConnect contact's role in a project, such as respondent, claimant, or witness. See Viewing Contact Involvement.
- Details—Enter or edit additional identification information, such as an employee ID, social security number, or Tax ID number.
- If necessary, use the additional contact pages to enter or edit supplementary information, such as historical details or relationships between contacts.
- Select a save option.
Note: If you get a Duplicate Contact message, see Duplicate Contacts for more information.
The tables below contain the default fields for both person and company contacts. The fields that you see may vary based on your system settings and assigned rights. Field descriptions are listed in alphabetical order and may display in a different order in the application.
Person and Company Information
|
Field |
Description |
|---|---|
|
Company |
The organization associated with this contact. Click the search icon, and then complete the search criteria to locate the appropriate company. If you cannot find the company that you want, click New to create it. |
|
*Company Name |
The name of the company for which you are creating the contact record. |
|
*First Name |
The contact's first name. |
|
Job Title |
The contact's job title. Maximum length = 250 alpha-numeric characters. |
|
*Last Name |
The contact's last name. |
|
Middle Name |
The contact's middle name. |
|
Prefix |
The contact's salutation, such as Mr., Mrs., or Ms. |
|
Suffix |
The contact's suffix, such as Jr., III., or M.D. |
Addresses
Multiple addresses are allowed for a contact.
|
Field |
Description |
|---|---|
|
City |
The name of the contact's city. |
|
Country |
The name of the country that applies to the address in this block. This order of options in this list is based on your company preferences, so the countries may not be in alphabetical order. |
|
County |
The name of the county that applies to the address is this block. |
|
Current as of |
The date on which this address information is up-to-date. |
|
State/Province |
The abbreviation for the state or province that applies to the address in this block. Click the icon next to this field to select the appropriate state code or province, or enter the information manually. The items in this list are based on the Country you select and your company's preferences. |
|
Street |
The street number and name. |
|
Type |
The type of address, such as home or business. |
|
Zip/Postal Code |
The zip code that applies to the address in this address block. |
Phone and Fax Numbers
Multiple phone and fax numbers are allowed for a contact.
|
Field |
Description |
|---|---|
|
Number |
Type the phone number. Important: Use a consistent format for all contacts, such as (nnn) nnn- nnnn. |
|
Type |
Select the phone number type, such as home or business. |
Email Address
Multiple email addresses are allowed for a contact.
|
Field |
Description |
|---|---|
|
|
The email address for this contact, such as yourname@yourcompany.com. Note: You can enter up to 250 alphanumeric characters, but only 28 characters will be visible in the field. To see the rest of the address, you have to scroll to the right. |
|
Type |
Select the email address type; for example, business or personal. |
Web Addresses
Multiple web addresses are allowed for a contact.
|
Field |
Description |
|---|---|
|
Address |
The Internet address for this contact, such as www.yourcompanyname.com. You can enter up to 250 alphanumeric characters, but only 28 characters will be visible in the field. To see the rest of the address, you have to scroll to the right. |
|
Type |
The type of the Internet address, such as, business or personal. |
Access Information
|
Field Name |
Description |
|---|---|
|
Created By |
The name of the user who created the contact record. |
|
Created On |
The date that the contact record was added to TeamConnect. |
|
Modified By |
The name of the user who last modified the contact record. |
|
Modified On |
The date on which the contact record was modified. |
Duplicate Contacts
If your system administrator enabled a duplicate contact check, when you select a save option, you may see a warning and a list of possible duplicate contacts.
Do one of the following:
- Review the duplicates to ensure that your contact is unique. If your new record is a duplicate, click Cancel.
- If you still want to save the new contact record, click the Allow contact to be saved check-box and complete the appropriate fields. See General page field descriptions for more information.
Setting Contacts Primary Information
Use the Contact's Profile page to designate the main contact information for a person or company.
Contacts can have several mailing, email, and Internet addresses, as well as several phone and fax numbers. Typically, the item that you add first in a section is set as the primary, so if you have multiple addresses and numbers, it is important that you designate which information is the main information.
The primary items in each section are marked with a check mark in a circle, and this information is what is displayed on both the list view and card view.
You can change the designated primary entry at any time.
To set contact primary information
- Search for a contact and open it.
- In the left pane of the contact record, click the General tab.
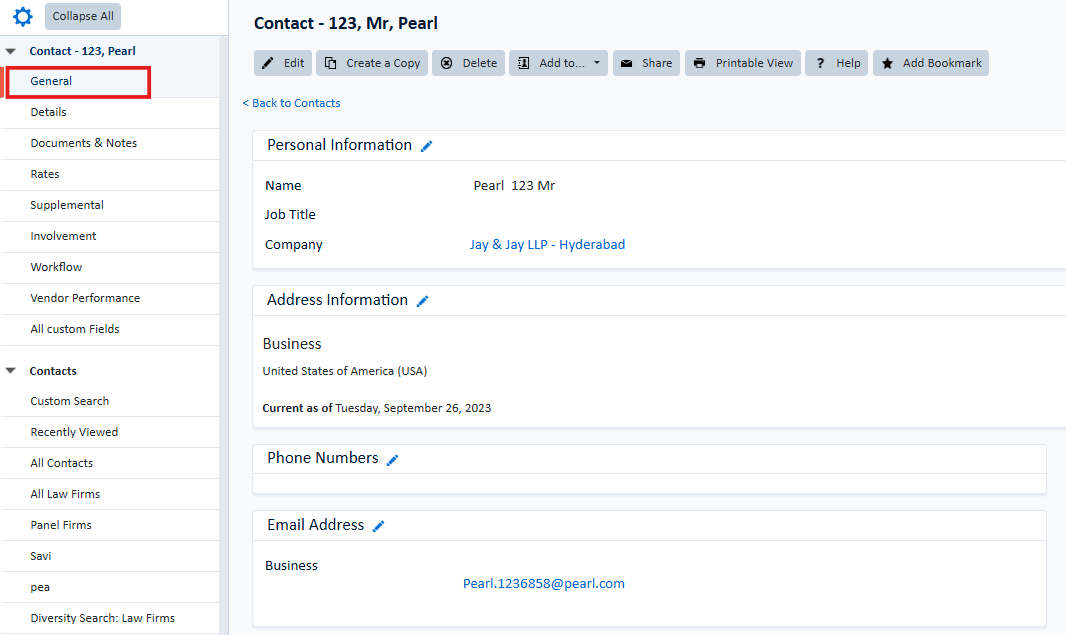
- Click the Edit pencil icon next to the section of information you would like to edit.
- If necessary, click the + sign to add an empty text block, and then enter the new information.

- Select the dropdown, to designate an information as the primary information.

- Select a save option.
Setting Contact Details
Use the Contact Profile page to view or edit additional contact identification information.
How Categories Affect the Details Page
In addition to the default fields, additional fields may appear based on the options you select on the Categories page and your access rights. These additional fields are called custom fields.
For example, if you select a category named Adjuster on the Categories page, and then return to the Details page, you may see fields that allow you to select the states in which the company is licensed, or the limits on payments that can be made on a claim without a supervisor's authorization. For a vendor, these fields are not relevant, so if you select Vendor on the Categories page, a different set of custom fields appear on the Details page, such as vendor type and payment method.
To set contact details
- Search for a contact and open it.
- In the left pane, click the Details page.

- View or edit the appropriate information.
See the Details page field descriptions for more information.
Based on the selections that you made on the Categories page, additional blocks of text may appear on this page. Review this page and complete any new fields, especially required fields. You cannot save this record if any required fields are blank. - Select a save option.
Details Page Field Descriptions
The tables below contain the default field information for person and company details. The fields that you see may vary based on your system settings, assigned rights, and the options you selected on the Categories page.
Field descriptions are listed in alphabetical order and may display in a different order in the application.
Details Page Field Descriptions
|
Field |
Description |
|---|---|
|
Birthday |
The contacts birthdate. You can enter this date manually, or click the Calendar icon next to the field to open the calendar and select the desired date. |
|
Company ID |
The numbering system that your organization uses to identify a company. This may be pre-defined or you can enter it manually. |
|
Drivers License |
The contact's driver's license number, including the state and the number, for example CA A5306279. |
|
Employee ID |
The numbering system that your organization uses to identify an employee. |
|
Nickname/ Alias |
The name that the contact prefers other than their legal first name. |
|
Social Security |
The social security number for this person. Important: Use the nnn-nn-nnnn format for the social security number. |
|
Tax ID |
The tax identification number that applies to this company. |
Adding and Removing Contacts Categories
Use the Contacts Categories page to assign a contact to a group that may describe the type of contact or its function. Categories are usually pre-defined by your system administrator.
Categories are displayed in a hierarchical view with the main categories at the top and related subcategories listed below each main category. For example, a main category named Employees may have subcategories under it named Accountants, Paralegals, and In-house attorneys. A main category named Non-Employees may have subcategories under it named Outside Counsel, Vendors, or Clients.
The categories that you see apply to the specific TeamConnect area that you are viewing and your specific rights.
How Categories Affect the Details Page
In addition to categorizing contacts, the categories that you select may cause additional information fields to appear on the Details page. These new fields may be required and if left blank, you are not able to save the record.
For example, if you select the Internal Employees category, and then select the Attorney category, when you return to the Details page, you may see custom fields that allow you to enter information about the attorney's specialty, home office, and current projects.
When you select a category, it is recommended that you return to the Details page to check for required fields.
See Setting Category Details for more information.
Viewing the Address Books for a Specific User
Use the Address Books page to view the address books that the contact is part of.
Tip: In previous versions of TeamConnect, Address Books were referred to as Contact Groups.
To view the address books for a specific user
- Search for a contact and open it.
- In the left pane, click the Address Books link.
The Address Books page opens and displays the names of the address books for which the selected user is a member.
Setting Contact Rates
Use the Contacts Rates page to view or edit the standard rates charged by a contact, the rate that is charged for non-standard tasks, the rate for an invoice task, and the preferred type of currency. The options that you see on this page depend on your access rights.
There are three types of rates:
- Default—The standard rate and currency that is used for a vendor for most of the services rendered to your company. This rate applies unless a specific task-based or invoice task rate is defined.
- Task-based—The rate that appears when you create a Task or add an entry to the Task Entry Tool. If defined for a contact, this rate overrides the default rate during the specified time period. See Assigning or Reassigning Tasks to Users for more information about tasks.
- Invoice task rates—The rate that applies to a specific task on an Invoice when the associated contact is selected as a timekeeper. If defined, this rate overrides the default rate during the specified period of time.
Each type of rate can have multiple entries with specific start and end dates for each entry.
Important: Information that is defined in each section is completely separate from other sections on the Rates page. For example, rates and dates defined in the Task section do not affect or apply to rates and dates defined in the Invoice Task Rates section.
Notes for Rates
- If you define a rate with no start or end date, you cannot add any other rates in that specific rate area. For example, if you define a task rate with no start or end date, you cannot define other task rates.
- If you enter a start date and the end date is blank, the rate starts on the date specified and the end date is indefinite.
- If the start date is blank, and you enter an end date, the rate applies to any date that is less than, or equal to the end date.
- If a contact has multiple rates in a specific area, such as invoice rates, overlapping date ranges are not allowed. For example, for the same contact, if one invoice rate has a start date of 3/16/09 and an end date of 4/16/09, and a different rate has a start date of 3/17/09 and an end date of 4/17/09, an error message appears and you must correct the overlapping dates.
How Rates Affect Invoice and Task Records
The rates that you enter on this page also apply to other areas in TeamConnect:
- Invoices—If an invoice is created for this contact, the type of currency that you enter on the contact Rates page is automatically used as the currency on the associated invoice. See Viewing Invoices for more information.
If a contact typically bills your company for services, the Invoice Task Rate that you enter on the contacts Rates page is automatically added to an invoice line item when the associated contact is selected as a timekeeper and the item type is Fee. See Timekeeper Rates for more information. - Tasks—Tasks can be billable time items that are tracked by their hourly rate. The rate information on the Rates page will auto-populate the Rate field for tasks assigned to this contact. The Default Rate is used to auto-populate Rate fields if a task does not have a current rate assigned to it.
To set a default rate
- Search for a contact and open it.
- In the left pane, click the Rates link. The Rates page opens.
- Click Edit. You can do this by clicking the Edit button at the top of the screen, or by clicking the pencil icon next to the Currency tab.

- If necessary, in the Currency drop-down list, select or change the type of currency that applies to this contact, for example, United States, Dollars. See the Rates page field descriptions for more information.
- In the Default Rates section, in the Rate field, enter or edit the standard rate charged by this contact for most services.
- If necessary, in the Start Date and End Date fields, enter the period during which this rate applies.
If you do not enter a start and end date, the default rate is applied indefinitely to related invoices and tasks. - If you want to add additional task-based rates, click the Add New Item button and repeat steps 5 and 6.
- Select a save option.
When you are working with billable tasks and invoices, this rate is used as the default rate unless a specific task-based or invoice based rate is defined. See Tasks for more information.
To set a task-based rate
- Search for a contact and open it.
- In the left pane, click the Rates link.
- Click Edit.

- In the Task Rates section, on the Task drop-down list, select the task to which the selected rate applies.
- In the Rate field, enter the rate charged by the contact for this specific task.
- If necessary, in the Start Date and End Date fields, enter the period during which this rate applies.
- If you want to add additional task-based rates, click the Add New Item button and repeat steps 4 through 6.
See the Rates page field descriptions for more information. - Select a save option.
When you are working with a billable task, this rate overrides the Default Rate only during the specified time period.
To set an invoice task rate
- Search for a contact and open it.
- In the left pane, click the Rates link.
- Click Edit. You can do this by clicking the Edit button at the top of the screen, or by clicking the pencil icon next to the Task Rates tab.

- In the Invoice Task Rates section, on the Task drop-down list, select an option.
- In the Rate field, enter the rate charged by the contact for this specific task.
- If necessary, in the Start Date and End Date fields, enter the period during which this rate applies.
- If you want to add additional task-based rates, click the Add New Item button and repeat steps 4 through 6 as necessary.
See the Rates page field descriptions for more information. - Select a save option.
When you are working with invoices, this rate overrides the Default Rate during the specified time period.
To remove a rate
To remove a rate, see Deleting an Entry.
Rates Page Field Descriptions
The tables below contain the default fields for the Rates page. The fields that you see may vary based on your system settings and assigned rights. Field descriptions are listed in alphabetical order and may display in a different order in the application.
Rates Page Field Descriptions
|
Field |
Description |
|---|---|
|
Add New Item |
Adds a new, blank rate row. |
|
Currency |
The currency used for payments to this contact. Notes:
|
|
Rate |
The rate that applies to the selected task or invoice. For Tasks and Invoice line items, this value is automatically displayed in the Rate field when you select a category. |
|
Remove |
Removes the selected line item from the Rates page. Click the appropriate check-box, and then click Remove. |
|
Start Date/ End Date |
Start Date—The earliest date that this rate is applicable. End Date—The latest date that this rate is applicable. Click the Calendar icon to select a date. Notes:
|
Relating Contacts
Use the Contacts Relations page to view or establish the relationships between a contact and other people or companies, for example, plaintiff-to-defendant, spouse-to-spouse, or employee-to- company. A contact may have several different relationships with other contacts and more than one relationship with the same contact.
After you create a relationship between contacts in one record, the related contact's Relations page is automatically updated with the same information.
With the appropriate rights, you can view, edit, and delete relations for a contact. See Working with Related Records for more information.
Setting Contact Skills
Use the Contacts Skills page to define a contact's skill set, and indicate the level of expertise for each skill. Skills associated with contacts can help you identify the best person or company for a specific task.
To set contact skills
- Search for a contact and open it.
- In the left pane, click the Skills link.

- Select one of the following options:
- To add a new skill, in the Type drop-down, select the desired Type of skill, and then type a number to indicate the corresponding Level of Expertise. The level of expertise field maxes out at '99'.
- To edit a skill, in each data entry row, change the desired Type of skill, and/or the number that indicates the corresponding Level of Expertise.
- To add an additional skill, click Add New Item and repeat step 3 until you've added all of the appropriate skills for this contact.
- Select a save option.
To update Currency
To update currency, click the dropdown and select the required one.

To delete contact skills
To delete skills for a contact, see Deleting an Entry.
Selecting Contact Territories
Use the Contacts Territories page to select the geographic areas where the selected contact conducts business. A contact may be associated with several territories.
Based on your assigned rights, you can view, edit, and remove territories.
To select contact territories
- Search for a contact and open it.
- In the left pane, click the Territories link. The Territories page opens.
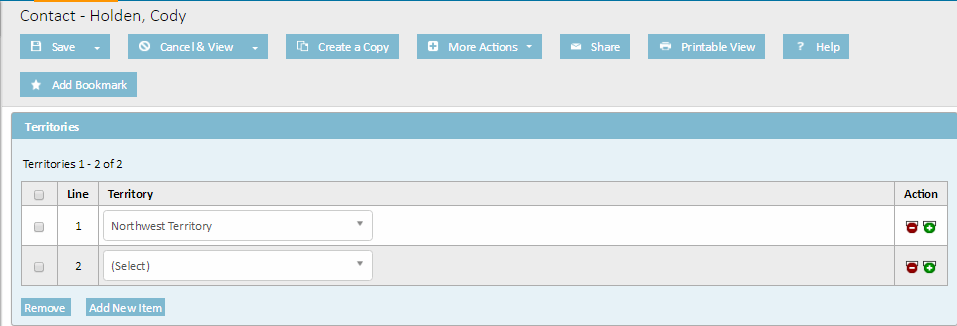
- In the Territory column, use the drop-down list to select the contact's territory.
- To add an additional territory, click + in the Action column or click Add New Item, and then select the necessary information.
- Select a save option.
To delete contact territories
To delete territories for a contact, see Deleting an Entry.
Viewing Company Employees
Use the Contacts Employees page to view a list of employees for a selected company. This list is automatically generated from contact records when you select a company in the Company field on the General page for a person.
Note: This page is only visible for company contacts.
To view company employees
- Search for a company contact and open it.
- In the left pane, click the Employees link.
The employees that are associated with this company are listed.
Viewing Contact Involvement
Use the Contact Involvement page to view information about people or companies who are involved in a project. These non-TeamConnect users are referred to as Involved Parties and their roles may vary, such as opposing party, outside counsel, claimant, witness, law firm, or attorney.
For example, Beth files a lawsuit against Jerry. An internal lawyer in your organization is assigned to the lawsuit and is responsible for it. Both Beth and Jerry are involved parties with roles - Beth's role is plaintiff and Jerry's role is defendant. Neither Beth nor Jerry is assigned to the project, but it is important that the details of their involvement is available to those assigned to the project.
If a contact is involved in several roles in a project, only one project entry displays on the Involvement page with the default role for the contact. Additionally, the list of involvements show where the contact is used in a contact centric object: ex: CSM offices.
Note: You cannot modify involved parties on this page; you must open the related project to make any changes. See Managing Involved Parties for Projects for more information.
To view contact involvement
- Search for a contact record and open it.
- In the left pane, click the Involvement link. The Involvement page opens.

- If necessary, use the Display drop-down list to view a list of specific contact records. You can view the project type, project name, and the role that a contact has in a project.
Contacts may have more than one role in the same project, or may be involved in many different projects, so you may see more than one listing on this page.
Involvement Page Field Descriptions
The tables below contain the default fields. The fields that you see may vary based on your system settings and assigned rights. Field descriptions are listed in alphabetical order and may display in a different order in the application.
Involvement Page Field Descriptions
|
Field |
Descriptions |
|---|---|
|
Application |
The applications for each project in which the selected contact is involved. |
|
Project Name |
All projects for the selected application. Click the individual project name link to view the corresponding detailed information. |
|
Role |
The contact's roles in each project. |
|
Show Involved Projects For |
The application for which you want to view the contact's involvement. Note: If you want to see all projects the contact is involved in, select the default option All. |