
Creating a Record
List View
To create a new record in list view, click the New button in the button bar.


In many cases, clicking New will immediately take you to a new page. In some cases, such as the Contact record type shown above,you may need to make a further selection from a list to indicate what kind of record you wish to create, such as a wizard.
Note: The New options that you see depend on your company policy. For example, some companies only allow you to create new records using a wizard, so that will be the only available option.
Open Record
Search for a specific record, and then click the New button next to the Search icon, if it is available.
When you create a new record, you are shown pages that contain fields that you can edit. The details of editing these fields are discussed in Editing a Record.
For new records of any record type, the History and Documents links in the left pane are disabled until the record is saved for the first time. After that, History and Documents are accessible. Similarly, the Address Books link for a new Contact record is disabled until the Contact is saved for the first time. You can create a new record from a list view or from an open record that provides an option to create a new record.
Wizards
A Wizard is a utility that displays a set of pages to guide you through the process of entering the information that is necessary to create a valid record.
For example, the Scheduler wizard can guide you through the steps necessary to create an appointment record. On predefined pages, you can specify the time of the appointment, add attendees, and then add resources for the event. This is the only default wizard.
All other wizards are created for your organization based on your business practices and procedures. For example, a matter wizard for a legal department might be designed to help you collect and enter information regarding a legal transaction.
Opening a Wizard
A wizard may be one of the available options to add a new record or the only option. If a wizard is your only option, it opens immediately when you click the New button. If several wizards are available, click the New button, and then select the appropriate wizard from the drop-down list.
Using a Wizard
To advance through a wizard, complete the appropriate fields on the first page, and then click Next to advance to the second page. The next page that you see depends on the options that you select on the previous page. On each page, complete the appropriate fields, and then click Next to advance to the next page. If you make a mistake, or need to change an option on a previous page, click Back to go back to the appropriate page. If you advance to the final page of the wizard, click Finish to save the record.
If available, any wizard page may include a Finish button that allows you to stop and save the wizard before the final page. Once the record is saved, you can go back and add additional information at any time.
Important: When you are using a wizard, do not use the browser's Back or Forward buttons. Instead, use the buttons in the wizard's toolbar (Next, Back, Cancel, and Finish) to navigate through the wizard.
You can also use the links in the left pane to advance through the wizard. When you open a wizard, the left pane displays all of the wizard pages in the correct order. The wizard pages that you can access in the left pane also depend on the selections that you make on a previous page.
Note: If you use the left pane to advance through the wizard, it is recommended that you complete each page in order.
Editing a Record
Editing a record is the process of changing the current values or entering additional values into a saved record.
To edit a record
- Select one of the following:
- When viewing a record, click the Edit button in the button bar.
- When viewing a record, click any Edit link in any section on that record's page.
- When viewing a list of records, click the Edit icon
 next to the record you wish to edit.
- Edit the appropriate fields. See Working with Different Types of Fields.
- Select a save option, as described in Saving an Edited Record.
Editing Multiple Records
In cases where you need to edit multiple records at a time, use the Mass Edit feature. This feature allows you to update the fields that appear in the results display of a search view page in multiple records at a time.
To edit multiple records
- Select one of the following:
- Navigate to an existing search view page (e.g. Recently Created, Recently Modified, a saved search) for the record type you want to mass edit.
- Perform a new Custom Search for the record type you want to mass edit. The Results Display options you define in your Custom Search will dictate which fields are available on the Mass Edit page. See Using Custom Search.
- When viewing the search results, click the Mass Edit button. Note: Users can only Mass Edit parent category or 'root' items.
- Select the check-boxes of the records you want to mass edit.
- In the Mass Edit table, enter the following items:
- In the Field column, select the field that you want to mass edit. The available fields are dictated by the results display of the originating search view page. See Specifying Results Columns.
- In the Operator column, select the operation to perform on the data contained within the record. If only one operator is available, this drop-down list will be grayed out and not interactive. See Supported Field Types and Operators.
- In the Value column, enter the new data to be applied to the selected records. When using the Replace operator with Assignees, the Value column will contain two data fields. See Supported Field Types and Operators.

- Click the Update button. Your changes will be applied to all selected records on the Mass Edit page.
You can also edit individual records directly in the record list. - Click the Save & Close button.
Important: Your changes are not permanently saved in the edited records until you click the Save & Close button!
Note: Mass Edit does not allow for edits on locked records. For example, if an invoice is posted, it is considered a locked record and is not modified during a Mass Edit, even if "Allow edits to custom fields after posting” has been selected.
The table below displays the field types and operators that are supported for mass editing:
Supported Field Types and Operators
|
Field Type |
Operators |
Description |
|---|---|---|
|
Main Assignee |
|
The Replace operator replaces the Main Assignee in the selected records with the selected User and Role. |
|
Assignees |
|
The Replace operator deactivates the selected Current Assignee and adds the selected New Assignee as an Assignee on the selected records. If the selected Current Assignee is the Main Assignee, then the selected New Assignee will become the new Main Assignee. The Add/Assign operator adds or assigns the selected user as an Assignee to the selected records. Selecting the Primary Assignee check-box will also designate the New Assignee as the main assignee on the selected records. The Unassign operator unassigns the selected user as an Assignee from the selected records. This operator will skip records where the selected Current Assignee is the Main Assignee. |
|
Involved |
|
The Add New operator adds the selected Contact in the selected Role as an Involved Party on the selected records. The Set Existing operator changes the Role of the selected Contact on the selected records. If the selected Contact is not an Involved Party on the selected records, no changes will be made. The Remove operator removes the selected Contact in the selected Role as an Involved Party on the selected records. |
|
Boolean |
|
The Replace operator replaces the Boolean value in the selected records with the new designated value. |
|
Text |
|
The Replace operator replaces the text in the selected records with the new designated text. |
|
Numeric |
|
The Replace operator replaces the numeric value in the selected records with the new designated value. The Adjust Amount operator adds the designated numeric value to the value in the selected records. You can subtract an amount by designating a negative numeric value. |
|
Date |
|
The Replace operator replaces the date in the selected records with the new designated date. |
|
Memo |
|
The Replace operator replaces the memo text in the selected records with the new designated text. The Add To End operator appends the new designated text to the end of the existing memo text, starting on a new line, in the selected records. |
|
Lists |
|
The Replace operator replaces the list in the selected records with the new designated list. |
Record Locking During Editing
The system administrator can enable or disable record locking. If record locking is enabled, when you edit a record, it is automatically locked to prevent changes by others while you are editing it. If another user who has editing rights to that record brings up a list that includes that record, they will see a lock icon  displayed next to it.
Record locks can last indefinitely, or can expire after a specified time interval. This expiration interval is determined by your system administrators.
It is possible to override a record lock, if you have been given rights to do so. Click on the record name link, and you see an warning message like the one shown below. If you wish to edit the record yourself, click the link that says Release the lock to edit the record.

If you override a record lock and then edit and save the record, the person who was originally editing that record will receive a warning message. If they still need to edit the record, they should examine its information carefully, since their original work may have been overwritten by your edits.
Note: When administrators disable record locking, multiple users can edit the same record simultaneously. However, only the user who first attempts to save the record can save it successfully. When the other users attempt to save, they will see a warning message that tells them that their save failed.
Working with Different Types of Fields
There are several types of fields:
When a field is required, you must make an entry in it before saving the record. Required fields are indicated by a bold label and an asterisk at the beginning of the label.
Check-box
Use a check to turn an option on or off. When the option is on, a check mark appears in the box. To select or clear a check-box, click inside it with the mouse, or navigate to it with the keyboard and press SPACEBAR. You can check multiple check-boxes as appropriate.
|
Edit mode |
Read-only mode |
|---|---|
|
|
(not applicable) |

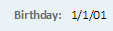
Date Field
Use date fields to store and display dates in the format specified in your user preferences (see Selecting Region, Date, and Time Formats).
|
Edit mode |
Read-only mode |
|---|---|
 |
 |
In date fields, you can do either of the following:
- Manually type the date in the accepted format. This method may be faster when entering dates that are in the past or distant future. You can copy and paste data, if necessary. A calendar window pops up, but does not interfere with your manual data entry.
- Put the cursor in the date field to automatically open the Calendar pop-up window and select the necessary date in the pop-up window.

To select a date in a pop-up calendar:
- Use the left or right arrow controls to set the desired month and year. The double arrows move by one year per click, and the single arrows move by one month per click.
- Select the desired day on the screen.
After you select the day, the Calendar window closes.
Time Zone Independent Date Fields
Depending on each object setting, date fields can be one of the following:
- Time zone dependent—Converts dates entered by other users to your time zone. If you enter a date in a time zone dependent date field and a user from a different time zone views the date, the date will be converted to that user's time zone.
- Time zone independent—Dates entered by another user are not converted according to time zone, regardless of your time zone setting. This means that dates should show up "as is", regardless of a user's Time Zone.
Some System Date fields will also be set to be Time Zone Independent by default.
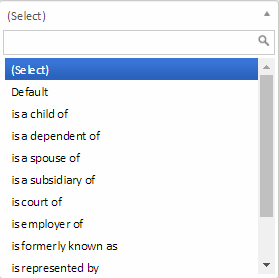
Drop-down List
A drop-down list is a field where you click the arrow on the right or press the DOWN ARROW key and choose an item in the resulting list. You can make only one selection in a drop-down list.
If items in a drop-down list are hierarchically related to each other, these relations are indicated by the appropriate indentation and a colon between the items.
The advantage of drop-down lists is that you can see all available items and can make your selection quickly. However, if you have a large number of items, you have to scroll up and down a long list making sure to select the correct item.
|
Edit mode |
Read-only mode |
|---|---|
 |
 |
As you can see, in read-only mode, a drop-down list presents its value as a simple field or background text. There is no indication that it is actually a list.
To find the necessary item in a drop-down list
- Click the drop-down list or navigate to it using the keyboard.
- Type the first letter of the item (or the first digit for numbers).
- To go further down in the list of words starting with the selected character, keep pressing that key.
When you reach the end of the list of the words starting with the selected character, the first word in the list is selected again.
Important: This technique does not work for the items displayed with spaces at the beginning of the item text (indented items).
Points to Remember
- To open the list, click or tab to the drop-down list.
- To select the necessary option, click the item or use the arrow keys.
If there is an adjacent command button next to the drop-down list, you must click the button or navigate to it and press ENTER to complete the selection. - In long lists, you can scroll up and down the list.
Important: For full keyboard accessibility in drop-down lists, you must enable Accessible Mode. For more details, refer to Enabling Accessibility Mode.
- In Accessible mode, use the arrow keys to select an option, press the TAB key to navigate to the go button, then press ENTER to make your selection.
- Categories or lookup table items in a list that are displayed in gray are inactive. If accessibility settings are enabled, (inactive) is added to the item name and they are not displayed in gray.
- Inactivated items must not be added to records, so they are not displayed in lists that are used to add items to records. If a category or lookup table item that you are familiar with is not displayed in a list, it may have been inactivated.
- If search screens include category lists or lookup tables for the type of record, any inactive items are displayed in gray. You can select these items to search for records that had the item selected before it was inactivated.
- If an inactive item was added to the record before it was made inactive, you can save the record without changing the item's value. If you accidentally change the value and save the record, you cannot restore the inactive value to the record, but you can contact your administrator to temporarily activate the needed item.
List Box
List boxes allow you to simultaneously select one or more items. List boxes are only available in search screens and in some wizards. It is also known as a "multi-select" list.
|
Edit mode |
Read-only mode |
|---|---|
 |
Not applicable |
To make a single selection
Select the item in the list using a mouse or keyboard arrow keys.
To make multiple selections
- Select the first item, press and hold the SHIFT key, and use the keyboard arrow keys or a mouse to select several consecutive items in the list.
- Press and hold the CTRL key and click on the desired items. If you prefer to use a keyboard, press SHIFT+F8 to activate the multiple select capability, use the arrow keys to move to items, and press SPACEBAR to select several random items in the list.
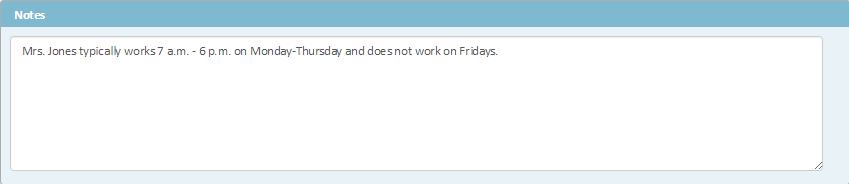
Memo Text
Memo Text fields allow you to type large amounts of plain text.
Edit mode:
Read-only mode:

If you copy and paste the necessary text from other word processing applications, you lose the formatting, including bullets, numbers, and indentations.
Note: In the unusual case that you enter 250 characters or more, without any embedded spaces, into a Memo Text field, the web browser might try to word-wrap the content by making the field much wider, causing any fields to the right of the memo to move much farther to the right. The fields are still accessible by using the horizontal scroll bar.
Number
Number fields can store and display decimals, percentages, and integers. In other words, Number fields accept only numeric characters. Also, each Number field may accept only appropriate values, for example, the Number of Plaintiffs field accepts decimal amounts, whereas a Total Amount field in accounts can accept both integers (whole numbers) and decimals. Most decimal amounts are rounded to two places. Invoice expense rates can have up to five decimal places.
Note: In read-only mode, negative numbers are displayed in parentheses. In edit mode, negative numbers are preceded by a minus sign. You should use the minus sign, not the parentheses, when editing a negative number.
|
Edit mode |
Read-only mode |
|---|---|
 |
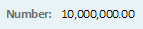 |
All number fields automatically format your entries as necessary, for example, to dollar or percentage amounts, and display the appropriate signs. In other words, you do not have to type formatting characters.
Option Buttons
Option buttons are fields that look like circles that you can use to select only one of the mutually exclusive options. These buttons are sometimes referred to as "radio buttons." To make a selection, click the desired item with your mouse or, alternately, move the focus to the option buttons with the Tab key and use the arrow keys to make your choice. In the example below, the option button serves to set the 'Primary' option.
|
Edit mode |
Read-only mode |
|---|---|
 |
 |
Text
Text fields accept any characters. Unlike memo text fields that accept large amounts of text, you can only type up to 50 - 250 characters in text fields.
If you are working with the Workflow Approvals or Invoices, you can enter up to 2000 characters in any Comments or Reason field.
Working with Batch Entries
Many of the pages allow you to put in the same kind of information multiple times within a single record. For example, by default, the following pages have batch appearance and functionality:
- Categories
- Relations and Involved (in projects and contacts)
- Assignees (in projects)
- Invoice Line Items
- Batch Tasks and Batch Expenses
- Attendees and Resources (in appointments)
- Address, Phone, Fax, Email, Internet Address, Skills, Rates, Territories (in contacts)
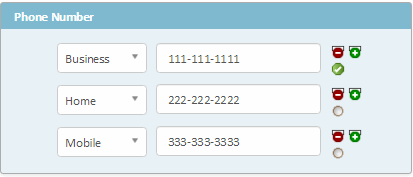
Initially the Phone section in the Contact record has only a single entry available. To add more entries, click the Plus button that is shown to the right of the input fields, one or more times. Now the section contains multiple entries, all still blank. You can edit all of these entries.

Primary Entries
For some record types, when multiple entries are allowed, you must designate one of the entries as primary. You do this by clicking the Option button next to the Plus button. When an entry is designated as primary, it is used in reporting and in any area where only one entry will be shown, no matter how many other entries exist.
In edit mode, the primary designation appears as a check mark in an option button. In view mode, however, the word "Primary" appears next to the primary entry instead.

Deleting an Entry
When a section already has multiple entries, and you wish to delete one of them, click the Minus button next to the entry. That entry will disappear but the other entries will remain.
Editing Batch Entries
For custom blocks, if enabled, you can add or delete one or more fields. Additionally, you can tab to specific fields in the batch display and edit them as necessary. A search feature is also provided so that you can search for information to populate a field.
Note: This feature is only available if it has been enabled by the system administrator. If not enabled or if you do not have access to this feature, the following screens and functions are not available.
To add a new entry
- To add a single row, click the Add New Item button above the batch display. A new empty row is added to the bottom of the display and the cursor moves to the Work Item field so that you can immediately begin adding information.
- To add multiple rows, click the Add Item drop-down list and select the number of rows that you want to add. The selected number of rows appear at the bottom of the batch display.
To edit an entry
Click the edit icon next to the line that you want to edit. The field becomes editable and you can make changes.
To copy an entry
Click the copy icon next to the line that you want to copy. An exact duplicate of the selected line appears at the bottom of the list.
When you are done adding, editing, or copying entries, click Save to save the changes.
To remove an entry
Click the check-box for the entries that you want to remove, and then click Remove.
To search in a batch display
Some fields provide a search icon that you can click to search for specific information to populate a field. Click the search icon to enter search criteria. For information about using the search module, see Searching for Specific Records.
Setting Category Details
You can add many additional custom information fields to the pages that appear in the "out of the box" version. To support these custom fields, they are organized into categories. A group of custom fields that belongs to a category is called category details or just details.
Categories are a way of specifying a particular kind of record. For example, in a Contact record of an employee, you may need to enter information about their hire date, manager, and department. To enter these details, the appropriate category, such as Employee, should be selected for that contact record. But those same details would not make sense in a Contact record for an outside vendor. For vendors, you may need other specific details instead, such as vendor type and payment methods. This can be addressed by adding the Vendor category to the contact record.
Categories control which specific sections of details are displayed on the Details sections of a record's General page. By adding or deleting categories in a record, you display or hide the associated sections of details in that record.
Note: Contact records differ from other record types, because all of the details related to categories are displayed on a Details page, not in details sections in the General page.
You might have many other categories of contacts. Categories can be structured like a family tree. For example, the Employee category might be subdivided into Manager, Non-Exempt, and Temporary categories. When you assign the Non-Exempt category to a contact record, you automatically include the parent Employee category, so that detail sections for both categories would be visible in that record.
The categories used by your organization are entered by your system administrator into a list that is then available for you to choose from when you work on Contact records, Project records, or any custom record type.
Categories and Record Types
Besides the Contact record type, categories are also used to control sections of custom fields (category details) in the Project record type, and in each custom record type.
In the Account record type, categories are used for organizing accounts, but accounts do not have custom fields associated with their categories.
The examples in this portion of the documentation have categories related to the Contact record type.
Assigning Categories
When viewing an existing record's Categories page, only the categories that are presently assigned to the record will be shown. There might be many other categories available for assignment, but they are not visible during viewing.
When editing the Categories page for a record, all of the categories that are available for assignment are shown. The categories that are presently assigned are indicated in check-boxes. You can assign multiple categories to a record.
The list of categories is structured like a family tree. Those branches that are expanded are marked by the minus icon, and those that are presently collapsed are marked by the plus icon. You can expand and collapse branches by clicking these icons.
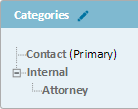
You can assign or unassign a category by clicking the check-box next to the category name to place or remove a check mark in the box.

Note: that assigning a category automatically causes any parent categories to be assigned, too. In this example, assigning Attorney to the record caused Internal to be assigned, because Internal is the parent of Attorney. It is also possible to assign a parent category to a record without assigning any of the child categories.
Set a primary category before saving as detailed in the image below.

Unassigning Categories
You can unassign a category by clicking the check-box next to the category name to remove the check mark in the box. Unassigning a child category does not automatically unassign the parent category.
Important: When you edit an existing record and unassign one of its categories, then save the record, all of the information in the category details for that category will be permanently deleted. Even if you re-assign the category the previous information cannot be recovered. Therefore you should use caution when unassigning a category.
Canceling Your Edits
If you choose to cancel the edits you made, click Cancel & Close or Cancel & View in the record toolbar. Then answer the resulting confirmation dialog box. The record's page disappears and you will return to the page that you were viewing before you began editing.
Saving an Edited Record
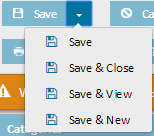
When you are done working on a record, use the Save button on the button bar to save your work. This button might have a label different than Save, depending upon how you have been using the button in your session. If you click or hover over the drop-down arrow, as shown in this example, you have one of the following options:
- Save—Saves the record but leaves the record open and in edit mode.
Since you requested that the record remain in edit mode, it will still appear in your list of Unsaved Items. To remove the record from that list, choose a different Save option. - Save & Close—Saves the record, closes the record's page, and then returns you to the previous page.
- Save & View—Saves the record, then returns to a read-only view of the record.
- Save & New—Saves the record, then opens a new blank record of the same type so that you can enter new information.
The default option out of this selection can be set by administrators. For more information, see Setting up the User Interface.
Save Options
If the label on the Save button is already the choice you want, simply click the button. If not, click the drop-down arrow on the right edge of the button and make your choice from the list that is shown there.
Note: Records contain fields to indicate when, and by whom, a record was created, last modified, and last opened. These fields are useful when searching or doing reports. All of these applicable fields are populated with your user name, and the current date and time, when you click a Save option.
If there are errors in the fields that you were editing, the save operation may fail and one or more error messages will appear at the top of the page.

The record remains in edit mode. Correct the errors that are described in the error messages, and try to save the record again.
Handling Unsaved Records
You can edit a new or existing record, then leave the page where you were editing the record and perform other tasks. When you do this, the record that you had been working on is remembered as an unsaved item. The Recent Items button in the upper right portion of the screen will show the presence of unsaved records, as shown in this example.
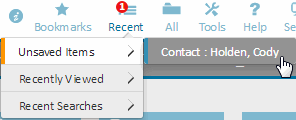
Unsaved Records
When you hover the mouse over the Recent Items button, a window appears that contains links to records you have worked on recently as well as unsaved records. To return to an unsaved record, simply click the link for that record. You can then edit the record further and/or save the record.
You are also reminded about unsaved records when you attempt to log out while there are still unsaved records present in your session. A window appears that lists the unsaved items.
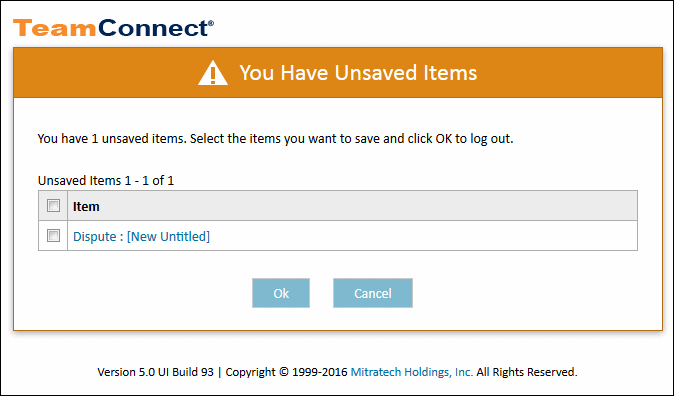
Unsaved Records Reminder
Each item has a check-box next to it. If you wish to save the items before you log out, click the related check-boxes and then click OK. If you do not wish to save any items, leave the check-boxes blank and click OK. If you decide not to log out after all, click Cancel.
Copying a Record
Copying a record is recommended when the new record is very similar to an existing one, and you will not have to change many of the values that are automatically populated.
To copy a record, on the record toolbar, click the Create a Copy button. The new record opens and some of the information is identical to the record you copied. You can now edit and save the new record.
Note: Not every piece of information will be copied from the old record to the new record. Each record type has its own set of excluded information. Generally, child records (such as Involved records for a Project or a custom record type) are never copied to the new record. In addition, any piece of information that displayed as "SECURED" in the old record will not be copied, and that field in the new record is blank. Likewise, in the case that multiple items are selected and one (or more) are deactivated, the inactive items will not be copied.
The table below displays the copy details for each record type:
Copying a Record
|
Record Type |
What is Copied |
What is Not Copied |
|---|---|---|
|
Accounts |
|
Note: If any field displays SECURED as the value, then the new record will not contain a value for that field. |
|
Appointments |
|
|
|
Contacts |
|
Additionally, none of the address books that the original user created are copied to the new user, and none of the address books to which the original user subscribed are copied. |
|
Documents Document Folders |
See Copying Documents for more information. |
|
|
Expenses |
|
|
|
Invoices |
|
Note: If any field displays SECURED as the value, then the new record will not contain a value for that field. |
|
Projects |
|
Accounts page Appointments page Documents page Expenses page History page Involved page Phase History page Tasks page Workflow page Also, none of the related child projects are copied to the new project. |
|
Tasks |
|
|
Reassigning Work
The Reassignment Tool is used to delegate the work of one user to another user or multiple users. With this tool you can reassign all:
- Appointments
- Tasks
- Projects
The tool lists all projects. However, you can only reassign projects that have the option to be assigned to a user.
Note: If you want to reassign all tasks and appointments as well as projects, the tool first reassigns projects and their related tasks and appointments, and then reassigns tasks and appointments that are not related to any specific project.
Important: For performance optimization, the tool reassigns large numbers of projects in small batches of 10 project records. If any record within a batch fails, the tool skips the entire batch and the next batch in the sequence executes. You can view the log for specific information about a failed batch. It is recommended that you reassign large groups of projects during off-peak hours.
To reassign work
- Click the Tools tab.
- In the Tools section, click Reassignment Tool. The Reassignment Tool page opens.
- Select or search for the user whose work you want to reassign.
- Select the check-box for the Record Type that you want to reassign.

- For each record type that you want to reassign, select the appropriate option in the Setting drop-down list:
- Appointments—Select Future for appointments that have not occurred or Future and Past for all appointments.
- Tasks—Select Incomplete for tasks without Completed as the Status, or select Un-posted for tasks that have not be posted.
- Projects or custom objects—Select the appropriate option. The options are most likely Open projects or Open and Closed projects.
- In the New Assignee column, select a user from the drop-down to be the new assignee of the selected record types.
- Click Reassign.
The status of the reassignment appears in the Status column. If the reassignment was successful, the status looks like the following image.
If the reassignment of a related task or appointment fails, for example, a record is pending approval at the time of the reassignment, the project reassignment fails as well. When the record reassignment is complete, a message displays the number of records successfully reassigned and the number of failures. You can view the log for detailed information. If the reassignment failed, the status looks like the following image.
Troubleshooting Scenario(s)
- Unable to Access History and Documents Links for New Records
- Ensure that the record was properly saved after creation. Unsuccessful saves will keep the links disabled.
- Verify if the user has sufficient permissions to access the History and Documents sections for the specific record type.
- If the issue persists, escalate to the system administrator to verify system settings or troubleshoot for any backend errors.