
Data Import Wizard
Use the Data Import Wizard to create multiple records at the same time. The wizard requires you to add all records to a spreadsheet so that you can import the data from that spreadsheet into TeamConnect.
You can import only the following types of records:
- Contacts
- Custom Objects
- Involved Contacts
Note: Embedded objects are supported when importing custom object records. Please refer to adding secondary field labels.
To import records, you must first create a data file. See Creating a Data File and Importing Data for more information.
Note: If you import data for a record that already exists, TeamConnect creates a duplicate record. In the case of contact records, if a solution developer has configured your system to prevent duplicate contacts, the wizard returns an error and does not create the duplicate record.
Creating a Data File
To import data, you must create an Excel spreadsheet that contains the record information that you want to import. The spreadsheet looks similar to the following image.

Note: If your Excel workbook has multiple sheets, only the first sheet uploads.
To create a data file
- (optional) Open the appropriate record type and use the label names in the record as a guide to determine label names for your data file.
- Enter the label names in the first row of the spreadsheet.
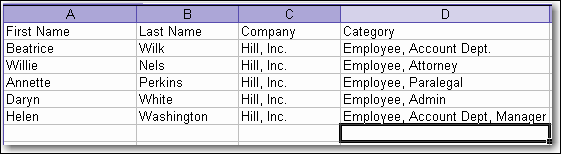
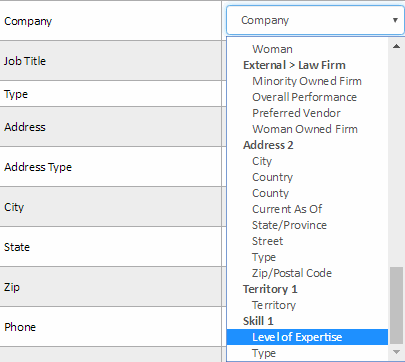
For example, for contact records, you could enter First Name, Last Name, Company, Job Title, Type, etc., as shown in the Contacts Example image. If you are creating a contact import file, see Importing Contacts for additional information. - Enter data for each record in a row.
Note: It is recommended that you import a small number of records to ensure that your data meets the guidelines.
Data File Guidelines
The following guidelines apply to the first row:
- The first row cannot contain duplicate label names, even if the names have different cases.
For example, Address, address, and aDDress are all considered duplicates. - Label names cannot contain the following symbols:
< (less than)
> (greater than)
. (period)
& (ampersand)
' (single quote)
" (double quote)
[ (left bracket)
] (right bracket)
Additionally, TeamConnect removes currency and percent symbols when importing data. Macros and formulas must be removed from the spreadsheet. If the data in formulas is needed, copy the column and re-paste it as values.
Localized Labels
If you want to create a data file that contains localized data for system and custom lookup fields, assignee roles, and categories, enter the field's tree position instead of translating the field.
Importing Categories
If you use a Category label in your data file, you can enter more than one category in the same field, separated by commas. The first category in the cell is automatically the Primary category.
For multiple categories, the Category cells may appear as follows:
Importing Contacts
Categories Example
Contact data files must contain a Type field for each entry. The options for the Type field must be one of the following:
- P or Person.
- C or Company.
This field is not case sensitive. See the Type field in the Contacts Example image for an example.
In addition, each entry that has a Type drop-down box, such as the Address or Phone label, must have a Type entry in the data file. For example, if you have an Address heading label in your data file, you must also have an Address Type heading label, as shown in the following image.

Importing Custom Objects
To import custom objects using the Data Import Wizard, start by preparing a spreadsheet containing the required details for population or updates. Ensure that the field names in the spreadsheet match those in the Matter.
Note: The following procedure assumes that you created or obtained a data file that meets the import guidelines. See Creating a Data File for more information.
Follow these steps to import custom objects:
- Go to the Matter.
- Navigate to Tools --> Data Import Wizard.
- Proceed to the 'Begin Import' tab and click the Next button.
- Choose the Record Type from the dropdown menu and select the file containing the previously prepared spreadsheet for upload. Then, click Next.
- On the next page, ensure that the Import fields correspond to the TeamConnect fields. If a field does not match, select the appropriate option from the dropdown menu. Click Next to proceed to the Preview.
- Review the necessary details displayed in the preview screen (as shown in the screenshot). Click Next to continue.

- When the import is complete, a confirmation page will display details such as the number of records imported and any records that failed to import due to errors. See Data Import Wizard Errors to troubleshoot errors.
- Click Finish to close the wizard.
Note: After import, the Excel file will not be retained within the TeamConnect instance.
Adding Secondary Field Labels
You can also add secondary information for the same label type, such as a secondary address for a contact.
For example, for a secondary address, create and then populate labels similar to the following labels:
- address2
- city2
- state2
- zip2
Importing Data
When the data file is complete, use the Data Import Wizard to perform the following process.

Note: The information that you see and the tasks that you can perform while using the import wizard depend on your access rights.
An incomplete import wizard appears in the list of Unsaved Items in the top-right of your browser. If you click away from the wizard at any time, click Unsaved Items to resume your work. The wizard no longer appears under Unsaved Items when you finish or cancel the wizard or log out of TeamConnect.
To import records
Note: The following procedure assumes that you created or obtained a data file that meets the import guidelines. See Creating a Data File for more information.
- Click the Tools button.
- In the Tools section, click Data Import Wizard.
The Data Import Wizard opens to the first page.

- Review the first page, and then click Next to continue.
The Upload Spreadsheet File page opens.

- In the Record Type drop-down list, select the type of records that you want to create.
- Click Choose File or Browse to locate the spreadsheet file that contains the data that you want to import.
- Click Next.
TeamConnect searches system and custom field labels to match the imported labels to TeamConnect fields.
When the tool finishes analyzing the data, the Map Record Fields page opens.
The label names from your data file appear in the Import Field column. If TeamConnect finds a match, the suggested label names appear in the TeamConnect Field column.
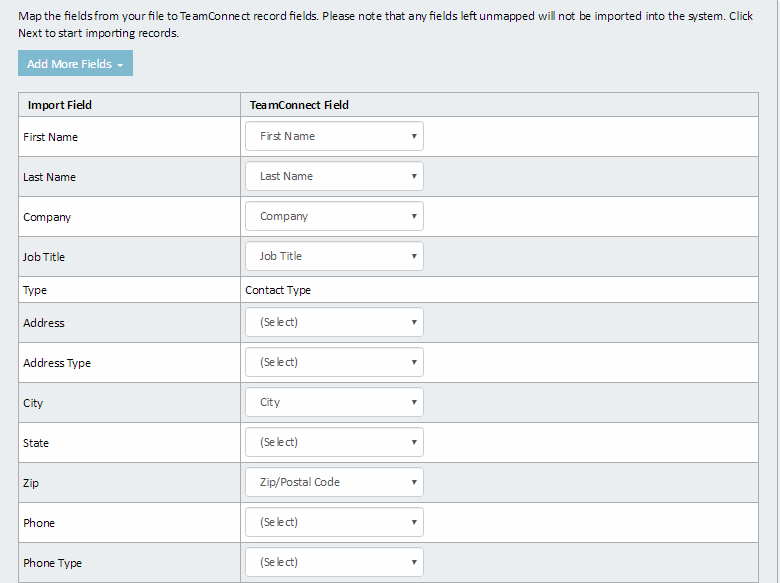
- For each incorrect or unmapped field, click the TeamConnect Field drop-down list, and select the correct label name.
If you added secondary fields or fields not in the drop-down list to the imported data, you can also adding more fields. - Click Next.
If you mapped a field twice, an error message appears. Correct the error, and click Next again to continue.
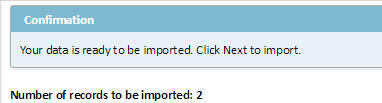
A Confirmation page opens that displays the number of records to be imported.
- Click Next to import the mapped data.
Importing may take several minutes, depending on the number of records you are importing.
During the import, TeamConnect ignores all blank lines and empty cells. Any custom rules that trigger upon record creation automatically execute.
When the import is complete, a confirmation page provides the details of the data import, including the number of records imported and the number of records that did not import because of errors. See Data Import Wizard Errors for how to troubleshoot errors. - Click Finish to close the wizard. Note: After import, the Excel file will not be retained within the TeamConnect instance.
To add more fields
To add more fields, click Add More Fields, and select the type of field that you want to add. Add more fields in one of the following situations:
- You want to import secondary fields, such as a second address or phone number.
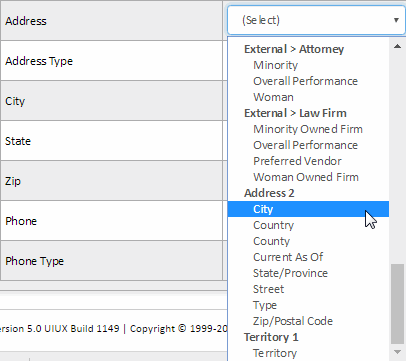
For example, if you want to add a second address, click Add More Fields, and then select Add Address. The secondary address fields appear as Address 2 in all drop-down lists. You can now map these labels to the secondary address labels.
-
Once you import the data file, you can use the Add More Fields option to map these fields as secondary addresses.
This is also used for adding embedded object records when a new custom object record is being created. In this example we have added the Damages embedded object to the mapping.
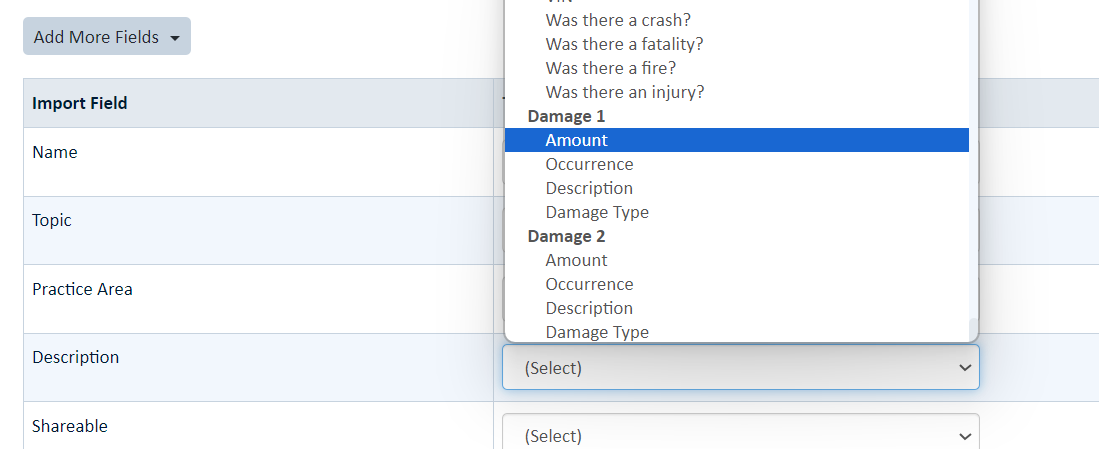
For an additional group of fields, such as a third address, add more fields again.
- You want to import fields not currently in the drop-down, such as rates or skills. Select Add Invoice Task Rate, Add Task Rate, or Add Skill to add these types of fields to the drop- down list.
For example, if you are importing contact records, the following table includes the mapping options for that record type.
Adding More Fields For Contacts
|
Add More Fields Selection |
TeamConnect Field on Mapping Page |
TeamConnect Field in Contacts Record |
|---|---|---|
|
Add Address |
City |
City |
|
Country |
Country |
|
|
County |
County |
|
|
State/Province |
State/Province |
|
|
Street |
Street |
|
|
Type |
Type |
|
|
Zip/Postal Code |
Zip/Postal Code |
|
|
Add Default Rate |
From Date Rate |
Start Date Rate |
| Rate |
Rate |
|
|
To Date |
End Date |
|
|
Add Email Address |
Email Address |
Email Address |
|
Email Address Type |
Email Address Type |
|
|
Add Invoice Task Rate |
Category |
Task |
|
From Date |
Start Date |
|
|
Rate |
Rate |
|
|
To Date |
End Date |
|
|
Add Phone Number |
Phone Number |
Phone Number |
|
Phone Number Type |
Phone Number Type |
|
|
Add Relation |
Direction (Enter TO_THIS or FROM_THIS in the spreadsheet) |
Switch Relation |
|
Related Contact |
Contact |
|
|
Type |
Relation |
|
|
Add Skill |
Level of Expertise |
Level of Expertise |
|
Type |
Type |
|
|
Add Task Rate |
Category |
Task |
|
From Date |
Start Date |
|
|
Rate |
Rate |
|
|
To Date |
End Date |
|
|
Add Territory |
Territory |
Territory |
|
Add Web Address |
URL |
Web Address |
|
Web Address Type |
Web Address Type |
The selections for Add Address, Email Address, Fax Number, Phone Number, and Web Address are all for adding secondary fields. The primary fields already exist in the drop-down.
Data Import Wizard Errors
If all records do not import, you can troubleshoot the errors that appear in the spreadsheet TeamConnect returns.
For example, if TeamConnect checks for duplicate contact records before creating a new record, the system marks the duplicate record as failed and logs the error.
Kindly note that only certain system fields can be mapped, namely Name, Number (if not automatically set), and Assignees. Assignees must consistently follow the <last name, first name> format. Additionally, if there are two individuals with identical names, the data cannot be loaded.
To troubleshoot Data Import Wizard errors
- From the Import Confirmation page, click Download spreadsheet file with failed rows to review them.
- Open the spreadsheet to display explanations for the rows that did not import.
- Use the error explanations to make corrections.
- Repeat the import process.
Note: To save time and to avoid duplicate records, re-import only the data that did not previously import.