
Managing Documents
A document is also a reference to a document, such as a link to a Web page, or a shortcut link that opens to a document in a different location.
You can perform the following tasks to manage documents in TeamConnect:
- Adding a Document to TeamConnect - Upload a document to a Documents page.
- Editing Documents - Edit a document by first checking it out, and then checking it back in when you are done editing it.
- Creating a Document Folder - Create a folder to hold related documents.
- Exporting a List of Documents in a Folder - Export a list of documents to an Excel spreadsheet or as a .pdf file.
- Copying Documents - Copy documents from one location in TeamConnect to a different location in TeamConnect.
- Moving Documents - Move documents from one location in TeamConnect to a different location in TeamConnect.
- Creating a Document Shortcut - Create a bookmark that allows you to access a document that is in a different location in TeamConnect.
- Creating a Link to a Web Page - Create a link that allows you to access a Web page.
- Downloading Documents - Copy a document from TeamConnect to your computer.
- Generating Documents Using TeamConnect Data - Use the Document Generator to create a form document, such as a standard status letter that you send to clients.
- Using Windows Explorer with Documents (WebDAV) - Use the Windows Explorer browser to view, copy, move, edit, and delete TeamConnect documents.
The tasks that you can perform depend on your assigned rights.
Adding a Document to TeamConnect
To add a new document to a Documents page, you upload it from a local computer to TeamConnect.
This can be achieved via two methods, either the Upload File icon or drag-and-drop file addition.
To add a document to TeamConnect via Drag-and-Drop
If adding multiple files, each file will be restricted by the maximum upload size set by your admin; the aggregate size of the documents can exceed the limit. Likewise, if a single upload exceeds the maximum, the files within the upload size limit will not be impeded.
- Click the box for drag-and-drop functionality, or simply drag-and-drop to begin the upload.
- After uploading the files to the open box area, click Start Upload to begin the process.

A document in TeamConnect may be many different types, such as a word-processed file, a spreadsheet, image files, text files, or email messages. A document is also a reference to a document, such as a link to a Web page, or a shortcut that opens to a document in a different location.
After you add a document to TeamConnect, you are listed as its author. As the author, you can edit or delete your documents and assign security rights that deny or allow other users to access it.
If you added the document using the Documents tab, all of the documents that you add are automatically listed in the My Documents collection, unless you navigate to a specific record. See Using Documents Collections for more information.
Important: Your system administrator can limit the size of documents that you can add to TeamConnect. An error message appears if you exceed the limitation. The size of the documents that you can add also depends on the amount of memory that is currently available on your company's server. You may have difficulty adding documents if the server memory is low. Contact your system administrator if you are having difficulty adding documents.
To add a document to TeamConnect via File Upload
- Open the Documents page where you want to add the new document. If you want to add a document to a folder, click the folder to open it.
- Click the Upload File button or icon. Likewise, users can drag-and-drop files for upload. After adding the desired files, click Start Upload to begin the process. See Sharing Documents using Email for more information.
The Upload New File window opens.

- Click Browse to locate the file that you want to add.
- In the Name field, enter the name of the document as you want it to appear on the Documents page. The name defaults to the current file name if you do not change it.
- In the Type drop-down list, click the type of file that you are adding. TeamConnect selects the file type if you do not select one. See the Supported Document Types for more information.
If you do not see the file type that you want, speak to your system administrator to see if it can be added. - (optional) In the Category drop-down list, select the category that applies to this document.
- (optional) In the Description box, enter a description of the file.
- Click Upload File.
- If you logged on using your personal login id and password, and you are on the Documents tab, the file is visible in the My Documents collection. See Using Documents Collections for more information.
- If you added this document to a Documents page for a record, the document is visible on the selected page.
- If necessary, complete the associated document property pages to add additional information, such as the category to which this document belongs or its access rights.
Supported Document Types
The list below provides the default document types that you can add to TeamConnect. Based on your policies, your list may include additional document types. The document types are listed in alphabetical order.
Note: Ensure that you update the file extension in lowercase in Setup menu for all Document Types.
|
Document Type |
File Extension |
|---|---|
|
Adobe Acrobat |
|
|
Audio (Aiff) |
aiff |
|
Audio(wav) |
wav |
|
Binary |
bin |
| Cascading Style Sheet | css |
|
Data Mapping File |
dm |
|
GIF |
gif |
|
HTM |
htm |
|
HTML |
html |
|
Image-jpg |
jpg |
|
Image-pcx |
pcx |
|
Image-tiff |
tiff |
|
JAR File |
jar |
|
JavaClass |
class |
|
JavaScriptCode |
js |
|
JSP |
jsp |
|
Microsoft Access |
mdb |
|
Microsoft Excel |
xls, xlsx |
|
Microsoft Power Point |
ppt, pptx |
|
Microsoft Word |
doc, docx |
|
MP4 or MPEG-4 |
mp4 |
|
Quicktime Video |
mov |
|
Rich Text Format |
rtf |
|
Standard Email |
eml |
|
Text |
txt |
|
Video |
mpg |
|
XML |
xml |
|
ZIP |
zip |
Editing Documents
To edit a document that is currently in TeamConnect, you must use the following process:
- Check out the document—When a document is checked out, no other users can edit it. See Checking Out a Document for more information.
Note: Super users are able to cancel document checkout for other users.
- Open the document and make the necessary changes—You must have the associated application to open and edit a document.
- Check in the edited document—Upload the edited version of the document to TeamConnect. See Checking In a Document for more information.
The edited document is now the latest version in TeamConnect. You can edit documents that you own or to which you have the appropriate rights.
If you check out a document and decide not to make any changes, you can cancel the check out. When you cancel a check out, the document remains as it was before you checked it out. See Canceling a Document Check Out for more information.
Document Versions
Each time you check out a document and then check it back in, a new version is created and added to the document Version page. See Viewing Document Versions for more information.
Checking Out a Document
To edit a document, you must first check it out of TeamConnect so that others cannot edit it at the same time.
To check out a document
- Open the Documents page that contains the document that you want to edit.
- In the Action column, click the check out icon next to the document that you want to edit.

- If a window appears with options to save or open the document, select the appropriate option. The document is handled as specified.
Once the document is checked out, in TeamConnect, your name is listed in the Checked Out By column on the selected Documents page, and only the check-in and undo icons are visible in the Action column.

- Make the necessary changes to the document.
When you are done making changes to the document, you can check it back in to TeamConnect. See Checking In a Document for more information.
Checking In a Document
Once you are done editing a document, you can check it back in to TeamConnect.
To check in a document after editing
- In TeamConnect, locate the document that you checked out.
- In the Action column, click the check in icon

.

- In the Please Select a File window, browse to the file that you want to check in, and then click Check in .
The edited document is saved to the original Documents page, your name is removed from the Checked Out By column, and the check out icon is visible again.
Additionally, this new version of this document is added to the Versions page. See Viewing Document Versions for more information.
Caution: If the document is not the same as the one that you checked out, the document that you check in overwrites the document that is currently in TeamConnect.
Note: From TCE v7.1 onwards, the document check-in process enforces file type consistency i.e., you can check in only files that match the original document’s type.
| Before TeamConnect Enterprise v7.1: When checking in a document, you could upload a file of any type, regardless of the original document’s format. For example, if you checked out an Excel file, you could check in a Word or PDF file. TeamConnect did not restrict the file type during the check-in process. This could result in file corruption, and the document might not open correctly.  |
From TeamConnect Enterprise v7.1 onwards: You can now check in only files that match the original document’s type. The check-in dialog displays only files with the same extension as the checked-out document and shows the original file name and extension for your reference. This ensures that only the correct file type can be uploaded during check-in.  |
Canceling a Document Check Out
If you decide not to make changes to a document that you checked out, you can cancel the check out.
To cancel a document checkout
- In TeamConnect, locate the document that you checked out.
- In the Action column, click the undo icon
 .
.
Creating a Document Folder
You can create a document folder to store related documents.
To create a document folder
- Open the Documents page where you want to create the new folder.
- Click the New Folder button or icon.
The New Folder window opens, and the Documents page is grayed-out in the background.
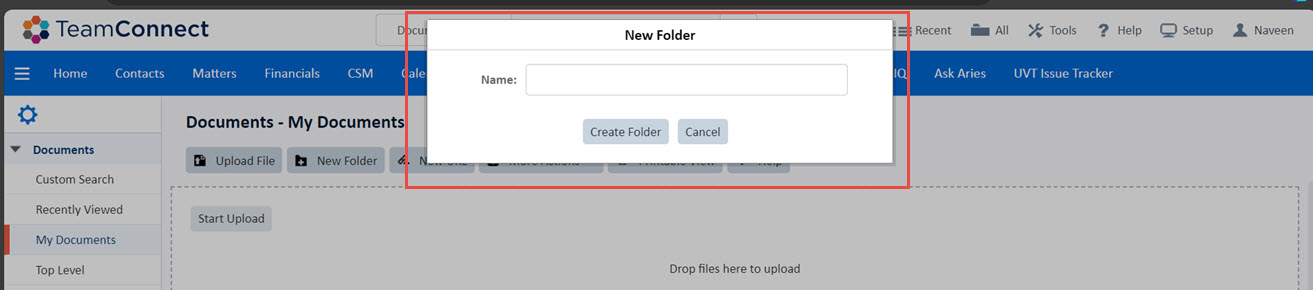
- In the New Folder field, enter the name of the new folder, and then click Create Folder.
Caution: You cannot use special symbols or characters in folder names. You can only use alphanumeric letters, numbers, and the underscore character, for example Status123_today. If you use special symbols or characters in folder names, they are replaced with hyphens (-). For example, if you enter Status12**@today, the folder name will appear as Status12---today.
The new folder is created. To view the folder:
- If you created the new folder in the global Documents area, click the My Documents collection link in the left pane to view it.
- If you created the new folder on the Documents page for a record, your folder is visible in the selected location.
Exporting a List of Documents in a Folder
You can export a list of folders on a Documents page and/or a list of the contents in a document folder. You can export the list in an .xls format that you can open in Microsoft Excel, or a .pdf format that you can open in Adobe Acrobat Reader.
To export a document folder list
- Open the Documents folder that contains the list of documents that you want to export. See Viewing Documents for more information.
- Click Export Data, and then select one of the following options:
- Export as Excel
- Export as PDF

- When the File Download window opens, select one of the following options:
- Save—Saves the file to the selected location without opening it.
- Open—Immediately opens the file in the related application. If you select this option, you must save this file if you want to access it later.
Copying Documents
You can copy documents and document folders from one location in TeamConnect to a different location in TeamConnect. You can only copy documents that you own or to which you have the appropriate rights.
Note: To copy documents, you must have View and Create document rights.
What is Copied
When you successfully copy a document or folder, the following information is copied from the original document record:
- The assigned categories on the Categories page
- Everything on the Details page
- Everything on the General page
- The User Rights and Groups Rights on the Security page
What is Not Copied
The following items are not copied from the original document record:
- Historical entries on the History page
- Versions that are listed on the Version page
- Approvals on the Workflow page
Copying Do's and Don't's
- You can copy documents from a system Documents collection, such as Recently Viewed, Recently Modified, or Checked Out.
- You cannot copy documents into a system documents collection.
- You can copy documents into your personal My Documents folder or go to the Top Level folder > Users folder and locate the appropriate users Documents folder.
- You can copy documents between different record types. if you have the appropriate rights. For example, you can copy a document from a contact's Documents page to a project's Documents page.
To copy documents in TeamConnect
- Open the Documents page that contains the document that you want to copy.
- Select the check-box for the document that you want to copy. You can select more than one check-box if necessary, but only if you want to copy all of the selected documents to the same location.
- Select one of the following options:
- If you are on the global Documents page, click More Actions, and then select Copy Document.
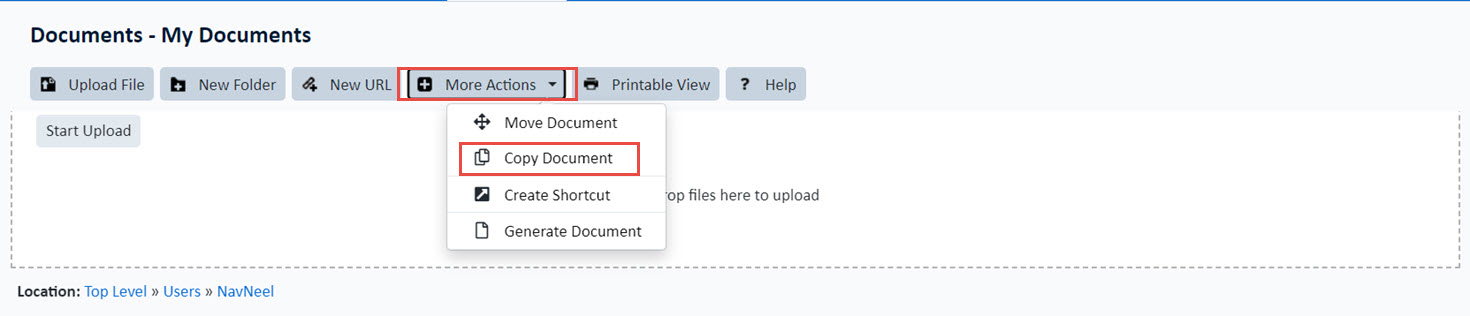
- If you are using the Documents page for a record, click the Copy icon.

A confirmation message appears at the top of the screen confirming the number of items that you want to copy.

- If you are on the global Documents page, click More Actions, and then select Copy Document.
- Select one of the following options to select the location where you want to copy the document(s).
- To copy the document to your own Documents page, click the Documents tab, and then, in the left pane, click My Documents.
- To copy a document to another user, click the Documents tab, and then, in the left pane, click Top Level. On the Documents -Top Level page, in the Name column, click the Users folder and then click the name of the user to whom you want to copy the document.
Tip: To alphabetize the list of users, on the Documents - Top Level page, click on the Name label.
- To copy documents to a different record type, locate the appropriate Documents page. For example, if you want to copy a document from your personal Documents page to the Documents page for an Invoice, click the Finance tab, click the Invoices sub-tab, and then click the Documents link in the left pane.
- Click Paste.

- A copy of the selected document is now available on the selected Documents page.
On the Global Documents page, the Paste button is located on the Global Toolbar; on a Documents page for a record, the Paste button is located on the Record Toolbar. See Sharing Documents using Email for more information.
If a Document Copy Fails
If one or more of the documents fails to copy, you will see an error message listing the failed documents. A document copy may fail for several reasons, such as the document that you want to copy is checked out by another user.
If the document is not visible in the selected location, you may not have rights to view or copy documents in TeamConnect. Contact your system administrator.
Moving Documents
You can move documents and folders from one location in TeamConnect to a different location in TeamConnect. Once you move a document, it is no longer available in the old location.
You can only move documents and folders that you created or to which you have the appropriate rights.
Note: To move documents, you must have View and Create document rights.
Moving Do's and Don't's
- You cannot move documents from a system documents collection, such as Recently Viewed, Recently Modified, or Checked Out.
- You cannot move documents into a system Documents collection.
- You can move documents into your own My Documents folder or go to the Top Level folder > Users folder and locate the appropriate users documents folder.
- You can move documents between different record types. For example, you can move a document from a contact's Documents page to a project's Documents page.
To move documents in TeamConnect
- Open the Documents page that contains the document that you want to move, and then select its corresponding check-box. You can select more than one check-box only if you intend to move all of the selected documents to the same location.
- Select one of the following options:
- On the global Documents page, click More Actions, and then select Move Document.
- On the Documents page for a record, click the Move icon.

A confirmation message appears at the top of the screen confirming the number of items that you want to copy.
- Select one of the following options to select the location where you want to move the document(s).
- To move documents to your own Documents page, click the Documents tab, and then, in the left pane, click My Documents.
- To move a document to another users, click the Documents tab, and then, in the left pane, click Top Level. On the Documents -Top Level page, in the Name column, click the Users folder and then click the name of the user to whom you want to move the document.
Tip: To alphabetize the list of users, on the Documents - Top Level page, click on the Name label.
- To move documents to a different record type, locate the appropriate Documents page. For example, if you want to move a document from your personal Documents page to the Documents page for an Invoice, click the Finance tab, click the Invoices sub-tab, and then click the Documents link in the left pane.

- Click Paste.
The document is moved to the selected Documents page.
If one or more of the documents fails to move, you will see an error message. A document move may fail for several reasons, such as the document that you want to move is checked out by another user.
If the document is not visible in the selected location, you may not have rights to move documents in TeamConnect. Contact your system administrator.
Creating a Document Shortcut
Create a shortcut if you want to provide a link that lets a user access a document that is on your Documents page.
Shortcut Do's and Don't's
- You cannot create shortcuts to a document in a system documents collection, such as Recently Viewed, Recently Modified, or Checked Out.
- You cannot create shortcuts in a system documents collection.
- You can create shortcuts in your own My Documents folder or go to the Top Level folder > Users folder and locate the appropriate users documents folder.
- You can create shortcuts between document types, For example, you can copy a document from a contact's Documents page to a project's Documents page.
Important: To create a shortcut, you must have View and Create document rights. In order for a user to access your document using a shortcut, you must allow them View access on the Documents Security page. See Working with Record Security for more information.
To create a document shortcut
- Locate the document or folder for which you want to create the shortcut link, and then select its check-box. You can select more than one check-box, but only if you intend to create all of the shortcuts in the same location.
- Select one of the following options:
- On the Documents tab, click More Actions, and then click Create Shortcut.

- On the Documents page for a record, click the Shortcut icon.

A confirmation message appears at the top of the screen confirming the number of items.
- On the Documents tab, click More Actions, and then click Create Shortcut.
- Select one of the following options to select the location where you want to create the shortcut(s).
- To add the shortcut to your own Documents page, click the Documents tab, and then, in the left pane, click My Documents.
- To create a shortcut on another users page, click the Documents tab, and then, in the left pane, click Top Level. On the Documents -Top Level page, in the Name column, click the Users folder and then click the name of the appropriate user.
Tip: To alphabetize the list of users, on the Documents - Top Level page, click on the Name label.
- To create a document shortcut on a different record type, locate the appropriate Documents page. For example, if you want to crate a document shortcut from your personal Documents page to the Documents page for an Invoice, click the Finance tab, click the Invoices sub-tab, and then click the Documents link in the left pane.
- Click Paste.
The shortcut is added to the selected location.
If the shortcut is not visible in the selected location, you may not have rights to view documents in TeamConnect. Contact your system administrator.
Creating a Link to a Web Page
You can create a document link that opens to a Web page.
To create a link to a Web page
- Open the Documents page where you want to create a link to a Web page.
- Click the New URL button or icon.
The New URL box opens and the Documents page is grayed-out in the background.

- In the Name box, enter the name of the Web page as you want it to appear on the Documents page.
- In the URL field, enter or paste the appropriate Web address.
Tip: For accuracy, open the Web page and copy-and-paste the Web address into this field.
- If necessary, in the Category drop-down list, select a category.
- Click Create URL.
The link appears on the selected Documents page next to its URL icon.
Downloading Documents
When you download a document, you save it to a location other than TeamConnect, such as your personal computer. You can also download email messages.
Note: If you need to make changes to a document, you must first check it out of TeamConnect. See Editing Documents.
To download a document
- Locate the document that you want to download and click its link in the Name column.
The document opens in its related application. If an additional window opens asking how you want to handle the file, select the desired options.
If the document does not open, you may not have its application installed. For example, if you want to open a .doc file, you must have Microsoft Word installed on your computer. - To save the document, use the save function that applies to the associated application.
To download an email message
- Locate the email message that you want to download and click its link in the Name column.
- Click Download Email, and then click the appropriate options to save the email message to the preferred location.
Generating Documents Using TeamConnect Data
The Document Generator lets you use a template to generate a document that contains data from TeamConnect records. For example, your organization may have already set up templates for generating letters to your clients. Information in the generated letter, such as contact names, addresses, and record numbers, are automatically filled in when you generate the document.
Templates are usually pre-defined by your system administrator. You must have the appropriate rights to generate a form document.
You can generate a document using the Documents tab or the Documents page for a record.
To generate a document from the Documents tab
- Click the Documents tab, and then click More Actions.
- Select Generate Document.
The first page of the Document Generator opens.

- Expand the tree to locate the appropriate template.
- Check the box of the desired template, and then click Next.
The object record selection page opens.

- Click the Select button of the object record that will be used during document generation.
- On each page that follows, enter or select the appropriate information, and then click Next until you reach the final page.
- To view the document before it is generated, click Preview Document.
- If necessary, in the Name field, enter the name of the document. This is the name of the final generated document.
- In the Default Category drop-down, select the appropriate category.
- Click Save Document to create the document. The generated document is saved to the selected object record.
You can leave the document in this location until you are ready to use it, or you can print it. See Printing Documents for more information.
To generate a document from the Documents page for a record
- Open the Documents page for the appropriate record type.
- Click the Document Generator icon.
The first page of the Document Generator opens.

- Expand the tree to locate the appropriate template.
- Check the box of the desired template, and then click Next.
- On each page that follows, enter or select the appropriate information, and then click Next until you reach the final page.
- If necessary, in the Name field, enter the name of the document. This is the name of the final generated document.
- To view the document before it is generated, click Preview Document.
- In the Default Category drop-down, select the appropriate category.
- Click Save Document to create the document. The generated document is saved to the selected object record.
You can leave the document in this location until you are ready to use it, or you can print it. See Printing Documents for more information.
Using Windows Explorer with Documents (WebDAV)
If your system administrator enabled it, once you open the Documents page for a record, you may see an Open In Explorer link.
WebDAV enables Windows Explorer to connect to your TeamConnect documents.
To use WebDAV
- Click the Open in Explorer link to open a Windows Explorer folder that links to the Attachment Root directory of the current record.
- If WevDav is enabled, you can use Windows Explorer to perform the following document tasks:
- Open, view, and save documents to your computer
- Open, edit, and save documents
- Copy documents
- Move documents
For more information, see your system administrator.