
Accessing System Settings
In addition to the TeamConnect system settings and predefined tools, your organization may require more configuration options to be set. This documentation provides only the following information:
- How to configure custom tools that you may develop or purchase, such as Time Entry, Batch Invoicing, or Custom Fields for Invoice Line Items tool. See Configuring Custom Tools.
- How to create custom fields, such as password fields, for integrating your TeamConnect application with other systems. See Miscellaneous Settings.
Rule Execution Properties
The Rule Execution Properties entry in the System Settings dropdown list allows you to temporarily disable all of the rules in TeamConnect.
It is useful to disable rules during some processes. For example, when running an upgrade tool, rules that activate automatically during the upgrade may cause the upgrade tool to fail.
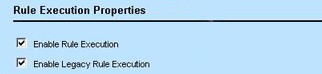
Both options are selected by default.
The options in the Rule Execution Properties section are described as follows:
Rule Execution Properties
|
Field |
Description |
|---|---|
|
Enable Rule Execution |
Clear this check-box if you want to temporarily disable all of the rules in TeamConnect. |
|
Enable Legacy Rule Execution |
Clear this check-box if you want to temporarily disable all of the legacy rules in TeamConnect. The Top Level/System/Legacy Rules folder is used for storing Java class files for legacy rules that were written for TeamConnect. This centralized folder allows the files to be shared by multiple objects instead of being uploaded to each individual object definition. |
Once you select the appropriate options, you must click Save in order for the settings to take effect.
Important: If you temporarily disable rules and you want to re-enable them, you must go back to the Rule Execution Properties, select the appropriate check-box, and then click Save. If you want to enable legacy rule execution, you must select the Enable Legacy Rule Execution check-box and the Enable Rule Execution check-box. Legacy rule execution does not succeed unless both check-boxes are selected.
For more information about rules, see Rule Components.
Miscellaneous Settings
If there is another system which your organization wants to use in tandem with TeamConnect, such as Microsoft Exchange or Lotus Notes, Mitratech can service a custom integration project for your organization.
In order for a TeamConnect to integrate with another system, the user must enter specific information into the available fields in the Other Settings page accessed from the user's Preferences page. However, these fields are unavailable to the user unless you create them.
You may create custom fields for system integration in the Miscellaneous Settings screen. Depending on the system your organization wants to integrate, Mitratech may provide you with specific guidelines and information for creating custom fields for your integration. However, the procedure itself is the same as creating custom fields for an object definition.
To access the Miscellaneous Settings screen
Select Misc. Settings from the Tools drop-down list.
The corresponding Miscellaneous Settings screen appears.
The Misc. Settings tool is only available in the Tools menu if you have been given the right to it on the Rights tab in either your user account or a group account.
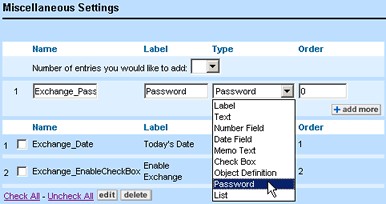
The following table describes the items in the Miscellaneous Settings screen.
Miscellaneous Settings Tool Screen
|
Field |
Description |
|---|---|
|
Name |
Enter an alphanumeric name (maximum 250 characters) to uniquely identify the field. |
|
Label |
Enter a label (maximum 250 characters) for the field as you would like it to display in the Other Settings page of the user's Preferences page. |
|
Type |
Select an option to specify the type of custom field that displays in the Other Settings page of the user's Preferences page. The options in this drop-down list are the same as the field types used for creating custom fields for objects, except for passwords. When creating a Password custom field for system integration, the following two fields appear on the user's Other Settings page of the Preferences page:
|
|
Order |
Enter an integer to indicate the display Order of the custom field in the Other Settings page of the user's Preferences page. If you create more than one custom field for the user, the custom fields appear in the order specified, lowest number first. Note: Items with the same Order are sorted and displayed alphabetically. |
|
add more |
Click to add the custom field to the Other Settings page of the user's Preferences page. |
To create a custom field for system integration
- In the Tools drop-down list, select Misc. Settings.
- Fill in the appropriate fields.
If necessary, you can learn more about custom fields, their name requirements and types under Creating Custom Pages. - Click the add more.
The custom field added is immediately available in the Misc. Settings tab of the user's Preferences screen. - Give users the Read and Update rights for Preferences in their user or group accounts, so that they can use the newly added fields.
Tip: You can view and access the information entered by the user in their Misc. Settings tab by clicking the Preferences hyperlink in the user's account.