
Creating Custom Tools
Custom Tools allow administrators and developers to extend TeamConnect functionality by building custom pages backed by Java classes and XML user interfaces. These tools run within the TeamConnect framework and are configured through the Administer Tools screen after deployment. This page explains how to upload, configure, and enable Custom Tools within your environment.
For information on creating custom tools, see Using the TeamConnect API.
Points To Remember
When creating custom tools, keep in mind:
- If you grant access to a tool, the user is able to both view and use the tool.
- You may grant group rights so that specific user groups can use the tool.
- You may set up loggers to monitor tools.
Note: Custom tools are developed using Java, and the user interface for the tools is developed using XML.
Custom Tool XML pages often use the expression-language alias ${pageDetail} to access the Java backing class that provides data and actions for the tool UI. This alias is automatically bound by the TeamConnect framework at runtime and allows XML to read and write values, iterate lists, and invoke methods on the backing class.
For detailed guidance on how {pageDetail}is resolved, how it relates to the customTool alias, how data binding works, and practical examples of reading/writing values in XML transforms, see the TeamConnect Custom Tool pageDetail Reference Guide.
Setting Up Custom Tools
After you have developed a custom tool, you must set it up it to work within TeamConnect by doing the following operations:
- Upload the Java and XML files to TeamConnect.
- Configure the tool in the Administer Custom Tools screen.
- Grant rights to solution developer users who are to test the tool.
- Test the tool on a test instance of TeamConnect before uploading it to your production system.
- After testing the tool, you must grant access to the tool on the Tools option of group accounts. That way, end-users in the appropriate user groups can access the tool from the Tools link in All Services > Tools drop-down list in the end-user interface.
Uploading Custom Tool Files
Before you can use or operate custom tools, you must first upload the code files you have written to TeamConnect.
To upload the custom tool files
- In the end-user application, select Documents in the tab bar. The Documents screen appears.
- Navigate to Top Level > System > Tools.
- Create a folder for the tool (for example, Batch_Invoicing).
Important: The name of the custom tool folder cannot have spaces and it must be the same as the name of the main class file.
- In the new folder, create the following folders:
- Classes
- Resource
- Upload the Java files to the Classes folder.
- Upload the XML files to the Resource folder.
After you have uploaded the necessary files, you must configure the custom tools in TeamConnect.
Configuring Custom Tools
To enable your custom tools, you must name them and point to their folder from the Administer Tools screen.
To configure a custom tool
- In the Designer window, in the Tools drop-down list select Administer Tools.
The corresponding Administer Tools screen appears.
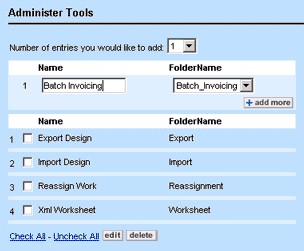
- Enter a name for the tool in the Name field.
- From the Folder Name drop-down list select the directory in which the class and XML files are located.
- Choose whether this tool will appear in the end-user interface (User Tool) or in the Designer interface (Setup Tool).
- Click add more.
The custom tool is now available in TeamConnect.
Important: You must give rights to users on the Tools tab of the user or group accounts in order for them to access the custom tool.