
TeamConnect Designer User Interface
Depending on your design, you may also need certain technical skills, such as a knowledge of Hypertext Markup Language (HTML) and Extensible Markup Language (XML), to create custom pages. Some customization of rules and pages requires expertise with Java and JavaScript.
To access the Designer user interface
- Log in to TeamConnect with Setup rights.
- Click the Setup link at the top of the page (upper right).
The main access page of the Designer user interface opens in a separate window, as shown in the following image.
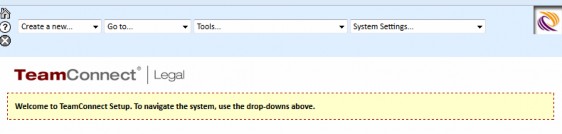
User Interface Overview
Most Designer user interface elements are self-explanatory. However, some procedures require knowledge of TeamConnect itself.
For example, you may define patterns to automatically name records, such as the date on which the record was created, the record's default category, and the name of the main involved party. To create such patterns, you must identify the location of these attributes within TeamConnect's object model (see the various Object Model appendices for details). Thus you would require Object Model knowledge for this task.
The Designer user interface has the following types of screens:
- Record Screens—Most Designer configuration screens include tabs and a toolbar. For example, object definition screens include tabs where you can create and define the corresponding components, such as the Templates and Wizards tabs of the Account object.
Unlike the end-user interface, the Designer user interface does not have the Read-only display mode. Most fields in the screens are editable at all times.
- Batch Screens—Many configuration screens include batch screens, which have a row of data entry fields for entering multiple items at the same time. For example, the Lookup Tables screen allows you to enter the names and tree positions of dozens of lookup table items at the same time.
- Using Object Navigator—A user interface tool for defining paths to attributes in the object model. See Using Object Navigator and Object Model: Read This First provides information about the objects, attributes and relationships in TeamConnect's object model that you can use to create your custom designs. This reference points you to additional reference tables that provide more information about object models.
While developing your design, you are testing it in the end-user interface as well. You may also need to use that interface to create and define users and groups, access rights, system settings, and so on.
Designer Menu Bar
The Designer menu bar contains a set of drop-down lists, which provide a quick access to the appropriate records and functions.

Designer Menu Bar Fields
|
Field or control |
Icon or option |
Description |
|
|---|---|---|---|
|
Logo |
|
TeamConnect logo. When the image in the icon is "spinning," it indicates that the system is processing a request, such as opening a record, searching for a records, or another operation. |
|
|
Home |
|
Opens your Home page. For details on home pages, see Creating Home Pages and Portal Panes. |
|
|
Help |
|
Provides access to the Designer help files. |
|
|
Sign Off |
|
Allows you to sign off from TeamConnect.. |
|
|
Create a new |
Object Definition |
Displays the General tab of the corresponding screen. |
For details on how to define objects, see Creating and Defining Objects. |
|
Route |
For more information on creating routes, see the Creating Routes. |
||
| Home Page |
See Home Pages. |
||
| Portal Pane |
See Portal Panes. |
||
|
Go to |
Object Definitions |
Displays a list of available system and custom objects. Click the appropriate hyperlink and the corresponding object definition screen appears with its General screen opened by default. For details on the information displayed in this screen, see General System Object Information and General Custom Object Information. |
|
|
Routes |
Click the appropriate hyperlink and the General tab of the corresponding screen appears by default. |
For more information on routes, see Creating Routes. |
|
|
Home Pages |
See Home Pages. |
||
|
Portal Panes |
See Portal Panes. |
||
|
Lookup Tables |
Displays the System tab of the tables screen, where you can add, modify, inactivate, and delete the necessary items in the appropriate system tables. For more details, see the Types of Lookup Tables. For details on creating custom lookup tables and using them in custom fields of type List, see Using Lookup Tables. |
||
|
Global Navigation |
Click the hyperlink to show the tabbed work screen. |
||
|
Tools |
Administer Custom Tools |
Displays the Administer Tools screen where you can add or delete custom tools, and rename system tools. See Creating Custom Tools. |
|
|
Misc. Settings |
Displays the Miscellaneous Settings screen where you can add custom fields for integration of TeamConnect with other products. See Miscellaneous Settings. |
||
|
Contact Sweeper |
Run a tool that identifies possible duplicate contacts and allows you to choose which ones to consolidate and delete. See Using Contact Sweeper. |
||
|
Design Snapshot |
Run a tool that captures complete information about the object definitions and other TeamConnect components in the current application. |
||
|
Design Import |
Run a tool that uses information from Design Snapshot to change the current application design to match the snapshot. |
||
|
XML Worksheet |
Launch a tool that allows you to upload XML requests to the application and view the responses. |
||
|
System Settings |
Rule Execution |
Displays the corresponding tab in the System Settings screen, where you can configure the appropriate setting for your application. |
|
|
Custom Messages |
Lets you create custom messages and assign unique messages keys. |
See Creating Custom Messages for more information. |
|
|
Clear Cache 2.x user interface Settings |
Allows you to clear the cache, which may be required when you create custom pages. See Creating Custom Pages. |
||
|
Default Object Views |
See Object Views. |
||
|
History |
Displays a Search page where you can set your search criteria for the history entries associated with system settings. |
||
|
Backward Compatibility Settings |
|||
|
System Appenders |
Displays the corresponding tab in the Logging screen, where you can define logs and set the status of loggers. |
||
|
Audit Appenders |
|||


Backward Compatibility Settings
Each new version of TeamConnect contains new and updated features. The Backward Compatibility Settings page provides several options that let you return to previous behavior until you are ready to shift to the new features.
Important: You can check and uncheck these boxes at any time, but it is not recommended for settings that affect how data is stored. Make the switch in a test environment to ensure that everything work s properly.
To open the Backward Compatibility Settings page
- Open the Designer.
- In the System Settings drop-down list, select Backward Compatibility Settings.
- On the Backward Compatibility Settings page, select one or more of the options in the Backward Compatibility Settings Page table.
Note: Most of the boxes on this page are unchecked by default. Adding a check-mark to a box indicates that you want to use the old behavior. This does not apply to the Optimize cascading security option, which is checked by default. Please see the details below.
Backward Compatibility Settings Page
|
Control |
Options |
|---|---|
|
Allow Duplicate Invoices (Same invoice number, invoice date, year, and vendor) |
|
|
Enable wild card characters in XML layer search requests |
|
|
Always use 'ISO- 859-1' for encoding characters entered in text/memo fields |
|
|
Optimize Cascading security |
Note: This box is checked by default. |
|
Ignore security cascading from document folders |
|
|
Take user to document properties page when clicking on a shared persistent URL of a document-- |
Notes: Users must be logged in to TeamConnect and have the appropriate rights to access documents, document properties, or document folders. Browser settings determine the way that documents are displayed. For example, if the browser is set to open a new tab whenever a document is opened, clicking a persistent document URL link always opens the document in a separate tab. |