
Workflow Properties and Options
Workflows are created in the Workflow (Pane | Page) of the Designer. Here you can add stages and relationships as well as a variety of properties and settings to each that allow you to create custom & unique workflows for your individual companies needs.
Accessing the Workflow Page
To access the Workflow Page:
- Click the Business Automation
 button in the TAP Toolbar to access the Business Automation module.
- The Designer tab is selected by default, and the screen displays the Designer Homepage.
- Click the Create button.
- The Designer displays the Forms - Properties tab.
- Click the Workflow tab.
The Workflow Page
The Workflow Page includes the following functional areas:
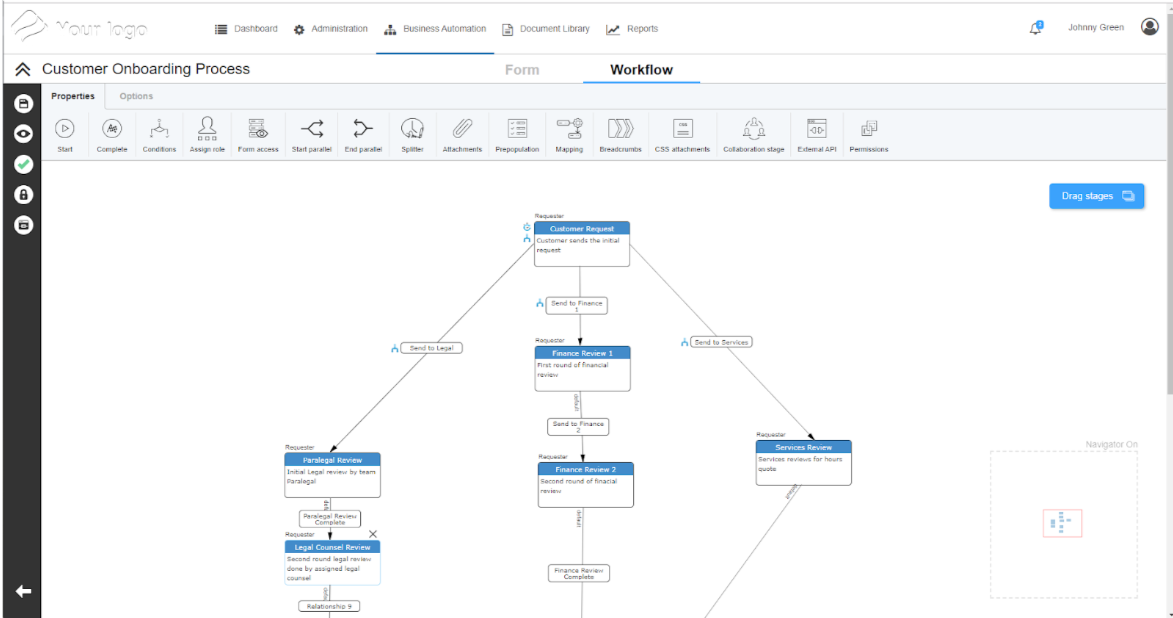
- Title Bar - Lets you assign a name to the workflow
- Toolbar - Provides the tools for specifying workflow options, and assigning stage-level and relationship-level properties
- Stage Tool - Drag to the Editor Window to add a stage to the workflow
- Editor Window - Provides the work area for constructing a workflow
- Tab Bar - Toggles between the Workflow options and workflow Properties functions
- Navigator - Lets you select the 'active' (currently visible) section of the workspace
Using the Navigator
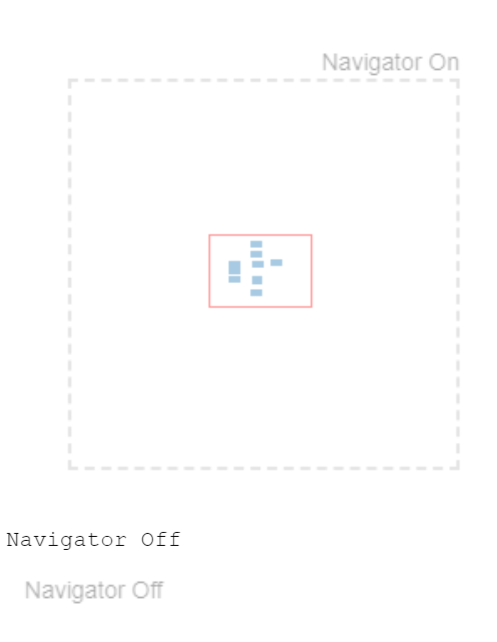
Only a small portion of the Editor Window workspace is visible at any given time. The Navigator lets you select the 'active' (currently visible) section of the workspace, indicated by the 'red square' in the Navigator window.
To use the Navigator:
- Click the Toggle Navigator link to 'show' or 'hide' the Navigator.
- To select the 'active' section of the workspace:
- Position the cursor over the 'red square' in the Navigator window.
- Click and hold the left mouse button, then drag the square to the desired position.
- Release the left mouse button.
Understanding Workflow Stages
Workflow Stages are one of the two core pieces of the workflow. Stages allow for you to collect data using the form <link>, while the relationships<link> route the workflow through each of those stages. Workflows can have a wide variety of stages depending on your individual requirements.
Let’s take a look at one of the simplest possible workflows below:
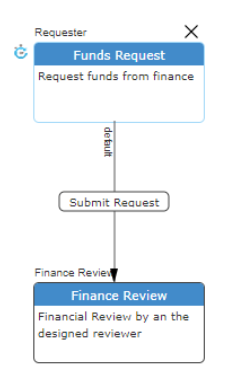
The first stage the requester fills out the form (not shown) to request funds for some reason, and in this workflow only finance needs to review it, they cannot deny the request, but they also have to take no action other than to approve.
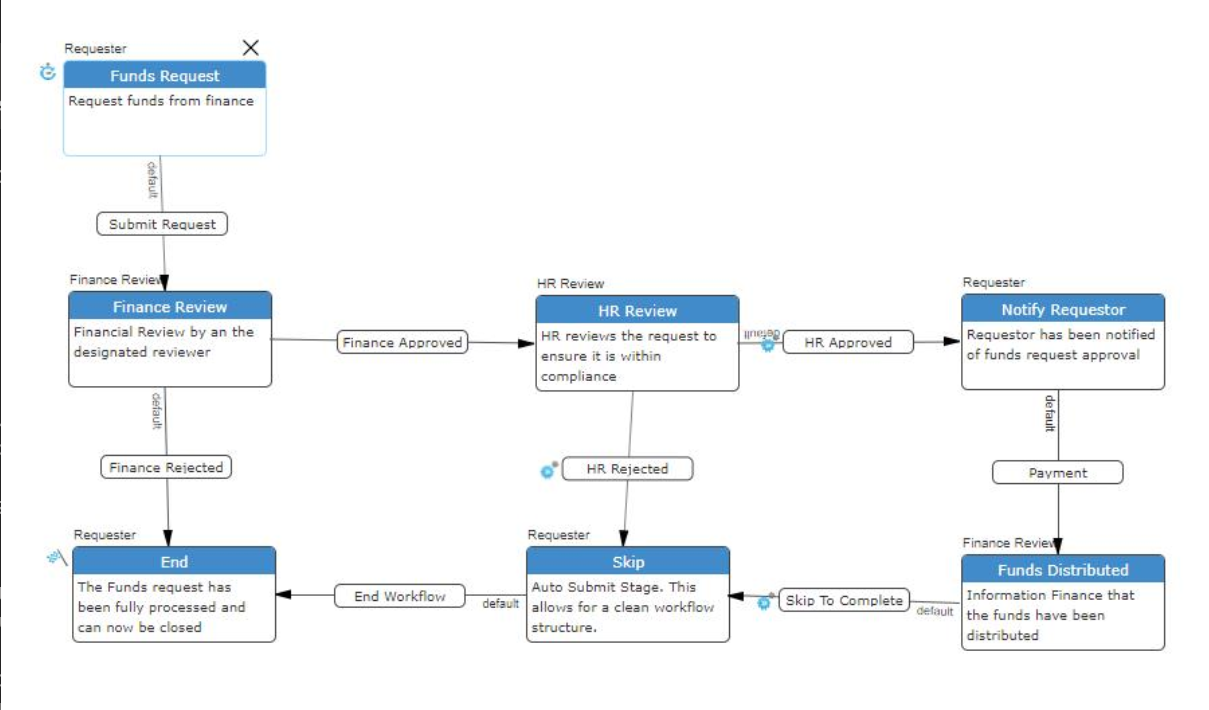
The workflow above doesn’t allow for much process flexibility, is the funds request even appropriate, what if it was for lawn darts? Let’s take a look at the workflow below:
Not only does finance approve it, but so does HR. This allows an additional set of eyes, in addition both can reject it and the request will end. This is due to the “HR Rejected” relationship being an AutoSubmit<link> relationship. “HR Approved” and “Skip To Complete” are also AutoSubmit<link>. This allows us to notify the requestor, see Notifications<link> while not requiring them to access the TAP form. The ‘Skip’ & ‘Notify Requestor’ stages are notable as they are never “accessed” by any user, instead they are used to either send notifications (‘Notify Requestor’) or keep the workflow relationships clean and easy to read and follow (‘Skip’). There are many properties to allow you to customize what you need to properly collect and automate your companies needs.
Workflow Properties
Stage-Level Properties
All workflow stages have a common set of properties that let you configure the functionality of the stage. Depending on the specific property, stage-level properties are set directly from the Workflow Page toolbar or by using a configuration dialog (displayed by selecting the desired property in the toolbar).

When you select a stage in the workflow, the toolbar updates to display the stage-level properties.
WORKFLOW STAGE-LEVEL PROPERTIES
|
Toolbar |
|
|
|---|---|---|
|
|
Assign role |
Designates the role of the user responsible for completing the associated workflow stage. To assign a user role to a workflow stage, select the desired stage in the workflow, click the Assign role button, and select the appropriate user role from the drop-down menu.
|
|
|
Attachments | Supports adding attachments or entering instructions for a workflow stage. Click the Attachments button to display the Attachments dialog. |
|
|
Breadcrumbs |
Used to add custom labeled chevrons on a workflow for one or more selected sections.Each chevron can be assigned a unique custom label based on the purpose or content of the associated stage/section. This feature can be used to label specific stages of a workflow or to create a trail of different sections being filled out by a user. |
|
|
Complete workflow |
When enabled for a workflow stage, skips the stage and finishes the workflow before proceeding to the next stage. This options is generally used when it is necessary to send notifications or make an echosign submission before finishing the workflow. To set Complete workflow for a stage, select the desired stage in the workflow, then click the Complete workflow button. The NOTE The Complete workflow property can be applied to multiple workflow stages in a given workflow. |
|
|
Conditions | Conditional logic that determines the set of form fields that are displayed for a given workflow stage based on if-this-then-that statements. Click the Conditions button to display the Conditions dialog. |
|
|
CSS Attachments | Supports upload of a custom Cascading Style Sheet (CSS) for a selected workflow stage, enabling the form to exactly match a desired style. This options is particularly useful when using anonymous access and embedded forms. CSS attachments can be associated with the class of user (anonymous or registered) accessing the form. |
|
|
e-Signature splitter | When enabled for a workflow stage, pauses the workflow at the stage until an associated echosign document is executed. Click the e-Signature splitter button, and select the desired option from the drop-down menu. |
|
|
Form access | Determines which form fields are displayed for a given workflow stage, and whether or not previously entered data for a displayed field is read-only or editable. Click the Form access button to display the Form access dialog. |
|
|
External API | Lets you associate and configure an external API trigger for a workflow stage. |
|
|
Form mapping | Prepopulates form fields for a given workflow stage based on the content of form fields from a prior stage. Click the Form mapping button to display the Form mapping dialog. |
|
|
Form prepopulation | Prepopulates form fields for a given workflow stage with data taken from a specified source. Click the Form prepopulation button to display the Form prepopulation dialog. |
|
|
Gather parallel |
When enabled for a workflow stage, indicates the associated stage is the end of a parallel workflow (the stage is not initiated until all prior parallel relationships connected to the stage are completed). To set Gather parallel for a stage, select the desired stage in the workflow, then click the Gather parallel button. The NOTE The Gather parallel property is used in conjunction with the Start parallel property.
|
|
|
Show in summary | When enabled for a workflow stage, indicates the results for the associated stage are shown in the Workflow History Audit Trail and in the Summary field when initiating or editing a workflow. To set Show in summary for a stage, select the desired stage in the workflow, then click the Show in summary button. |
|
|
Start parallel |
When enabled for a workflow stage, indicates the associated stage is the start of a parallel workflow (subsequent stages are submitted to multiple users simultaneously). To set Start parallel for a stage, select the desired stage in the workflow, then click the Start parallel button. The NOTE The Start parallel property is used in conjunction with the Gather parallel property. |
|
|
Start Stage |
Designates the starting stage of a workflow (indicated by the NOTE The Start Stage property can be applied to only one workflow stage in a given workflow. |
.jpg?revision=1)
.jpg?revision=1)
 symbol displays to the left of the stage name to confirm the selection.
symbol displays to the left of the stage name to confirm the selection..jpg?revision=1&size=bestfit&width=11&height=13) symbol displays to the left of the stage name to confirm the selection.
symbol displays to the left of the stage name to confirm the selection..jpg?revision=1)
.jpg?revision=1)
.jpg?revision=1&size=bestfit&width=12&height=13) symbol displays to the left of the stage name to confirm the selection.
symbol displays to the left of the stage name to confirm the selection..jpg?revision=1) symbol to the left of the stage name). By default, the first stage added to a workflow is designated as the Start Stage. To select a different stage as the Start Stage, select the desired stage in the workflow, then click the Start Stage button. The
symbol to the left of the stage name). By default, the first stage added to a workflow is designated as the Start Stage. To select a different stage as the Start Stage, select the desired stage in the workflow, then click the Start Stage button. The Relationship-Level Properties
All workflow relationships have a common set of properties that let you configure the functionality of the relationship. Depending on the specific property, relationship-level properties are set directly from the Workflow Page toolbar or by using a configuration dialog (displayed by selecting the desired property in the toolbar).

When you select a relationship in the workflow, the toolbar updates to display the relationship-level properties.
WORKFLOW RELATIONSHIP-LEVEL PROPERTIES
|
Toolbar |
|
|
|---|---|---|
|
|
Auto submit | Configures the associated workflow stage for automatic submission (regardless of user action) based on either number of days and hours since receipt of the stage by the associated user or at a specific date and time. Click the Auto submit button to display the Auto submit options dialog. The .jpg?revision=1&size=bestfit&width=14&height=14) symbol displays to the left of the relationship name to confirm auto submit configuration. symbol displays to the left of the relationship name to confirm auto submit configuration. |
|
|
Child workflow | Configures a relationship to initiate a secondary (child) workflow. Click the Child workflow button to display the Child Workflow Initialization dialog. The .jpg?revision=1) symbol displays to the left of the relationship name to confirm configuration for triggering a child workflow. symbol displays to the left of the relationship name to confirm configuration for triggering a child workflow. |
|
|
Conditions | When two or more relationships are associated with a workflow stage, establishes the set of conditions under which a relationship is valid. Click the Conditions button to display the Conditions dialog. |
|
|
Default |
When two or more relationships are associated with a workflow stage, establishes the default relationship for the workflow stage. The default relationship is valid when the conditions for all other relationships for the workflow stage are not met. To set a relationship as the Default relationship, select the desired relationship in the workflow, then click the Default button. The word "default" displays on the path of the relationship.
|
|
|
Document Builder |
Assigns a Document Builder template to a relationship to select the trigger point at which the document is generated. |
|
|
e-Signature support | Configures e-signature support for a relationship. Click the e-Signature support button to display the e-Signature support dialog. The .jpg?revision=1) symbol displays to the left of the relationship name to confirm configuration of e-signature support. symbol displays to the left of the relationship name to confirm configuration of e-signature support. |
 |
External API | Lets you associate and configure an external API trigger for a workflow relationship. |
|
|
Notifications |
Establishes the content of the email notification sent the to user responsible for completing the next stage of the workflow. Additionally, "information notifications" can be created to inform other users of the current state of the workflow. Click the Notifications button to display the Workflow Notifications dialog. |
|
|
Push to FTP |
Configures File Transfer Protocol (FTP) support for a relationship. Supports generation and upload of a Comma-Separated Values (CSV) file containing workflow field data, as well as any related document attachments, to a specified FTP site. NOTE The Push to FTP property is intended to facilitate integrations with customer systems that do not have APIs, |
|
|
Salesforce support | Defines the attributes, options and trigger conditions for Salesforce integration with a relationship. Click the Salesforce support button to display the Salesforce support dialog. |
|
|
Thank you page | Used to create a stage-specific "Thank You" page that overrides the global (system default or workflow-specific) "Thank You" page. Thank you page button to display the Thank You page editor. |
|
|
Triggers |
Defines specific trigger conditions that initiate a relationship between workflow stages. Click the Triggers button to display the Relationship triggers dialog. The |


.jpg?revision=1) symbol displays to the left of the relationship name to confirm configuration of one or more triggers.
symbol displays to the left of the relationship name to confirm configuration of one or more triggers.
Workflow Options
Workflow options let you configure several operational and informational parameters for a workflow, view workflow documentation, and publish a workflow when completed. Depending on the specific option, workflow options are set directly from the Workflow Page toolbar or by using a configuration dialog (displayed by selecting the desired option in the toolbar).

The following options are available:
|
Toolbar |
Workflow |
|
|---|---|---|
|
|
Published / Unpublished |
Publishes and unpublishes a workflow. Workflows must be published to be available for selection through the Workflow Dashboard. Click the Unpublished button to publish a workflow. Click the Published button to unpublish a workflow.
|
|
|
Roles | Defines the workflow roles responsible for completing one or more workflow stages. The Requester role is defined by default. You may add one or more additional roles as appropriate. Click the Roles button to display the Workflow Roles dialog. |
|
|
Embed | Generates an HTML string that can be used to embed a TAP form into an inline frame in any other web page. Simply copy the HTML string from the Embed or Public embed text box, as appropriate, and paste into the HTML of the desired web page to display the form. |
|
|
Documentation | Displays reference documentation for the workflow, including a Workflow summary and detailed information related to Workflow permissions, Workflow roles, Form fields and Stages. You can also choose to download a PDF copy of workflow documentation to your local workstation. |
|
|
Result Title | Determines whether or not a result title will be included in the workflow, and at what stages the result title will be displayed. |
|
|
Anonymous access | Configures the workflow for anonymous access and submission.This will allow non-TAP users to access and initiate a workflow. It also gives the capability to initiate a workflow via an email. |
|
|
Sequence generator | Assigns a specified document ID to e-signature transactions associated with the workflow. Document IDs are specified using sequence generators defined through the Document Library. |
|
|
Workflow templates | Lets you create and manage workflow templates. |
|
|
Auto-save on Timeout |
When enabled (on), automatically saves any unsaved changes to the form and/or workflow in the event a timeout occurs and unsaved changes are present. Auto-save on timeout is applicable to both Designer Form/Workflow and the actual on-going request. It automatically saves unsaved changes to form/workflow, and also creates a record in pending submission status if user timeouts while filling the form |


Publishing a Workflow
Once you have created and saved a workflow, you must publish the workflow to make it available for use.
NOTE
The workflow form must have at least one form field configured with the Add to repository property for the workflow to be available through the Create menu on the Workflow Dashboard.
To publish a workflow:
- Review the workflow form. Make sure:
- Form field sections have been appropriately named where applicable.
- All necessary form fields are included in the form.
- Global styles and form field styles have been applied as desired.
- Form field labels have been renamed as desired.
- Form field properties have been applied as appropriate.
- At least one form field has been configured with the Add to repository property.
- Review the workflow. Make sure:
- Workflow stages and relationships have been appropriately named.
- Stage level properties have been applied as appropriate.
- Relationship level properties have been applied as appropriate.
- Workflow options have been configured as appropriate.
- Click the Unpublished button in the Workflow Page Toolbar.
- The button changes to the Published icon.
- The button changes to the Published icon.
- Click the Save button in the Workflow Toolbar to save the workflow.
- A confirmation popup displays the message "Form workflow successfully saved," and the workflow is available through the Create menu on the Workflow Dashboard.