
Form Mapping
Form Mapping lets you create “auto-text” values that are entered in selected form fields for a workflow stage when a specified trigger event occurs. The triggering event is either when the workflow stage is submitted or when a change is made to a form item value.
Three types form mapping are supported:
- Parent/Child Mapping: The auto-text for a given field (child) is dependent on the content of a second field (parent).
- Child-Only Mapping: The auto-text is entered in the field automatically, with no parent present.
- Same as Parent Mapping: The value from the parent field is copied to the child field.
Parent/Child Form Field Mapping
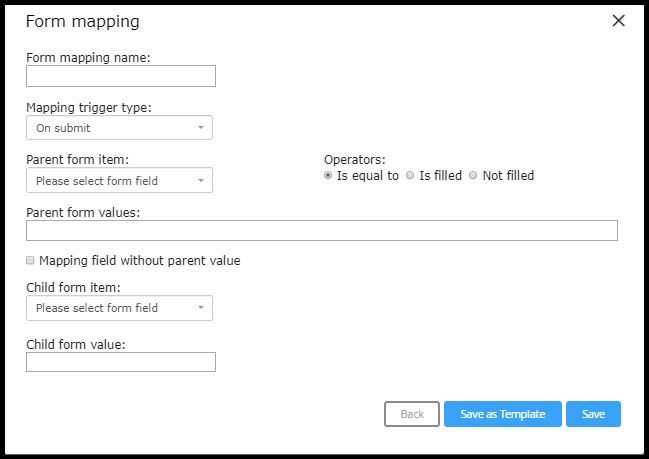
- Select the workflow stage for which you wish to map a form field.
- Click the
 Form mapping button in the Workflow Page toolbar.
- The Form mapping dialog displays.
- If form fields were previously mapped, the dialog shows a list of map names.
- If no form fields have been mapped, the list is empty.
- Click the Add button.
- The Form mapping dialog refreshes to display the mapping options.
- If desired, select a template for the form map from the Load from template menu.
- The Load from template menu lists all form map templates saved for the active workflow. If no templates are associated with the active workflow, the Load from template menu is not displayed.
- Enter a name for the mapped value in the Form mapping name text box.
- Select the trigger for the auto-text entry from the Mapping trigger type menu:
- On submit – the Child form value (auto-text) will be entered in the Child form item (mapped field) when the workflow stage is submitted.
- On change form item value – the Child form value (auto-text) will be entered in the Child form item(mapped field) when the content of the Child form item (mapped field) is changed.
- Select the field on which the mapping will be based from the Parent form item menu.
- The Parent form item menu lists all fields in the associated workflow form.
- Table fields can be used as Parent form items. When used, the table cell should be indicated using th #,# formatting, where the first number corresponds to the row and the second number corresponds to the column.
- Select the appropriate operator from the Operators section.
- The operator determines the logic under which the Parent form item value will map a Child form value into the Child form item.
- Is equal to – Mapping occurs when the value of the Parent form item matches a value selected from the Parent form values menu.
- Is filled – Mapping occurs when the any value is entered in the Parent form item.
- is not filled – Mapping occurs when the Parent form item is “blank (not filled).
- The operator determines the logic under which the Parent form item value will map a Child form value into the Child form item.
- Select the value that will trigger the auto-text entry from the Parent form values menu.
- Click the Parent form values field and select the desired value.
- To remove a value from the Parent form values field, click the x icon for the desired value.
- Click the Parent form values field and select the desired value.
- Select the field into which the auto-text value will be inserted from the Child form item menu.
- The Child form item menu lists all fields in the associated workflow form except the field selected as the Parent form item.
- Enter the value to be inserted into the Child form item field in the Child form value text box.
- When all necessary parameters have been specified, click the Save button to save your changes.
- The Form mapping dialog refreshes with the new map added to the list.
Note: When you use the department drop-downs under form mapping for parent or child values:
If you export the workflow and simultaneously import it in different environments, the selected department dropdown values will disappear from the form mapping fields. However, there is no issue if the import and export occur within the same environment.
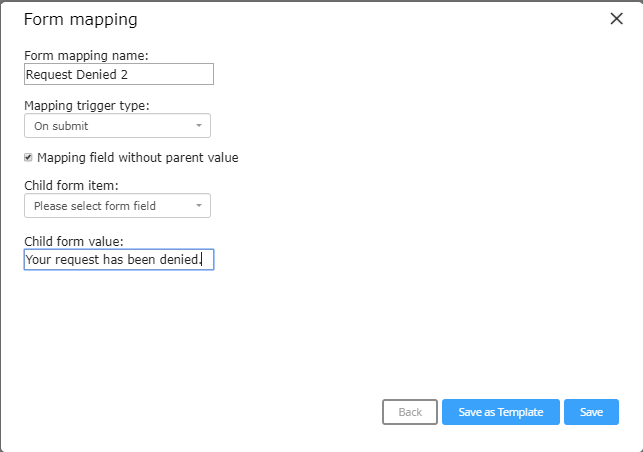
Child-Only Form Field Mapping
- Select the workflow stage for which you wish to map a form field.
- Click the Form mapping button in the Workflow Page toolbar.
- The Form mapping dialog displays.
- If form fields were previously mapped, the dialog shows a list of map names.
- If no form fields have been mapped, the list is empty.
- Click the Add button.
- The Form mapping dialog refreshes to display the mapping options.
- Select a template for the form map from the Load from template menu if desired.
- The Load from template menu lists all form map templates saved for the active workflow. If no templates are associated with the active workflow, the Load from template menu is not displayed.
- Enter a name for the mapped value in the Form mapping name text box.
- Select On submit from the Mapping trigger type menu.
- Select the Mapping field without parent value check box.
- Select the field into which the auto-text value will be inserted from the Child form item menu.
- The Child form item menu lists all fields in the associated workflow form.
- Enter the value to be inserted into the Child form item field in the Child form value text box.
- When all necessary parameters have been specified, click the Save button to save your changes.
- The Form mapping dialog refreshes with the new map added to the list.
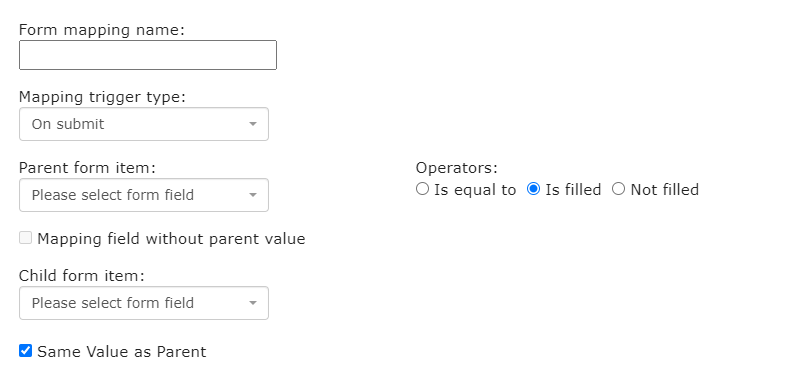
Same Value as Parent Mapping
- Select "is filled" option
- Click "Same value as Parent" checkbox. When checked, any value entered into the Parent Field will be copied into the Child Field The child value field will be hidden.
note: You will still need to select a child form item to map where the value will be shown.
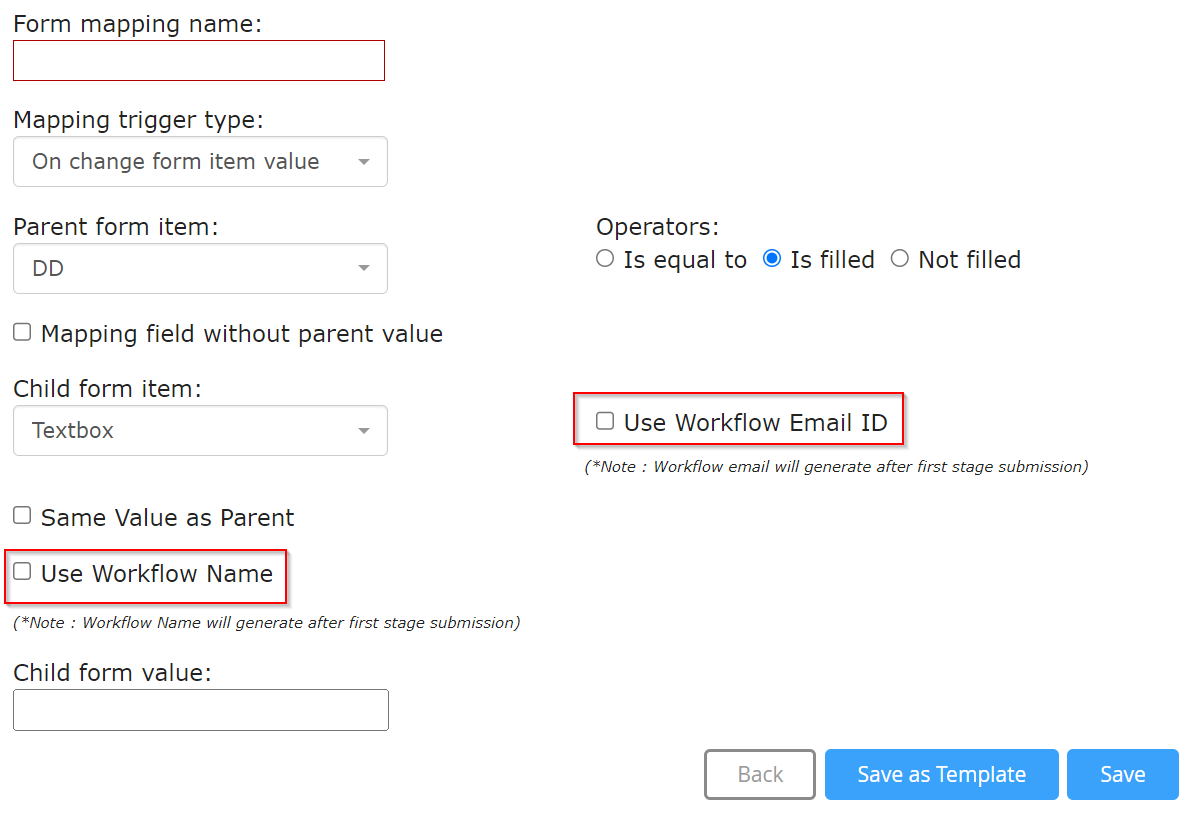
Workflow Name and Email ID Mapping
- Select the workflow stage for which you wish to map a form field.
- Click the Form mapping button in the Workflow Page toolbar.
- The Form mapping dialog displays.
- If form fields were previously mapped, the dialog shows a list of map names.
- If no form fields have been mapped, the list is empty.
- Click the Add button.
- The Form mapping dialog refreshes to display the mapping options.
- Select a template for the form map from the Load from template menu if desired.
- The Load from template menu lists all form map templates saved for the active workflow. If no templates are associated with the active workflow, the Load from template menu is not displayed.
- Enter a name for the mapped value in the Form mapping name text box.
- Select the required option from the Mapping trigger type menu.
- Do not select the Mapping field without parent value check box.
- Select the field into which the auto-text value will be inserted from the Child form item menu.
- The Child form item menu lists all fields in the associated workflow form.
- If the Child Form item is selected 'Textbox' or 'Area' field from the drop-down options, two new fields are displayed.
- Use Workflow Name - Select this checkbox to map the record/workflow name.
- Use Workflow Email ID - Select this checkbox to map the record/workflow email ID. NOTE: Only one of the above two options can be selected. If Workflow name is selected, email ID is disabled, and vice versa.
- When one of the above two options is selected, the Child Form Value field is disabled.
- When all necessary parameters have been specified, click the Save button to save your changes.
- The Form mapping dialog refreshes with the new map added to the list.
Saving a Form Map Template
Form map templates let you use previously created form maps as the basis for creating a new form map. Form map templates are “workflow-specific,” and are available only for the workflow to which they were saved.
To save a form map template, create and save a form map as described above, then click the Save as Template button to save the current form map as a template. Once a template has been saved, it can be accessed and modified to create a new form map for any stage in the active workflow.
Editing a Form Map
- Select the workflow stage for which you wish to edit a form map.
- Click the Form mapping button in the Workflow Page toolbar.
- The Form mapping dialog displays.
- The dialog shows a list of map names for the workflow stage.
- Click the edit link for the form map you wish to edit.
- The Form mapping dialog refreshes to display the current values for the form map.
- Edit the parameters for the form map as desired.
- When all desired changes have been made, click the Save button to save your changes.
- The form map list displays.
Deleting a Form Map
- Select the workflow stage for which you wish to edit a form map.
- Click the Form mapping button in the Workflow Page toolbar.
- The Form mapping dialog displays.
- The dialog shows a list of map names for the workflow stage.
- Click the delete link for the form map you wish to delete.
- The form map list refreshes with the selected map removed from the list.
Form Mapping Tips
1. The workflow Name or Workflow Email ID can be form mapped into any text or area field. To do this, check either 'Use Workflow Name' or 'Use Workflow Email ID' when a text/area field is selected as the child field.
2. Document Field and Document Builder documents can be form mapped into any Document Field. To do this, select an existing Document Field as the child field. You will then get a list of Document Field and Document Builder templates to select as the child value.
Use Cases
-
Populating fields in the backend based on selections made in the front end. This can allow you to populate search fields in the backend from other form fields and can be used in tandem with prepopulation to auto populate a form without the user needing to manually enter information into a search field.
-
Populating document fields with pre-built documents. Users can use document builder to create a document built off of a template that contains form field values and show/hide logic, and then form map it into a document field on the front end for a user to continue editing before sending for signature or to other users.
-
Triggering formulas - form mapping can be used to auto populate fields on the backend when a user opens a form. Those fields can then be used in case formulas in order to automatically trigger the formula when a user opens the form. Normally, formulas need some value in one of the fields to change in order to trigger. With form mapping, you can trigger the formula without needing a user to do anything.
-
Copying the workflow name into a text field so that it can be used in notifications and sent to 3rd party systems when utilizing the external api functionality.
-
Copying the workflow email id so that it can be linked to a role and automatically cc’d on a workflow notification. This allows users to attach emails and other things directly to a workflow just be responding to a workflow notification.
-
Can be used to get values into and out of a table field in order to view those values in a dashboard view or send them to external systems.