
Form Prepopulation
What is Form Prepopulation?
Prepopulation is used to prefill TAP fields based on the selection in an initial parent field. Prepopulation values can be pulled from a variety of places which includes:
-
Grid data sources (TAP hosted and External) - Parent field must be text or dropdown field.
-
Salesforce records - Parent field must be SF lookup field.
-
Teamconnect records - Parent field must be TC lookup field; Allows document prepop as well.
-
Other TAP Workflow records - Parent field must be Workflow Records lookup field.
-
User profiles - Parent field must be user select or must be pulling from current user.
-
Address field - Parent field must be address lookup field.
Prepopulation rules can be configured directly on a stage, or in the template section. When configuring a prepopulation rule, the user can designate the field as either editable or read only. Additionally, when using grid data sources that are stored in the TAP, the user can opt to allow new values to be added to the grid data source directly from a form in the scenario where new values might be getting entered.
Note: Date fields cannot be pre-populated
To prepopulate form fields:
- Select the workflow stage for which you wish to prepopulate a field.
- Click the
 Form prepopulation button in the Workflow Page toolbar.
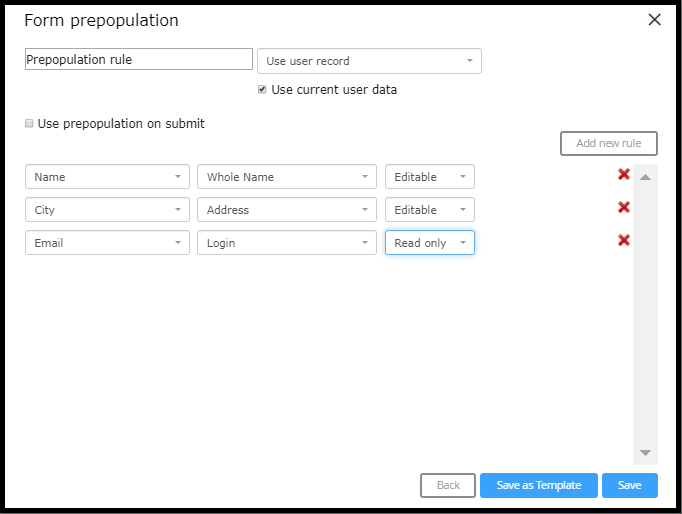
- The Form prepopulation dialog displays.
- If prepopulation rules were previously defined, the dialog shows a list of rules.
- If no prepopulation rules have been defined, the list is empty.
- Click the Add button.
- The Form prepopulation dialog refreshes to display the prepopulation options.
- If desired, select a template for the prepopulation rule from the Load from template menu.
- The Load from template menu lists all form prepopulation rules saved for the active workflow. If no templates are associated with the active workflow, the Load from template menu is not displayed.
- Enter a name for the prepopulation rule in the Please enter prepopulation label text box.
- Select the type of prepopulation, depending on the source from which you are prepopulating your information. The five options are listed below.
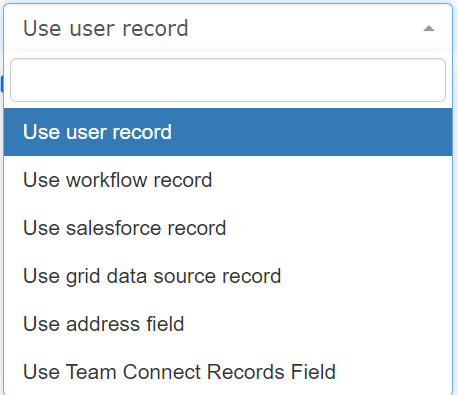
- Use user record – allows you to prepopulate a form field based on user information stored in the Active Directory (in the Administration Tab).
- Use workflow record – allows you to prepopulate a form field based on a workflow instance that has already been completed.
- Use salesforce record – allows you to prepopulate a form field based on information in your Salesforce account.
NOTE: To set up Salesforce prepopulation, one of the form fields in your workflow must be a Salesforce Record form field. - Use grid data source record – allows you to prepopulate a form field using information from a Grid Data Source.
- Use address field – in conjunction with Google API integration, allows you to prepopulate address information into a form field.
NOTE: To set up address field prepopulation, one of the form fields in your workflow must be an Address type form field. - Use Team Connect records field – allows you to prepopulate a form field using information from Team Connect records. NOTE: To set up team connect records field prepopulation, one of the form fields in your workflow must be a Team Connect record type form field.
- Select the desired form field from the Please Select form field menu to tie your prepopulation rule to the “starter” form field.
- If you are using a User Record as your prepopulation source, and the User current user data checkbox is selected, you will not need a “starter” form field.
- If you are using a Salesforce record as your prepopulation source, select the form field that was set up with a Salesforce Record field type.
- If you are using a Grid Data Source Record as your prepopulation source, select the form field that was set up with a Grid Data Source.
- If you are using an Address field as your prepopulation source, you will need to select the form field that was set up with an Address field type.
- If you are using a Team Connect record field as your prepopulation source, you will need to select the form field that was set up with a Team Connect record field type.
- Click the Add new rule button.
- The Form prepopulation dialog refreshes to display a data entry line for the new rule.
- Select the form field you wish to prepopulate from the Please select form field menu.
- The Please select form field menu lists all form fields in the associated workflow form.
- Select the source record field containing the data you wish to use to populate the selected form field from the Please select option menu.
- The Please select option menu lists all available source record fields.
- Indicate whether or not the prepopulated field can be edited by selecting Editable or Read only from the third menu.
- To add another prepopulation rule, repeat steps 8 through 11.
- To remove a rule, click the Remove icon for the rule you wish to delete.
- The Form prepopulation dialog refreshes with the selected rule removed from the list.
- To remove a rule, click the Remove icon for the rule you wish to delete.
- When all desired prepopulation rules have been entered, click the Save button to save the rules, then click the Close button to close the Form prepopulation dialog and return to the Workflow Page.
Form field Options
In the rules section of the prepopulation configuration, select the form field options from the drop-down field.
.png?revision=1&size=bestfit&width=927&height=418)
To save a form prepopulation template:
NOTE: Form prepopulation templates let you use previously created rules as the basis for creating new rules. Templates are “workflow-specific,” and are available only for the workflow to which they were saved.
To save a form prepopulation template, create and save the desired prepopulation rules as described above, then click the Save as Template button to save the current rule(s) as a template. Once a template has been saved, it can be accessed and modified to create a new prepopulation rule for any stage in the active workflow.
To edit prepopulation rules:

- Select the workflow stage for which you wish to edit a prepopulation rule.
- Click the Form prepopulation button in the Workflow Page toolbar.
- The Form prepopulation dialog displays.
- The dialog shows a list of all currently configured prepopulation rules for the workflow stage.
- Click the edit link for the rule you wish to edit.
- The Form prepopulation dialog refreshes to display the current values for the selected rule.
- Edit the values for the rule as desired.
- To remove a rule, click Delete for the rule you wish to delete.
- When all desired changes have been made, click the Save button, then click the Close button to close the Form prepopulation dialog and return to the Workflow Page.
To delete prepopulation rules:
- Select the workflow stage for which you wish to edit a prepopulation rule.
- Click the
 Form prepopulation button in the Workflow Page toolbar.
- The Form prepopulation dialog displays.
- The dialog shows a list of all currently configured prepopulation rules for the workflow stage.
- Click the delete link for the prepopulation rule you wish to delete.
- The Form prepopulation dialog refreshes with the selected rule removed from the list.
- When all desired rules have been deleted, click the Close button to close the Form prepopulation dialog and return to the Workflow Page.
Inserting values into a grid data source
When using prepopulation combined with a grid data source, it is possible to allow new values to be inserted and old values to be updated. To do this, insert must first be enabled on the grid data source. This can be done by editing the data source in the data source section:
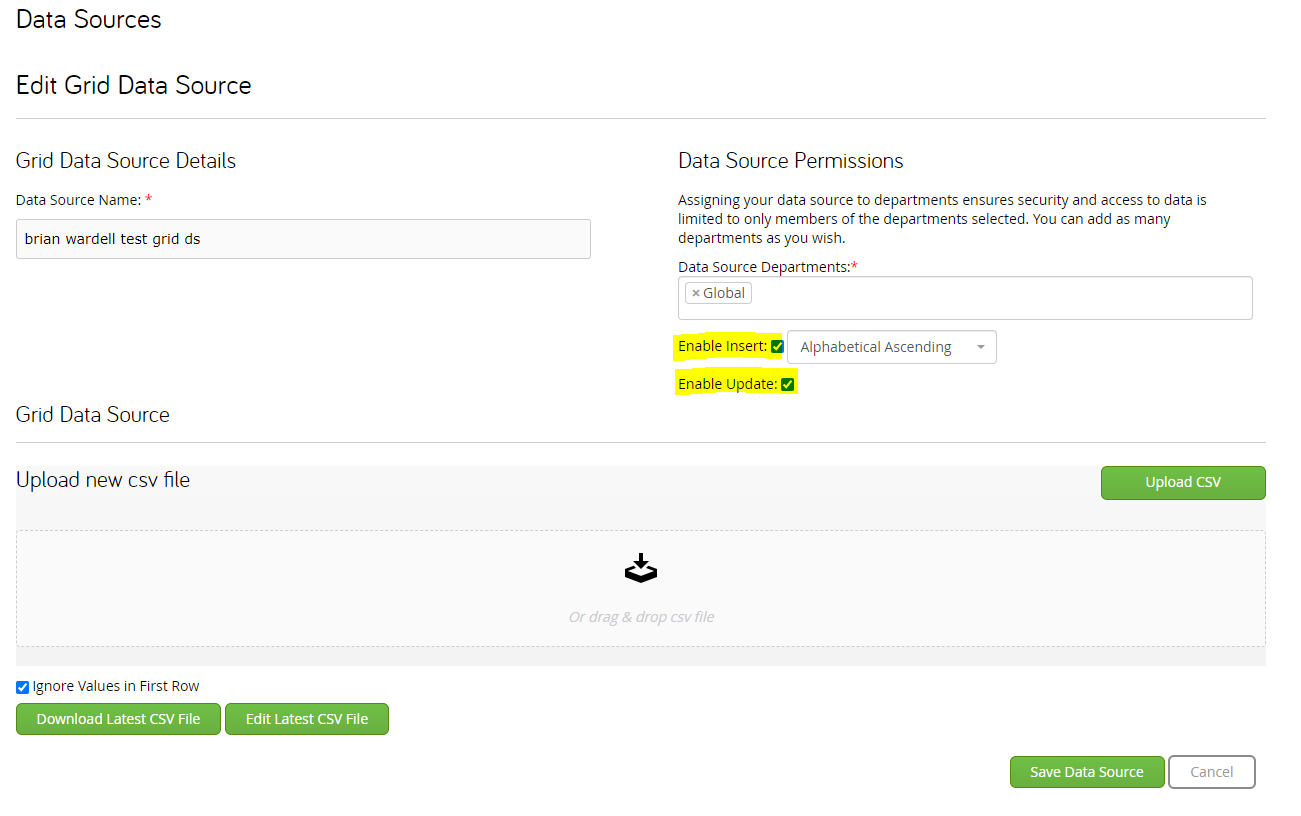
When Enable Insert is checked, new values will be allowed to be inserted into the data source directly from a TAP form. When Enable Update is checked, existing values will be able to be updated directly from a TAP form.
After enabling one or both of these options in the grid data source, you must then enable them in the specific dropdown field that is hosting the data source within a TAP form. To do this, open the options section of that dropdown field:
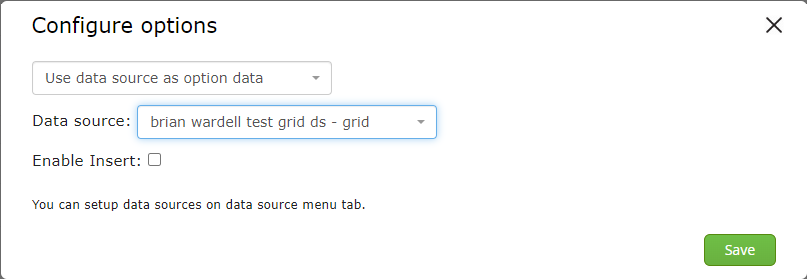
If the field is mapped to a data source that allows insert or update, then the 'Enable Insert' checkbox will display. Checking this will then require you to map the fields on the form to their corresponding column headers within the grid data source:
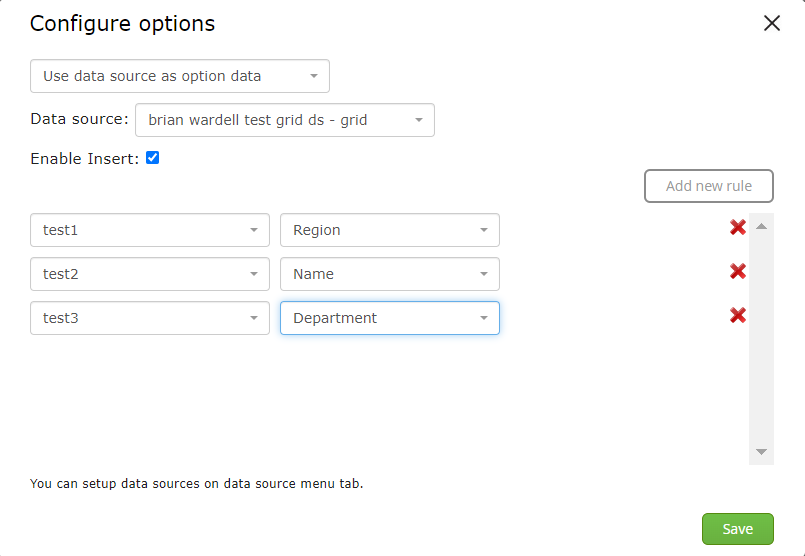
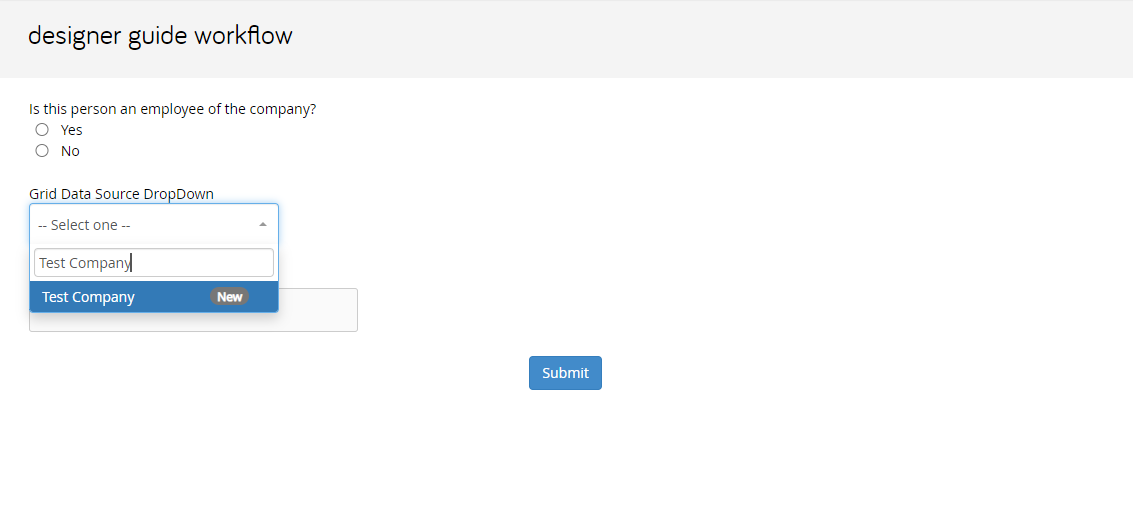
Column headers appear in the left side selectors, while the form fields appear in the right side selectors. When this functionality is enabled, a user entering a new value into the dropdown will be able to add this value to the grid data source. New values will have the 'New' indicator next to them when being entered for the first time:
Additionally, if Enable Update has been configured then a user that is prepopulating from existing values will be able to change the mapped fields and update that row within the grid data source directly from the TAP form. Values will always pull from the fields they have been mapped to within the dropdown.
Use Cases
-
Automatically entering values into fields so that there are no user mistakes and the values match what would be expected for the option selected in a parent field.
-
Saving a user time by automatically entering their personal details when they open a form.
-
Allowing grid data sources to be updated directly from a TAP form when new information is gathered in the form.
-
Allowing users to see information related to a third party system record which can help them complete a form or step in the business process.
-
For Teamconnect, bringing in documents and other information directly into a TAP form so that users who do not have access to TC can see important information related to a matter.
-
Allows a user to clone a previous entry by using the workflow records lookup and prepopulation.