
eSignature Support
What is eSignature Support?
eSignature Support is used to send a document(s) out for signature during the course of a workflow. eSignature Support is always configured on a relationship and will trigger when the workflow proceeds down that pathway. If a splitter is configured on the following stage, the workflow will pause on that status and relationship until the document status has changed.
To configure eSignature Support, a user must first connect either an Adobesign or Docusign account to their TAP instance. Instances can have multiple accounts connected, but can only have either Adobesign or Docusign accounts, not a mix of both. If an eSign account is not connected, users can still utilize eSignature Support in order to send documents to a user or assignee. However, those documents will not go through the signing process and must instead be generated and attached to a normal TAP notification.
You can learn more about sending documents for signature in this training module, but general information regarding this feature is available in this article as well.
What is Configured in eSignature Support?
There are many options that a user can choose from when configuring eSignature Support. Documents can be pulled from document builder templates, or from upload fields, or can be mapped to data source selections. A combination of multiple sources can be used in order to construct a document package to be sent. Signers can be assigned to sign documents in series, or in parallel, and approves and cc’s can also be assigned. There are also a few specific TAP fields that correspond to eSignature Support. These include the email notification, expiration, reminder, rejection reason, localization, and password fields. These fields can be mapped to the corresponding functionality within eSignature Support in order to capture information from the signing process or provide additional information to the signees and approvers.
How do I Configure eSignature Support?
Documents are sent for signature after a webform has been submitted (which is one of the ways we can remember that eSignature support is a relationship level property).
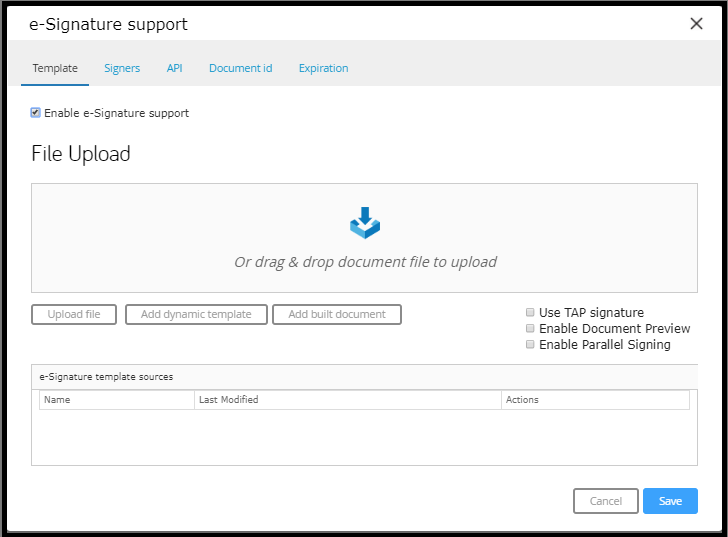
To Configure eSignature Support:
- Select the relationship at which you would like a document to be sent out for signature.
- Click the eSignature Support button in the Workflow page toolbar.
- The e-Signature support dialog opens, and the Template page displays by default.
- Select the Enable e-Signature support check box.
Configure documents to be sent for signature:
There are three different sources from which you might send a document for signature. In the e Signature Support dialog, you can select to Upload file, Add dynamic template or Add built document.
Select the desired option below:
- Upload File
- When you select Upload file, you are prompted to upload a file from your computer. If you upload a file from your computer, this document will become your eSignature document. If you wish to learn more about tagging documents such that they populate with information submitted into the webform, please see the article, “Text Tagging and Pre-Merge.”
- Add dynamic template
- Add dynamic template makes it possible for the end user to receive a different e‑Signature document, depending on what has occurred previously in the workflow.
- File upload form fields can become dynamic templates. For example, if Legal Counsel drafts a document that they upload into a workflow, TAP can send out that document for signature with the dynamic template option. If you wish to learn more about tagging documents such that they populate with information submitted into the webform, please see the article, “Text Tagging and Pre-Merge.” While uploading a template file, files must be in Adobe Portable Document File (.pdf) or Microsoft Word (.doc, .docx) format.
- NOTE: If we use the files from "File upload or Multi upload" from the form, make sure the files which are attached in the stage are of Adobe Portable Document File (.pdf) or Microsoft Word (.doc, .docx) format to use those options in a e-signature service. Any other file formats which are uploaded through the "File upload or Multi upload" option will not be accepted by e-signature service and will throw an error.
- Data Sources can also be leveraged in dynamic templates. For example, a user might select from a data source drop down that he or she is from a particular region. There might be a different document associated with each region. By mapping each drop down value to a document, the workflow is leveraging a dynamic template.
- Add dynamic template makes it possible for the end user to receive a different e‑Signature document, depending on what has occurred previously in the workflow.
- Add built document
- Built documents are created in Workflow Templates as part of the Document Builder functionality.
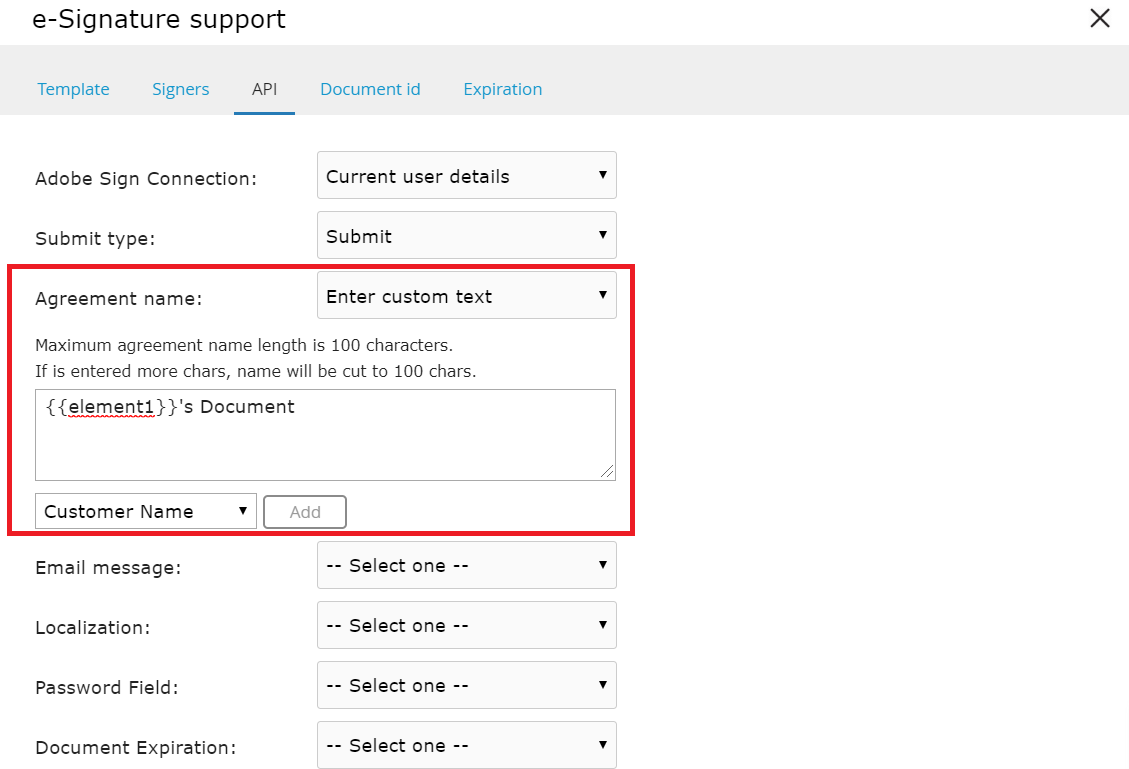
Note:- The E-signature document name character limit is only up to 100 characters. If its beyond 100, then TAP will display submission error for the request. Ensure that the document name is within 100 characters.
Note: For additional information on document generation in TAP, see our guide.
Document Preview:
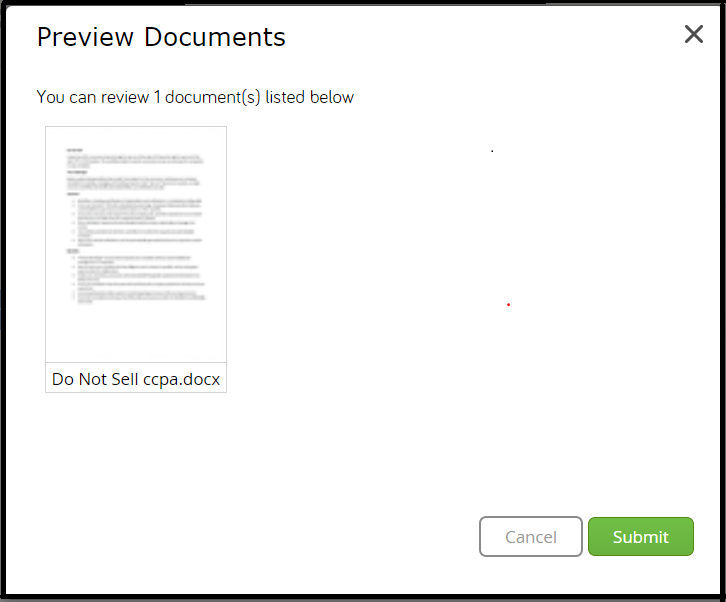
To configure Document Preview, select the "Document Preview" checkbox on the right hand side. Document Preview allows whoever submits the document for signature to preview it. This means that he or she has the opportunity to review the document before sending it. When this person reviews the document, the document will open up in Word Online. There, he or she can make changes before submitting the document to the signer.
How do I Configure Signers?
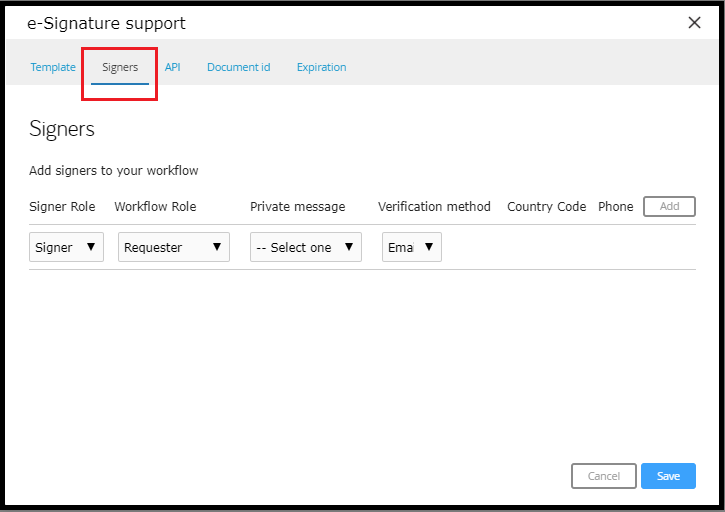
Configuring Signers is simple. Access the Signers page of the e-Signature support dialog, then proceed as follows:
- First, select the Signer Role. This defines what action each Workflow Role will take in the document. There are three options: Signer, Approver, and CC.
- Signers sign documents.
- Approvers approve but do not sign documents.
- CC’d roles are emailed the documents but take no actions. CC’d roles do not show up in the Audit Trail.
- Next, designate which Workflow Role is associated with each Signer Role. Note that any Workflow Role can become a Signer. This includes the Group Role.
- When you define the Workflow Role as a Group Role, each end-user who is included in the Group Role will receive a copy of the document, but the first person to sign the document will satisfy TAP.
- If additional Signers are needed, click the Add button and repeat steps 1 and 2, above.
- Signers sign in the order that they are configured. If you would like for all signers to sign in parallel, return to the Template page of the e-Signature support dialog and select the Enable Parallel Signing check box.
How do I Configure Private Messages to Signers?
Each Signer receives a notification from the e-Signature account associated with the e-Signature document prompting them to open and sign the document. In TAP, you can also configure personalized, private messages to your Signers, as follows:
- First, make sure there is a place in the webform where an end user can submit a message that they wish to be sent to a particular role in the workflow.
- This form field in the webform must be the Email Message form field found in the E‑Signature Functionality section of the Form Fields Menu.
- Next, on the Signers page of the e-Signature support dialog, identify the Workflow Role to whom you wish to send the message.
- From the Private Message dropdown, select the name of the Email Message field included in the form.
- Repeat as necessary.
.jpg?revision=1&size=bestfit&width=300&height=327)
What Should I Configure in the API Tab?
Adobe Sign/DocuSign Connection
Which account are you using to send the document out for signature? Is it an account that your team uses globally, or does every user who sends out documents have his or her own account? If the latter is the case, select Current user details from the drop down. If the former is true, identify the account from which this document should always be sent.
Adobe Sign / DocuSign “Send on Behalf of”
This feature allows workflow designers to configure the email address from which an e‑Signature document is sent for signature.
To set up the “Send on Behalf of” functionality: After selecting Send from specific user, determine if the sender email address is dynamic (from a form field within the workflow) or static. If it is dynamic, select the appropriate email field from eSignature User Email Address. If it is static, enter the static email into the Email.
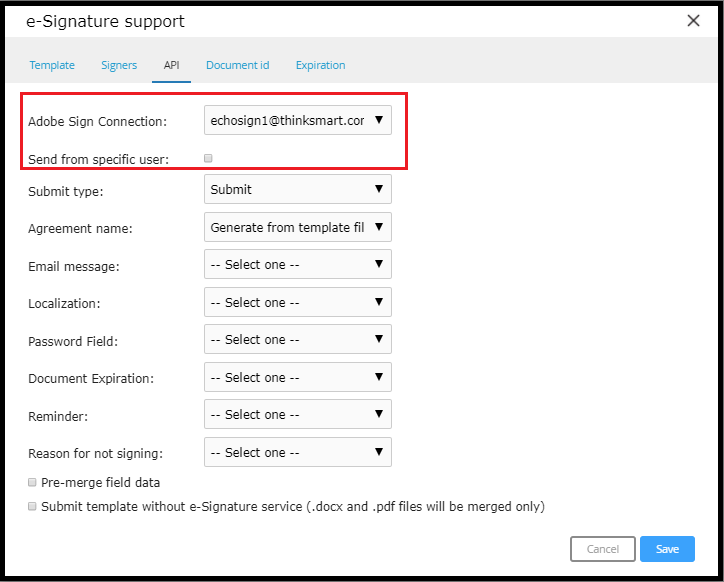
Submit Type
Select how you would like your document to be submitted; Submit or Sign after Submission.
The Submit option simply sends the document to the relevant parties after the end user submits the preceding webform.
Sign after Submission sends the document to relevant parties while also showing a copy of the document beneath the Thank-You page after the webform is submitted. This is useful in self-service contracts, where the person approving the document also needs to sign it.
For Adobe Sign customers, Sign Interactive is a third option that allows whoever submits the webform to configure new form fields in the document to be sent.
Agreement Name
Configure this drop down if you wish to change the name of the Agreement in the email that is sent out.
Pull fields from the web form to dynamically customize the name of the document by clicking "Enter custom text" and populating from the drop down with dynamic web form fields.
Note that custom fields must not be duplicated within the web form: If your workflow has more than one field named "Customer Name" (as in the example below) the information that is pulled will not be consistent. Ensure that each field pulled into a "document name" is unique.
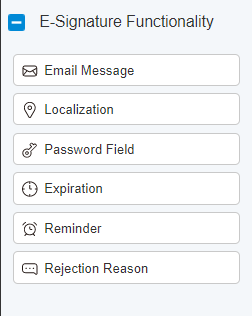
Email Message, Localization, Password Field, Document Expiration, Reminder, Reason for Not Signing
These fields are all Adobe Sign and DocuSign functionality that map to the E-Signature Functionality fields that you find in the Form Fields menu.
To add any of these features to your E-Signature Support, you must first add these fields to your form.
.jpg?revision=1)
Pre-Merge Field Data
If the document you are sending is a Microsoft Word document, you should select this check box. To learn more about the Pre-merge field data feature, please see the article “Text Tagging and Pre-Merge.”
Submit Template without e-Signature Service
Select this check box if the document you are sending is not an e-Signature document. It’s helpful to send non e-Signature documents with e-Signature support if you wish to create a document with merged field data
How to Set Reminders
Users can set reminders on a document that is sent out for signatures to remind their signers. This functionality can send reminders on a daily or a weekly basis. Reminders can be set following the below steps.
1) In the form field, under E-Signature Functionality, create a form field Reminder on the form page. In workflow designer set the form access for the field to hide.
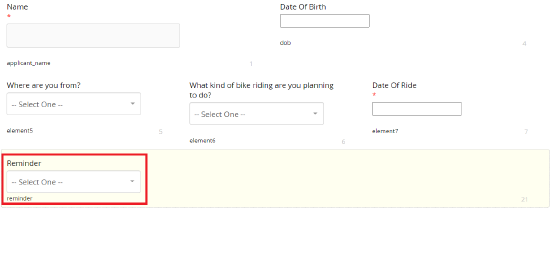
2) In workflow designer, in form pre-population, set value for reminder as daily or weekly as per your requirement.
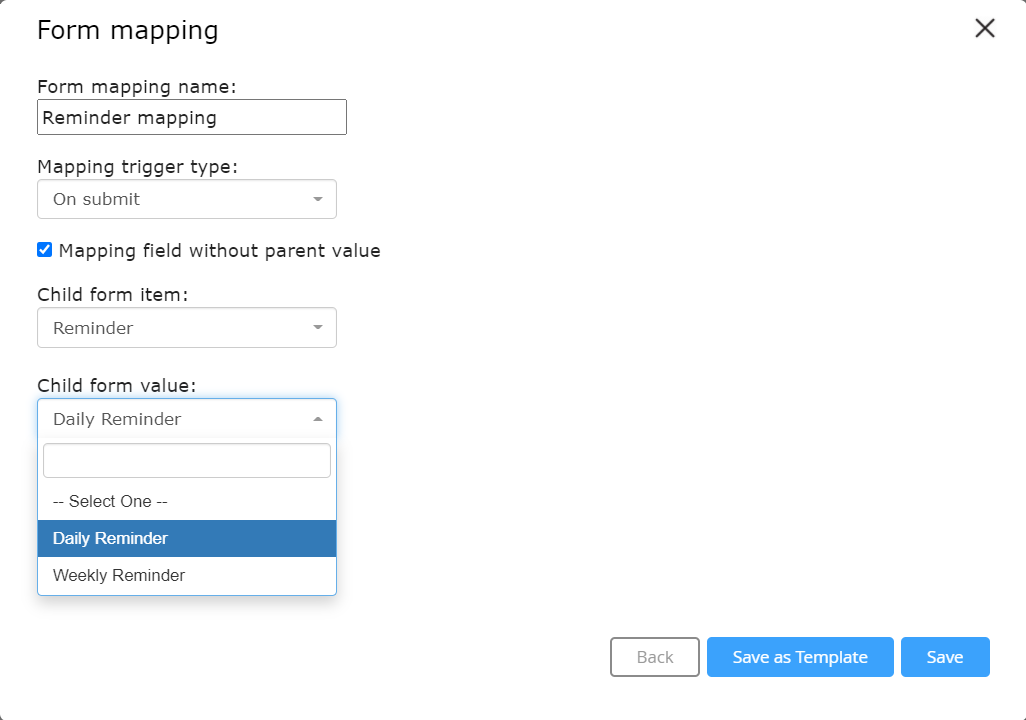
4) In the Sent to signature stage, configure reminders in E-signature Support in the API tab by mapping the Reminder form field. The value will appear in the drop-down if and only if Reminder field is added in the form.
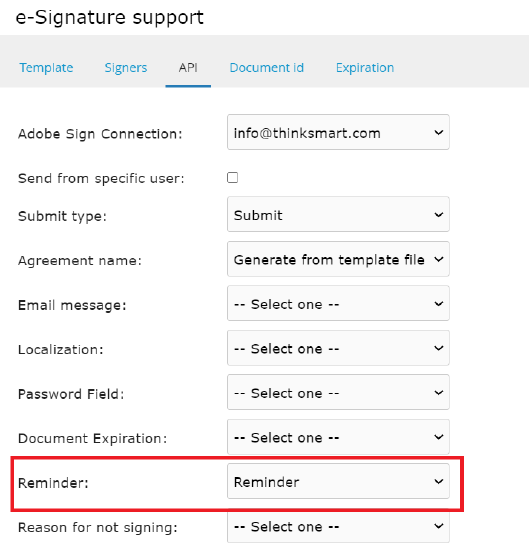
Note:Daily reminders are sent up to 10 days.
Using TAP Sign
In order to use TAP Sign, it must first be enabled from your site's Provisioning Portal. You can request TAP Sign be turned on by submitting a ticket to the TAP Service Desk. Once TAP Sign has been enabled in your site, it will become selectable in the eSignature Support window:
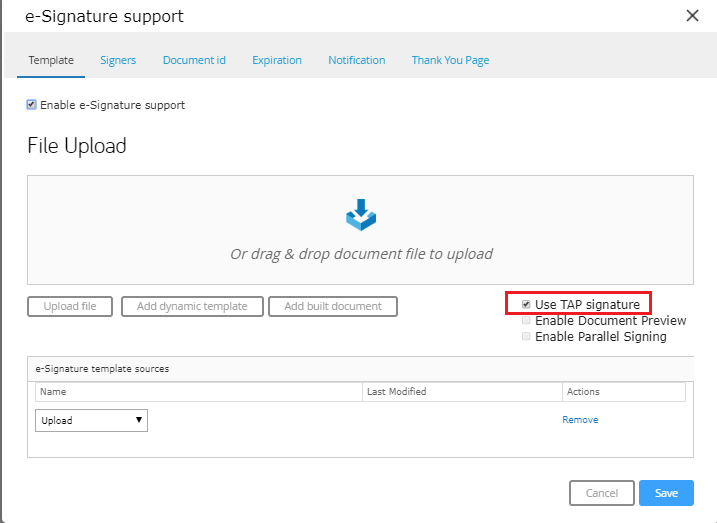
When the TAP Sign box is checked, you will lose access to the API section of the eSignature Support Box. However, you will gain access to three new tabs:
- Expiration Date:
- Gives you the ability to set an expiration date for the document that is being sent for signature. You can choose one of two options:
- From form field: Allows you to link the expiration date to a TAP Date Field. When this is chosen, the document will expire on the date entered in the linked TAP Date Field.
- Dynamic, from send date: Allows you to set the document to expire 'x' number of days from when the document was sent. Simply enter a value in the Expired in x days dropdown.
- Regardless of which option you choose, you can setup a custom notification to be triggered if the document expires. Simply select the Add Notification button and configure your expiration notification.
- Gives you the ability to set an expiration date for the document that is being sent for signature. You can choose one of two options:
- Notification:
- Allows you to configure a notification that will be sent to the signer along with the document that needs signing. This notification is configured in the same way that normal workflow notifications are configured, and will contain a link to the document. Instead of the Next Action link, you can create a document link by selecting the Add link to document button.
- To modify a TAPSign notification, within Designer, click on the relationship where TAPSign is enabled. Click eSignature Support on the top menu, then click Notifications. Make the desired changes, click save, and then save the workflow.
- Thank You Page
- Allows you to create a Thank You Page that will display after the document is signed. This is configured in the same way that workflow Thank You Pages are configured.
The rest of the configuration is the same as any eSign provider setup. You will still need to link Signers by Role and designate a Template to be used. There are a few things to note when using TAP Sign for your workflow:
- At this time, only PDFs and Document Builder Documents can be used as TAP Sign Templates.
- You will need to tag the document with a TAP Sign specific Signer tag which designates where the signature block will display. The correct formatting is __Signer1, __Signer2, __Signer3 etc., or two underscores followed by Signer#.
- The email that is sent to each signer will use the email associated with the TAP user who submitted the stage that leads into the eSignature Support Relationship as the From address.
- The CC functionality is not implemented in TAP Signature. So the document sent out for signature cannot be CCed to any user.
How does switching eSign providers impact completed workflows and in progress workflows?
The transition between eSign providers is crucial to understanding the impact on both completed and in-progress workflows. If a client decides to switch from, for example, Adobe eSign Integration to DocuSign Integration, it may affect existing workflows. In such cases, documents created using the old eSign provider will remain in TAP. However, after the transition to the new eSign provider, there might be limitations on accessing the old documents. It's essential to follow best practices to manage these changes effectively and ensure a smooth transition for users.
eSignature Use Cases
-
Sending documents for signature through the integration with Adobesign and Docusign.
-
Merging documents and sending them to individuals by using the ‘Send without eSignature’ functionality.
-
Merging images and pdfs together using 'Send without eSignature' functionality.