
Workflow Roles
What they are
Workflows connect people with tasks and technology. But who are these people, and how do we make sure that the right people are assigned the right task?
We use Workflow Roles to assign webforms to different people throughout a given workflow. When we first begin building a workflow, the default role of the “requester” is assigned every single stage. When we want to make specific people responsible for different workflow stages, we need to first create more roles.
Where they are
We set Workflow Roles up in two places. First, we create roles in our Workflow Options section of the Workflow Builder in the Designer tool. Then, we assign particular roles to particular stages at the Assign Role property of the Stage-level Workflow property.
How to set them up
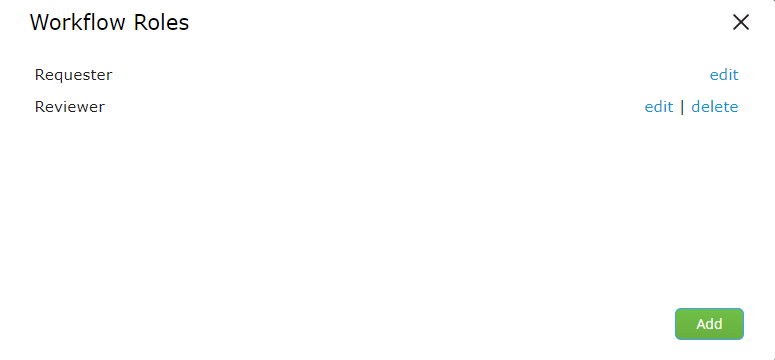
- Navigate to Workflow Options in your Workflow Builder and select “Roles.”
- Select “Add.”
.jpg?revision=1)
- You will now be prompted to determine how this role ought to be configured. Is the role identified with a particular registered user? With a particular non-registered user? The six options and their respective configurations are listed below.
- a) Registered User. This role indicates that a particular person who is already registered as a “User” in TAP may be assigned to particular stages. Each time you assign a task to this role, you are effectively assigning it to the same person each time.
- b) Non-Registered User. This role is for a particular person who has not yet become a User of TAP. Maybe you are creating a Coffee Order Workflow and you always want to send the order to the same Coffee Associate, but he or she is not a user in your TAP site. You can give that person a Non-Registered User role – just sign him or her up as a Non-Registered User.
- c) Get User Data From Form. This one has a descriptive name that almost tells you what you need to know! This role is dynamic – it is configured through the workflow itself. You identify a particular text field (Text field: Validation: Email) and then whatever email address is submitted into that form field becomes the role.
- d) Selected User. Like the Get User Data From Form role, this role is dynamic. It is configured dependent on the particular user that someone selects from a drop down of registered users. First create such a drop down (Drop Down: Option: Registered Users) and then identify that drop down with this role.
- e) Group of Users. This “Role” grants permission such that multiple registered users can complete the same task. Like “Selected User,” Group of Users relies upon selecting users from a drop down. This time, it’s no ordinary drop down but a Multi-Select. Any users you select in such a multi-select will be given access to the assigned task.
- e) Group of Roles. This role is a compilation of other Roles. To create a Group of Roles, first create all of your roles (see above) and then list the roles that you would like to group together in this Role configuration.
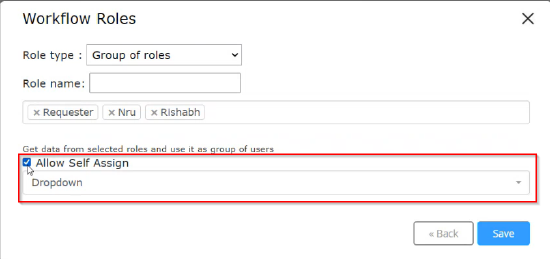
- NOTE: Group roles can be configured to allow delegation. To do this, check the "Allow Self Assign" box when configuring a group role. You will be required to link this to a user select dropdown that has been added to the form. Once configured, that user select field can be used to delegate stage assignment on a stage assigned to a group role. The stage will initially be assigned to the group, but if a user is selected in the dropdown and the stage is saved, the assignee will update to the selected user.
- After creating a role, toggle back to the Properties section of the Workflow Builder. Select the stage to which you would like to assign a particular role.
- Select “Assign Role” and choose the role (which you have already created in the “Roles” area).
Multi-role Option
This section explains the configuration and usage of the multi-role option in the TAP platform, providing greater flexibility and efficiency in managing workflows with multiple users and roles to access the same stage when it is assigned to a group of roles.
Configuration Steps
- Create a new form.
- Add a drop-down field and Save and Submit buttons as form elements. The drop-down field is added to enable user selection in cases where the multi-role option is needed.
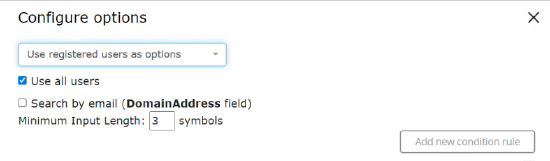
- Configure the drop-down options by selecting registered users as options and checking the Use all users checkbox. Click Save.
- Navigate to the Workflow tab. Create a workflow and select a stage.
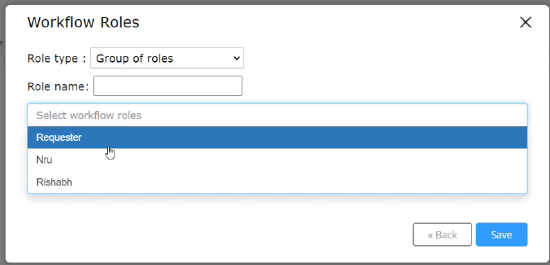
- In the Roles section, select Role Type as Group of Roles.
- Choose the workflow roles from the drop-down. You can select any number of roles that should be grouped together.
- Enter the Role Name. Click the Save button.
- Optionally, you can enable the Allow Self Assign checkbox. This allows selecting a registered user from the drop-down while working on the form itself.
- Create a workflow and select a stage.
- Assign a role by choosing the Role name previously created for the group of roles.
- Save the Workflow.
- Go to the Dashboard.
- Under 'Current Assignee,' the 'Multi Role' option will be visible.
Note: If the requester is added to the group of roles, the requester's name will be shown under 'Current Assignees.' Otherwise, 'Multi role' is displayed.

- To add more users to the workflow, follow these steps:
- Select the workflow and click 'Edit.'
- Choose any user from the drop-down options.
- Click the 'Save' button.
- Go to the dashboard and refresh the screen.
- The newly added user will appear under 'Current Assignee.'
Note: The 'Re-assign option'  is available if the workflow is assigned to a single user only. For 'Multi-role,' the reassign option is not visible in the dashboard as it is assigned to multiple users.
Tips for utilizing Roles
There are a few ways that utilizing role types and TAP fields in combination can save you some time when configuring a workflow.
- For stages which require multiple assignees and where that number could be variable, utilize TAP Email Validated Text fields with either form mapping or prepopulation from a grid data source. This allows you to assign those text fields to individual roles and then to a group role. When running the workflow, only fields which have emails populated into them will be added to the group role which means you can use a single stage and group role to account for many different group review scenarios.
- A case formula can also be used to accomplish the previous use case. By creating a text field with a case formula that populates in different email values, you can create a single role that could potentially be assigned to any number of emails depending on the values entered into a form.