Document Creation
Document Creation
In TAP, creating documents is effortless, and there are several ways to get it done based on your needs. Here's a breakdown of the methods:
- Tagging Word docs and PDFs:
- Users can tag Word docs and PDFs with TAP fields using
 formatting.
 - The final document is then generated with eSign support, whether or not it's sent for a signature.
- Users can tag Word docs and PDFs with TAP fields using
- Document Builder
- Documents can be generated as part of a relationship, notification, or with eSign support.
- Document Field
- Similar to Document Builder, this allows document generation as part of a relationship, notification, or with eSign support.
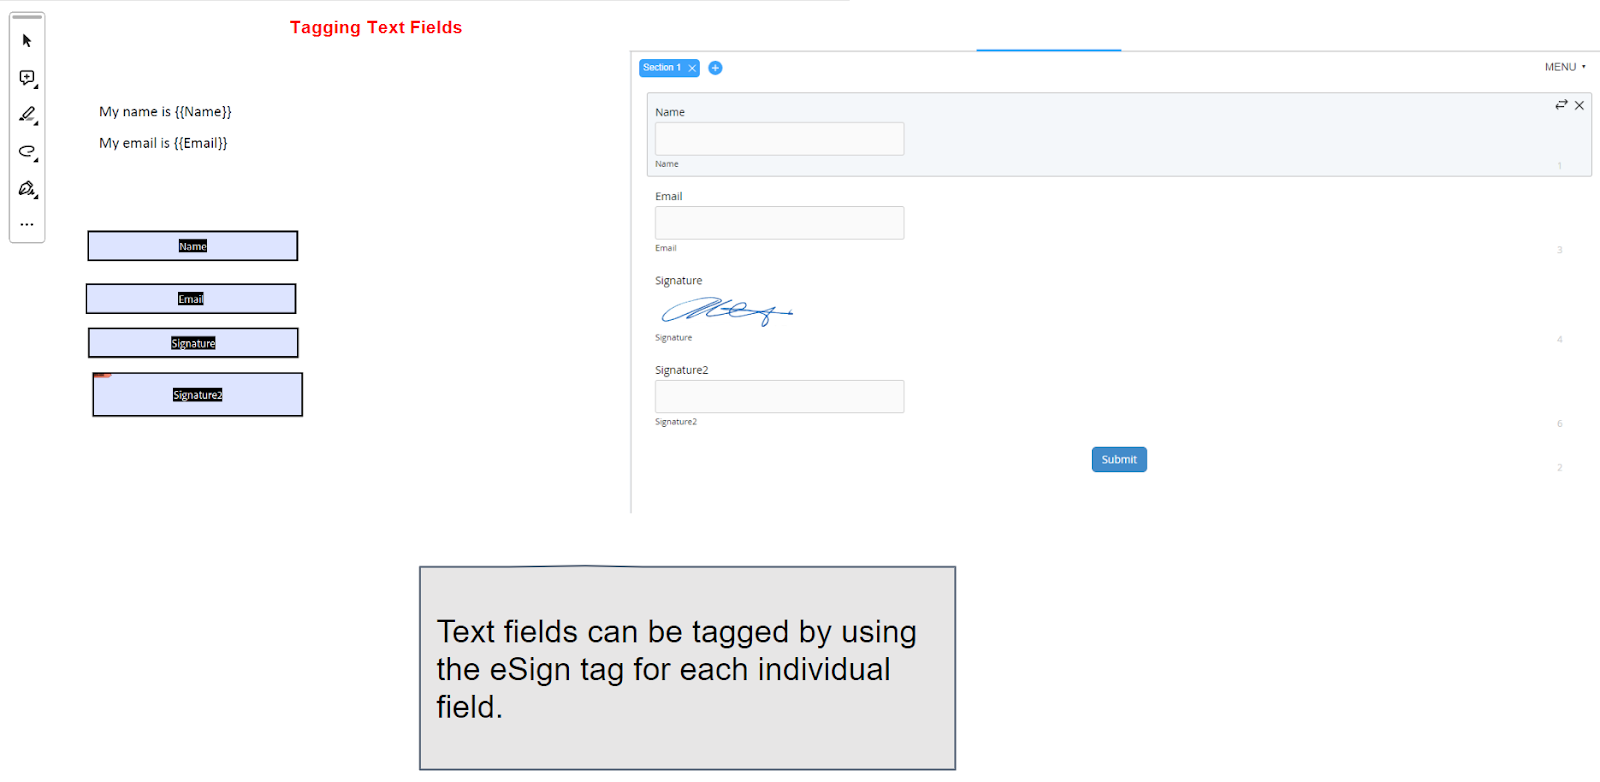
Tagging Word Documents
-
Word documents are tagged using
 formatting, referencing the eSign tag of the form field.

- Once tagged, the document can be generated using eSign Setup.
- If the document is to be sent for signature, consider the following:
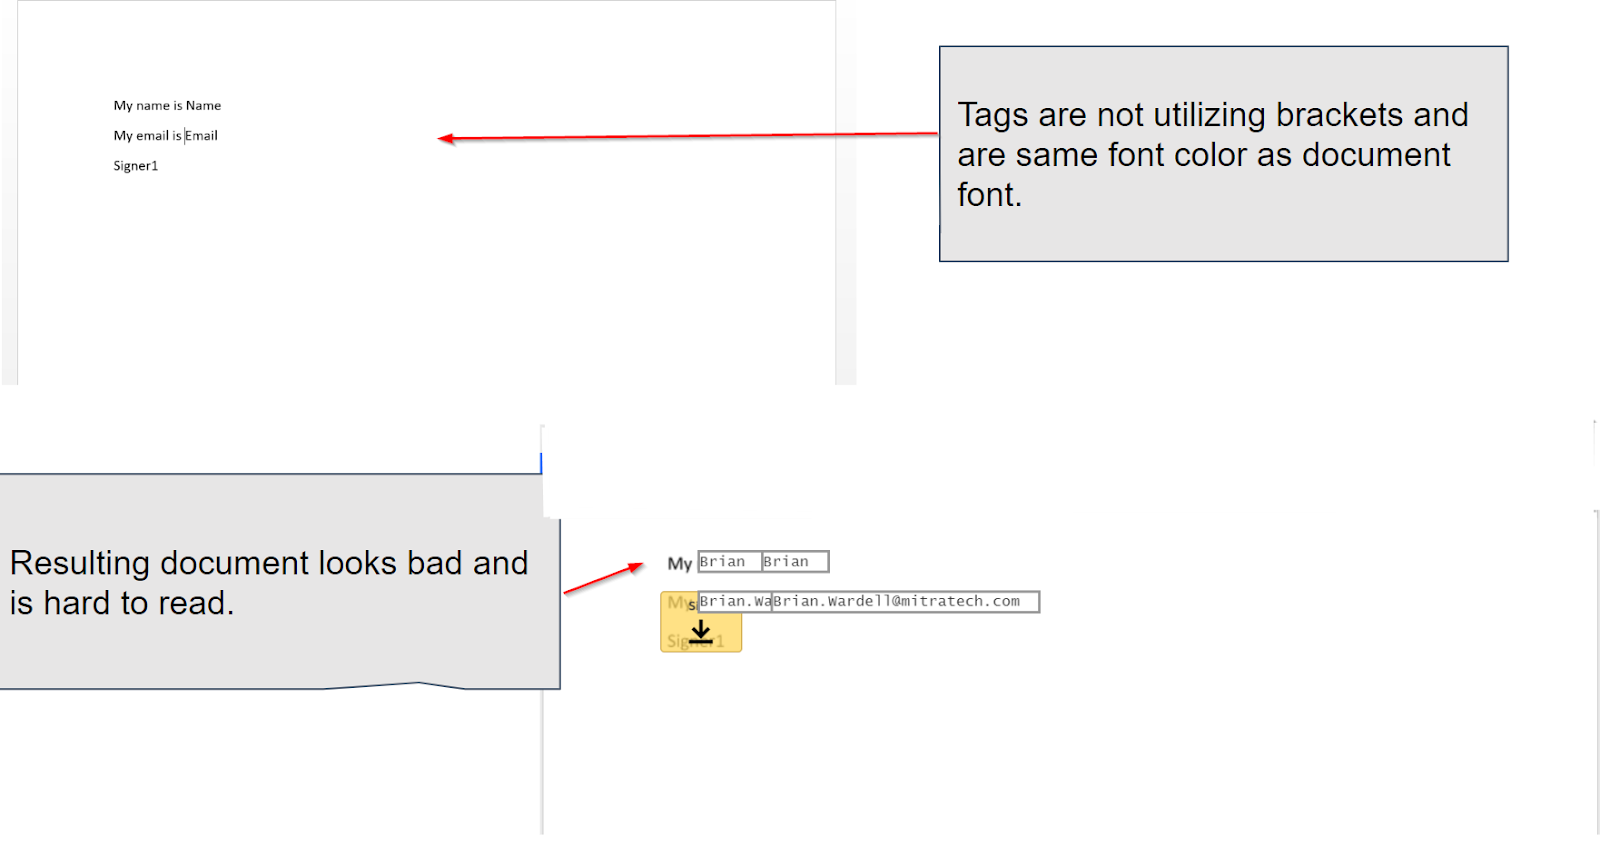
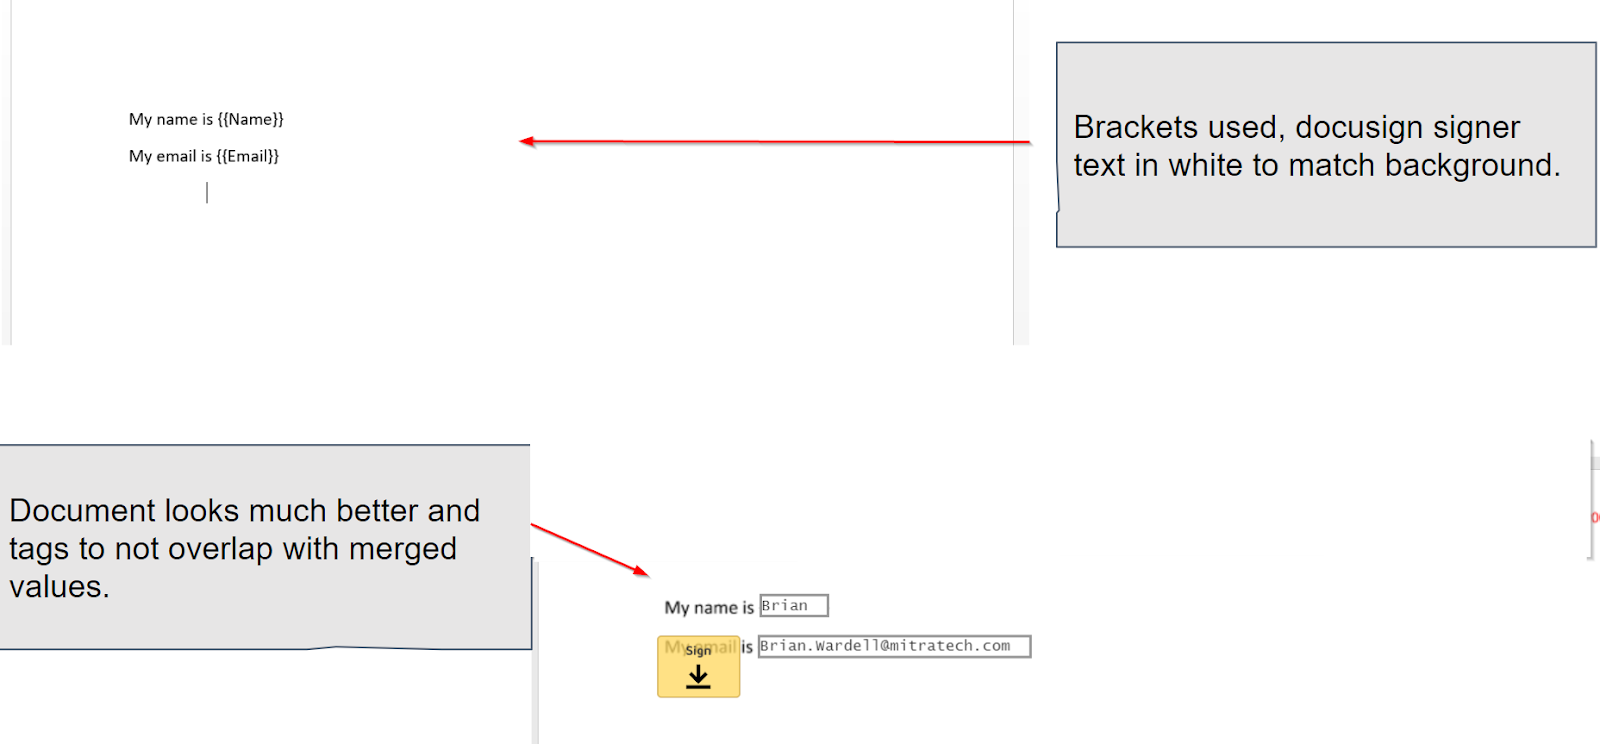
- For Docusign, text tags can be either bracketed or un-bracketed.
- If un-bracketed, ensure that tags match the background color to avoid readability issues when values merge.
- Decide whether to use brackets or un-bracketed tags when sending through Docusign.
- Ensure this setting matches the formatting used during document tagging.
- If using 'pre-merge,' TAP field values will be merged before sending to the eSign provider.
- Pre-merge always uses brackets, and the setting should align with the formatting used during tagging.
By following the above steps, you can efficiently tag and generate Word documents with eSign, ensuring clarity and readability when sending documents for signature.
Tagging PDFs
Tagging PDFs is a bit different from Word docs because we can't hardcode text.
We use actual field tags within the client environment for PDF tagging.
- PDFs must be tagged with acro tags using Adobe or another PDF tagging software.
- Different field types have different tag formats. Tags vary for Text, Area, and Date fields.
|
 |
|
  |
|
  |
By following the above-simplified steps, you can efficiently tag PDFs, ensuring accurate and effective field representation within your documents.
Generating Tagged Documents in TAP
Tagged documents can only be generated using eSignature Support functionality. The document does not have to be sent for signature to have field values merged. Users can select the ‘Send Without eSignature’ option if they would like to merge values and generate the document, without utilizing Docusign or Adobesign.
Document Builder
The Document Builder is a powerful HTML generator integrated into the TAP backend, providing dynamic document creation capabilities. Although it remains behind the scenes and is not visible on the front end, it plays a crucial role in generating documents as part of various TAP functionalities such as relationships, notifications, or eSign support.
Template Configuration:
Template Configuration involves the use of CK Editor version 4, allowing users to customize document templates. This configuration occurs within a workflow template, providing a versatile framework for various use cases.
Use Cases:
-
Document Generation:
One significant use case is Document Generation, where users can create documents incorporating form field values. The template supports show/hide logic, enhancing its flexibility. Additionally, it serves as a starting point for document creation, generating initial documents that can be further edited. These initial documents also form the basis for exposing documents in document fields.
-
Signature Workflow:
Another use case is the Signature Workflow, which streamlines the creation of simple documents intended for signatures.
Strengths:
- Simple generation of standard or replicated documents.
- Incorporates show/hide logic within documents.
- Quick document creation compared to tagging large documents.
- Versatile generation methods (attachment, relationship, eSign support).
Gaps and Considerations:
- Challenges with replicating documents featuring complex formatting.
- Functionality issues related to formatting, headers/footers, and tables.
- Limited maintenance capabilities; templates cannot be shared across workflow templates.
The Document Builder empowers users to effortlessly create and customize documents within the TAP environment. While it excels in simplicity and versatility, users should be mindful of its limitations, particularly in handling complex document structures and sharing templates across workflows.

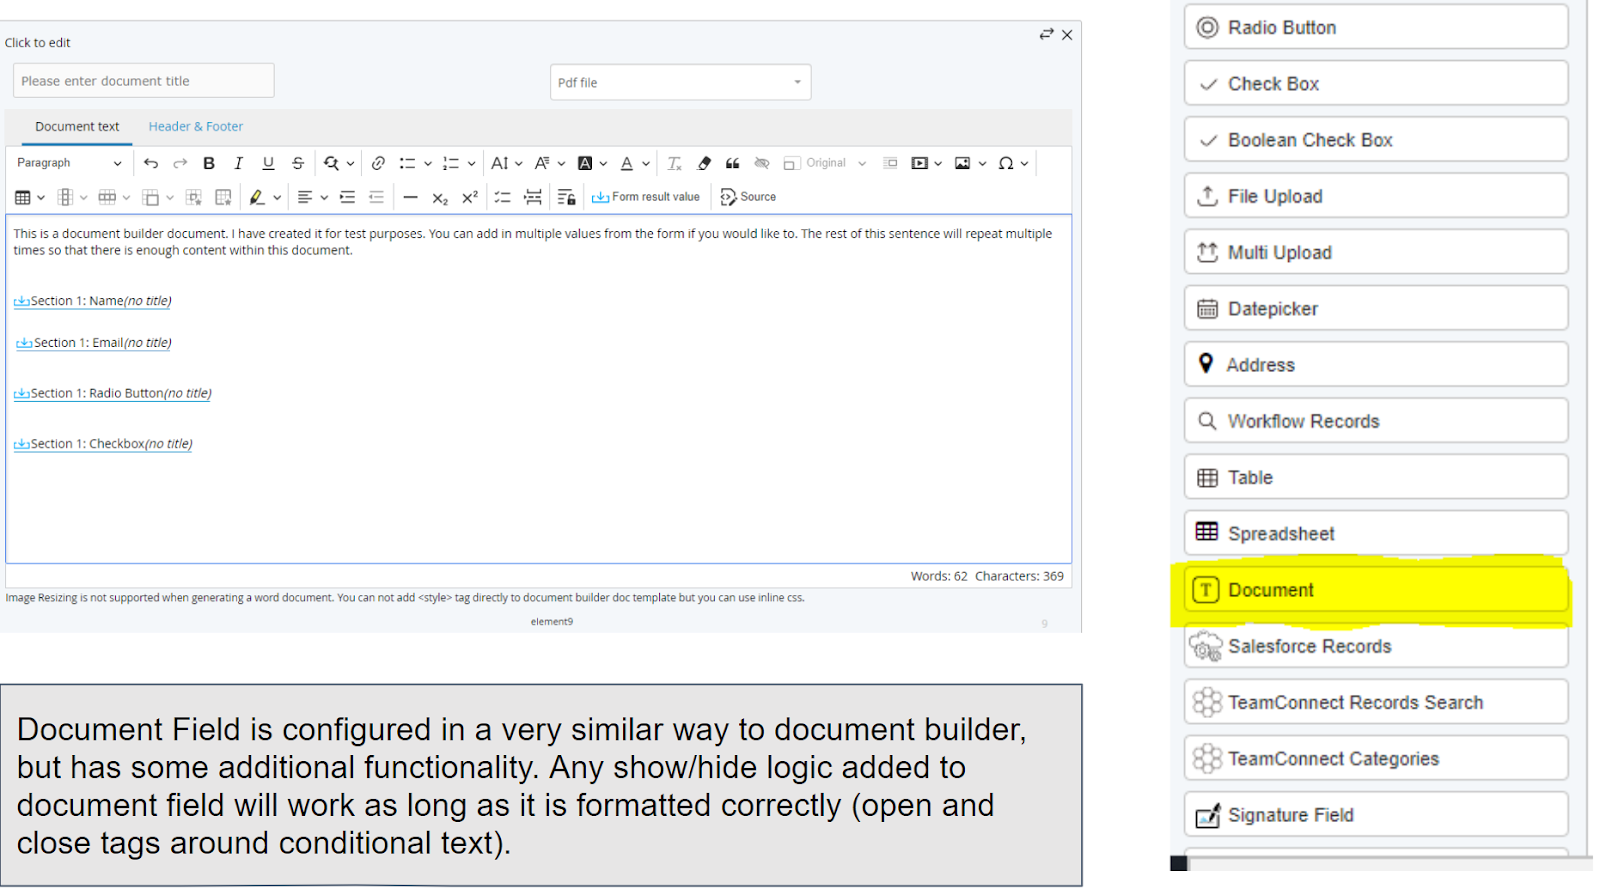
Document Field
This is similar to the Document Builder. The main difference between them is that this is an actual field and hence it can be viewed on the User interface.
The Document Field is a versatile field type integrated into forms within the TAP environment, operating on CKEditor 5. This field offers users the ability to expose and edit documents throughout a workflow, providing enhanced control over the document creation process and greater flexibility for modifications before document generation.
Key Features:
Form Integration:
Form Integration seamlessly incorporates the document field into forms, offering a cohesive user experience. This integration leverages CKEditor 5 to provide users with a robust and efficient editing environment.
Use Cases:
These use cases highlight the diverse applications of the system. Redlined Document Creation is particularly advantageous for generating documents that necessitate redlines before obtaining signatures. Complex Document Generation is well-suited for the creation of intricate documents, while Collaborative Document Creation allows multiple contributors to provide input during the document generation process. The system also supports Change Tracking, enabling the efficient tracking of changes and versions throughout the workflow for enhanced document management.
Strengths:
One of its notable strengths lies in its enhanced Formatting Capability, enabling the management of more complex document formatting. Users can conveniently copy and paste content from external sources like Word. Additionally, the system excels in Direct Editing, allowing users to edit documents directly within a form, streamlining the workflow. Furthermore, the functionality includes robust Change Tracking and Redlining features, facilitating the monitoring of changes and versions, along with supporting redlining during the workflow for effective collaboration.
Gaps and Considerations:
CLM Functionality:
- Redlining and versioning functionality may not match that of dedicated Contract Lifecycle Management (CLM) software.
Formatting Challenges:
-
Occasional issues with document formatting and generation due to translation from HTML to Word/PDF.
The Document Field enhances the document creation process within TAP workflows, providing users with advanced editing capabilities and collaborative features. While it excels in complex formatting and direct editing, users should be aware of its limitations, particularly in comparison to specialized CLM software.
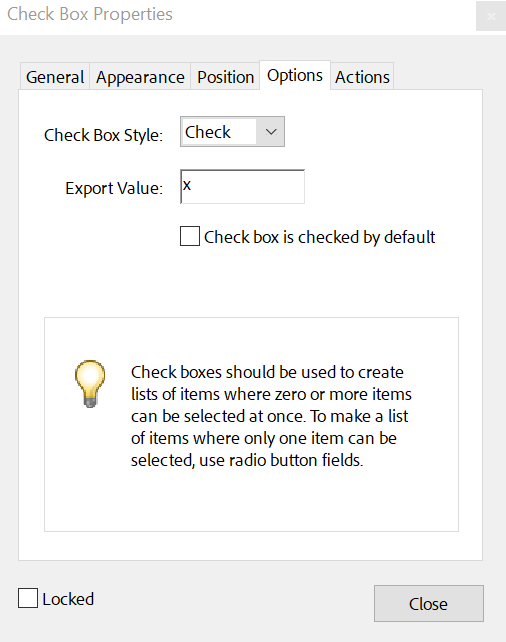
Document Field Options
Document Field Options
The Document Field in TAP comes with various configurable options to enhance user control and document management. Here are the key options available:
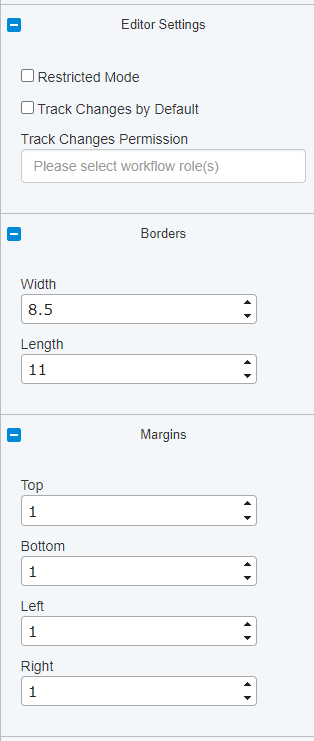
Restricted Mode:
Description: Blocks all or selected portions of the document from being edited.
Configuration: In this mode, specific areas of the document must be configured as editable; otherwise, the entire document becomes read-only.
Track Changes by Default:
Description: Automatically enables track changes when checked.
Configuration: Activates track changes as the default setting for document editing.
Track Changes Permission:
Description: Governs the permissions related to track changes functionality.
Configuration: Specifies workflow roles with the authority to toggle track changes on/off and manage the acceptance/rejection of tracked changes.
Borders:
Description: Offers configuration options for document borders.
Configuration: Allows users to customize border settings for the document.
Margins:
Description: Provides configuration options for document margins.
Configuration: Enables users to customize margin settings to meet specific document requirements.
These Document Field options contribute to a flexible and controlled document editing environment within TAP workflows, allowing users to customize documents to their needs while ensuring proper tracking, editing restrictions, and formatting details.
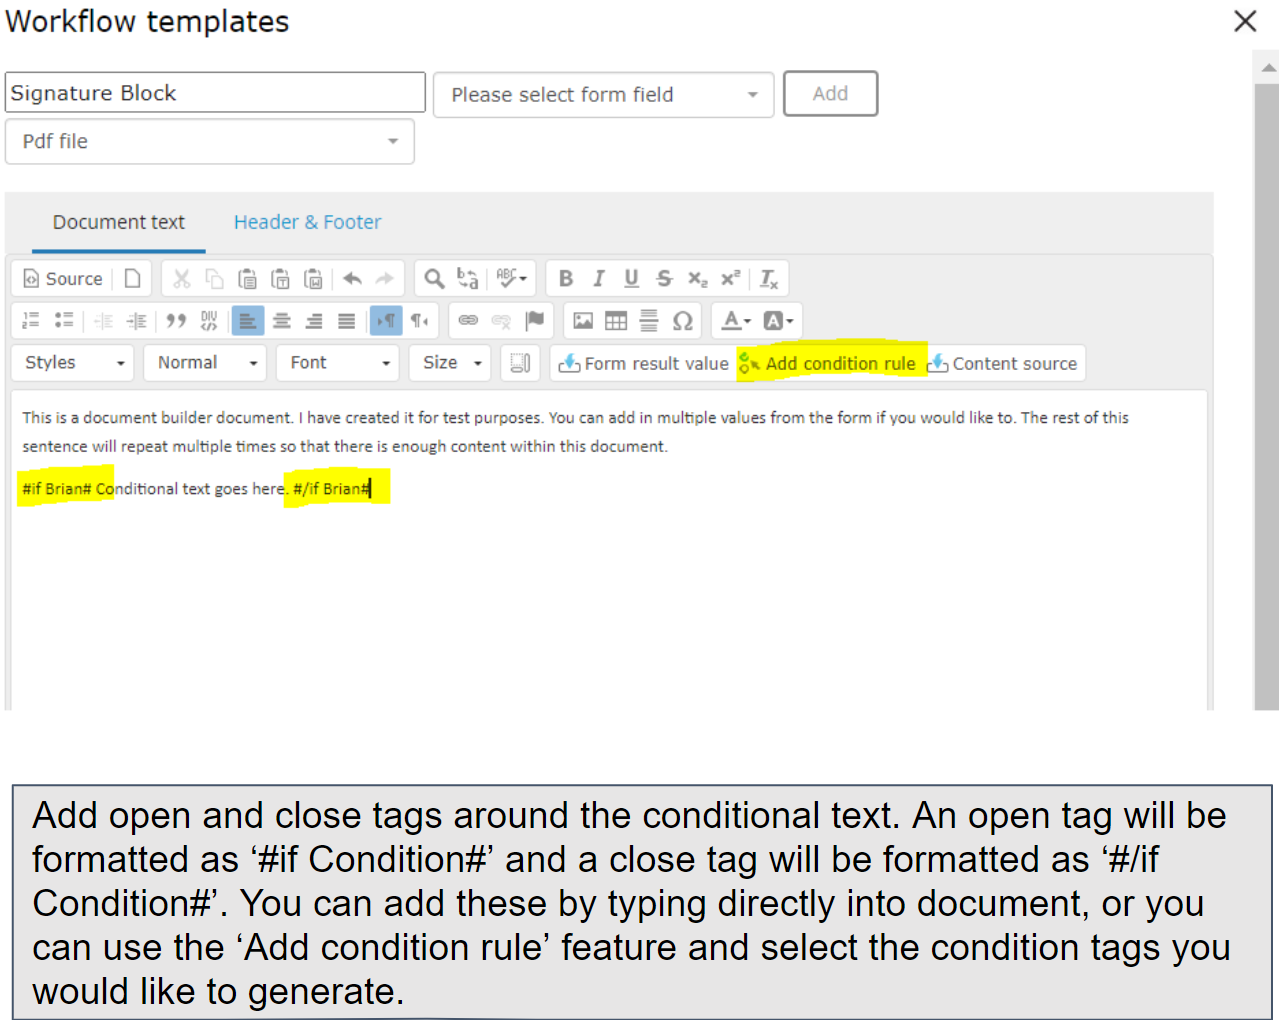
Show/Hide Rules in Document Builder and Document Field:
To implement Show/Hide rules effectively in TAP's Document Builder and Document Field, follow these steps:
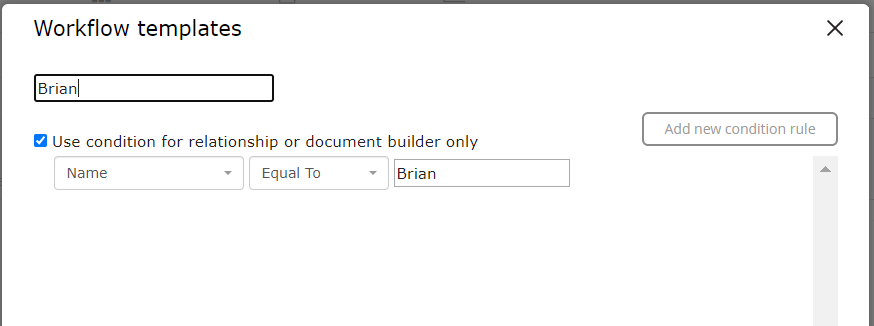
Conditions Building:
Description: Before incorporating Show/Hide rules, create the necessary conditions.
Instructions: Construct conditions in the template section to establish the criteria for when elements should be shown or hidden.
Document Rules:
Description: For Document Rules, conditions should be added within the template section.
Configuration: While setting up conditions, select the checkbox labeled ‘Use condition for relationship or document builder only.’
These steps ensure that the Show/Hide rules are integrated seamlessly within the Document Builder and Document Field functionalities in TAP. By establishing conditions and configuring them appropriately, users gain the ability to control the visibility of elements within their documents based on specified criteria.
Generating Documents from Doc Builder or Doc Field:
Documents configured within Doc Builder or Doc Field can be generated in various ways to suit workflow needs:
eSignature Support Functionality:
Documents can be generated using the eSignature Support functionality, providing a streamlined process for document creation and signing.
Configuring Document Generation on a Relationship:
Documents from Doc Builder or Doc Field can be configured to generate a specific relationship within the workflow. This ensures documents are created at predefined stages.
Adding Documents as Attachments to Notifications:
Documents can be attached to notifications, enhancing communication by sharing generated documents seamlessly.
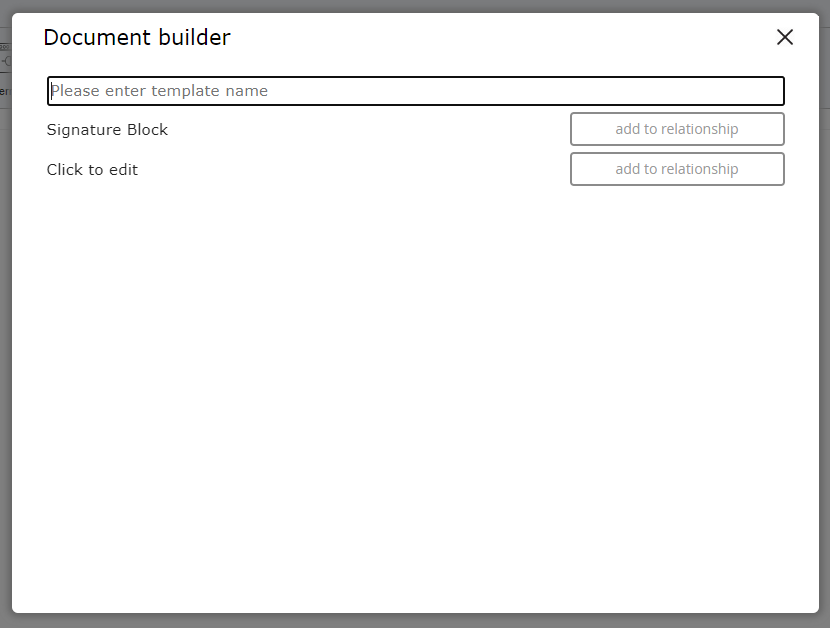
Audit Log Integration:
Utilize the 'Document Builder' property when configuring a specific relationship. By selecting this property, users can access a list of available Doc Builder and Doc Field templates. Choosing 'add to relationship' configures the workflow to generate the specified document and adds it to the audit log as the record progresses through the relationship.
These versatile document generation methods offer flexibility within TAP workflows, allowing users to seamlessly integrate document creation and management into their processes.

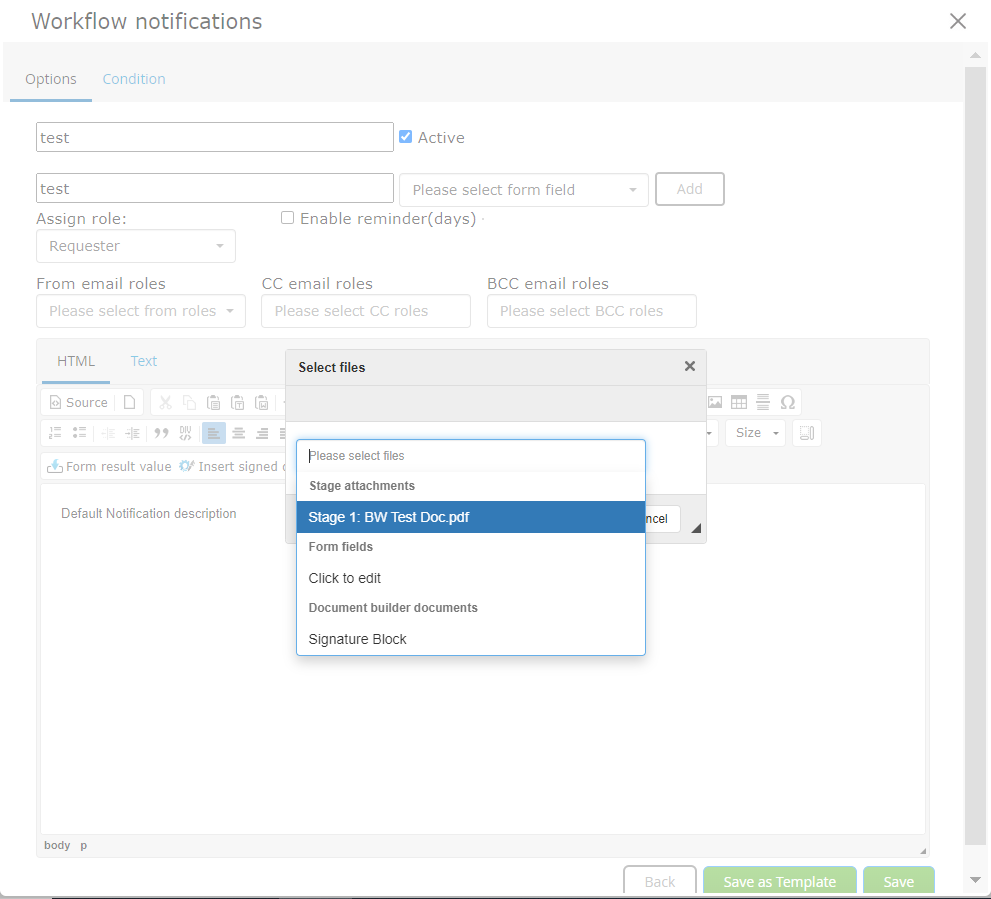
Generating and Attaching Doc Builder and Doc Field Documents to Notifications:
Doc Builder and Doc Field documents can seamlessly integrate with notifications, enhancing communication within the workflow. By choosing the 'attachments' option in a notification, users gain the ability to include any pre-existing Doc Builder and Doc Field templates. Once added, the document undergoes generation and becomes an attachment to the notification, ensuring comprehensive and relevant documentation is shared seamlessly throughout the workflow process.
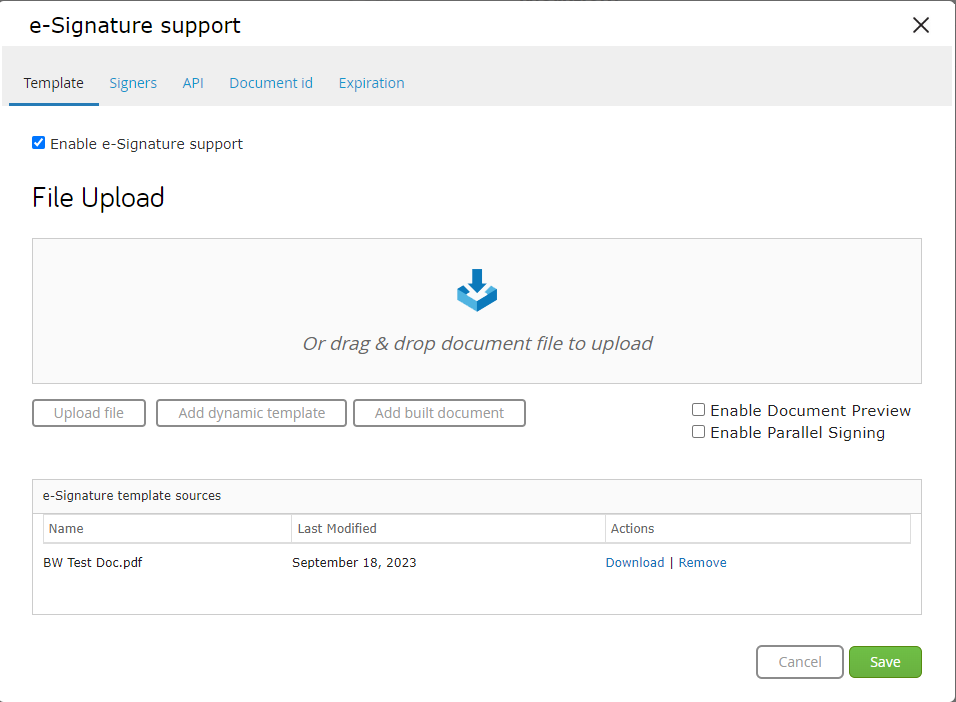
Generating Documents with eSignature Support:
One of the widely employed methods for document generation is through eSignature Support. This versatile feature offers the flexibility to either dispatch the generated document for signature or send it without necessitating a signature. Users can initiate this process by:
Uploading a Document Template:
-
Upload a pre-created document template to serve as the foundation.
Utilizing Mapped Document Values:
- Incorporate document-mapped values from a designated field.
- Extract content from a file upload field.
- Apply a stage attachment, enabling the addition of dynamic templates.
Applying Doc Builder or Doc Field Templates:
-
Use Doc Builder or Doc Field templates for a customized document creation experience.
This streamlined approach within eSignature Support ensures efficient and versatile document generation to meet diverse workflow requirements.
Document Sending Options:
When opting to send a document without necessitating a signature, users gain the flexibility to make crucial decisions regarding document composition. They can choose to either merge all Word documents and PDFs seamlessly or opt not to merge them. Additionally, users can convert image files into PDF format, facilitating their integration with other PDFs.
However, it's important to note that merging Word documents with PDFs directly, without the requirement for a signature, is not supported within this functionality. The merging feature is exclusively available when documents are sent for a signature. This distinction ensures clarity in document handling based on the intended workflow.

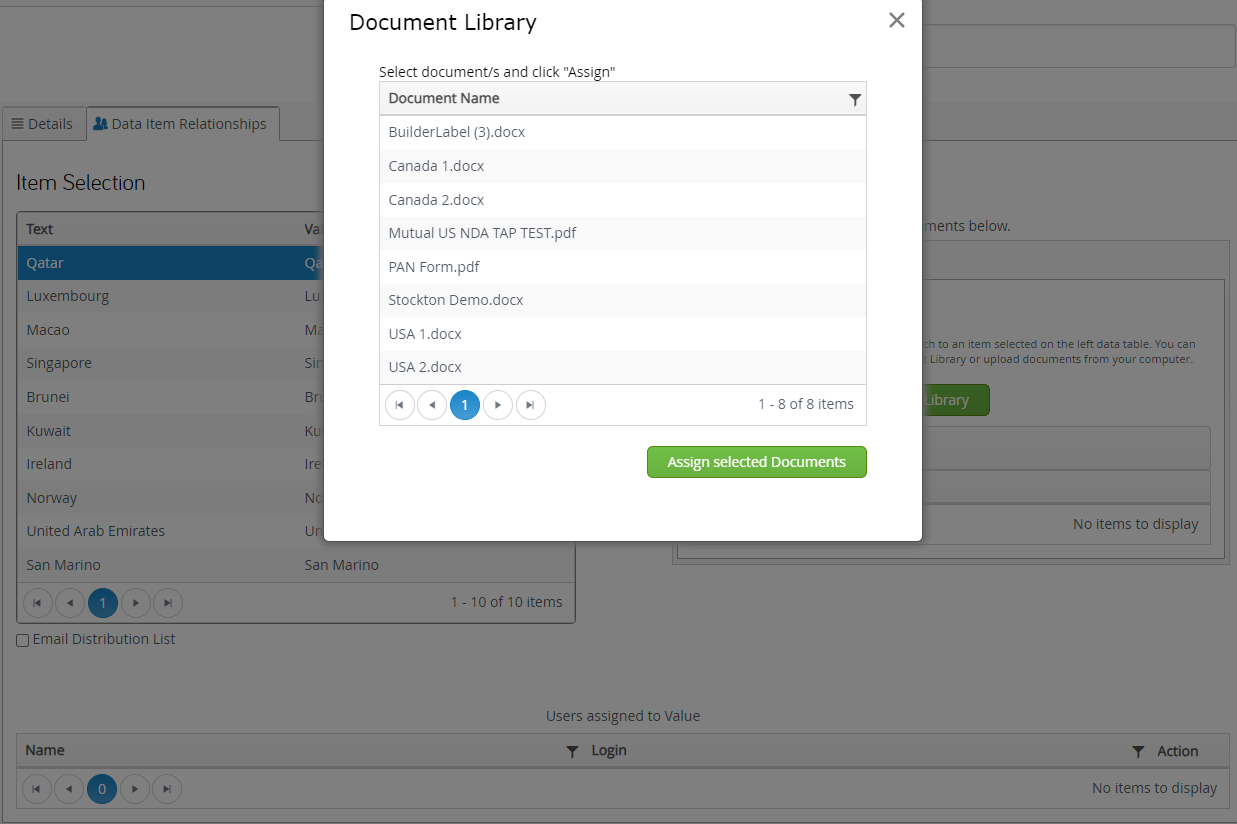
Data Mapping Documents
For straightforward data sources, it's possible to associate documents with their respective values. This can be achieved by configuring the mapping within the 'Data Item Relationships' tab available in the data source setup screen. Within this setup, each value in the data source has the flexibility to be mapped to multiple corresponding documents. This ensures a versatile and comprehensive linkage between data values and associated documents within the system.
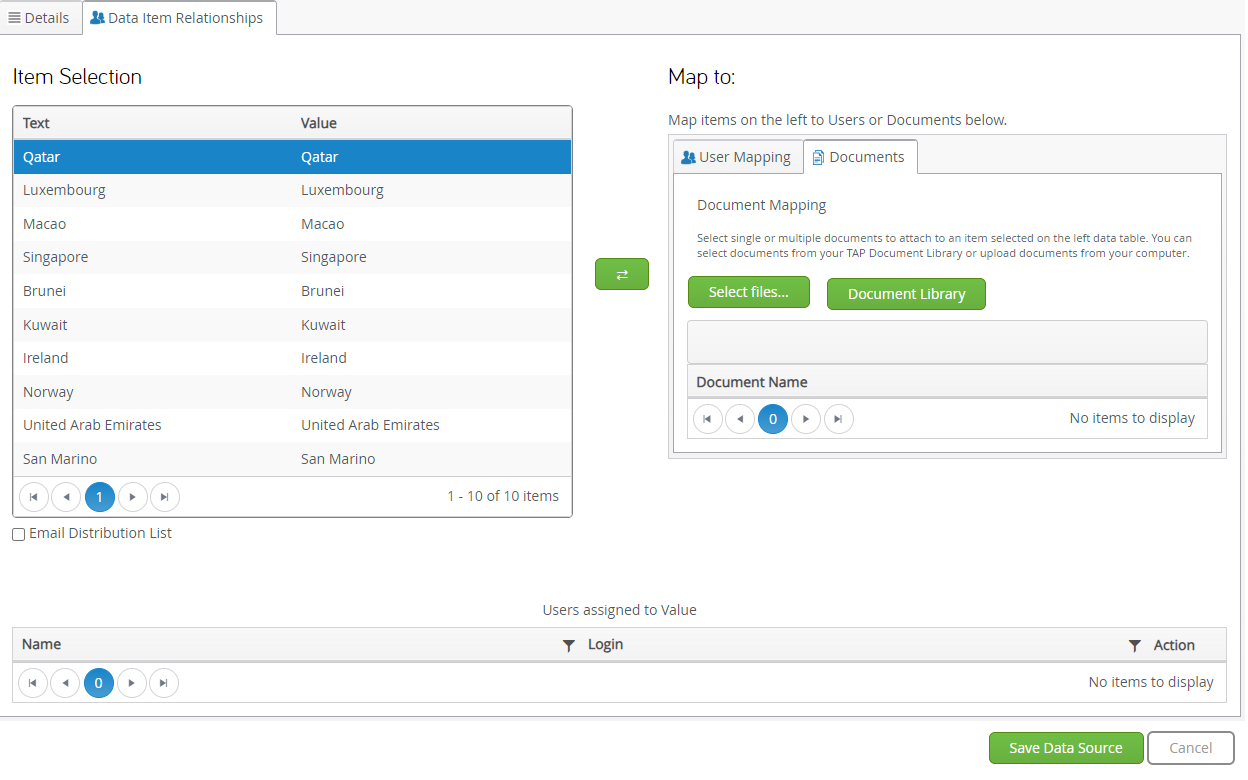
Utilizing Document Library Documents for Mapping:
Document library documents serve as a valuable resource for mapping purposes. Users have the option to directly upload documents for seamless mapping. Once the mapping is established, users gain the capability to employ this data source for selecting documents during workflow generation. This streamlined approach provides users with a straightforward method to generate documents based on workflow selections. The convenience lies in eliminating the necessity to set up and configure multiple document generation pathways.