Salesforce Support
The Salesforce support property lets you define the attributes, options and trigger conditions for Salesforce integration with a relationship. Click the Salesforce support button to display the Salesforce support dialog.
|
To access Salesforce support:
-
Select the workflow relationship for which you wish to configure Salesforce support.
- Click the
 Salesforce support button in the Workflow Page toolbar.
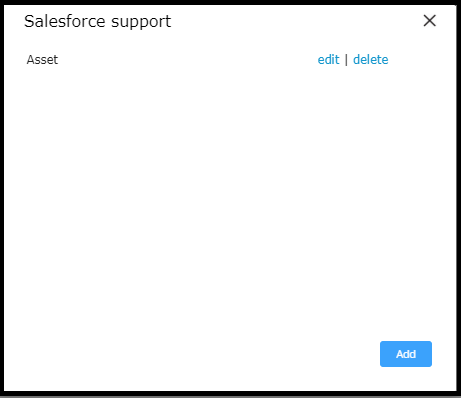
- The Salesforce support page displays.
- The Salesforce support page shows a list of all currently defined Salesforce support configurations for the relationship.
- To create a new Salesforce support configuration, click the Add button.
- To edit an existing Salesforce support configuration, click the edit link for the desired configuration.
Configuring Salesforce Support
You can define a new Salesforce support configuration for the currently selected relationship.
To configure attributes for a new Salesforce object:
- Access the Salesforce support dialog.
- Click the Attributes link on the Salesforce support dialog.
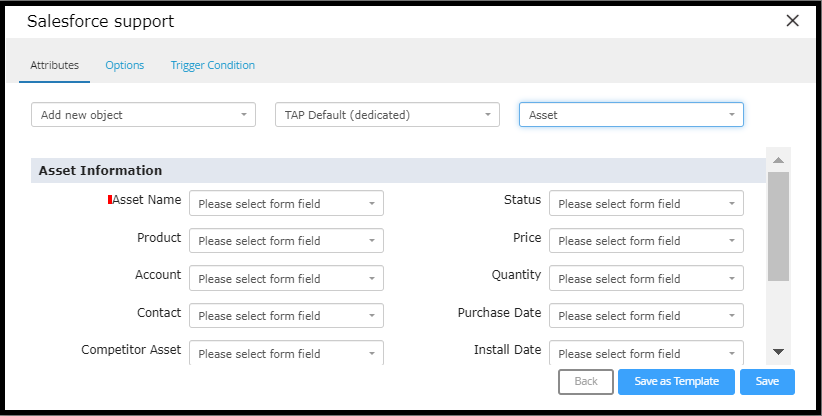
- The Attributes page displays.
- The Attributes page displays.
- Select Add new object from the first drop-down menu.
- To edit attributes for an existing Salesforce object, select Update existing object from the first drop-down menu, then choose the desired object from the Please select object to update menu.
- To edit attributes for an existing Salesforce object, select Update existing object from the first drop-down menu, then choose the desired object from the Please select object to update menu.
- Select the desired Salesforce key from the Please select salesforce key menu.
- The Please select salesforce key menu lists all Salesforce keys for which you may configure Salesforce support.
- The Please select salesforce key menu lists all Salesforce keys for which you may configure Salesforce support.
- Select the desired Salesforce object from the Please select object type menu.
- The Please select object type menu lists all available object types for the selected Salesforce key.
- The Please select object type menu lists all available object types for the selected Salesforce key.
- The Attributes page refreshes to display the specific Salesforce form fields associated with the selected Salesforce object.
- Make the desired selections from each Please select form field menu, as appropriate.
- Mandatory fields are indicated by a red bar preceding the name of the field. All other fields are optional.
- You must make a selection for all mandatory fields.
- When all desired values have been selected, click the Save button to save the Salesforce attributes.
- The Options page displays.
To configure options for Salesforce support:

- Access the Salesforce support dialog.
- Click the Options link on the Salesforce support dialog.
- The Options page displays.
- The Options page displays.
- Enter a name for the Salesforce support configuration in the Label text box.
- Select the desired handling method when a Salesforce error is generated during the workflow from the On salesforce error menu, as desired.
- Throw error - an error is generated for the workflow.
- Skip salesforce support - Salesforce support is terminated for the workflow relationship.
- If Throw error is selected from the On salesforce error menu, use the Salesforce errors menu to select whether to Hide or Show the error.
- The On salesforce error menu is shown only when Throw error is selected from the On salesforce error menu.
- The On salesforce error menu is shown only when Throw error is selected from the On salesforce error menu.
- Select any mandatory attachments for the workflow from the Attachments menu.
- The Attachments menu shows the label for each File upload or Notes & Attachments form field in the workflow form.
- To de-select an attachment, click the X next to the attachment name.
- To de-select an attachment, click the X next to the attachment name.
- The Attachments menu shows the label for each File upload or Notes & Attachments form field in the workflow form.
- Select the desired handling method when to be used a mandatory attachment (selected from the Attachments menu) has not been included in the workflow stage associated with the relationship from the On missing attachments menu.
- Continue - the workflow is allowed to proceed to the next stage.
- Throw error - an error is generated for the workflow.
- Select the desired handling method to be used when a workflow is manually terminated from the On terminate workflow menu.
- Do nothing - no change is made to Salesforce record related to the workflow.
- Update salesforce record - the Salesforce record associated with the workflow is updated upon manual termination.
- When all options have been configured, click the Save button to save the option settings.
To configure trigger conditions for Salesforce support:
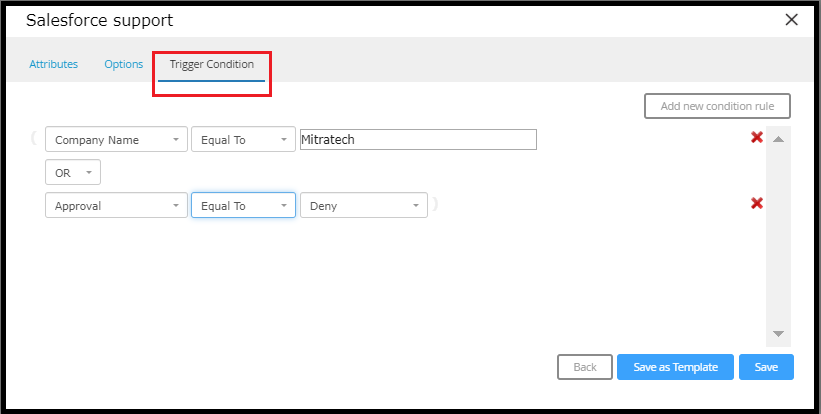
- Access the Salesforce support dialog.
- Click the Trigger conditions link on the Salesforce support dialog.
- The Trigger conditions page displays.
- The Trigger conditions page displays.
- Click the Add new condition rule button to display the condition entry fields.
- Select the form field on which to base the condition from the first Please select menu.
- Select the matching criteria for the condition from the second please select menu:
- Equal to - the condition will be valid when the content of the form field is an exact match to the value specified
- Not equal to - the condition will be valid when the content of the form field is not an exact match to the value specified
- Contains - the condition will be valid when the content of the form field includes the specified value anywhere in the field
- Does not contain - the condition will be valid when the content of the form field does not include the specified value anywhere in the field
- Filled - the condition will be valid when the form field does contain a value (is filled)
- Not filled - the condition will be valid when the form field does not contain a value (is empty)
- Specify the term against which the matching criteria will be applied.
-
Select the desired value from the drop-down menu, or, enter the desired value in the text box, as applicable.
NOTE
When a matching criteria of Filled or Not filled is selected, term options are not applicable.
-
- To add another rule to the condition, click the Add new condition rule button.
- The Conditions dialog refreshes to display a new "select field" menu.
- Choose the Boolean operator to be applied between the rules.
- Select AND if both rules must be met to satisfy the condition.
- Select OR if either rule must be met to satisfy the condition.
- Repeat steps 3 through 5 to specify the conditions for the new rule.
- Repeat step 6 to add additional rules to the condition, as desired.
- When all necessary values for the condition rule have been specified, click the Save button to save the rule.
Editing a Salesforce Support Configuration
TAP can update a record found in a Salesforce records form field or from a previously created record in the workflow process.
NOTE
You can also edit an existing Salesforce support configuration by selecting Update existing object from the Attributes page, then choosing the desired object from the Please select object to update menu.
1.Click the Salesforce support menu after selecting the desired Relationship in the workflow designer

2. Select “Update existing object”. You can now choose either your Salesforce records field or the previously created SFDC record from the workflow process

3.Conduct tests to verify that your records are updating appropriately
To edit a Salesforce support configuration:
- Access the Salesforce support page.
- Click the edit link for the Salesforce support configuration you wish to edit.
- The Attributes page displays.
- The page is pre-filled with the current values for the selected Salesforce support configuration.
- Edit the attributes, options, and trigger conditions for the Salesforce support configuration as desired.
- When all desired changes have been made, click the Save button to save your changes.
Deleting a Salesforce Support Configuration
You can delete an existing Salesforce support configuration from the currently selected relationship.
To delete a Salesforce support configuration:
- Access the Salesforce support page.
- Click the delete link for the Salesforce support configuration you wish to delete.
- The selected Salesforce support configuration is removed from the list.
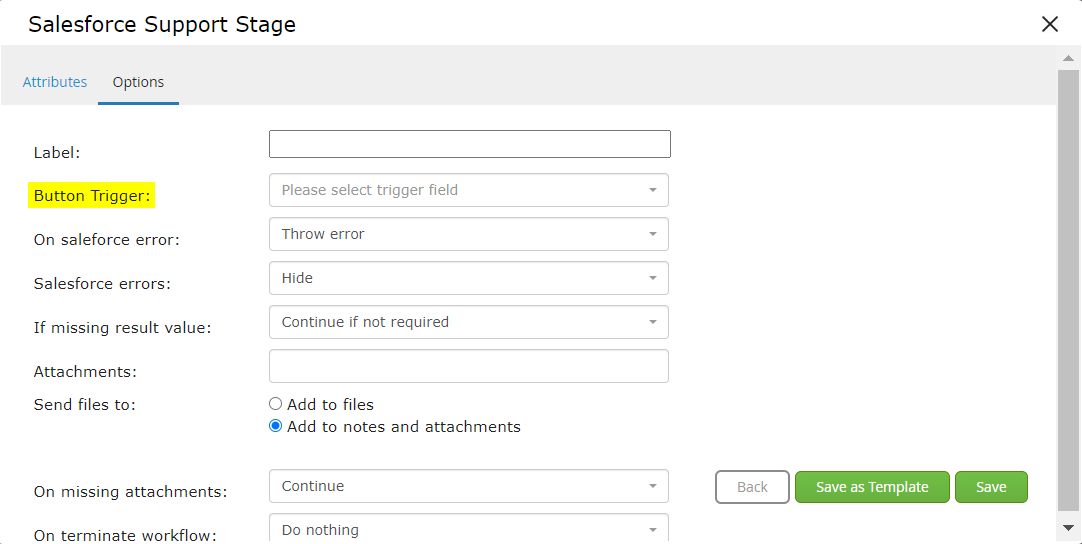
Stage Level Salesforce Support
Stage level Salesforce (SF) Support is essentially identical to relationship level Salesforce Support. The only difference is that when configured at the stage level, a button field is required to trigger the call to Salesforce. Up to 5 calls can be linked to a single button, so you can use this functionality to create or update multiple SF matters on a single stage. To do this, simply add a button field to your form and then select that field in the 'Button Trigger' dropdown in the Salesfore Support Options: