
Pages and Tabs
The Wizards page contains wizards that let you perform a single task on several items, such as:
- Copy Matter: Use a matter as a template to create one or several similar matters.
- Global Assign/Unassign: Assign or unassign entities as players, and assign or unassign players to matters.
- Timekeeper File Import: Import one or several people as timekeepers by using a CSV file.
- Matter Restricted Logical Group Assign/Unassign: Assign or unassign players to matters in the case where the player belongs to a limited logical group and the matter belongs to a different logical group from the player.
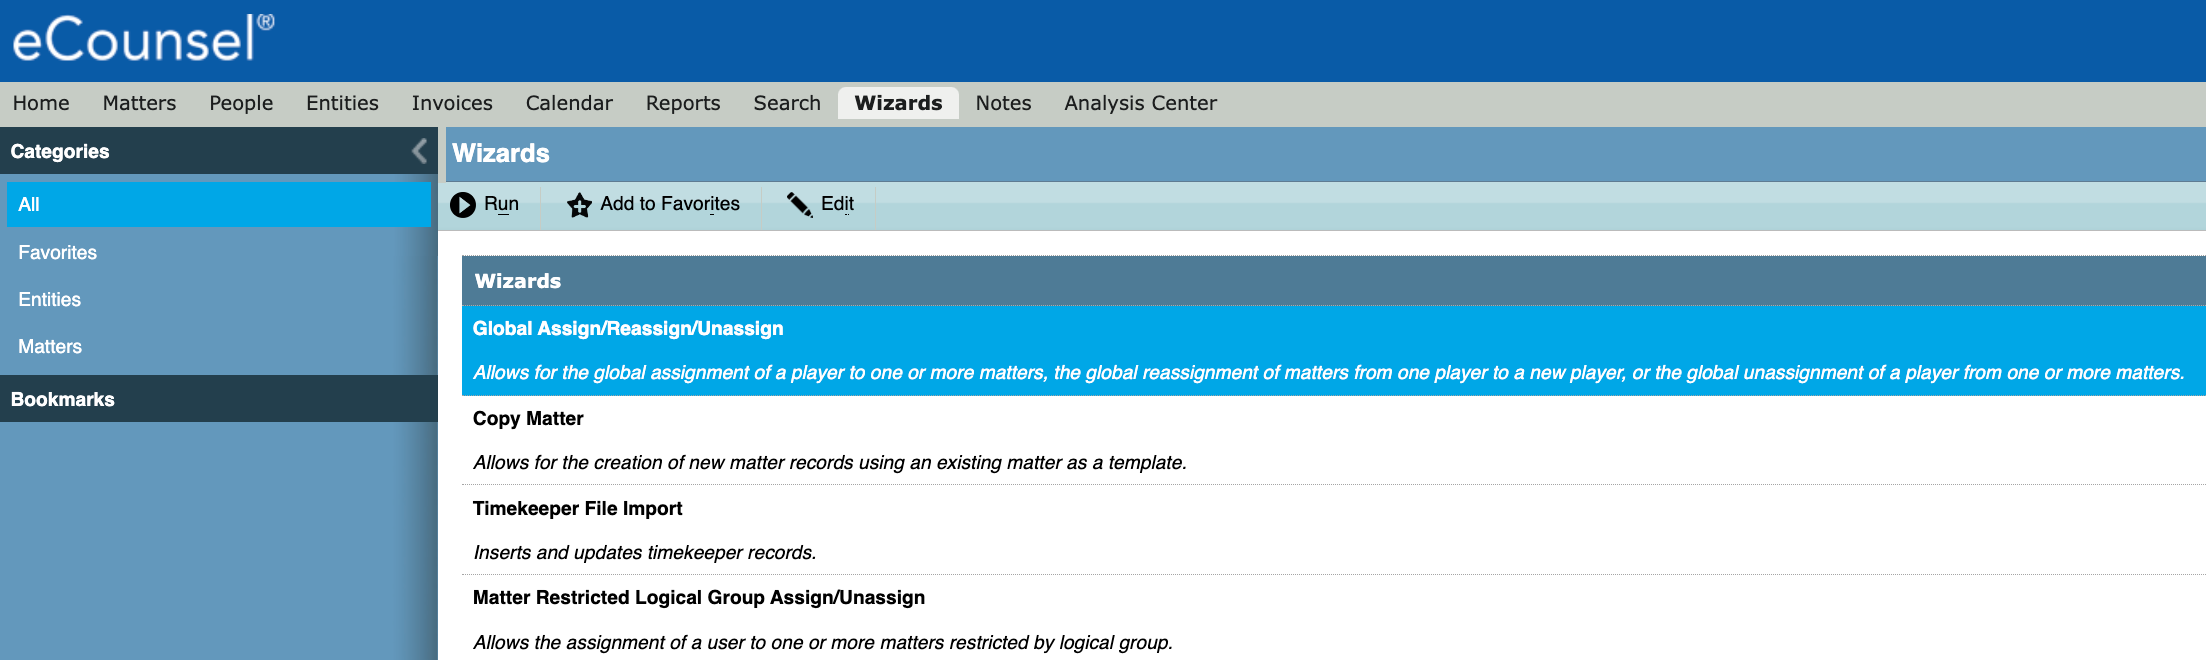
The Categories pane lets you group wizards. All available wizards are listed under All, and it's also the default view. You can add wizards to Favorites. The rest of the categories are determined by the system admin or a user with Wizard Access security attribute rights.
Use the following functionalities to customize your Wizards view:
| Button | Description |
 Run Run |
To use a wizard, select the wizard (it highlights in blue) and then click Run. |
 Add to Favorites Add to Favorites |
To add a wizard to favorites, select the wizard (it highlights in blue) and then click Add to Favorites. |
 Remove from Favorites Remove from Favorites |
To remove a wizard from favorites, select the wizard (it highlights in blue) and then click Remove from Favorites. |
 Edit Edit |
Click edit to modify the view of the wizard:
|
Copy Matter Wizard
The Copy Matter Wizard lets you to create up to 1,000 new matter records at one time using an existing matter as a template. This wizard appears in the Wizards module and the Matters module. The Copy Matter Wizard copies all information to the new matters, with the following exceptions.
- Costs and Time tabs information.
- Parent Budget in the Budget tab.
Additionally, these fields have the following constraints:
- Matter numbers generated by the automatic matter number generator. The automatic matter number generator assigns successive numbers to matters based on a format established by the System admin.
- The legal section, matter type, and logical group cannot be changed on the Copy Matter Wizard. However, you can edit that information in the Matters module.
The Copy Matter Wizard obeys customizations and access rights established by type and view profile. In addition:
- Fields and tabs that are hidden will not display in the Copy Matter Wizard nor will they be copied.
- Fields and tabs that are read-only to the user creating the copies will not be copied.
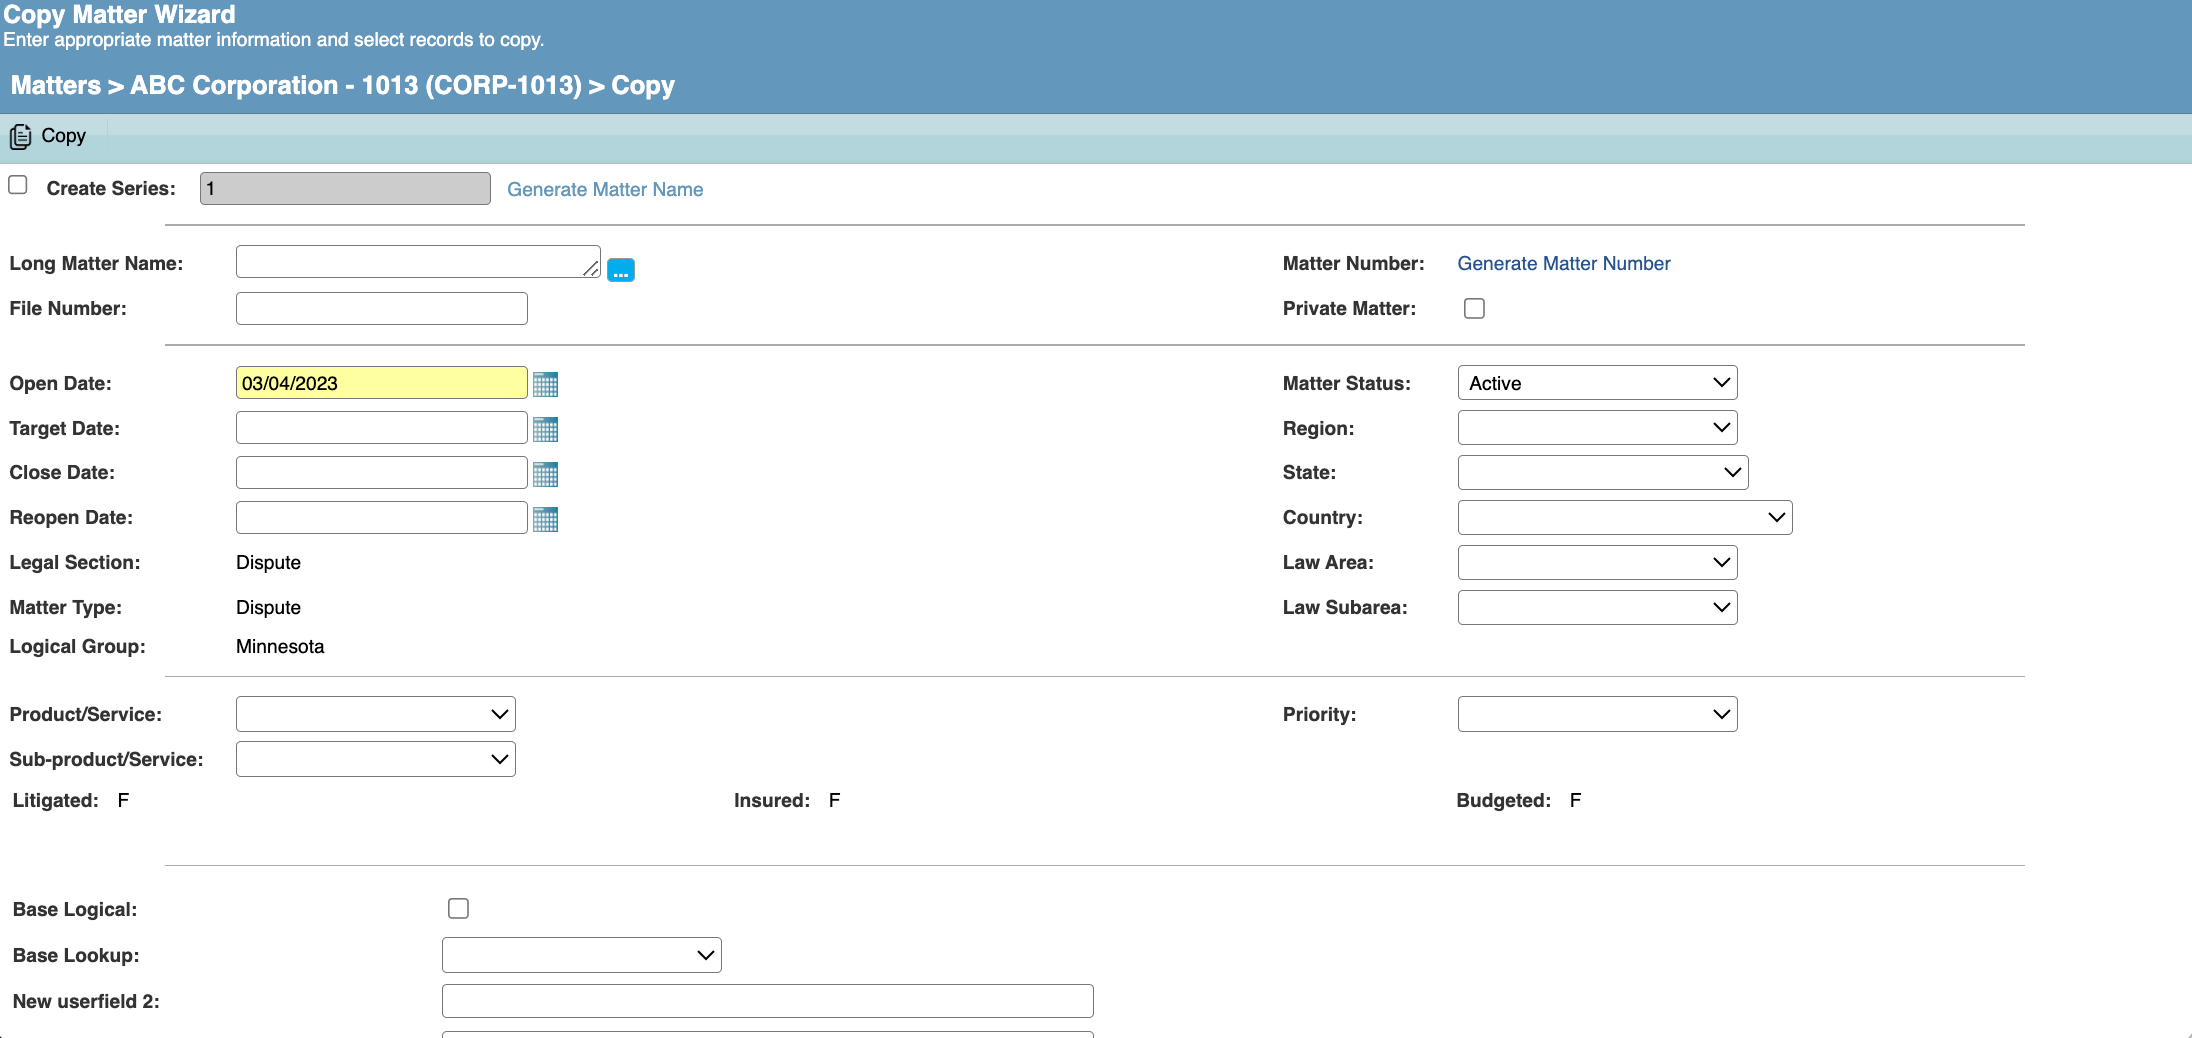
The following table describes the fields contained in the Copy Matter Wizard:
| Field | Description |
| Create Series | To make multiple copies, click Create Series and enter the number of copies. |
| Generate Matter Name | Click Generate Matter Name to open a popup window to assign names to the copies. |
| Long Matter Name | The entire name of the matter. Click the |
| Matter Number | An identifier that is assigned to the matter. |
|
File Number |
An internal identifier for the matter.
|
|
Private Matter
|
A Private Matter has restricted access. A copied matter can be marked as private matter even if the original matter is not private.
|
|
Open Date |
The date the matter was created. Click the Calendar button to select a date from a calendar.
|
| Target Date | The date the matter should be resolved. Click the Calendar button to select a date from a calendar. |
| Close Date | The date the matter was completed. Click the Calendar button to select a date from a calendar. |
| Reopen Date | The date the matter was reopened if applicable. Click the Calendar button to select a date from a calendar. |
| Matter Status | The current status (such as Active or Closed) of the matter. |
|
Region |
A user-defined geographic area that applies to the matter. |
|
State |
The state in which the matter was opened. |
| Country | The country in which the matter was opened. |
|
Legal Section |
The legal section (such as Litigation) for the matter. |
| Matter Type | The classification (such as Litigation) of the matter. |
| Logical Group | The category, such as a business unit, to which the matter belongs. |
| Law Area | The area of law associated with this matter. Law areas are defined by the System Administrator. |
|
Law Sub Area |
A sub-classification within the area of law. |
|
Product/Service |
The product or service associated with this matter. Products and services are defined by the System Administrator. |
|
Sub-product/Service |
A sub-classification within the product or service. |
| Priority | The priority of the matter. |
| Litigated | If a T appears next to the field, the Dispute tab is available. |
| Insured | If a T appears next to the field, the Insurance tab is available. |
| Budgeted | If a T appears next to the field, the Budget tab is available. |
| Comments | Click the … button to open a dialog box to edit the comment. |
| Additional sections | Information that has been configured on the tabs other than the Base Info tab appears at the bottom of the page. Click on any checkboxes to copy the specified information. For example, the Active Player section lists all players for the current matter. Click a checkbox next to a name to select the player for the copied matter. |
The following table describes the buttons functionality:
| Button | Description |
 Copy Copy |
Create the copies of the selected matter using the specified information. |
 Cancel Cancel |
Close the wizard without saving any changes. |
Global Assign/Unassign Wizard
The Global Assign/Reassign/Unassign Wizard performs the following tasks:
- Global Assign: Assigns a player to one or more matters.
- Global Reassign: Reassigns matters from one player to new players.
- Global Unassign: Unassigns a person or entity as an active player from one or more matters.
Additionally, the Global Assign/Reassign/Unassign Wizard reassigns appointments, tasks, and pending invoices.
Note: Invoices that have timed-out are not reassigned.
Use the following controls to navigate the Global Assign/Reassign/Unassign Wizard:
| Button | Description |
| Back | Go to the previous page. |
| Next | Go to the next page. |
| Cancel | Cancel the wizard. |
| Close | Close the wizard. |
| Finish | Save and close the wizard. |
| Print the wizard. |
Global Assign
Enter the following information in the Global Assign form. The information changes depending on whether you enter a person or an entity (company) as a player in a matter(s).
Global Assign for a Person as a Player
Fill in the following information when a person is selected as a player.
| Field | Description |
| Name | Enter the name of the person. |
| Billing Method |
Enter one of the following options:
|
| Billed Rate | Enter the cost of the fee. |
| Approver/Reviewer Status [A/R] | Check if the player is an approver/reviewer of invoices for the matter. |
| Approval Amount | The maximum amount that the person can approve in an invoice. |
| Approval/Review Order | The order in which the person is assigned an invoice to approve/review. |
| Start Date | The date on which the person is assigned as a player for the matter. |
| Player Type |
Enter one of the following options:
|
| Role | Select the role from the dropdown box. The roles available are dependent on the Player Type selected. |
Global Assign for an Entity as a Player
Fill in the following information when an entity (company) is selected as a player.
| Field | Description |
| Name | Enter the name of the entity. |
| Chargeback |
Check Chargeback to use the entity's chargeback/allocation information for the matter's invoices to which the entity is assigned. If Chargeback is checked, enter Chargeback Percent and up to three Chargeback Accounts. Note: By default, eCounsel uses the chargeback information of the entity configured in the Base Info tab. |
| Chargeback Percent | Enter the chargeback percent if you check Chargeback. |
| Chargeback Account 1 | Enter the deposit account if you check Chargeback. |
| Chargeback Account 2 and Chargeback Account 3 | You can enter two additional deposit accounts if Chargeback is selected. |
| Start Date | The date when the entity is assigned as a player for the matter. |
| Player Type |
Enter one of the following options:
|
| Role | Select the role from the dropdown box. The roles available are dependent on the Player Type selected. |
Global Reassign
Reassign matters from one player to another. The information entered in the form changes depending on whether you enter a person or an entity (company) as a player in a matter(s).
Global Reassign for a Person as a Player
Fill in the following information when a person is selected as a player.
| Field | Description |
| Name | Enter the name of the person. |
| Billing Method |
Enter one of the following options:
|
| Billed Rate | Enter the fee. |
| Approver/Reviewer Status [A/R] | Check if the player is an approver/reviewer of invoices for the matter. |
| Approval Amount | The maximum amount that the person can approve in an invoice. |
| Approval/Review Order | The order in which the person is assigned an invoice to approve/review. |
| Start Date | The date on which the person is assigned as a player for the matter. |
| Player Type |
Enter one of the following options:
|
| Role | Select the role from the dropdown box. The roles available are dependent on the Player Type selected. |
| Calendar Options |
Check the options that you want to configure:
|
| Invoice Option |
Check Replace the existing player with the new player for all invoices requiring approval if needed. |
Global Reassign for an Entity as a Player
Fill in the following information when an entity (company) is selected as a player.
| Field | Description |
| Name | Enter the name of the entity. |
| Chargeback |
Check Chargeback to use the entity's chargeback/allocation information for the matter's invoices to which the entity is assigned. If Chargeback is checked, enter Chargeback Percent and up to three Chargeback Accounts. Note: By default, eCounsel uses the chargeback information of the entity configured in the Base Info tab. |
| Chargeback Percent | Enter the chargeback percent if you check Chargeback. |
| Chargeback Account 1 | Enter the deposit account if you check Chargeback. |
| Chargeback Account 2 and Chargeback Account 3 | You can enter two additional deposit accounts if Chargeback is selected. |
| Start Date | The date when the entity is assigned as a player for the matter. |
| Player Type |
Enter one of the following options:
|
| Role | Select the role from the dropdown box. The roles available are dependent on the Player Type selected. |
| Calendar Options |
Check the options that you want to configure:
|
| Invoice Option |
Check Replace the existing player with the new player for all invoices requiring approval if needed. |
Global Unassign
Unassign matters from one player by entering the following information.
| Field | Description |
| Name | Enter the name of the person or entity. |
| End Date | Enter the date when the player becomes inactive. |
| Player Type |
Enter the Player Type of the person/entity to unassign:
|
| Role | Enter the role of the person/entity to unassign. |
Timekeeper File Import Wizard
The Timekeeper File Import Wizard allows you to import a Comma-Separated Values (CSV) file that contains information about people who bill time against matters in eCounsel. Electronic invoices can then be submitted to eCounsel for the timekeeper and any business rules (such as a maximum billing rate, etc.) can be enforced. For information about how to fill the timekeeper import CSV file, see Timekeeper Import Functionality.
eCounsel imports timekeeper information as follows:
- If the vendor identifier does not match the tax identifier in eCounsel for an entity, the import fails.
- If a timekeeper does not exist in eCounsel, but the vendor does, the wizard adds a new people record for the timekeeper and creates an employment record for the timekeeper with the vendor.
- If both the vendor and timekeeper already exist in eCounsel, but the timekeeper is not an employee of the vendor, the wizard creates an employment record for the timekeeper with the vendor.
- If both the vendor and timekeeper already exist in eCounsel and the timekeeper is an employee of the vendor, a new employment record with the updated billing information is added for the timekeeper for the vendor if the billing rate in the import file does not equal the primary rate in eCounsel. In addition, the previous employment record is modified with the begin date for the new rate as the end date for the record. If multiple employment records already exist and the rates do not match, a new record is created and no other employment records is modified (although a warning message will appear for the situation).
- If the timekeeper already exists in eCounsel, but the telephone or e-mail information differs from the existing information, eCounsel creates a new communication record with the imported information.
- If the timekeeper record already exists, but the rate is different, the wizard performs the following actions:
- Creates a new record with the updated information.
- Makes the end date of the existing record equal to the date before the start date of the new record.
- Makes the existing record inactive.
- In order to import phone numbers, communication lookup types of Phone - Business and Phone - Mobile are required.
The Timekeeper File Import Wizard can only import a maximum of 500 records from the import file at one time. If you are importing more than 500 records, use multiple import files and repeat the steps to import each one separately.
Beginning with Suite 8.11.0 Service Pack 12, if you have hidden the gender/ethnicity fields in eCounsel by view profiles, the Timekeeper File Import Wizard will not display this information and the data for these fields will not be saved to the database.
Use the following controls to navigate the Timekeeper File Import Wizard:
| Button | Description |
| Back | Go to the previous page. |
| Next | Go to the next page. |
| Cancel | Cancel the wizard. |
| Print the wizard. | |
| Import Another File | Restart the wizard to import another CSV file. |
| Close | Ignore changes and close the wizard. |
| Reject | For Corridor integrations only, click to reject the timekeeper record for a Corridor vendor. |
For information about how to fill the timekeeper import CSV file, see Timekeeper Import Functionality.
See Exporting Timekeeper Information to obtain the timekeeper import CSV file.
To import a CSV file using the Timekeeper File Import Wizard:
1. Run the Timekeeper File Import Wizard.
2. Click Choose File... and upload the CSV file with the timekeeper information.
3. Click Next.
4. If you use an outdated CSV file, eCounsel will show a warning and a link to download the current CSV template. Otherwise, the imported data appears in the Review and Update window.
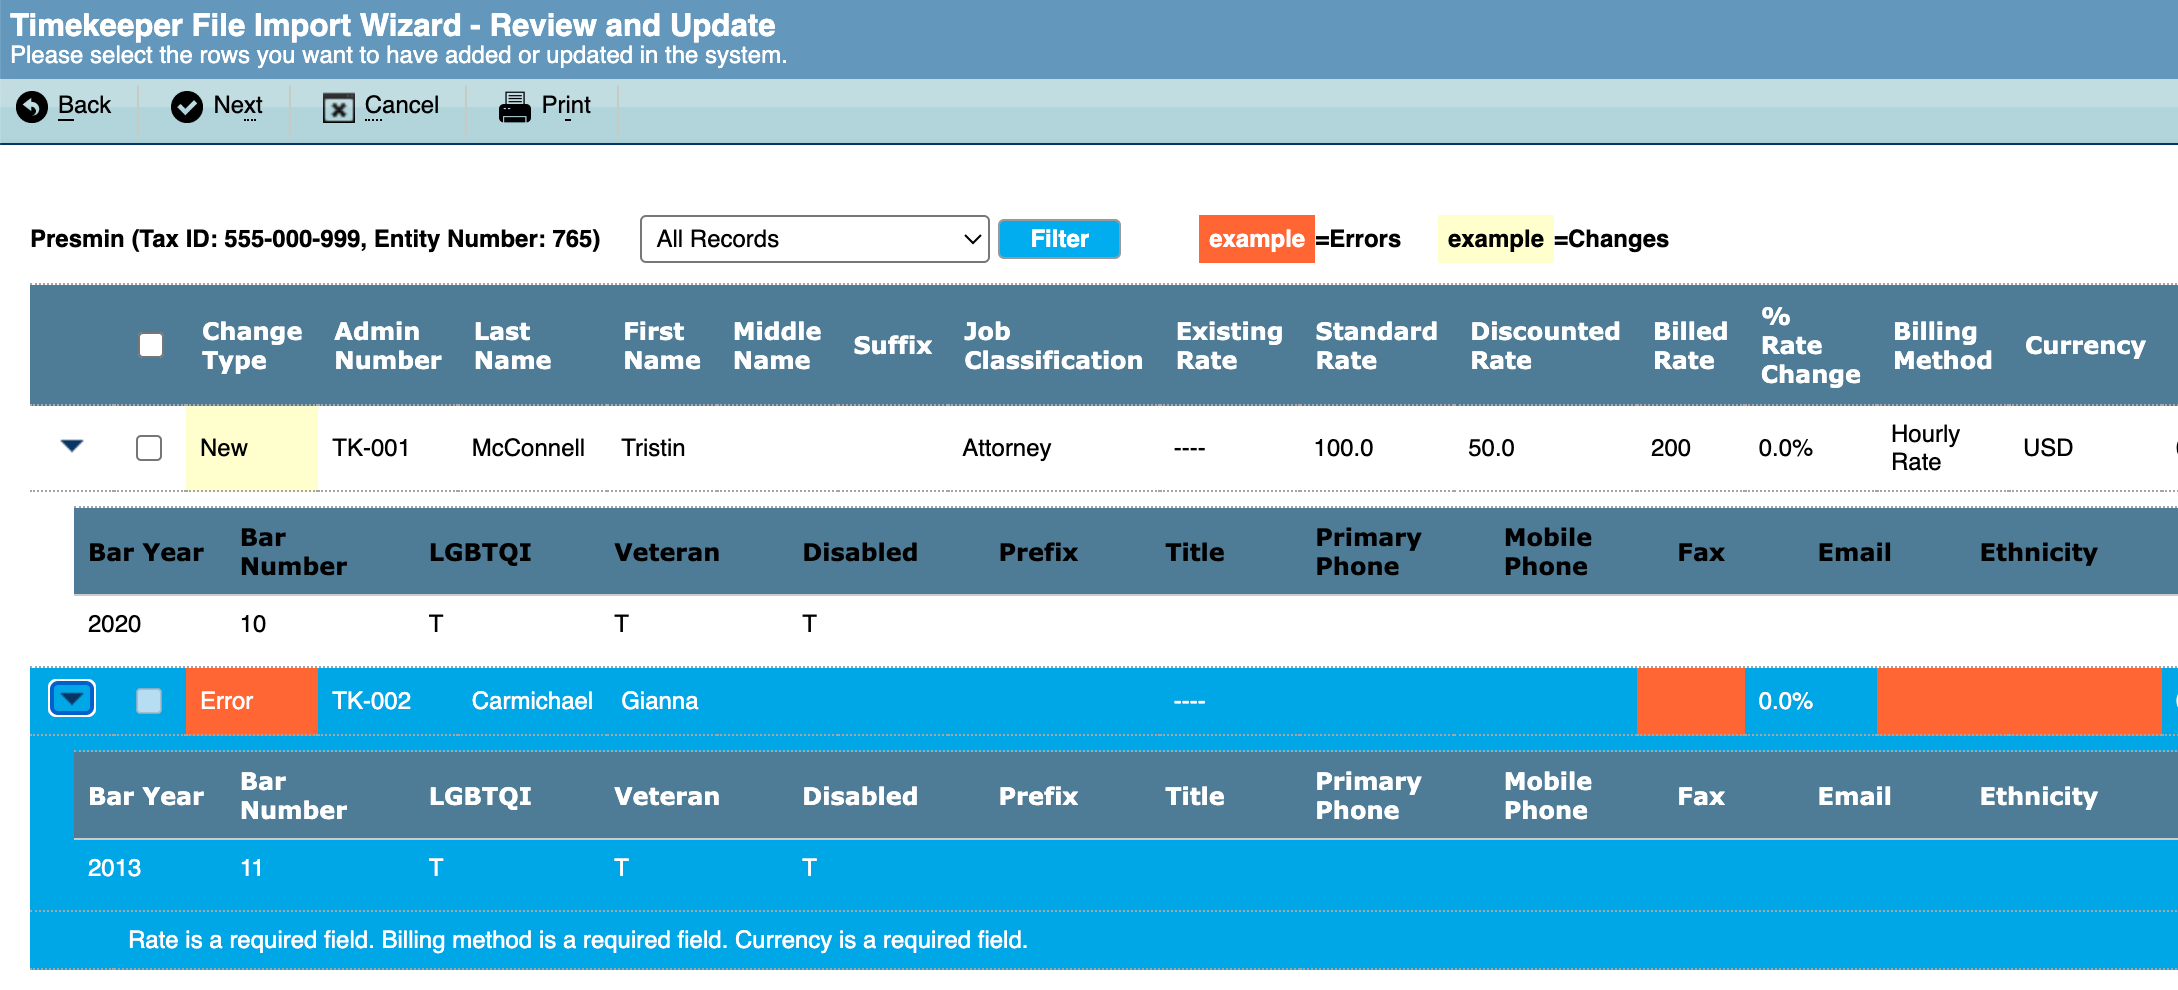
5. If an error appears, click Cancel and correct the CSV file. Use the left arrow to expand the entry and display the errors. For example, for the screenshot, the second entry has Rate, Billing method, and Currency missing.
6. The Review and Update window has the following controls.
| Filter |
Select the filter from the drowdown list and click Filter. Available values from the dropdown list are:
|
| Checkboxes | Use the checkboxes to select the entries that will be imported to eCounsel. |
| Expand arrow | Use the expand arrow to display all the values for a row and the errors encountered, if applicable. |
7. After you select the entries to import, click Next.
8. In the window with the data to import, click Save to complete the import process.
Matter Restricted Logical Group Assign/Unassign
The Matter Restricted Logical Group Assign/Unassign Wizard (MRW) lets admins configure permissions for users to view or edit matters that don’t belong to their logical group.
See Matter Restricted Logical Group Assign/Unassign for instructions to use the MRW wizard. See Configuring a User or Group in a Logical Group to configure the logical group.