
Tools Page
The Tools page allows you to view information concerning the Suite application, change your password, customize preferences, or request an enhancement.
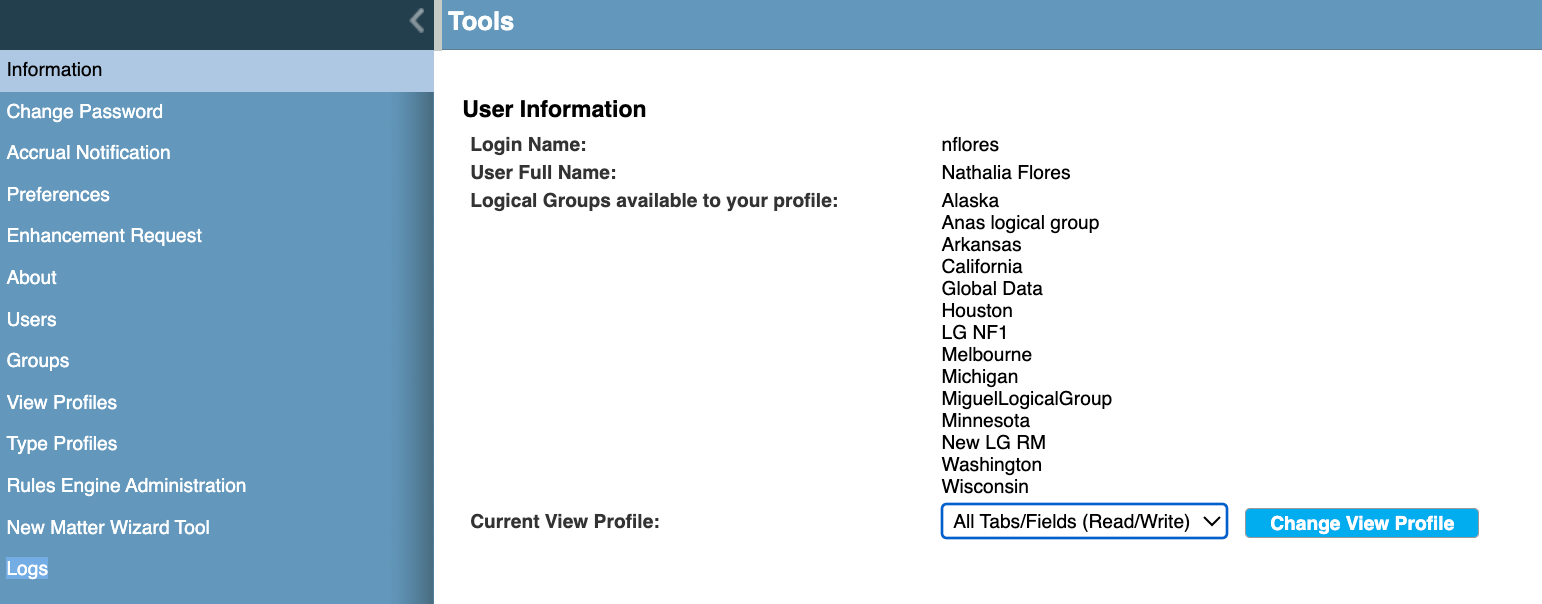
Information Tab
Contains information concerning the current user and database settings. In addition, the user can change the view profile if multiple view profiles are assigned to the user. If the user has the ability to switch between view profiles, the most restrictive security will be applied.
Change Password Tab
Select this command to change your Suite login password.

After entering the old and new passwords, click Save.
Accrual Notification Tab
Select this tool to customize the e-mail sent when accruals are due and to create the schedule for sending the accrual notifications. See Working with Accruals for more information.

Enhancement Request Tab
The Enhancement Request tab contains a link to Mitratech ideas portal, where you can enter features or changes that you would like to see in Suite. Also, you can vote for ideas entered by other users.
About Tab
Displays Suite version information. Click Support Information to see a list of patches applied to the release.
Logs Tab
This tab is included with Suite 8.11.0 Service Pack 2 and can only be accessed by users with Diagnostics Administration security rights. You must be assigned the View Logs security attribute to view log files that do not contain login information, and in addition, you must be assigned the View Security Logs to view log files that contain login information.
Logs tab contains two tabs: Logs and System Appenders
Users Tab
This tab is included with Suite 8.10 Service Pack 8 and Suite 8.11 Service Pack 5 and can only be accessed by users with Accounts Administration security rights.
Select this tab to view a list of users and their descriptions, with the ability to filter and search users by User Name, Login Name, Inactive status(T/F), Locked Out status (T/F), Last Login, and Expiration Date. You can view and print summaries or export the list to a CSV file.
Groups Tab
This tab is included with Suite 8.10 Service Pack 8 and Suite 8.11 Service Pack 5 and can only be accessed by users with Accounts Administration security rights.
Select this tab to view a list of groups and their descriptions, with the ability to search groups by description. You can view and print summaries or export the list to a CSV file.
View Profiles Tab
This tab is included with Suite 8.10 Service Pack 8 and Suite 8.11 Service Pack 5 and can only be accessed by users with View Profiles Administration security rights.
Select this tab to view a list of View Profiles and their descriptions, with the ability to search View Profiles by description. You can view and print summaries or export the list to a CSV file.
Type Profiles Tab
This tab is included with Suite 8.10 Service Pack 8 and Suite 8.11 Service Pack 5 and can only be accessed by users with View Profiles Administration security rights.
Select this tab to view a list of Type Profiles and their descriptions, with the ability to search Type Profiles by description. You can view and print summaries or export the list to a CSV file.
Timekeeper Notification Tab
To access the new Timekeeper Notification Page, users must first be granted Allow Access to Timekeeper Notifications permissions by Admin.
This is done through the following steps:
- Navigate to Manager → Users and Groups→ click Edit.
- Go to the Security Attributes tab → eCounsel section.
- Locate and set Allow access for the new option: Allow Access to Timekeeper Notifications and click Save.

Once access is granted, the user can proceed to the E-Counsel and click on Tools → Timekeeper Notification. On this page, users can configure the following fields:
- From
- CC
- Subject
- Body
Additionally, the entire feature can be toggled on or off by marking the checkbox. And click Save.

Go to Home and click Timekeepers are Awaiting Approval.

And in the pop-up window appears, Click Send to Timekeeper File Import Wizard.

In the pop-up box appears, select the items for rejection and click Reject.
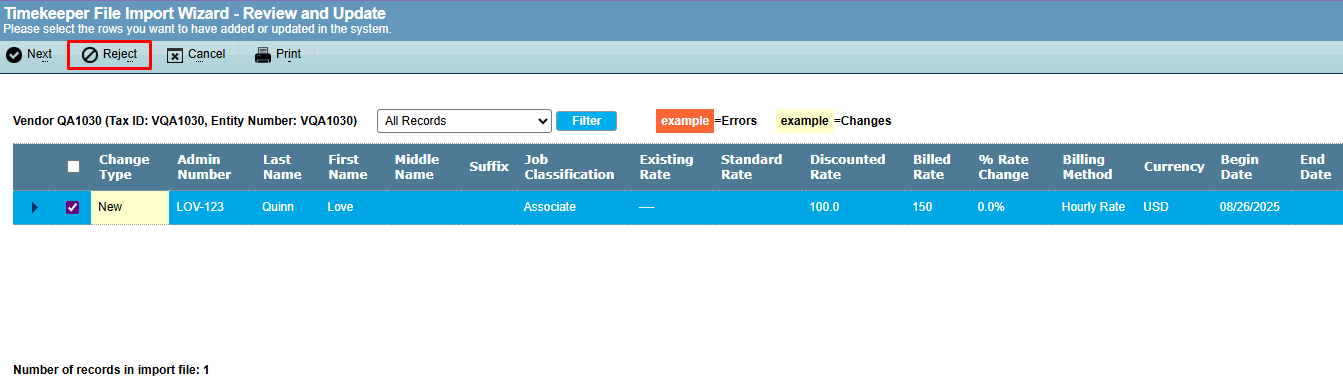
In the Rejection Comments box, add necessary comment before confirming the rejection by clicking the reject button again.

Vendors will receive a notification email confirming that details about the rejected timekeepers.

Preferences Tab
The Preferences tab in Tools is where you can personalize Suite. All preference settings are tied to your user ID; these settings go with you from computer to computer. Changes that you make here do not affect other users.
Each tab of the eCounsel user interface has different parameters that you can customize.
- Matters
- People
- Entities
- Invoices
- Timekeeper Mapping Settings
- Business Objects (premium feature)
- Calendar
- Date and Time
- Office Link (premium feature)
- Reset Preferences
Matters Preference Settings
Matter preference settings can be accessed through the Tools page.

Fields
Always open matters with the summary view open – If selected, the Matters Summary page will display when the matter record is first opened.
Number of MRAs to store in the database – Determines the total MRA (Most Recently Accessed) records to display on the Matters List page.
Note: After changing this field, you must open a record in the module list page before the new setting will take effect.
Private Matters Override – If an administrator has granted you access to view private matters, click this checkbox so that private matters will be viewable. Even if you have the security access to view private matters, you will not see the records unless you click on this checkbox.
Default values for new matters (only available with Suite 8.11 SP 9 and later)
Legal Section - When a user creates a new matter, the Legal Section is populated with this value by default.
Matter Type - When a user creates a new matter, the Matter Type is populated with this value by default.
Logical Group - When a user creates a new matter, the Logical Group is populated with this value by default.
Buttons
Save – Click to save changes.
People Preference Settings
People preference settings can be accessed through the Tools page.

Fields
Always open people with the summary view open – If selected, the People Summary page will display when the people record is first opened.
Number of MRAs to store in the database – Determines the total MRA (Most Recently Accessed) records to display on the People List page. After changing this field, you must open a record in the module list page before the new setting will take effect.
Buttons
Save – Click to save changes.
Entities Preference Settings
Entities preference settings can be accessed through the Tools page.

Fields
Always open entities with the summary view open – If selected, the Entities Summary page will display when the entity record is first opened.
Number of MRAs to store in the database – Determines the total MRA (Most Recently Accessed) records to display on the Entities List page. After changing this field, you must open a record in the module list page before the new setting will take effect.
Use Entity Short Name in selection screens – If selected, the abbreviated name for the entity will be used when searching for entities using the grid list.
Buttons
Save – Click to save changes.
Invoices Preference Settings
Invoices preference settings can be accessed through the Tools page.

Fields
Always open invoices with the summary view open – If selected, the Invoices Summary page will display when the invoice record is first opened.
Use one-page form when creating new invoices – If selected, invoices can be created from a single dialog box.
Number of MRAs to store in the database – Determines the total MRA (Most Recently Accessed) records to display on the Invoices List page. After changing this field, you must open a record in the module list page before the new setting will take effect.
Buttons
Save – Click to save changes.
Timekeeper Mapping Settings
To access the Timekeeper Mapping Settings Page, users must first be granted Allow Access to Timekeeper Mappings permissions by Admin. This is done through the following steps:
- Navigate to Manager → Users and Groups→ click Edit.
- Go to the Security Attributes tab → eCounsel section.
- Locate and set Allow access for the new option: Allow Changes to Timekeeper Mapping and click Save.

Timekeeper Mapping Settings allows users to customize templates for importing timekeepers and manage the import process. Accessed by navigating through Tools → Preferences → Timekeeper Mapping Settings.
you can customize the template for importing timekeepers via a CSV file. You can check the fields you want to include in the CSV file for later import using the wizard.
Note: Certain fields are mandatory and cannot be unchecked as they are required for timekeeper import. These include:
- Vendor Tax ID
- Timekeeper ID
- Last Name
- First Name
- Billed Rate
- Billing Method
- Currency
Once the desired fields for your template are selected, click, Save → OK. Click Export CSV to download your customized template.

After customizing and exporting your template, you can use it to import timekeepers. If you need to edit the CSV file, Open the exported CSV file and update changes and save the changes to the CSV file.
To Run the Timekeeper File Import Wizard, Go to the Wizard → Timekeeper File Import.

Click Choose File and select your customized CSV template and Click Next.

The wizard will display all fields from your CSV file with their coded values. Select the timekeeper(s) and Click Next.

Click Save to complete the import.

You will see confirmation that the timekeeper has been successfully imported with your customized template and then click close.

When a user attempts to import a timekeeper with an incorrectly formatted CSV, the system displays an error message. This message provides a hyperlink to download an updated sample timekeeper CSV template, which includes all necessary fields. Users can then edit and save this correct template, and successfully re-import the timekeeper using the wizard

Note: For Client instances integrated with Corridor and eCounsel TK Mapping enabled, Corridor CSV files will retain their original format without disruption, ensuring seamless processing from lobby to wizard upon receiving notifications and flags are introduced to differentiate between:
- Corridor CSV files (flagged as original_format), processed as per existing integration workflows.
- Custom CSV files (flagged as custom), processed based on fields selected in TK Mapping Settings.
And clients using Collaborati integration do not have this capability.
BusinessObjects Settings
![]() Premium feature – A registration key code is required to activate.
Premium feature – A registration key code is required to activate.
BusinessObjects preference settings can be accessed through the Tools page. Select Business Objects to configure a specific BusinessObjects user account from which to execute standard reports.

Fields
BusinessObjects User Name – When using named accounts, the user account to be used to run reports.
BusinessObjects Password – The corresponding password for the above user account.
Buttons
Save – Click to save changes.
Test Login – Click to verify that the BusinessObjects user name and password combination is valid.
Calendar Preference Settings
System-wide settings for Microsoft Office integrations are the same for all users and for all records and are performed by the System Administrator using Suite Manager. However, each user must specify his/her e-mail address in order to receive appointments/tasks from eCounsel.

Fields
E-mail Address – The e-mail address of the current user. This setting ensures that appointments and tasks are sent to Microsoft Outlook.
Buttons
Save – Click to save changes.
Date and Time Preference Settings
System-wide settings for date/time display of calendar appointments are the same for all users and for all records and are performed by the System Administrator using Suite Manager. However, users can override the system default to display dates/times for calendar appointments in a user-specified format.
Note: The first time you open the Date and Time settings on the Preferences tab of the Tools page in eCounsel, the system will attempt to set the time zone based on the system-wide settings for Suite (configured by your System Administrator).
Adjust the settings as needed. These settings override the system-wide settings from Suite Manager.

Fields
Time Zone – The time zone to use to display dates/times for calendar appointments. An offset will be calculated and applied if needed to the server time, which is stored in UTC – Universal Coordinated Time (formerly called GMT – Greenwich Mean Time).
Format – User-specified display settings for date/times for calendar appointments.
Date Separator – The character (such as a forward slash) used between date fields.
Day Size – The number of digits (either one or two) to display for the day.
Month Size – The number of digits (either one or two) to display for the month.
Year Size – The number of digits to display for the year.
Order of Date Fields – The order in which the date fields appear.
Hours – The type of clock (either 12-hour or 24-hour) that is used to display time.
Hour Size – The number of digits (either one or two) to display for the hour.
Seconds – An indication of whether seconds are shown or not.
Buttons
Save – Click to save changes.
Reset Preferences
You can reset user preferences in the Reset Preferences tab. The tab divides preferences by module. Use Others to reset preferences for Dynamic Filters, Business Objects, and Date and Time.
The Preferences modules are:
- Matters
- People
- Entities
- Invoices
- Reports
- Search
- Wizards
- Others
To reset the user preferences for a module, select the checkbox next to the module and clik Reset Preferences. On the modal that appears, click OK to confirm. To reset all user preferences, select the checkbox next to Module.

Rules Engine Administration Settings
For rules within eCounsel, some rules require the installation of configuration or property files that are customized per client and the installation of utility files in the form of JAR files that are specific for the rule. If your system administrator has enabled Rules Administration in Suite Manager System Settings and your user has been granted Rules Engine Administration rights, you can access the Rules Engine Administration tab on the Tools page.
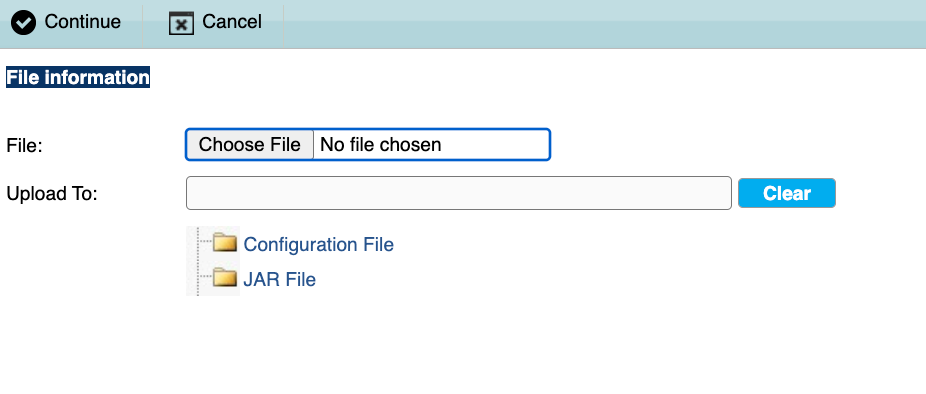
Fields
File – The file to upload. Only configuration or property files and JAR files can be uploaded. If the file already exists in the folder, it will be backed up prior to uploading the new file.
Upload To – Select either Configuration File or JAR File for the respective file upload.
Buttons
Choose File – Click to open a file explorer to select the property or JAR file to upload.
Clear – Click to remove the current folder to which the file will be uploaded.
Continue – Click to upload the file to the selected folder.
Cancel – Click to exit the dialog box without uploading the file.