
Remote I-9 Workflows
Different Remote Form I-9 Workflows
There are Five different ways to create a new Remote Form I-9 record in the Tracker I-9 system.
Section 1 Only: The employee completes Section 1 remotely. The employer completes Section 2 at a later time.
Employer Appoint: The employee completes Section 1 remotely. An authorized Employer Representative completes Section 2.
Employee Appoint: The employee completes Section 1 remotely and designates an Authorized Employer Representative to complete Section 2.
Network Alliance: The employee completes Section 1 remotely and schedules an appointment with an Authorized Employer Representative from Network Alliance who completes Section 2.
I-9 Pro: Employee completes Section 1 remotely and also instructs the employee to schedule an appointment date/time to meet with an I-9 Pro representative via a live interactive video meeting to complete Section 2. This workflow is available only when the I-9 Pro feature is enabled and the employee’s worksite is E-Verify enabled.
I-9 Pro + E-Verify: Employee completes Section 1 remotely and is instructed to schedule an appointment date/time to meet with an I-9 Pro representative via a live interactive video meeting to complete Section 2. In addition, the I-9 Pro representative may also administer the associated E-Verify case for eligible statuses. This workflow is available only when the I-9 Pro + E-Verify feature is enabled and the employee’s worksite is E-Verify enabled.
Creating a New Remote Form I-9
Follow the steps below to create a new Remote Form I-9:
Note: Remote Form I-9 options will not appear unless they are enabled for your Tracker account.
- Click the Create New I-9 : New Employee buttons or select Create New Form I-9 from the Manage I-9 dropdown menu.
- Select Create New I-9: New Employee if the employee does not already have a profile in Tracker or Create New I-9: Existing Employee if they do have a profile in the Tracker I-9 system.
- For new employees who do not currently have a profile in Tracker I-9, you will need to fill out a profile for them.
- For active or inactive employees who already have a profile in Tracker I-9, you will just need to search for and view their profile.

Remote Section 1 Only
- Select Section 1 Only.
- Enter the employee’s Email Address and Start Date, then click Create I-9.
- The employee receives an email to complete Section 1.
- Once the New Hire completes Section 1, the I-9’s Next Action will become Complete Section 2.
- Complete Section 2.
- Correct any Validation Alerts, if present.
- Sign Section 2.

Employer Appoint
- Select Employer Appoint.
- Enter the Employee’s Start Date, Employee and Authorized Employer Representative’s email address, and click Create I-9.
(Note: You can choose to fill the Authorized Employer Representative’s details while creating Remote Form I-9 or later.) - An email will be sent to the New Hire to complete Section 1 and an email to the Authorized Employer Representative notifying them that they have been identified as the representative to handle Section 2 of this remote I-9.
- Once the New Hire completes Section 1, another email will be sent to the Authorized Employer Representative to complete Section 2.
- Once the Authorized Employer Representative has completed Section 2, the I-9 will update as needing to reviewed and approved by an I-9 manager.
- Access the I-9, review the information submitted for Section 1 and Section 2, and Accept or Reject the I-9.

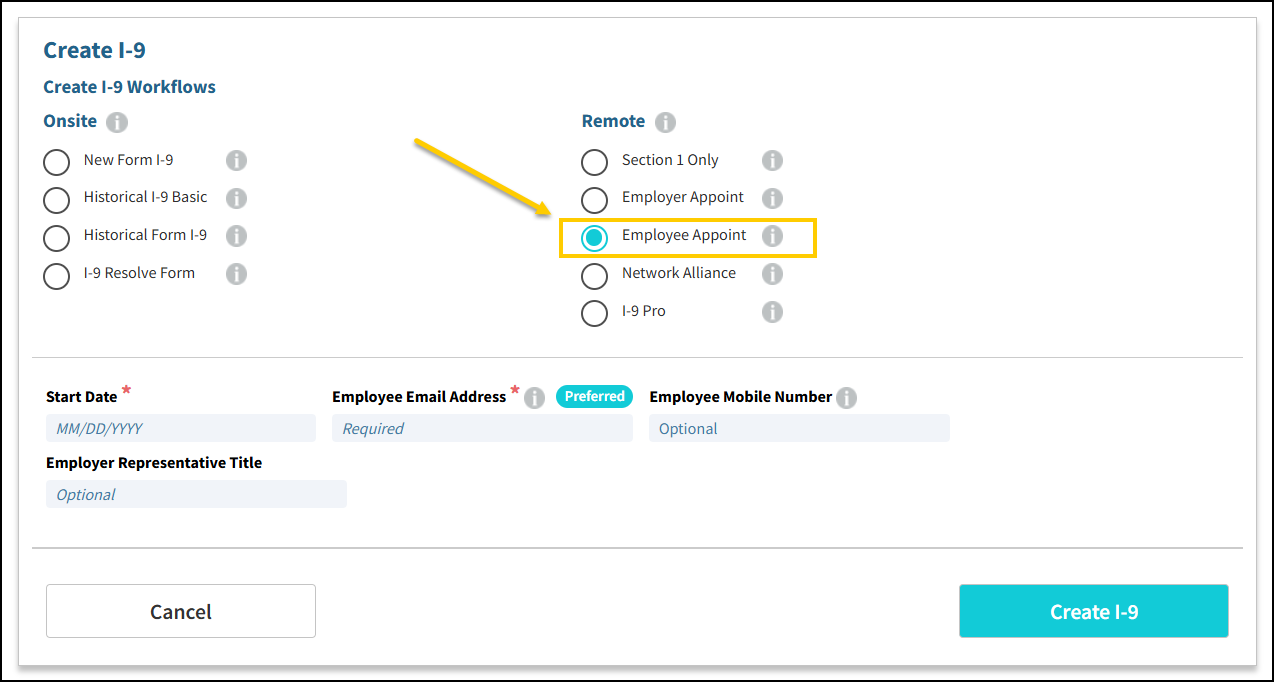
Employee Appoint
- Select Employer Appoint, enter the Employee’s Start Date, Employee and Authorized Employer Representative’s Title (optional), and click Create I-9.
- An email will be sent to the New Hire to complete Section 1 and to fill the details of Authorized Employer Representative to complete Section 2.
- The next step is for the New Hire to present the identity and U.S. employment authorization document(s) to an authorized employer representative who must complete Section 2 of the Form I-9.
Network Alliance
- Select the Network Alliance Form I-9 option, enter the Employee’s Start Date, and Employee's Email Address, then click Create I-9.
- The system will ask the I-9 Manager to confirm that they want to create a Network Alliance Form I-9. Each Network Alliance Remote Form I-9 transaction has a per usage fee, which will be defined in the service agreement.

- An email will be sent to the New Hire to complete Section 1.
- When the New Hire fills in all applicable fields successfully and sign Section 1, it will automatically redirect the New Hire to the Network Alliance page for scheduling appointment to complete Section 2. If it doesn't automatically direct due to the pop-up being disabled, click on the "Navigate to the Network Alliance Remote I-9 Scheduling application" link.
I-9 Pro
- Select I-9 Pro, enter the Employee’s Start Date, either the Employee Email Address or Employee Mobile Number, as required or preferred when creating the Employee Profile and click Create I-9.
- An email will be sent to the new hire to complete Section 1.
- Once the new hire successfully fills in all applicable fields, signs Section 1, and the Employee Document Identification and Upload (EDU) page, they will receive another email from Tracker. This email will include instructions for completing Form I-9 and scheduling a virtual appointment with a Tracker I-9 compliance expert, who will finalize Section 2 of the form.

I-9 Pro + E-Verify
- Select I-9 Pro + E-Verify, enter the Employee’s Start Date, and either the Employee Email Address or Employee Mobile Number, as required or preferred when creating the Employee Profile, then click Create I-9.
- An email will be sent to the new hire to complete Section 1 of the Form I-9.
- Once the new hire successfully completes all required fields, signs Section 1, and completes the Employee Document Identification and Upload (EDU) page, a confirmation message will prompt them to proceed to the I-9 Pro scheduling application.
- The employee will then receive instructions to schedule a virtual appointment with a Tracker I-9 compliance expert via a live interactive video meeting.
- During the virtual appointment, the I-9 Pro representative will complete Section 2 of the Form I-9 and may also be responsible for initiating and administering the associated E-Verify case, as applicable.

Note: Click here to learn more about the I-9 Pro and I-9 Pro + E-Verify features.