Admin Guide for TeamConnect O365 Add-In 4.0
- Introduction
- Objectives
- Overview of the Admin Personas
- User Access Configuration
- Admin Prerequisites
- Add-in Configuration by the Admin within TeamConnect
- Add-in Localization
- Edit Tab Names
- Enable Document Versioning Comments
- Select Category for Create Matters
- Adding Custom Fields to the User Interface
- Set File Upload Size
- Set Document Upload Size
- Sort documents within a Matter Search
- Modify Add-in Name
- Modify Add-In Name and Outlook Category
- Customizing Appointment Categories in Outlook
- Test Connection Button
Introduction
TeamConnect O365 Add-In 4.0 is a newly developed product utilizing Microsoft’s latest Add-in technology. Its purpose is to empower attorneys and paralegals by allowing them to conveniently access commonly used TeamConnect features through Outlook 365, rather than TeamConnect.
Objectives
This document serves as a comprehensive guide, providing an overview of the essential administrative tasks required to effectively manage the operations of TeamConnect O365 Add-In 4.0. The Add-in is more accessible and user-friendly for people in different regions as it supports Localization.
Overview of the Admin Personas
TeamConnect Admin: Usually a LegalOps Admin(s) or anyone with Admin permissions to the TeamConnect instance. Those with admin permissions have the ability to manage all administrative tasks within the TeamConnect Add-in.
Microsoft Admin: An Admin for a Microsoft Portal is a person or a team responsible for managing and overseeing the operation, security, and access control of Microsoft services and products within an organization. They handle user accounts, configurations, software deployment, and troubleshooting to ensure the efficient and secure use of Microsoft technologies.
User Access Configuration
This section describes the user access rights or permissions for the Add-in, which closely resembles those in TeamConnect.
- If system rights are granted, then Category rights are not required.
- If a system right is not assigned, then specific category rights can be provided.
- If the user is a Normal User, Record-Level Rights apply in addition to System and Category rights.
- Super Users remain affected by Record Level rights.
Admin Prerequisites
User Licensing and Account Prerequisites:
- Users must possess an active Outlook 365 license.
- For authentication purposes, users must have a valid TeamConnect account.
TeamConnect Version Compatibility:
- The installation of TeamConnect O365 Add-In 4.0 requires TeamConnect Enterprise version 7.1 or higher.
- To locate and Determine the user’s TeamConnect Version refer to the Upgrade Scenarios for TeamConnect O365 Add-In 4.0.
- Installation of TeamConnect O365 4.x module via Available Updates in Admin Settings → About.
Browser Compatibility:
- The new TeamConnect O365 Add-In 4.0 seamlessly integrates with cloud-based versions of Outlook.
- Supported browsers include Google Chrome, Microsoft Edge, and Mozilla Firefox.
- As Safari is not supported, we suggest you utilize an alternative web browser on your Mac.
Cross-Platform Availability:
- The Add-in is compatible with desktop environments on both Windows and Mac operating systems, ensuring accessibility for a wide range of users.
- The TeamConnect O365 Add-In is not supported on Outlook 2019 or earlier versions on the
desktop.
Avoid Concurrent Usage with Office Suite Plug-in:
- To prevent unnecessary complications, we do not support the use of the Office Suite Plug-in (for Outlook) and the new TeamConnect O365 Add-In 4.0 simultaneously. It is highly recommended to uninstall the previous Plug-in before proceeding with the installation of the new Add-in.
- To learn more about the reasons behind the transition from the Office Suite Plugin to the Outlook Add-in, refer to O365 Outlook Plugin Vs Add-in.
Installation Process in Microsoft 365 Admin Center:
- Install TeamConnect O365 Add-In 4.0 through the Microsoft 365 Admin Center to ensure efficient and simplified administration. Kindly refer to the Installation Guide for comprehensive insights into the installation procedure.
- For newly installed TeamConnect 7.1 along with the Office Suite plugin, clients will be required to perform an upgrade to the TeamConnect O365 Add-In 3.X version.
Modern Authentication Configuration (Windows Desktop):
To install on Windows desktops, ensure that Modern Authentication is enabled in the Microsoft 365 Admin Center under Settings.
Manifest File Provision:
Generate the manifest file required for TeamConnect O365 Add-In 4.0 using the TeamConnect application.
Note: The "Generate manifest" option works in TeamConnect only when using the 4.0 version of the Add-in.
For more details on how to generate a manifest file, refer to the Installation Guide.
Instance Switch Limitations:
Note: The Add-in does not support switching instances through a manifest file.
- Ensuring your server meets the specified system requirements is crucial for optimizing the installation process and seamlessly integrating the TeamConnect O365 Add-In 4.0 into your operational environment. For additional guidance on system requirements and installing the TeamConnect O365 Add-In 4.0, refer to the Installation Guide.
- The Add-in does not support instance switching, in compliance with Microsoft's security guidelines. To enable instance switching or a similar feature, clients should deploy distinct manifests, especially for their test, development, and production environments. Client IT Admins will manage Add-in deployment, applicable to both On-Premise and Hosted setups, as they have exclusive access to their respective Microsoft 365 Admin Centers. End users do not need to take any action during the installation process. After successful deployment through the Microsoft 365 Admin Center, the Add-in will be accessible on both Web and Desktop Outlook clients.
- Generate the manifest file required for TeamConnect O365 Add-In 4.0 using the TeamConnect application. Only an IT administrator who has access to the Microsoft 365 Admin Center can deploy the manifest file.
- Outlook Add-in deployment requires Microsoft 365, and Exchange Online.
Note: File check-In/check-Out is supported in the Outlook Add-In, rather than in Word, PowerPoint, and Excel. Users can efficiently manage files through Outlook Add-In or directly through TeamConnect for seamless file handling.
Add-in Configuration by the Admin within TeamConnect
After deploying the TeamConnect O365 Add-In 4.0, you can perform the following actions within the Admin Interface:
Add-in Localization
To include languages in the Add-in, follow the instructions provided in the Working with Locales section.
To implement a language and verify the Add-in, Click the end user guide for localization guidance.
Edit Tab Names
Each Tab in the Outlook Add-in corresponds to an Object within TeamConnect. And each search view is a sub-tab.
- For example in the below screenshot, "Matter" is the object definition and "Significant Matters" is the corresponding search view from that Object Definition

- To display Objects as Tabs in the Add-in, you need to enable "Integration" for a search view. Go to Setup > Object Definition > Search views > any search of view of choice. In the "Used For" checkboxes list, select "Integration".
- For more information, refer to integrate projects and how to prevent records from appearing in the add-in.
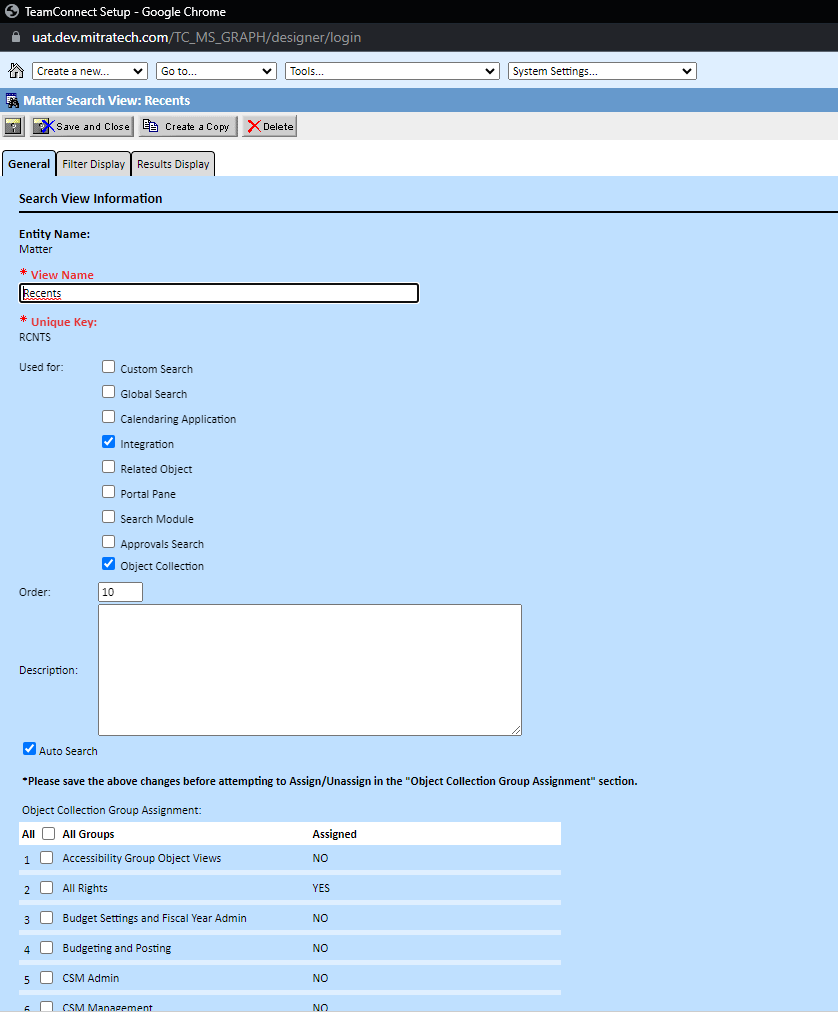
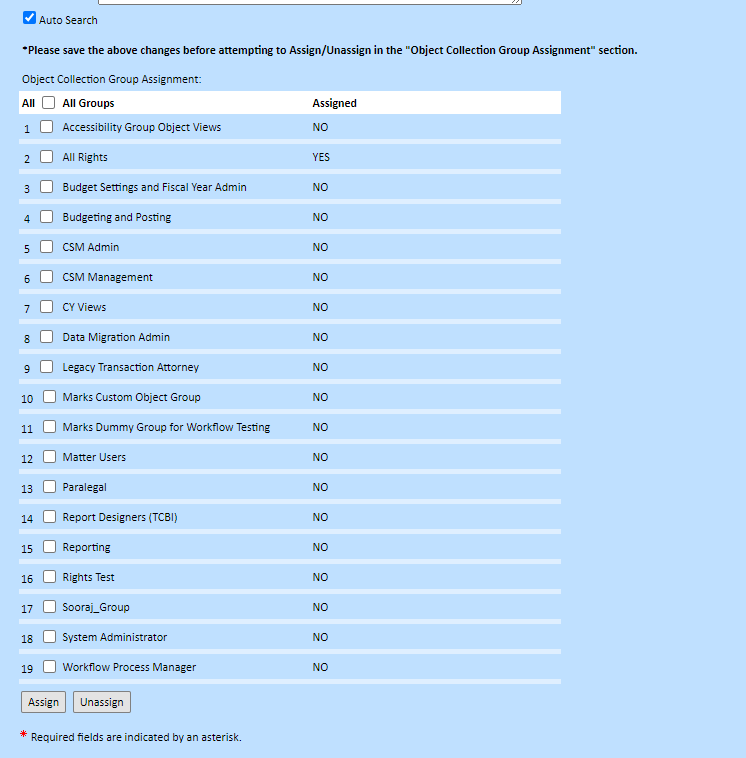
Note: To be able to view "Integration" Search views on the Outlook 365 Add-In, you also need to go to Admin>Groups> Group of your choice> System Rights> Select Object Definitions in the dropdown. In the "Permissions" table, enable the permission to "View Object Definition Search Views".


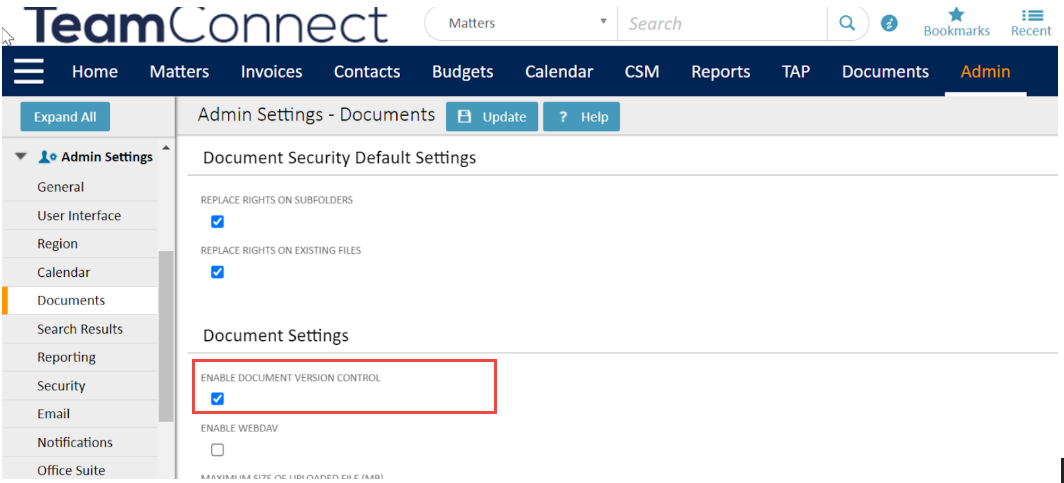
Enable Document Versioning Comments
TeamConnect allows users to determine whether version comments should be provided when uploading a file or document as a version within the Add-in. To mandate version comments whenever a document is uploaded as the version of an existing document, you can select the Require Version Comment checkbox under Admin → Admin Settings → Office Suite in TeamConnect.
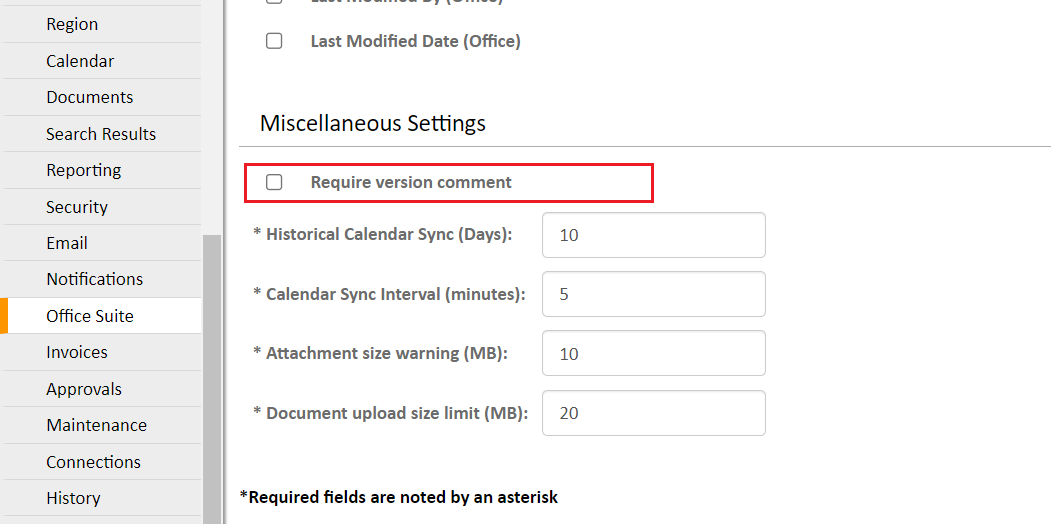
To enable document version control, select the Enable Document Version Control checkbox under Admin → Admin Settings → Document Settings in TeamConnect.
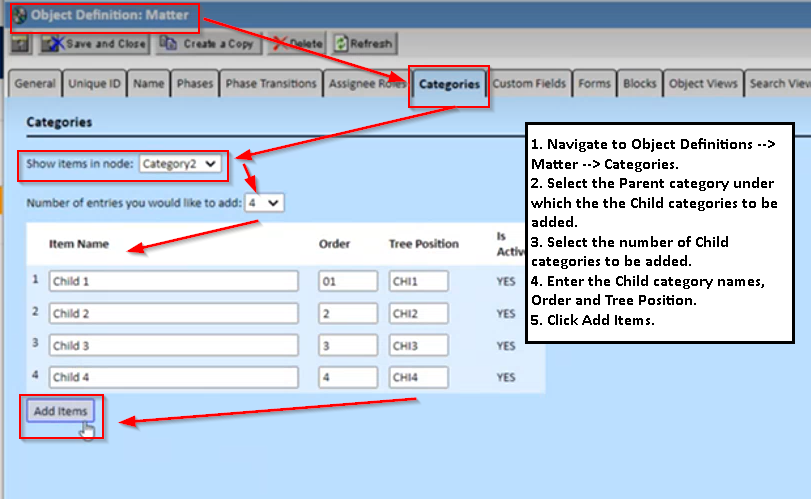
Select Category for Create Matters
When an end user attempts to create a matter, a list of objects and categories is displayed. Only categories that are selected in the setup menu are visible in the user interface.
- Navigate to Object Definitions → Matter → Categories.
- Select the Parent category under which the Child categories are to be added.
- Select the number of Child categories to be added.
- Enter the Child category names, Order, and Tree Position.
- Click Add Items.
-
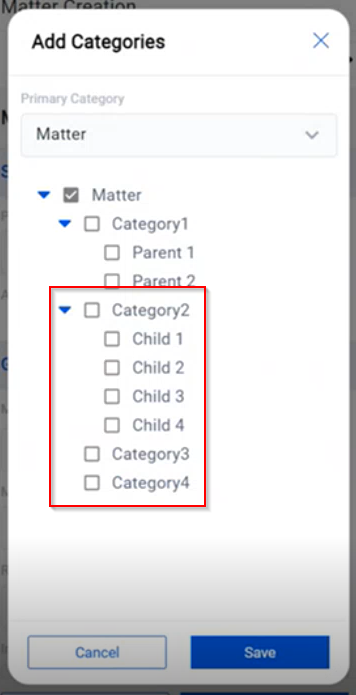
The added items will be displayed in the Add-in.
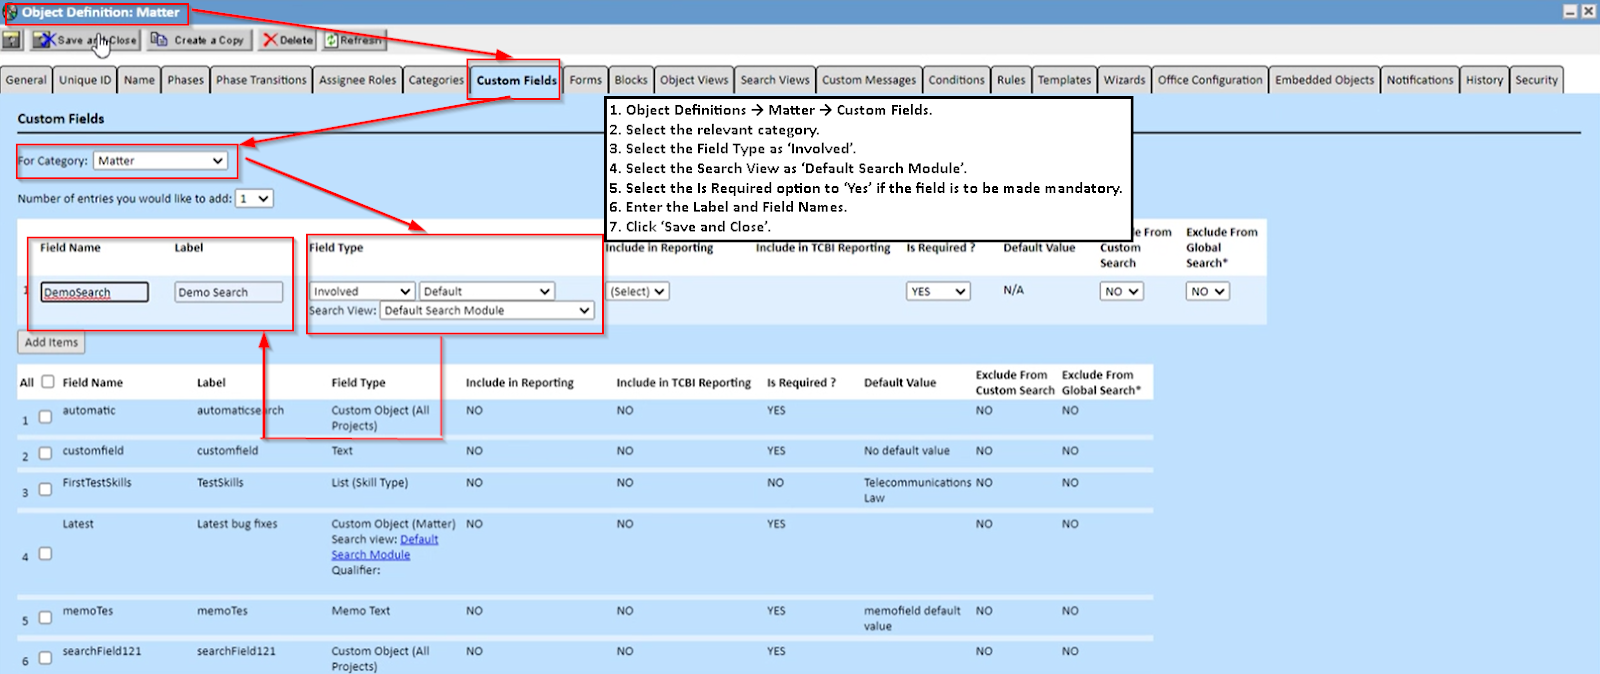
Adding Custom Fields to the User Interface
For an improved user experience and to capture specific information during the matter creation process, you have the option to create different types of custom fields within the user interface.
Note: The end user cannot create a matter when custom fields are deleted from the setup. It is advisable to first delete fields in the office config and then in custom fields.
To create custom fields, refer to the Client Success Center. Follow the below steps to create different types of fields for your category (matter):
| Instructions | Screenshot for Reference |
|---|---|
Search Field:1. Navigate to Object Definitions → Matter → Custom Fields. 2. Select the relevant category. 3. Select the Field Type as ‘Involved’. 4. Select the Search View as ‘Default Search Module’. 5. Select the Is Required option to ‘Yes’ if the field is to be made mandatory. 6. Enter the Label and Field Names. 7. Click ‘Save and Close’. |
 |
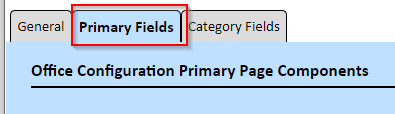
|
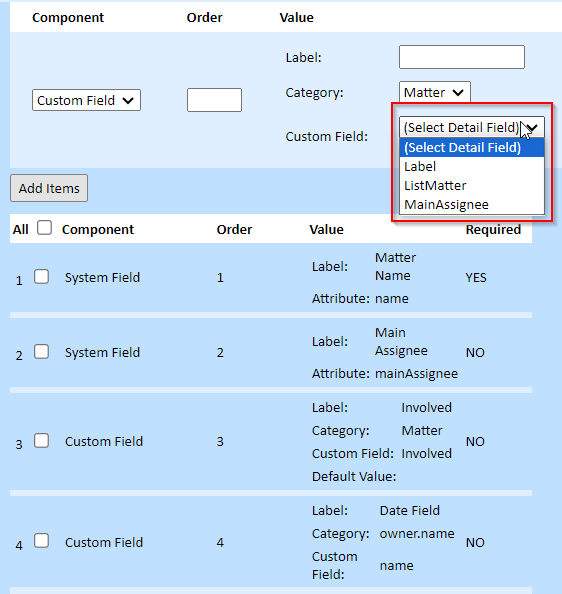
8. Go to the Office Configuration tab. 9. To add Custom fields under matter categories, use Primary Fields. The created custom field will be listed in the drop-down options. |
 |
|
10. Select the Custom Field, and enter Label and Order. 11. Click Add Items → Save and Close. 12. Then the custom field will be displayed on the UI. 13. The search field will be visible when creating a matter. If mandatory, users must fill in the required details. |
 |
Memo Field:
|
 |
Checkbox Field:
|
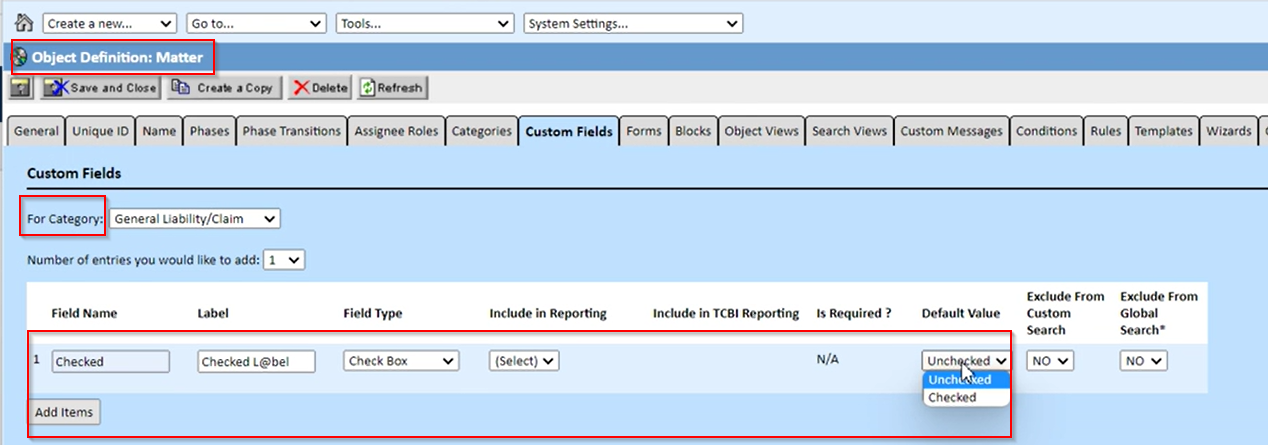 |
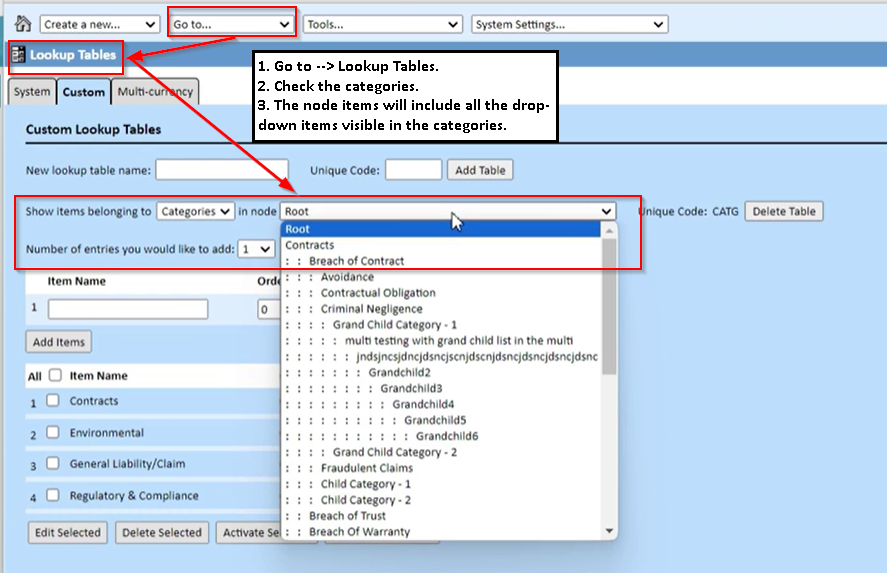
List (Dropdown) Field:1. Follow the same procedure as for the Search field when dealing with the List(Drop-down) field. The only modification required is to select the field type as "Drop-down" in the fourth step. |
 |
|
2. Go to → Lookup Tables. 3. Check the categories. 4. The node items will include all the drop-down items visible in the categories. |
 |
Main Assignee and Role Fields:
|
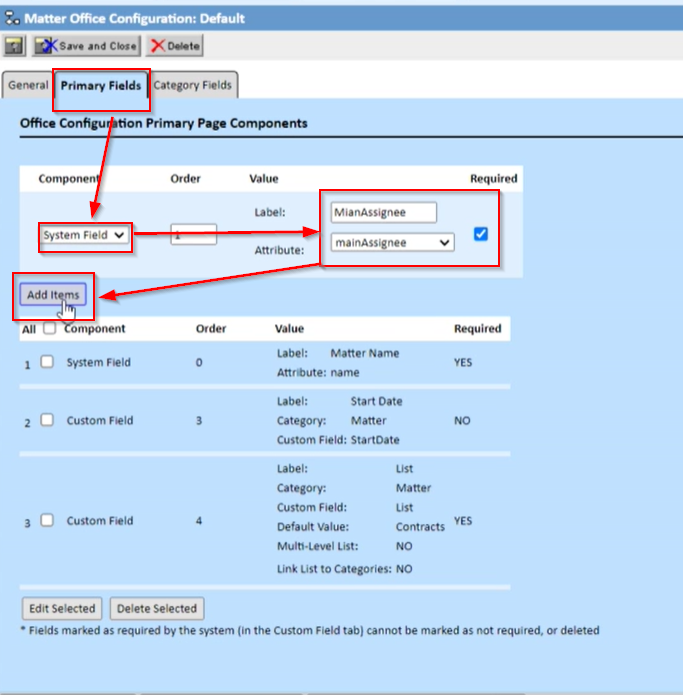 |
Date Field:1. Follow the same procedure as for the Search field when dealing with the Date field. The only modification required is to select the field type as "Date" in the fourth step. 2. Select the Time Zone Independent checkbox. |
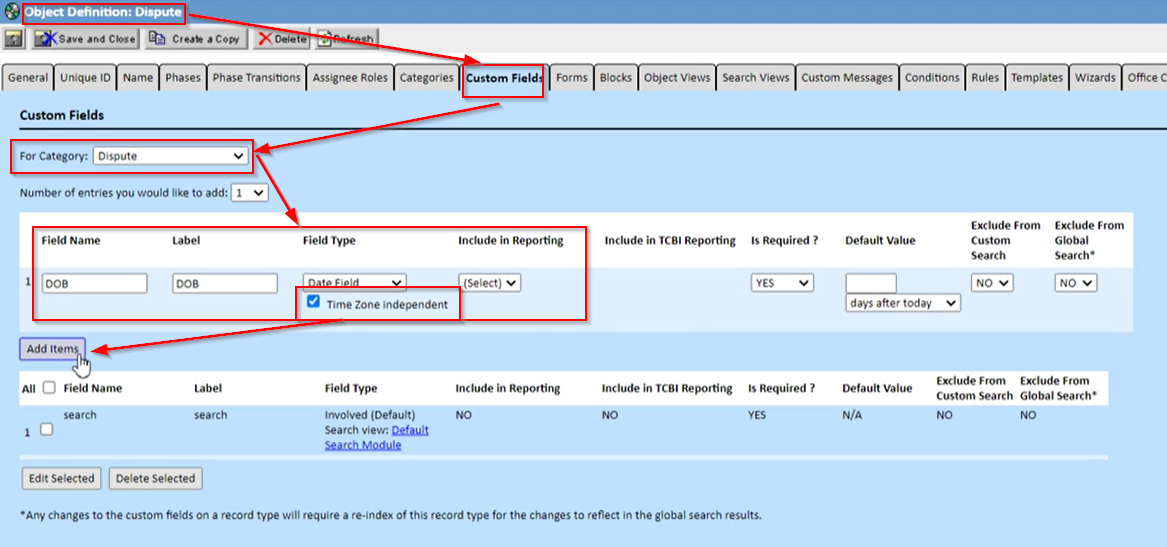 |
|
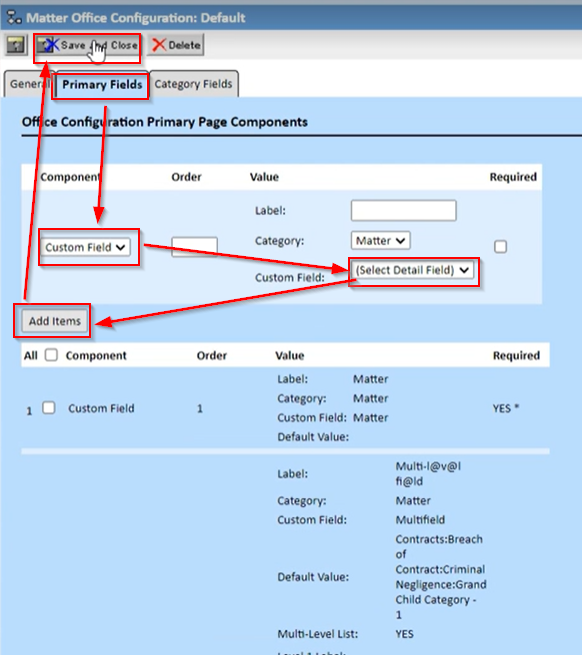
3. Navigate to Office Configuration → Primary Fields. 4. Select the Custom Field as the Date Field. 5. Select Add Items. 6. Click Save and Close. If mandatory, users must either input the date manually or select from the date picker. Note: We recommend not marking labels as mandatory in TeamConnect. |
 |
Delete a Custom Field
To delete a custom field, ensure you delete it first in Outlook and then in the setup. Otherwise, the end user won't be able to create a matter.
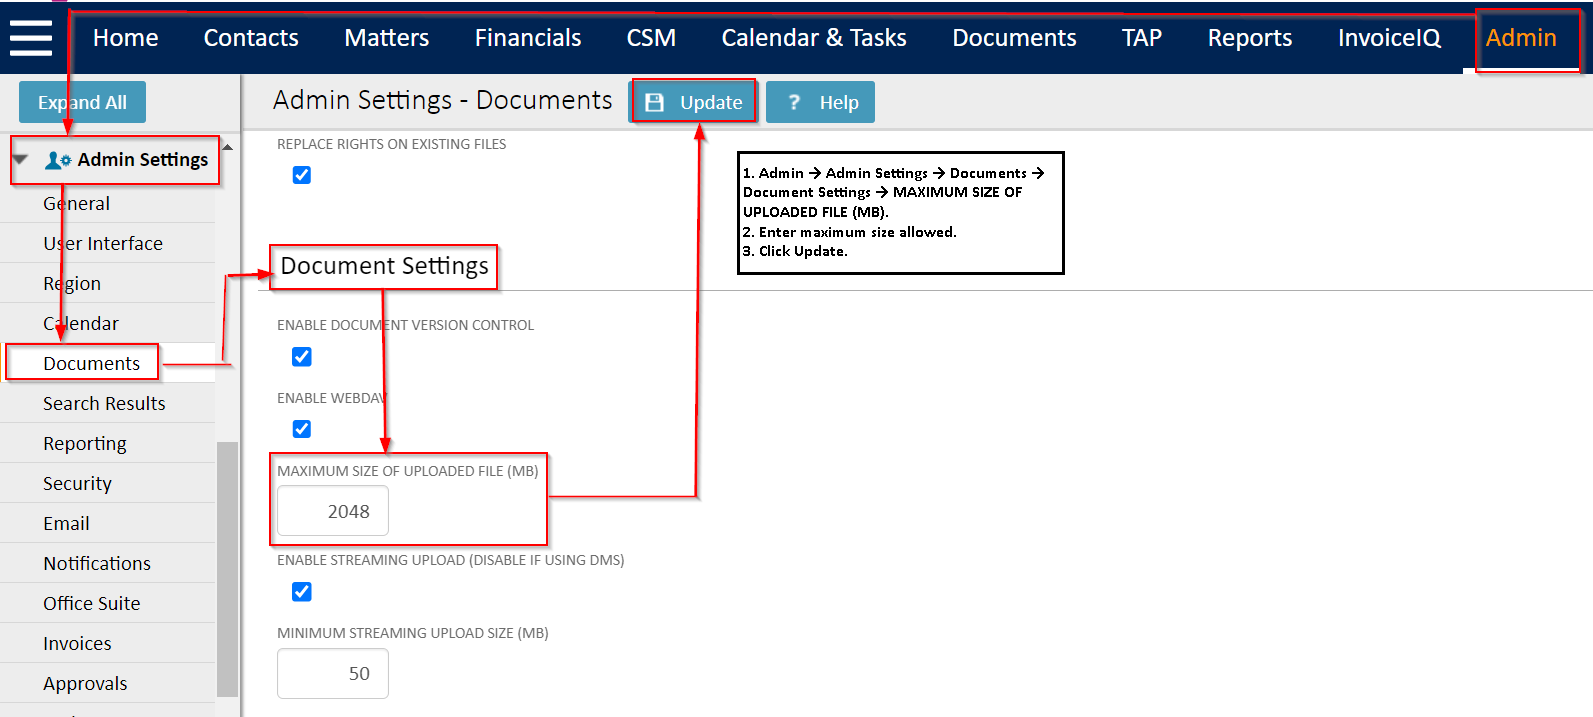
Set File Upload Size
- To set the Max File Size for a document to be uploaded to TeamConnect, navigate to Admin → Admin Settings → Documents → Document Settings → MAXIMUM SIZE OF UPLOADED FILE (MB).
- Enter the maximum file upload size allowed.
- Click the Update button.
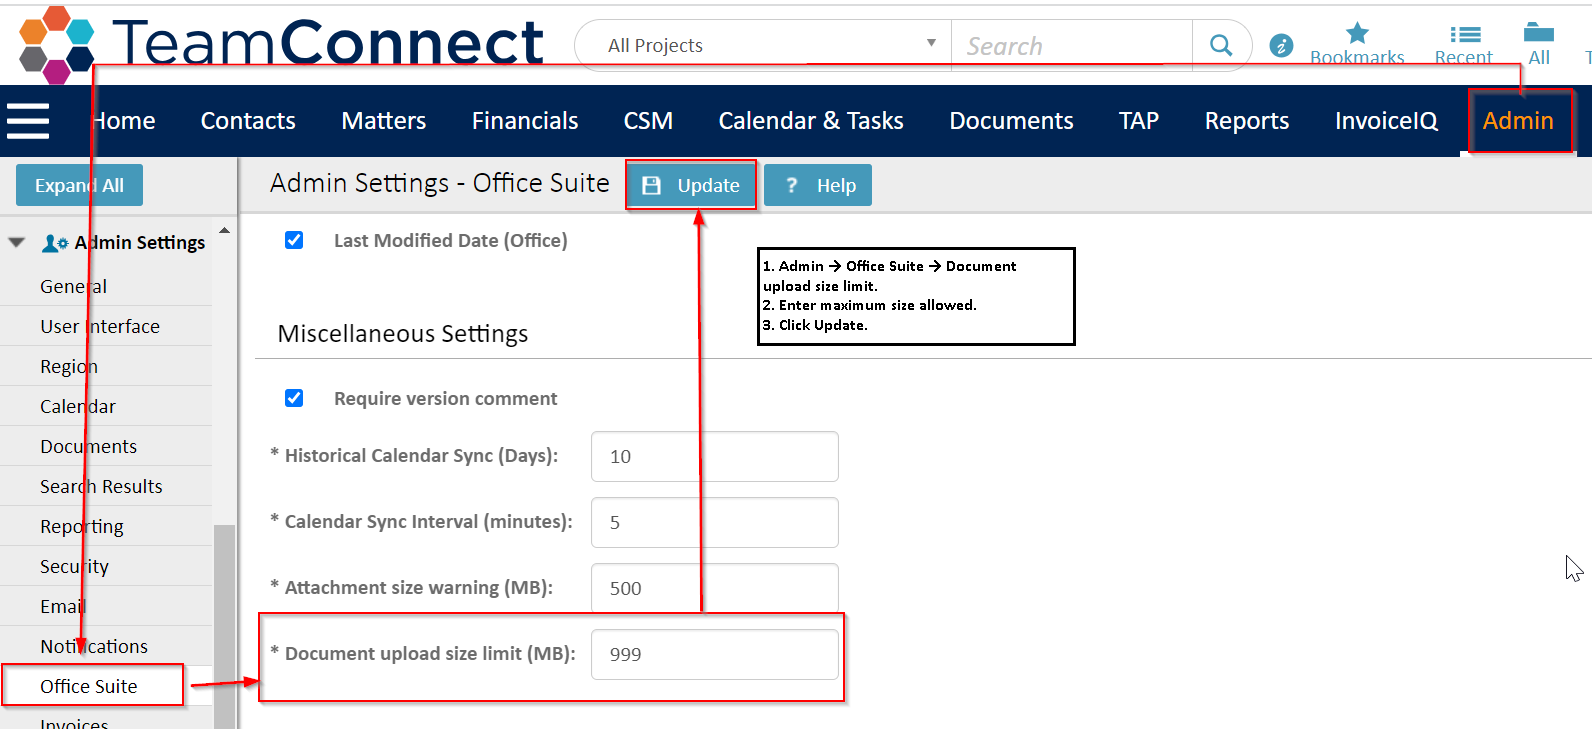
Set Document Upload Size
For the Outlook Add-in, the Max File Size cannot be greater than the above value.
- To set the Max File size for a document to be uploaded to TeamConnect through the Add-in, navigate to Admin → Admin Settings → Office Suite → Document upload size limit (MB).
- Enter the maximum document upload size allowed.
- Click the Update button.
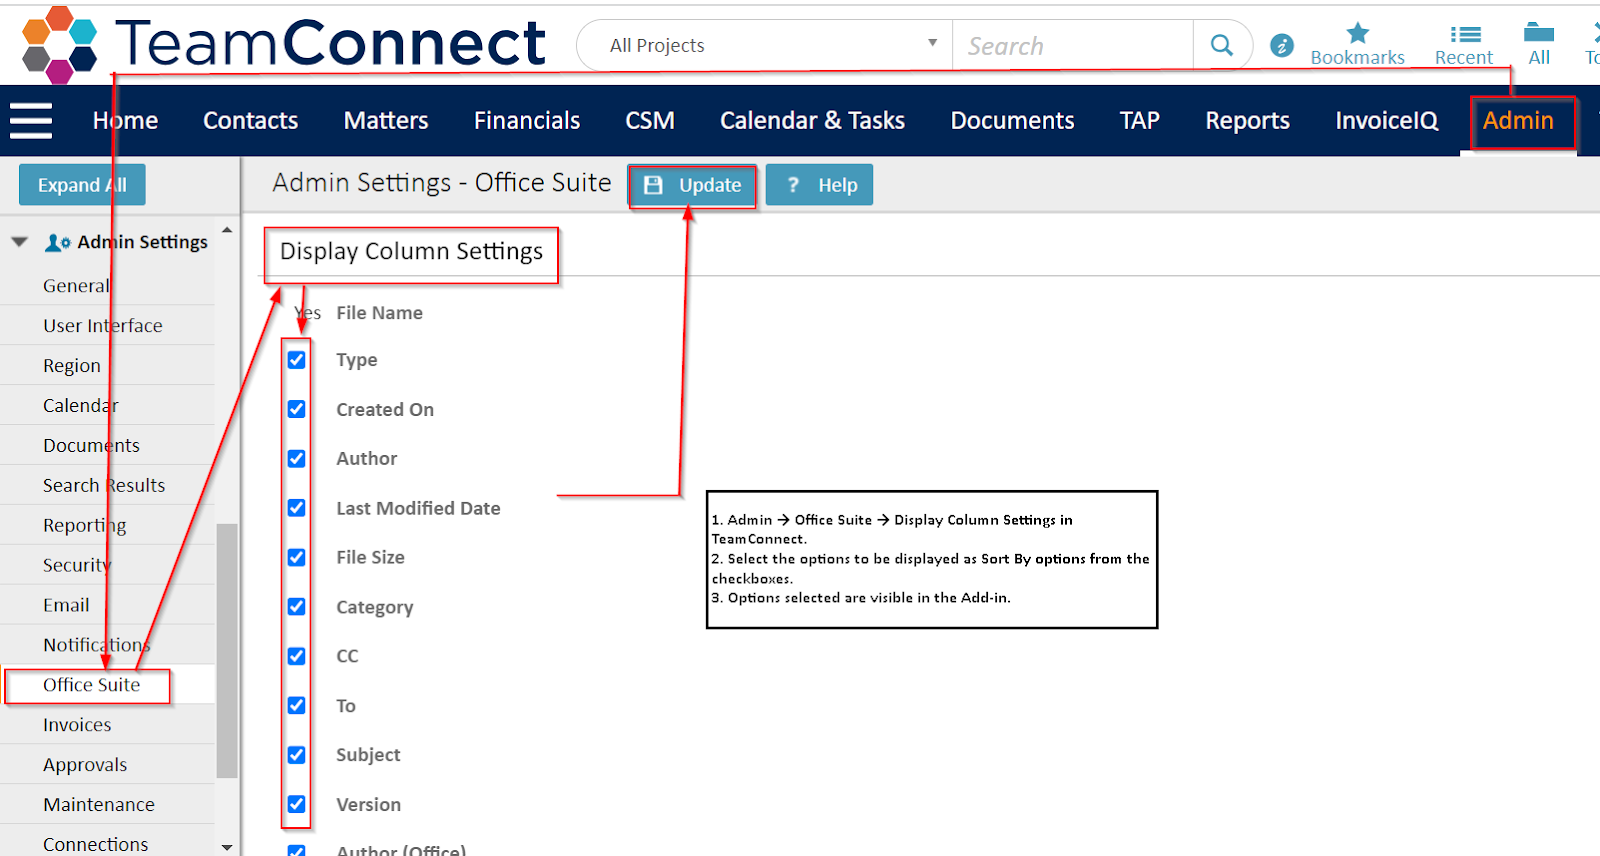
Sort documents within a Matter Search
This option allows the end user to sort documents within a folder of a matter record. The sorting options are dynamic and can be set through Office Suite settings.
- Navigate to Admin → Office Suite → Display Column Settings in TeamConnect.
- Select the options to be displayed as Sort By options from the checkboxes.
- The options selected are visible in the Add-in.
Modify Add-in Name
This option allows the user to modify the name displayed on the Add-in.
- Navigate to Admin → Admin Settings → Office Suite.
- Scroll down to find Miscellaneous Settings → Office Suite Header.
- Modify the name, and this altered name will appear in the generated manifest file.
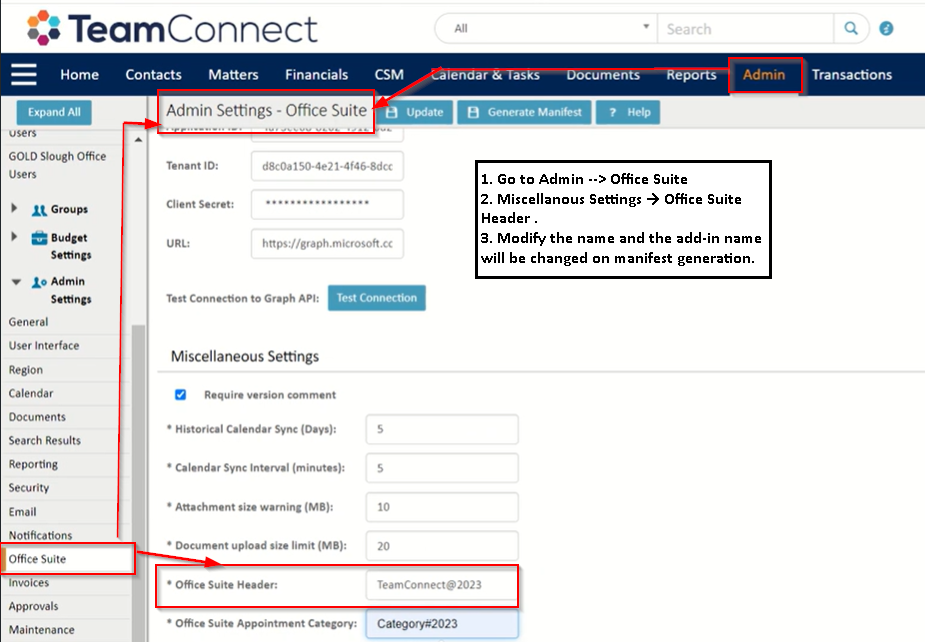
-
The new manifest file will have the modified name.
This will help distinguish different manifest installs and allow each instance to have its own category during upgrades and keep environments distinct from each other.
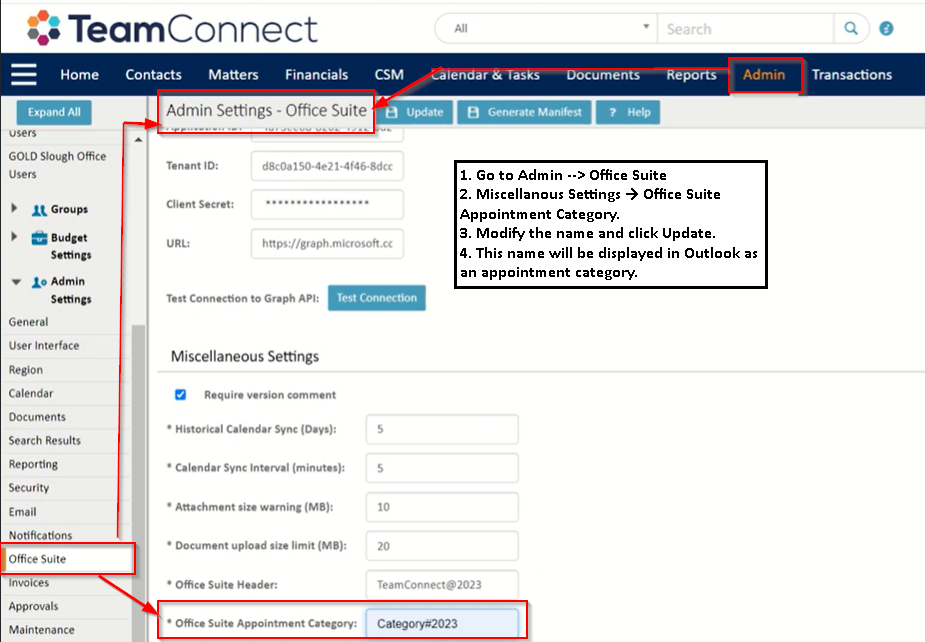
Modify Add-In Name and Outlook Category
This option allows you to modify the name of the appointment category.
- Navigate to Admin → Admin Settings → Office Suite.
- Scroll down to find Miscellaneous Settings → Office Suite Appointment Category.
- Change the name and click the Update button.
- This name will be displayed in Outlook as an appointment category.
- There is no need for a manifest update in this case. Any changes made to the Appointments category will be immediately visible from the next new appointment creation onwards.
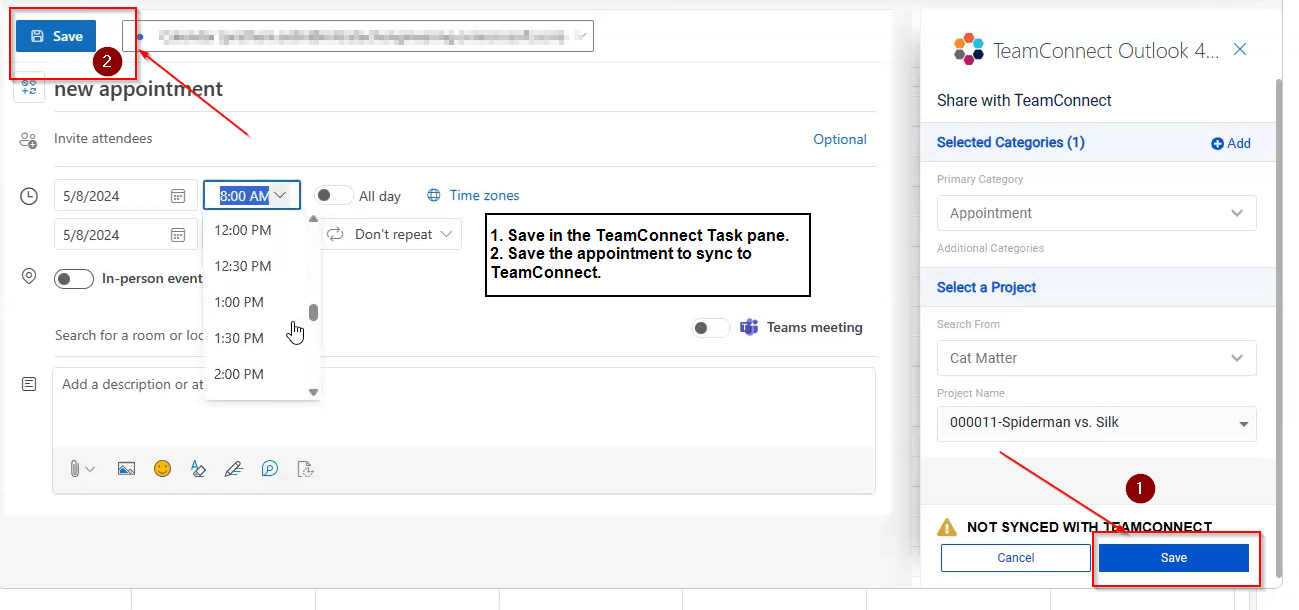
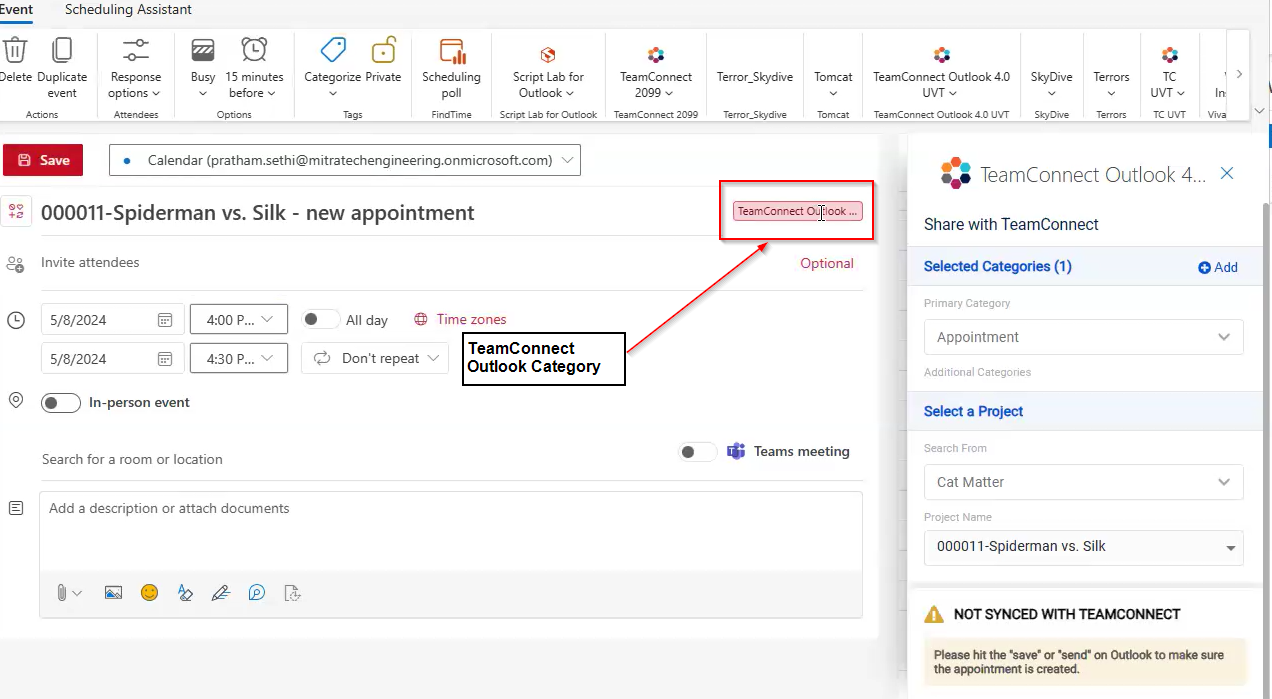
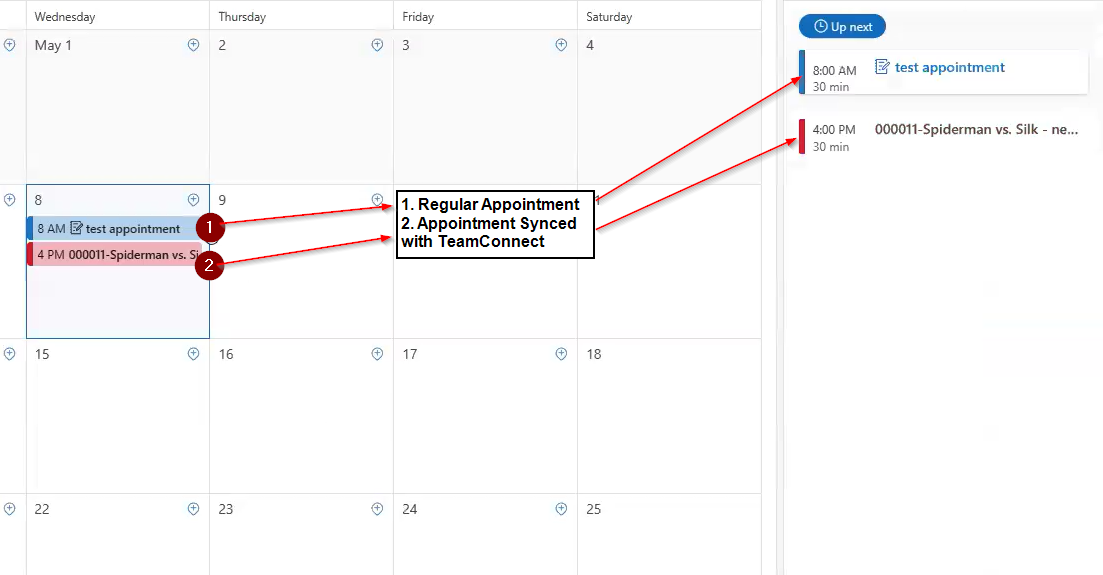
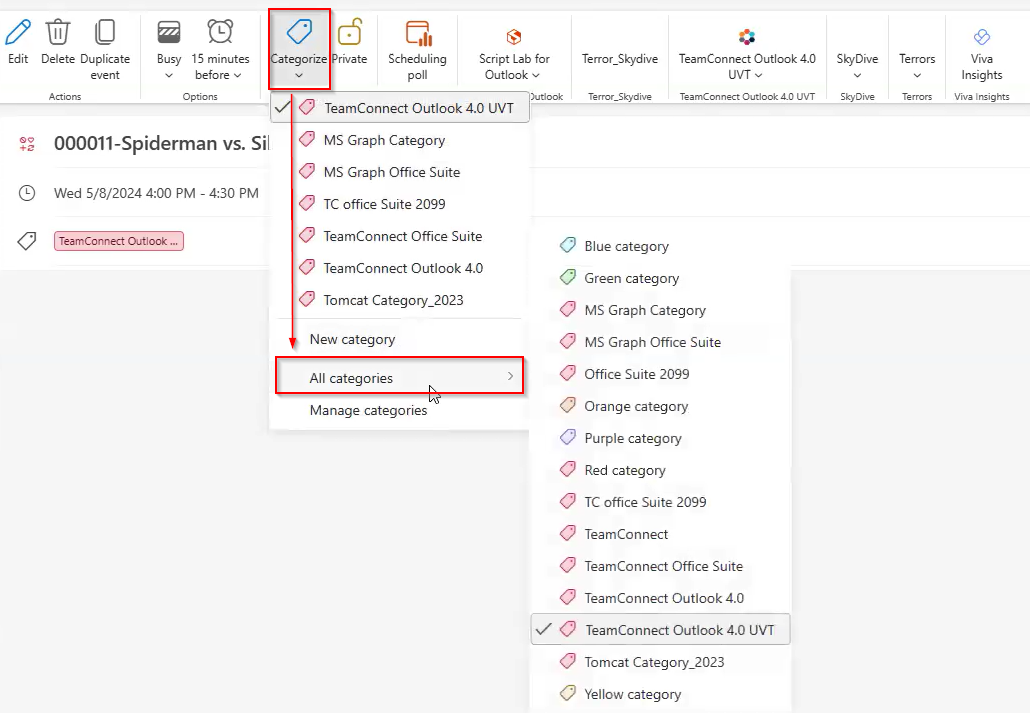
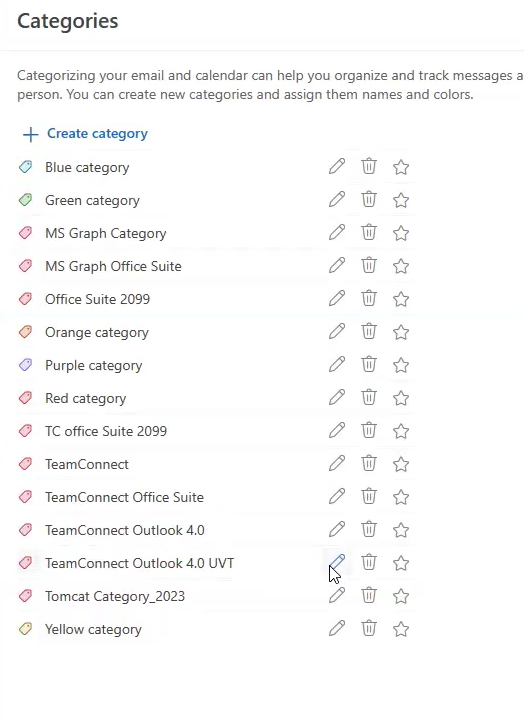
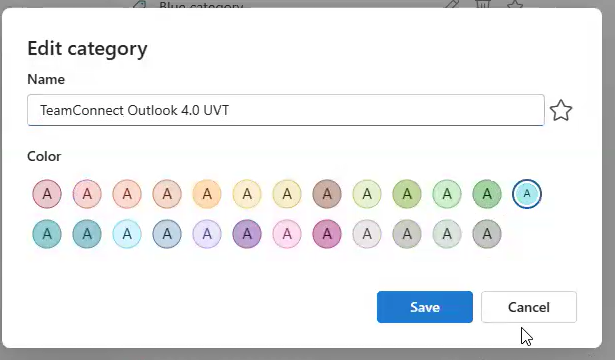
Customizing Appointment Categories in Outlook
In Outlook, each appointment is assigned a category. When an appointment is created either in TeamConnect and synchronized with Outlook, or vice versa, it automatically receives the "TeamConnect" tag, which can be configured in the Admin Settings under Office Suite.
In Outlook categories, the color of the tag can be personalized, while the tag's name can be modified in the Admin Settings under Office Suite. Please verify how to change the label here.
To modify the Office Suite Appointment category, navigate to the admin section and access the Office Suite settings. Here, you can change the label associated with the category.
Categories play a key role in distinguishing between appointments synced with TeamConnect and those that aren't.
| Instructions | Screenshot for Reference |
|---|---|
|
 |
|
 |
|
 |
The TeamConnect label can be configured in the TeamConnect Admin settings.
Changing the label color:
By default, the TeamConnect category label appears in red.
| Instructions | Screenshot for Reference |
|---|---|
|
 |
|
  |
|
|

Filtering by category:
| Instructions | Screenshot for Reference |
|---|---|
|
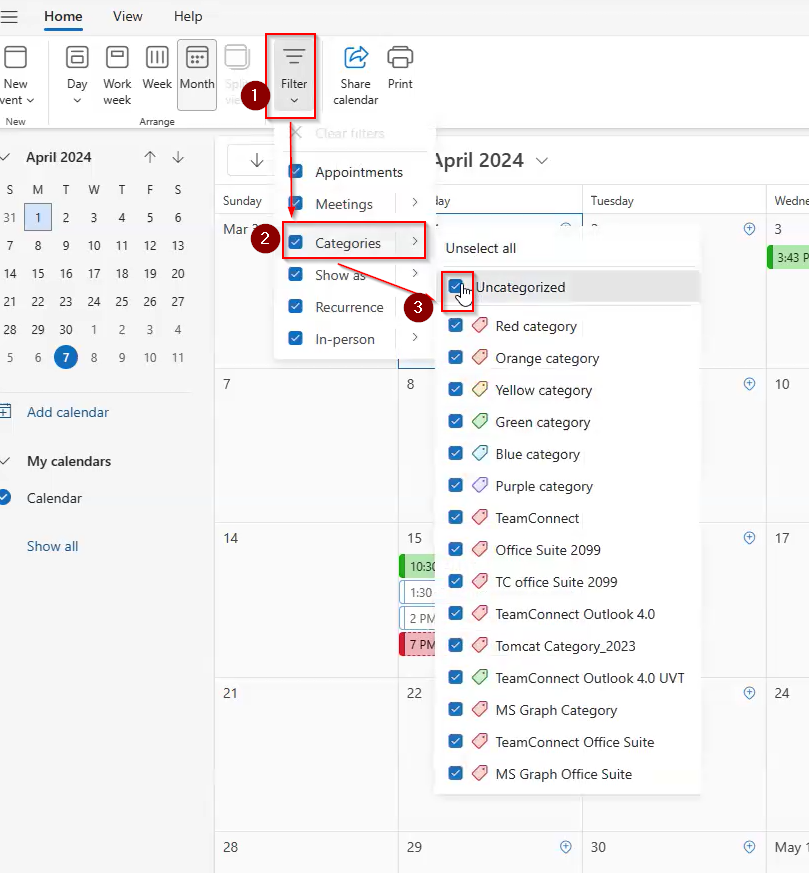 |
Set Matter Records Mandatory for Appointments
Making it mandatory to attach matter records to appointments can be achieved through Object Definitions: Appointments → Rules. Create a rule that prohibits the creation of appointments without an associated matter.
For more information on creating rules, refer to the Client Success Center.
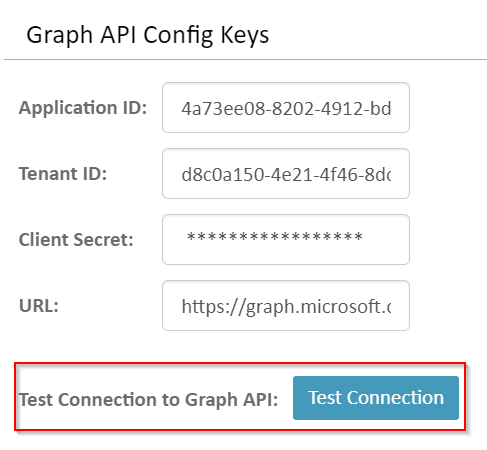
Test Connection Button
To verify the Graph API connection, the user can find a button to test the connection under Admin Settings → Office Suite, located below Graph API Config keys. In case the test connection fails, the error details will be recorded in the error logs.