
Installation Guide for TeamConnect O365 Add-In 4.0
TeamConnect O365 Add-In 4.0 is a newly developed product utilizing Microsoft’s latest Add-in technology to integrate TeamConnect with Outlook.
This document is a guide that details the prerequisites, system requirements, step-by-step installation instructions, and troubleshooting for the TeamConnect O365 Add-In 4.0. This details the instructions to generate a manifest and deploy the Add-in. Once the manifest is generated and Add-in is deployed, the final TeamConnect O365 Add-In 4.0 configuration is automatically available for the end users within the duration mentioned by Microsoft post-deployment.
Introduction
TeamConnect O365 Add-In 4.0 introduces a different way to integrate with Microsoft Outlook leveraging the Microsoft Add-in technology. Its purpose is to empower attorneys and users by allowing them to conveniently access commonly used TeamConnect features through Outlook 365, rather than TeamConnect. To locate and Determine the user’s TeamConnect Version refer to the Upgrade Scenarios for TeamConnect O365 Add-In 4.0.
The TeamConnect O365 Add-In 4.0 is deployed to the end users using the admin center of the Microsoft 365 and needs to be handled by the client's IT irrespective of the fact whether they are a hosted TeamConnect client or deploy TC on-premise.
System Requirements
Following are the essential system requirements to implement TeamConnect O365 Add-In 4.0:
- Users must have an active Outlook 365 license and a TeamConnect user account.
- TeamConnect O365 Add-In 4.0 requires a TeamConnect Enterprise 7.1 version or higher.
- Installation of TeamConnect O365 4.x module via Available Updates in Admin Settings → About.
- Compatible web browsers are Google Chrome, Microsoft Edge, and Mozilla Firefox.
- As Safari is not supported, we suggest you utilize an alternative web browser on your Mac.
- Compatible Desktop versions are Windows and Mac.
- TeamConnect Add-in should be installed in the Microsoft 365 Admin Center.
- The TeamConnect O365 Add-In is not supported on Outlook 2019 or earlier versions on the
desktop.
Add-in Limitations
- We do not support using the previous Office Suite Plug-in (for Outlook) and the new Add-in simultaneously. It is highly recommended to uninstall the previous Plug-in before proceeding with the installation of the new Add-in.
- The Tasks function is under research for the next TCE release. Organizations interested in utilizing Tasks have the option to use the plugin instead of the Add-In.
- File check-In/check-Out is supported in the Outlook Add-In, rather than in Word, PowerPoint, and Excel. Users can efficiently manage files through Outlook Add-In or directly through TeamConnect for seamless file handling.
Outlook Integration with TeamConnect
Prior to initiating the integration process, it is advisable to examine the Admin guide accessible through the following link: Admin Guide
Custom Fields Included with Outlook Module Installation
Certain categories and custom fields are currently in use with the plugin and some come along with the new Add-in. This section outlines these custom fields and categories that are included with the Outlook module installation in TeamConnect. It provides a comprehensive overview of these elements and their functionality.
Existing Fields
The subsequent fields are already available in the plugin.
Documents |
Office Category |
| authorName | cc |
| createdDate | date |
| modifiedBy | from |
| modifiedDate | subject |
| to | |
| attachments |
New Fields
The following fields are newly introduced with the Add-in.
Appointments
Appointments Category
- integrationId (text): This field is used to save the appointment ID after creating the item in the MS Graph API.
- externalOrganizer (boolean): A field to determine whether or not the appointment has an external organizer. This is crucial as it helps in monitoring Graph API changes for the organizer's events.
- syncToOutlook (boolean): This field is used to determine whether or not an appointment should be synced to Outlook.
- changeKey: This field is used to store the hash associated with the appointment to indicate changes for the resource.
- iCalUID: This is an ID that is unique across mailboxes and can be used to indicate the same appointment across attendees.
Attendees
- appointmentViewAttendees.jsp/appointmentEditAttendees.jsp: In these views, the contact's default/primary email address was added as a column to assist users in understanding whether or not their attendees would sync the appointment in the add-in. This functionality should be moved to a custom screen in the new Office Suite module.
Rules
- Custom Invoice Action Rule: This rule is used to force sync appointments to Exchange and set the syncToOutlook flag for those appointments in TeamConnect.
- Office Suite Retry Executor (wip): This is a scheduled action that processes the Office Suite Retry Queue.
Custom Object Definitions
Office Suite Retry Queue
- Appointment: This represents a TC appointment associated with the sync request (TC->OL).
- Resource: Represents the Graph API Resource associated with the sync request (OL->TC).
- ChangeKey: Represents the change key for the resource indicating changes (OL->TC).
- ChangeType: Denotes the operation, which can be one of Create, Update, or Delete (Both).
- SubscriptionID: This represents the ID of the subscription associated with the sync request (OL->TC).
Azure Keys for Graph API Configuration
TeamConnect utilizes the Microsoft Graph API for communication with the Microsoft Exchange server. Below are comprehensive, step-by-step instructions on configuring Azure keys for Graph API.
| Instructions | Screenshot for Reference |
|---|---|
|
1. Go to the Azure Active Directory. (Note: This website is external and managed by Microsoft, not under the Mitratech domain.) 2. Sign in with your Azure admin account that has administrative privileges to the organization’s M365 domain.
|
 |
|
3. Click on App Registrations → New Registrations. 4. Enter a name for the registration. 5. Select the ‘Single Tenant’ option for Supported Account Types. 6. Click the Register button. |
 |
|
If you have upgraded to TCE 7.1 PB10 kindly check the Admin Guide for TCE 7.1 PB10 O365 Add-in 4.1 to complete the installation process. or If you have upgraded to TCE 7.2 PB1, kindly check the Admin Guide for TCE 7.2 PB1 O365 Add-in 4.2 to complete the installation process. |
|
|
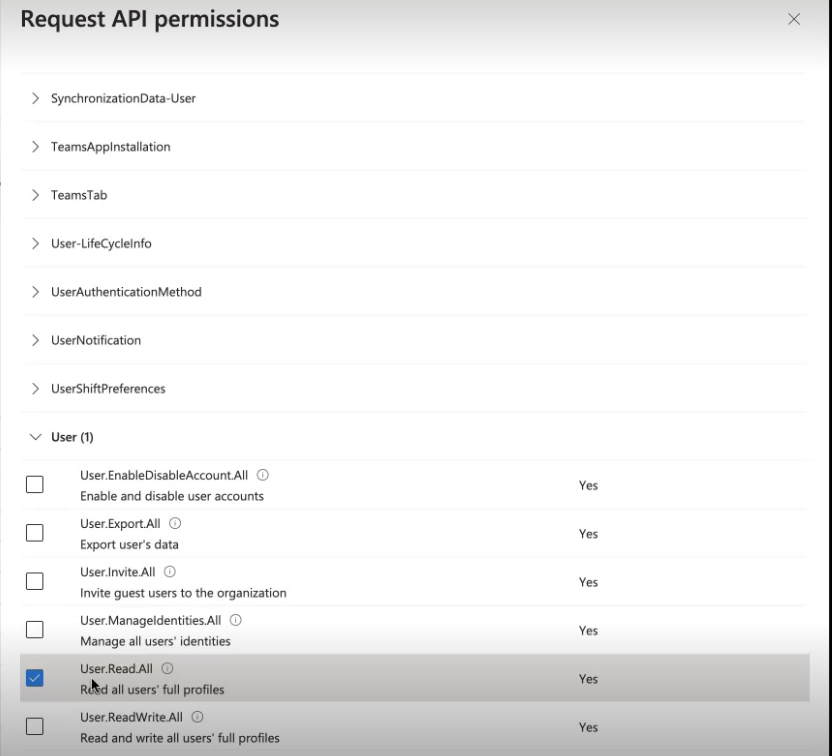
7. Go to the API Permissions tab on the left task pane. 8. Click Add a Permission. 9. Select Microsoft Graph → Application Permissions. 10. Click Add Permissions. 11. Search for User Permissions and add ‘User.Read.All’. 12. Search for Calendars and add 'Calendars.ReadWrite'. |
 |
|
14. The added permissions are displayed. You need to grant admin consent for all the permissions added. |
 |
|
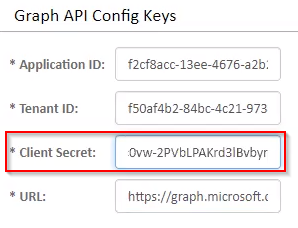
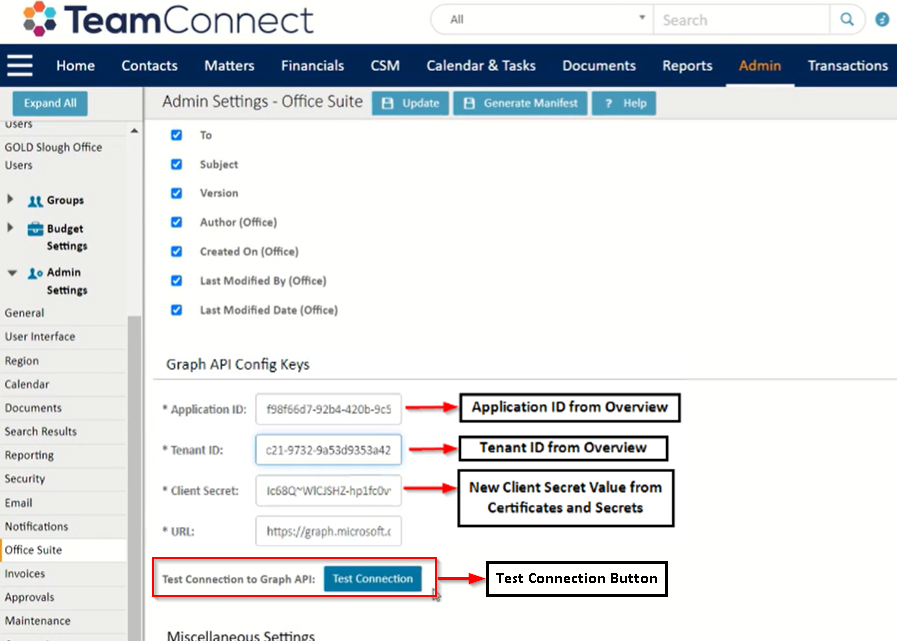
15. To grant permissions, go to the Certificates & Secrets tab on the left task pane → New Client Secret → Add a description. 16. Once the new client secret is added, copy the Client Secret Value as it will disappear if you navigate away from the page. 17. Paste the copied value at TeamConnect instance, navigate to Admin → Admin Settings → Office Suite → Graph API Config Keys → Client Secret. |
 |
| 18. Go back to Overview (Azure page)→ copy the Application (Client) ID, paste it at Graph API Config Keys (in TeamConnect) → Application ID. | 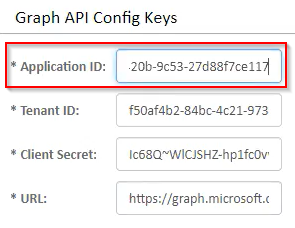 |
| 19. Go back to Overview (Azure page) → copy the Directory (Tenant) ID, paste it at Graph API Config Keys (in TeamConnect) → Tenant ID. | 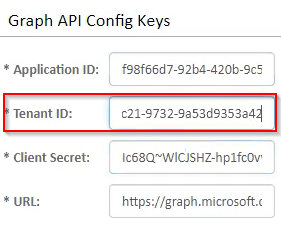 |
|
20. Click the Update button. The Azure Keys for Graph API are now configured. |
 |
Note: To ensure seamless integration between the Office Add-In 4.x and TeamConnect, it is imperative that the Notifications API of TeamConnect remain accessible to Microsoft's Graph API. This accessibility is crucial for enabling Web Hook to synchronize any changes made to appointments. Failure to grant access to TeamConnect's Notifications API will result in the inability to receive updates for appointments from Outlook.
For instructions on changing the Permission Type setting at a later time, please click here.
Test Connection Button
To verify the Graph API connection, the user can find a button to test the connection under Admin Settings → Office Suite, located below Graph API Config keys. In case the test connection fails, the error details will be recorded in the error logs. (Refer above image.)
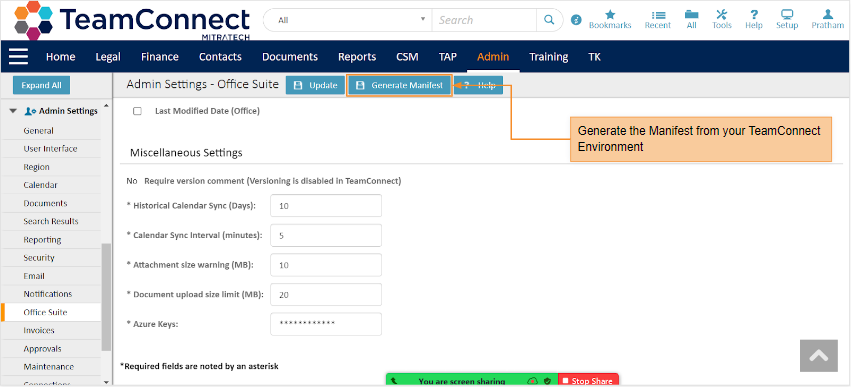
How to generate the Manifest file?
A Manifest File is an XML document that describes the manifest, or package contents, of a Windows software application. It is pre-configured by Mitratech and hence any customization to this file is not supported. The manifest file is used to deploy the Add-in from the Microsoft Admin Center.
Note: The "Generate manifest" option works in TeamConnect only when using the 4.0 version of the Add-in.
Each TeamConnect Environment will have its own manifest file. You can generate the manifest from your Teamconnect environment.
Note: Please make sure to check if the TeamConnect URL under Admin Settings → General is populated as per the below screenshot - {your TeamConnect domain name}/login. Otherwise, the Add-in will not work after deployment.

- Open TeamConnect and log in with your credentials.
- Click Admin → Admin Settings → Office Suite → Generate Manifest.
- The generated manifest will be saved in your local storage.
Note: Multiple manifest files can be generated and deployed.
Add-in Deployment
Once you get your manifest file, follow the below steps to deploy the Add-in. TeamConnect O365 Add-In 4.0 deployment requires Microsoft 365, and Exchange Online.
Follow the below instructions to deploy the Add-in from the Microsoft Admin Center:
| Instructions | Screenshot for Reference |
|---|---|
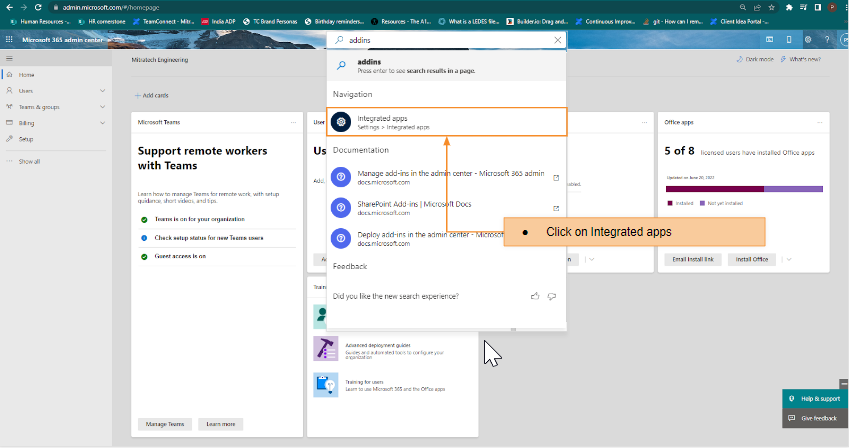
| 1. Navigate to your Microsoft 365 Admin Center or admin.microsoft.com and search for Add-ins in the search bar or go to Settings → Integrated Apps. | 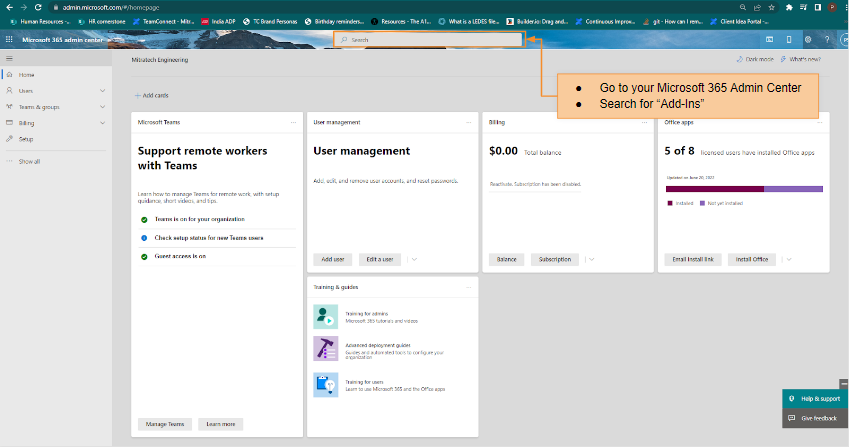 |
|
2. In the search results, from the options displayed, click Integrated apps. |
 |
| 3. The Add-in can be deployed in two different ways: | |
|
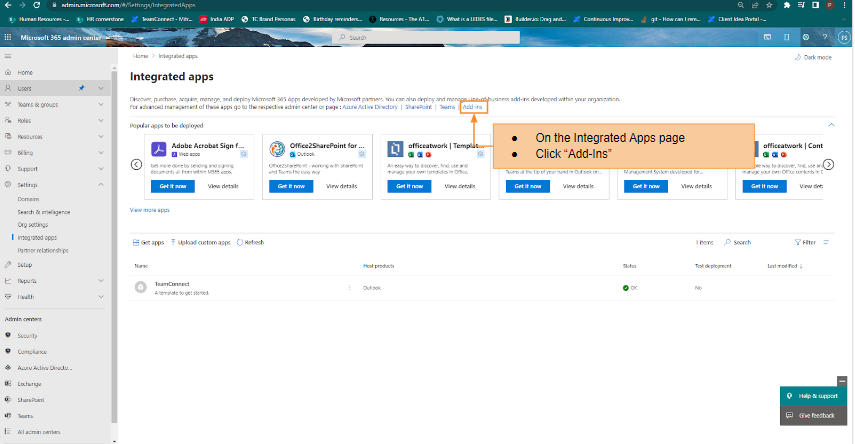
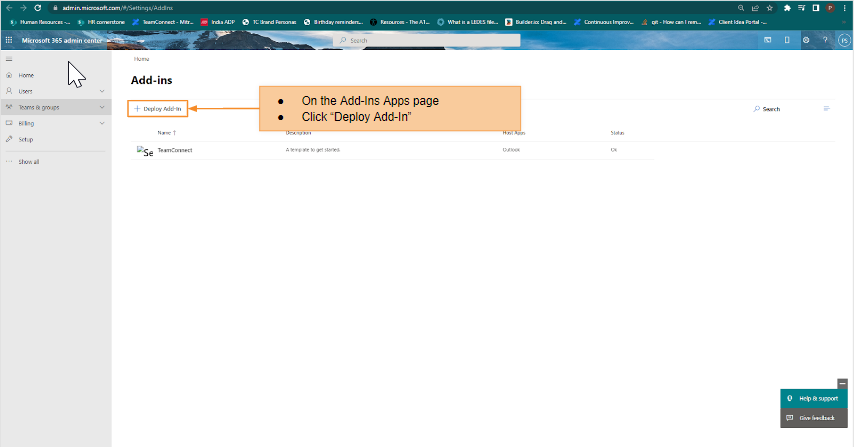
4. Method 1: (Recommended) a. Select Add-ins on the Integrated Apps page. |
4. Method 2: a. Click Upload custom apps on the Integrated apps page. |
|
b. Click the Deploy Add-in button. |
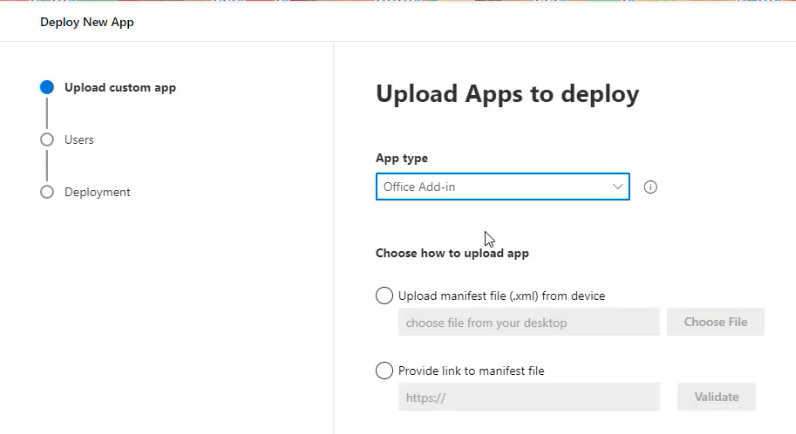
b. Deploy New App modal is displayed. Select Office Add-in from the App Type drop-down options. |
|
c. Deploy a new add-in modal is displayed. Click the Upload Custom Apps button. 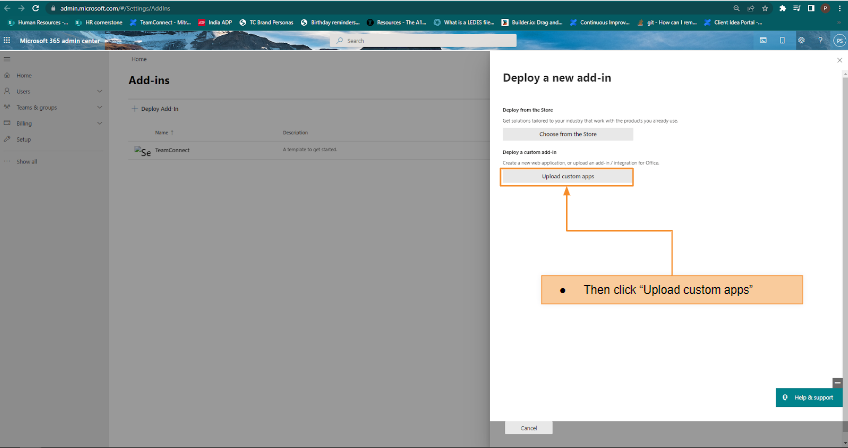 |
c. Select the Upload manifest file from the device and choose the manifest file provided to you by Mitratech and click the Next button. |
|
Select I have the manifest file option and click Choose File. Upload the manifest file generated through the Microsoft Admin Center and click the Upload button. |
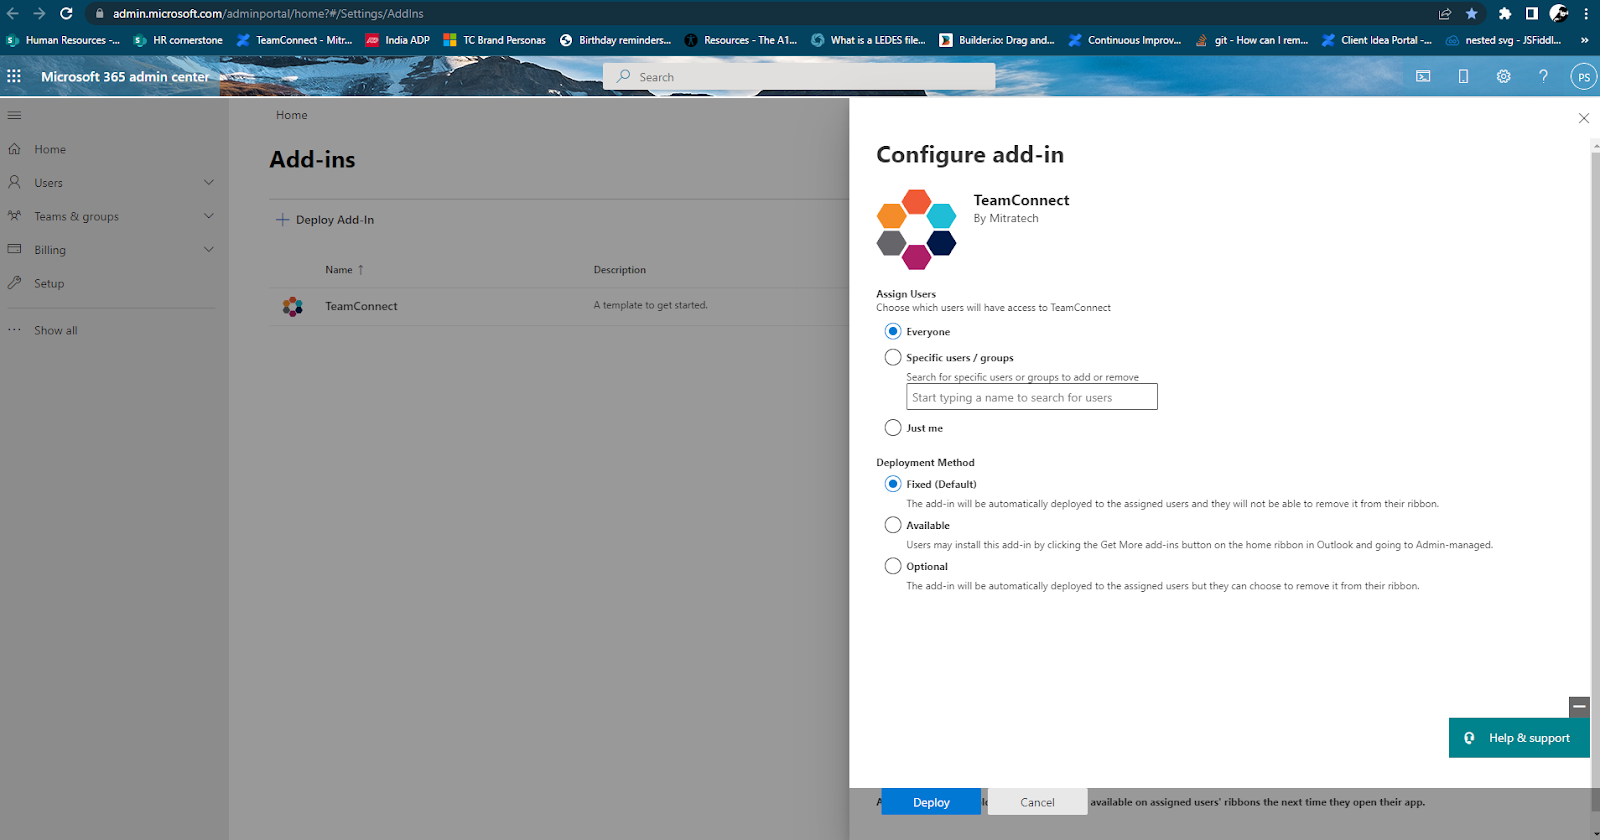
Select the availability of the Add-in to the users by selecting the Assign Users radio button. |
|
d. The Configure Add-in modal is displayed. Configure the settings as per your organization. |
d. Click the Next button.
|
|
e. Finally, click the Deploy button. |
e. Click the Deploy button. Note: Configuration options are not available in this method. |
|
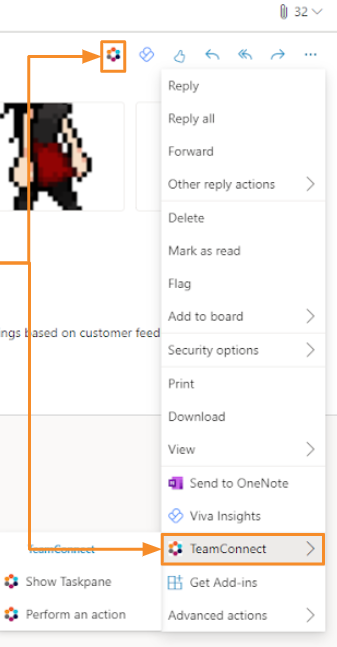
5. The Add-in will be deployed and it will be automatically available within the duration mentioned by Microsoft post-deployment. (Note: This website is external and managed by Microsoft, not under the Mitratech domain.) 5. The TeamConnect icon is present in every Outlook mail of the end user. Clicking the icon |
 |


The latest TeamConnect Outlook 365 Add-in can be updated through the Microsoft 365 Admin Center, utilizing the updated Manifest file from your TeamConnect Instance (provided the Manifest File has been updated).
There are certain functions in the admin interface that only the organization administrators can perform to set limitations or ease of use for the end users. For a detailed list of tasks achievable by administrators, refer to the following document: Admin Guide