
The Workflow Dashboard
The Workflow Dashboard is the initial screen displayed when you access the Dashboard module. The Workflow Dashboard is the heart of the TAP system. It provides you with a full view of all active workflows. The Workflow Dashboard lets you monitor the status of workflows that you are granted permission to access, view and modify details for a workflow, and generate reports. The Workflow Dashboard is dynamically updated as workflows transition from one stage to the next, so the information provided is always current.
Overview
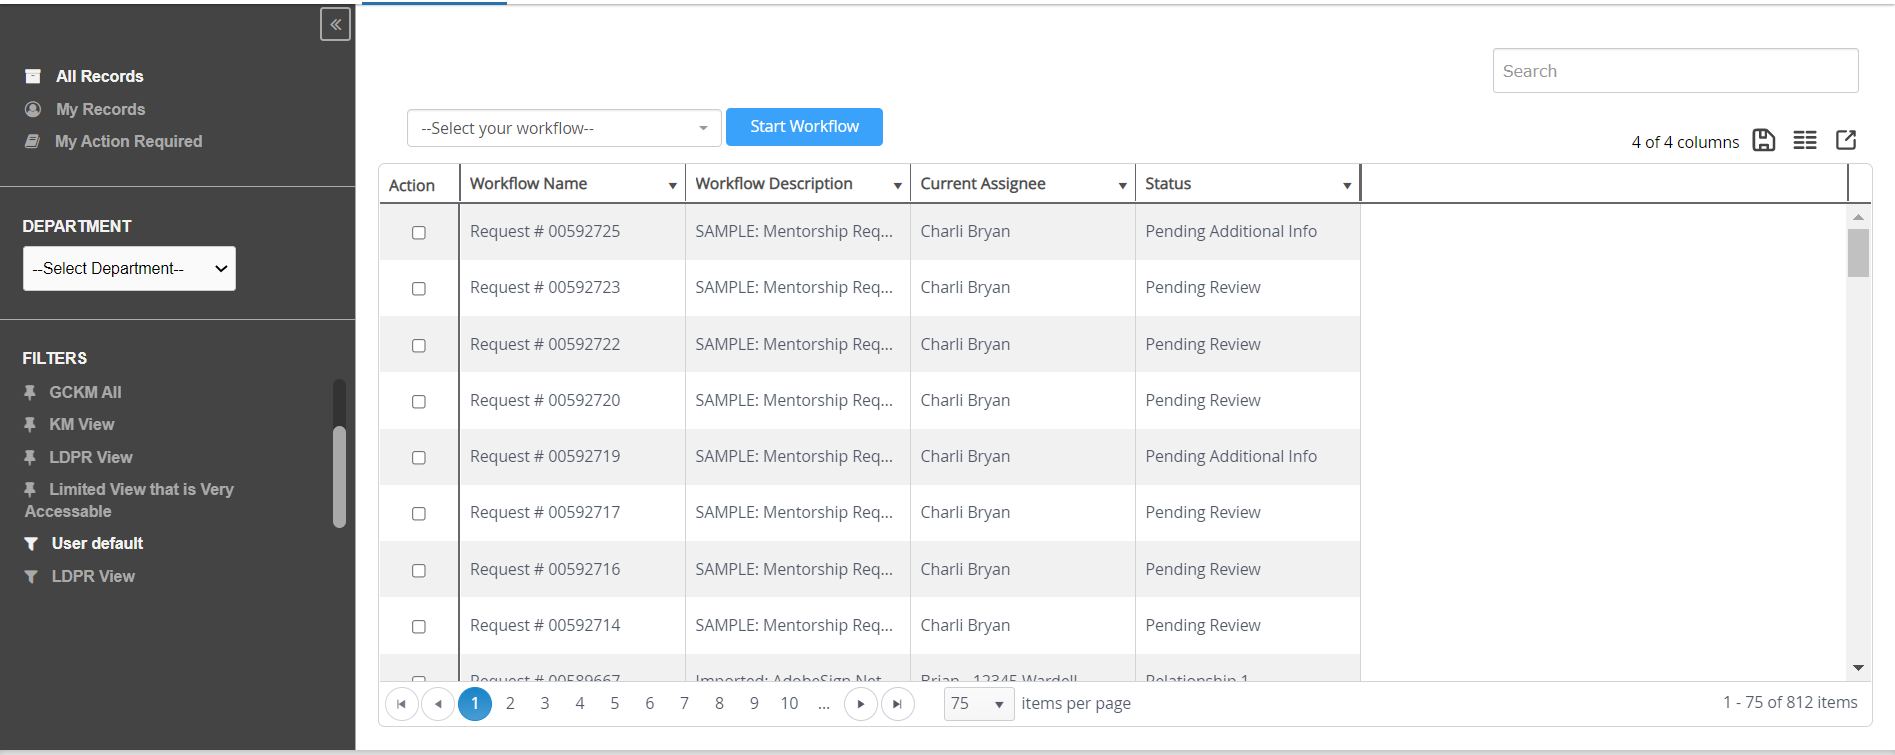
Each entry in the Workflow Dashboard shows the Workflow Name and may selectively include one or more of the following: a Workflow Description, the Current Assignee for the workflow, the date on which the workflow was most recently updated (Last Updated), the date on which the workflow was signed (Date signed), the Document ID for the workflow, and/or the current Status of the workflow. Use the scrollbar at the top of the Workflow Dashboard to view other columns.
The screen below shows the Dashboard for Super Admins.
Dashboard for Non-Super Admins
By default, Non-Super Admin users will see only "In Progress" workflows on the dashboard. They can toggle between "In Progress" and "All Records," and their selected view will persist across sessions. The toggle allows users to filter the dashboard to display only incomplete workflows, improving dashboard performance by loading data faster. Selecting the "In Progress" view does not impact API calls that retrieve data from the dashboard.

NOTE
The Workflow Name is the name assigned to the workflow by the requester when the workflow was initiated, and represents a specific instance of the workflow. The Workflow Description is the name given to the workflow when it was created through the Designer.
An Actions Bar associated with each entry in the list lets you cancel a request or signature, view documents associated with the workflow, edit item details, edit a request, reassign a workflow, delete a workflow, and view workflow history.
The Actions Bar will display once a record is selected:
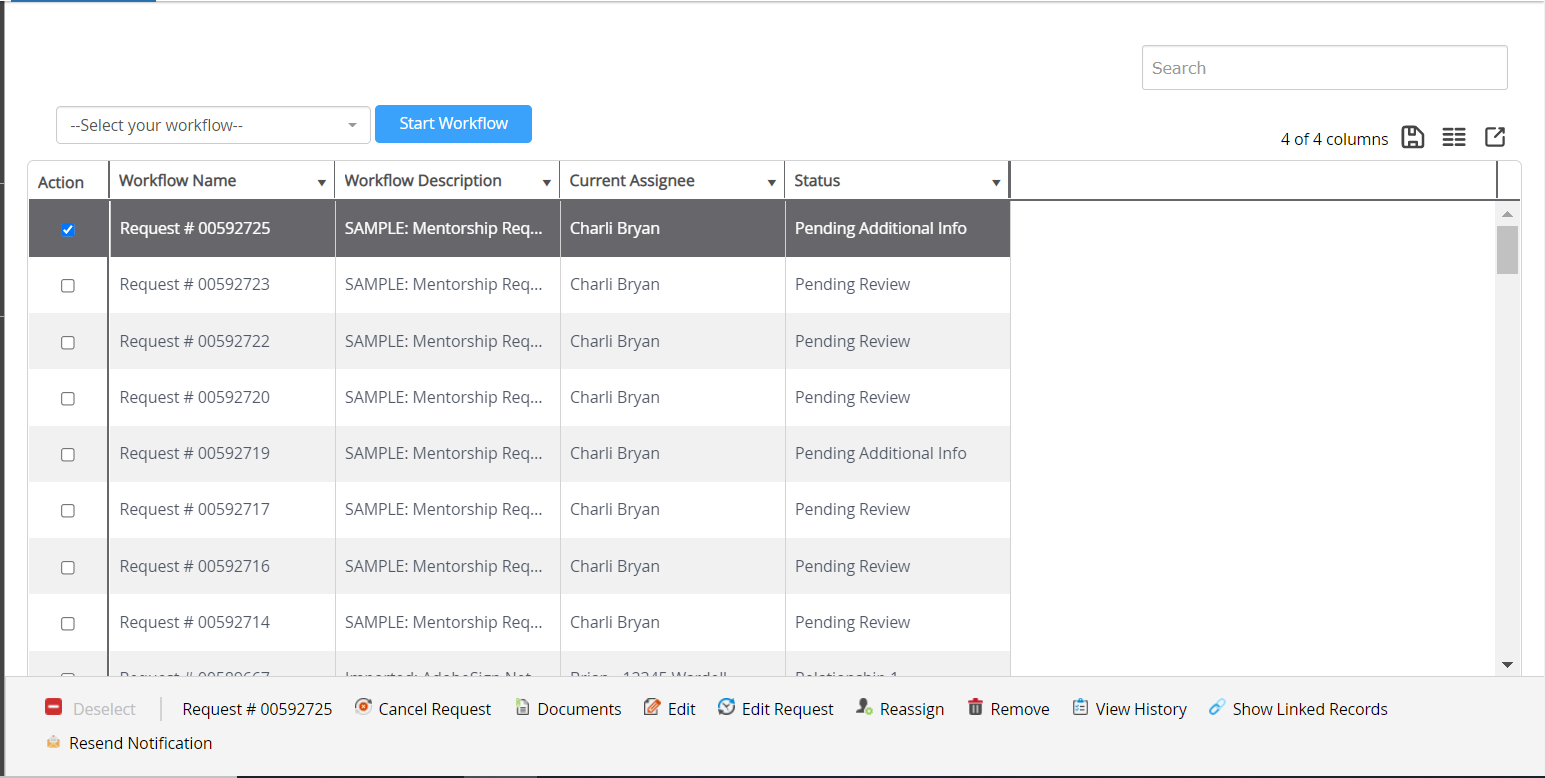
The same action can be taken on multiple records at a time. In order to do so, simply select each one of the records that you would like to act upon. Once this is done, select the action that you would like to take. A user will only see Actions which are available for all selected records. For example, if a user has selected 5 records, but they only have Edit Request permissions for 3 of those records, the Edit Request action will not appear on the Actions Bar. Some actions, such as Show Linked Records, are only available for single records at a time.
Navigating the Workflow Dashboard
The Workflow Dashboard is a multi-page screen, with a selected number of workflows shown per page. The sequence numbers for the currently displayed workflows and the total number of workflows included in the list are shown in the lower right corner of the Workflow Dashboard. Controls for navigating the Workflow Dashboard are shown in the lower left corner of the dashboard. The page number for the currently displayed page is highlighted in blue.
.jpg?revision=1)
If desired, you can choose to:
- Search the Workflow Dashboard to locate a specific workflow
- Sort the Workflow Dashboard according to a selected sort key
- Filter the Workflow Dashboard to display a subset of available workflows
- Use the Utilities Toolbar to configure the Workflow Dashboard, save or load a configuration, or export a copy of the dashboard.
Searching the Workflow Dashboard
The Search feature lets you locate workflows based on a search term you enter. You may use a complete or partial word as your search term. The system reads your search term as a string of characters (rather than a whole word) and limits the Workflow Dashboard to only those workflows containing the specified term anywhere in an indexed field. For example, the search term “tes” would locate workflows containing the words “Test” or “Associates.” The search feature operates only on the values dynamic fields added to the dashboard. To search through values in main fields, one must use dashboard filters

Sorting the Workflow Dashboard
The Workflow Dashboard is initially sorted in reverse chronological order, by Created date (newest workflow first). The .jpg?revision=1) or
or .jpg?revision=1) symbol is shown next to the column heading by which the Workflow Dashboard is sorted.
symbol is shown next to the column heading by which the Workflow Dashboard is sorted.
- The icon indicates the Workflow Dashboard is sorted alphabetically (when sorted by Workflow Description, Current Assignee, Document ID or Status), alphanumerically (when sorted by Workflow Name or Document ID) or chronologically (when sorted by Created, Last Updated, Date Signed or Completed).
-
The
icon indicates the list is sorted in reverse alphabetical/alphanumerical/chronological order, as applicable.NOTE: The Current Assignee column is sorted by the user’s first name.
- You can sort the Workflow Dashboard using any main column head as the sort key. Dynamic fields cannot be sorted.
Filtering the Workflow Dashboard
.jpg?revision=1)
The Workflow Dashboard initially shows all active (currently available) workflows. You can limit the workflows displayed in the list to a “subset” of active workflows by applying filters to one or more columns.
The Filters popup is displayed by clicking the .jpg?revision=1) icon for the column by which you wish to filter the list. The Filters popup for the Workflow Dashboard may be a a "one term" filter or a "two term" filter, depending on the column. Using the Filters popup, you can enter the term for your filter and specify matching criteria (e.g., equal to, not equal to). Each filter is applied only to the contents of the associated column.
icon for the column by which you wish to filter the list. The Filters popup for the Workflow Dashboard may be a a "one term" filter or a "two term" filter, depending on the column. Using the Filters popup, you can enter the term for your filter and specify matching criteria (e.g., equal to, not equal to). Each filter is applied only to the contents of the associated column.
If a filter, sort, or column width is adjusted in the main dashboard grid, the filters and other selections will be saved during your session. The filters will be saved on the left side menu to easily reference if you navigate away and return to the dashboard.
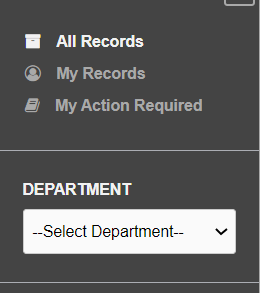
Additionally, you can use the filtering options provided in the Records section of the Workflow Dashboard menu bar to limit entries in the list by department, record type (all records or records "owned" by you), or records requiring action by you.
To limit the Workflow Dashboard by department:
- Select the desired department from the Select Department menu.
- The Workflow Dashboard refreshes to display only those workflows associated with the selected department.
To limit the Workflow Dashboard by record type:
- Select the All Records radio button to display all available workflows.
- Select the My Records radio button to display only those workflows "owned" by you.
- Select the My Action Required radio button display only those workflows requiring action by you.
- The Workflow Dashboard refreshes to display the appropriate workflows.
Initiating a Workflow
The Designer lets you develop online forms that support the stages or phases of a process, and organize the forms in a workflow that automatically routes the forms to the responsible parties within your organization. The Create function on the Workflow Dashboard lets you initiate a specific instance of a workflow. For example, you might create a "Month End Summary" in the Designer, then use the Workflow Dashboard to initiate the workflow at the end of each month.
To initiate a workflow:

- Select the desired workflow from the –Select one-- menu at the top of the Workflow Dashboard.
- The menu lists the Workflow Description for all available workflows (workflows that have been published through the Designer) for your TAP system.
- The menu lists the Workflow Description for all available workflows (workflows that have been published through the Designer) for your TAP system.
- Click the Create button.
- The selected workflow displays.
.jpg?revision=1)
- The workflow form is shown in the left panel of the display. The form shows only those fields configured for display at the current (initial) stage of the workflow.
- The right panel of the display includes the workflow Status, a Summary tab (which may contain instructions for completing the form), and a Communications tab where you can enter and view comments for the workflow.
- Enter a name for this specific instance of the workflow in the text box at the top of the workflow form.
- Use a name that uniquely identifies this instance of the workflow (for example, "Month End Report May 2016").
- Use a name that uniquely identifies this instance of the workflow (for example, "Month End Report May 2016").
- Complete the form, as appropriate.
- If desired, you may add a comment to the workflow.
- When all necessary information has been entered, click the Submit button on the workflow form.
- The workflow is automatically routed to its next stage, and a "Thank You" page displays.
- The workflow is automatically routed to its next stage, and a "Thank You" page displays.
- Click the Workflow Dashboard tab to return to the Workflow Dashboard.
NOTE
To exit the workflow without submitting, click the .jpg?revision=1) Exit workflow button.
Exit workflow button.
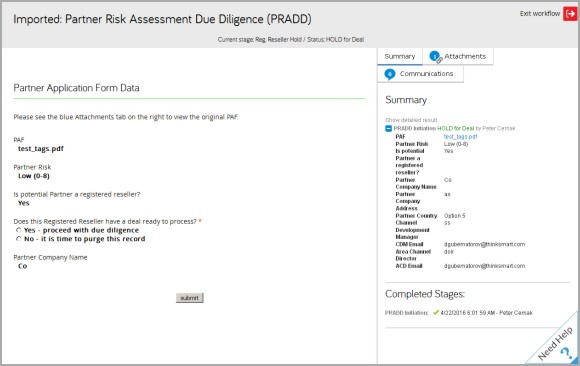
Viewing the Workflow Summary
The Summary tab lets you view summary details for each completed stage of the workflow.
.jpg?revision=1)
To view the workflow Summary:
- Click the Summary tab in the right panel.
- The Summary Page displays.
- The Summary Page displays.
- The Summary Page lets you view summary details for each completed stage of the workflow.
- The Summary section of the tab lists each completed stage of the workflow by stage name, and shows the name of the user responsible for completing the stage.
- The Completed Stages section of the tab lists each completed stage of the workflow by stage name, and includes the date and time at which the stage was completed, and the name of the user who completed the stage.
- Each entry in the Summary section of the list is shown in "collapsed" format by default.
- Click the
.jpg?revision=1) button next to a workflow stage to "expand" the stage.
button next to a workflow stage to "expand" the stage.
- The "expanded" entry shows the values currently entered in the workflow form for the associated stage.
- Click the
.jpg?revision=1) button next to a workflow stage to "collapse" the stage.
button next to a workflow stage to "collapse" the stage.
- Click the
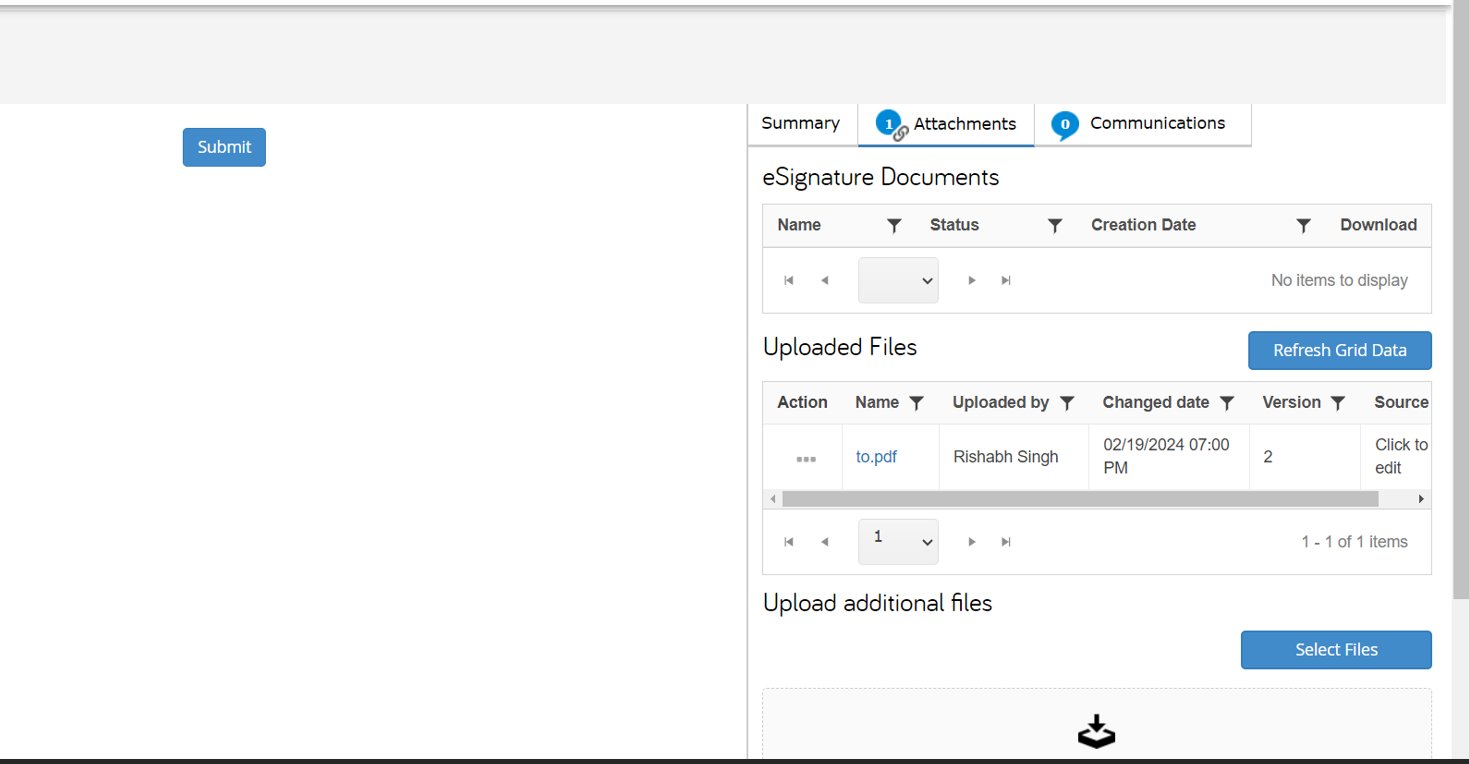
Viewing Attachments
The Attachments tab shows a list of all documents attached to the currently selected workflow.
To view attachments:
- Click the Attachments tab in the right panel.
- The Attachments page displays.
- The Attachments page displays.
- The e-Signature documents list shows the Name of each document in the list, current document Status, and the Creation date for the document. The Uploaded Files list shows the Name of the attachment, the name of the user that uploaded the attachment (Uploaded by), the attachment Version number, and the Source of the attachment.
- If there are more than 10 items in a list, the list is a multi-page list, with a 10 documents shown per page. The sequence numbers for the currently displayed documents and the total number of documents included in the list are shown in the lower right corner of the list.
- Controls for navigating the list are shown in the lower left corner of the list.
- The list is initially sorted in alphanumeric order, by Name. If desired, you can:
- Sort the list according to a selected sort key
- Filter the list to display a subset of documents
- If there are more than 10 items in a list, the list is a multi-page list, with a 10 documents shown per page. The sequence numbers for the currently displayed documents and the total number of documents included in the list are shown in the lower right corner of the list.
-
Additionally, the Attachments tab lets you download, edit and delete documents for with the associated workflow, and upload new documents to the workflow.
Click the Refresh Grid Data button after uploading or deleting an attachment to refresh the contents of the Uploaded Files list.
To download an attachment:
- Click the
.jpg?revision=1) Download icon (for e-Signature documents) or select
Download icon (for e-Signature documents) or select .jpg?revision=1) Download from the Actions menu (for Uploaded Files) for the desired document.
Download from the Actions menu (for Uploaded Files) for the desired document.
- A standard File Download dialog displays.
- A standard File Download dialog displays.
- Select the "save" options from the File Download dialog.
- A standard Save As dialog displays.
- A standard Save As dialog displays.
- Navigate to the location in which you wish to save the document.
- If desired, enter a new name for the document in the File name text box. Be sure to retain the file extension.
- Click the Save button on the Save As dialog.
- The document is downloaded to the selected location.
To edit an attachment:
- Select
.jpg?revision=1) Edit from the Actions menu for the desired attachment.
Edit from the Actions menu for the desired attachment.
- The system launches an online editor for the selected attachment file type.
- Make the desired changes, then select the Save option in the online editor to save your changes.
To view versions for an attachment:

- Select Versions from the Actions menu for the desired attachment.
- The File Versions list displays.
- The File Versions list displays.
- The File Versions list shows the Name of the attachment (it is a hyperlink to the attachment), the name of the user that uploaded the attachment (Uploaded by), the attachment Version number, and the Source of the attachment.
- If there are more than 10 items in a list, the list is a multi-page list, with a 10 documents shown per page. The sequence numbers for the currently displayed documents and the total number of documents included in the list are shown in the lower right corner of the list.
- Controls for navigating the list are shown in the lower-left corner of the list.
- The list is initially sorted in alphanumeric order, by Name. If desired, you can:
- Sort the list according to a selected sort key
- Filter the list to display a subset of documents
- The list is initially sorted in alphanumeric order, by Name. If desired, you can:
- If desired, you can download a specific version of the document.
- Controls for navigating the list are shown in the lower-left corner of the list.
- If there are more than 10 items in a list, the list is a multi-page list, with a 10 documents shown per page. The sequence numbers for the currently displayed documents and the total number of documents included in the list are shown in the lower right corner of the list.
- Click the Close button to close the dialog and return to the Attachments page.
To delete an attachment:
- Select
.jpg?revision=1) Delete from the Actions menu for the desired attachment.
Delete from the Actions menu for the desired attachment.
- A conformation dialog displays the message "Do You want to delete this Workflow Attachment?"
- Click the OK button on the confirmation dialog to delete the attachment. (Click the Cancel button to cancel the deletion and leave the attachment intact.)
- The Uploaded Files list refreshes with the selected document removed from the list.
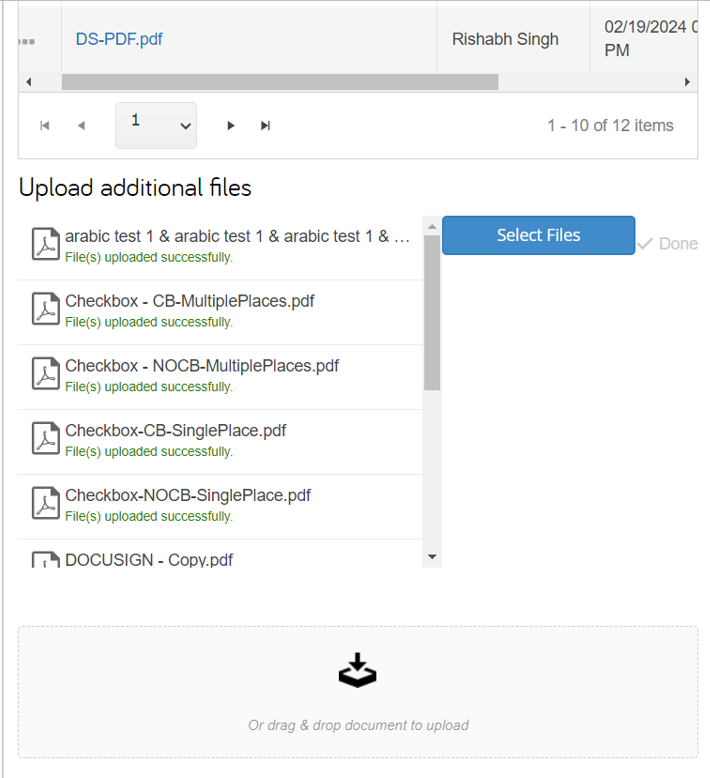
To upload additional files:
You can upload additional attachments to the workflow from the Attachments page. You can upload attachments either by "drag and drop" or by using the Select files function.
- To upload an attachment using "drag and drop:"
- Locate the file you wish to upload on your local workstation.
- Make sure both the directory containing the file for upload and the Attachments page are visible on the desktop.
- Click and hold the left mouse button on the file you wish to upload, then "drag" the file to the drag & drop document to upload field on the View Documents dialog.
- A status bar displays in the Upload additional files field while the upload is in process.
- When the upload has completed, the uploaded file is shown in the Uploaded Files list.
- Locate the file you wish to upload on your local workstation.
- To upload a file using the Select files function:
- Click the Select files button.
- A standard File Upload dialog displays.
- A standard File Upload dialog displays.
- Locate and select the file you wish to upload, then click the Open button on the File Upload dialog.
- The File Upload dialog closes automatically.
- A. status bar displays in the Upload additional files field while the upload is in process.
- When the upload has completed, the uploaded file is shown at the top of the Uploaded Files list.
- Click the Select files button.
Viewing Communications
The Communications tab shows a list of all communications attached to the workflow by all users.
.jpg?revision=1)
To view communications:
- Click the Communications tab in the right panel.
- The Communications page displays.
- The Communications page displays.
- The Communications page shows Comments and Emails attached to the workflow. Communications are listed in reverse chronological order (most recent communication first). Each entry shows the title of the comment, the email address of the user who added the comment, the date and time at which the comment was added, and the comment text.
- Communications are shown in "expanded" format by default.
- Click the button next to the comment title to "collapse" the comment (hide the comment text).
- Click the button to "expand" the comment (show the comment text).
- Click the
- Communications are shown in "expanded" format by default.
- From the Communications page you can choose to add a new comment, edit an existing comment, reply to a comment, or delete a comment.
.jpg?revision=1)
To add a new comment:
- Place the cursor in the Add a comment... text box, then press the <Enter> key.
- The Add New Comment dialog displays.
- The Add New Comment dialog displays.
- Enter a title for your comment in the Title text box.
- Enter the text of your comment in the Text comment text field.
- When all desired information has been entered, click the Add Comment link to add your comment to the workflow. (Click the Cancel link to cancel the comment.)
- The Add New Comment dialog closes, and the Communications page refreshes to display your comment.
.jpg?revision=1)
To edit an existing comment:
- Click the Edit link for the comment you wish to edit.
- The Edit Comment dialog displays.
- The dialog is pre-filled with the current content of the comment.
- Edit the Title and/or Text comment, as appropriate.
- When all desired changes have been made, click the Edit Comment link to save your changes. (Click the Cancel link to discard your changes and retain the previous content of your comment.)
- The Edit Comment dialog closes, and the Communications page refreshes to display your changes.
To reply to a comment:
.jpg?revision=1)
- Click the Reply link for the comment to which you wish to reply.
- The Respond to comment dialog displays.
- The text and Title of the comment are shown at the top of the dialog.
- Enter your response in the Text comment text field.
- Click the Add Comment link to add your response to the comment. (Click the Cancel link to cancel your response.)
- The Respond to comment dialog closes, and the Communications page refreshes to display your response.
To delete a comment:
- Click the Delete link for the comment you wish to delete.
- The Communications page refreshes with the comment removed.
Using Utility Functions
The Workflow Dashboard Utilities Toolbar provides the tools to configure the Workflow Dashboard, save and recall customized configurations of the dashboard, and export a copy of the currently displayed instance of the Workflow Dashboard in Microsoft Excel format. The Utilities Toolbar is located in the Workflow Dashboard header.
The Utilities Toolbar
The Utilities Toolbar lets you perform the following functions:
.jpg?revision=1)
|
Toolbar |
|
|
|---|---|---|
|
|
Save | Lets you save a specific configuration of the Workflow Dashboard (the specific set of columns shown in the list and the order in which they are displayed). |
|
|
Load | Lets you load a previously saved configuration of the Workflow Dashboard. You can also delete previously saved configurations. |
|
|
Select Columns | Lets you select the specific set of columns displayed in the Workflow Dashboard and define Dynamic Fields. You can also change the order in which the columns are displayed. |
|
|
Export Grid | Lets you export a copy of the currently displayed instance of the Workflow Dashboard in Microsoft Excel format. |
Configuring the Workflow Dashboard
You can configure the specific columns and dynamic fields shown in the Workflow Dashboard and the order in which they are displayed.
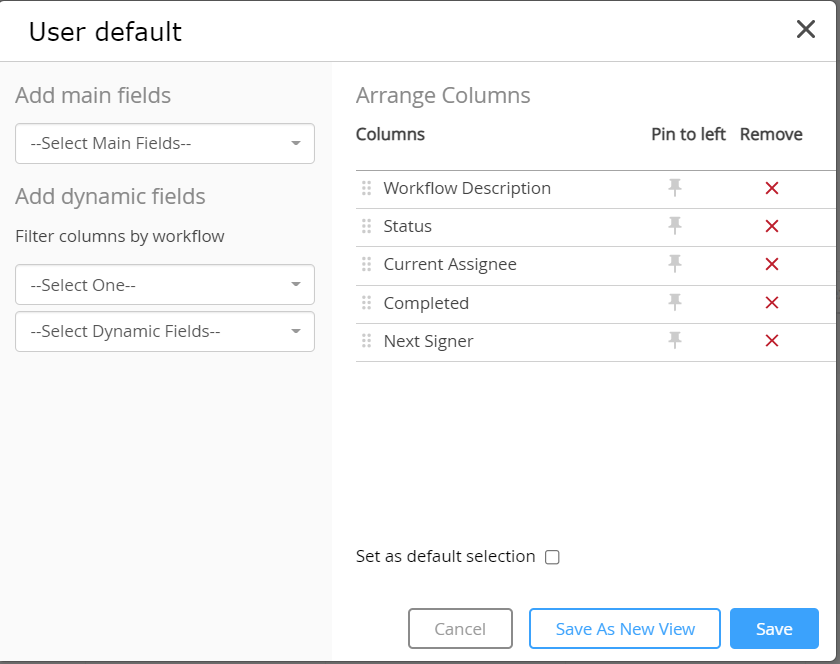
To define a configuration for the Workflow Dashboard:
- Click the Select Columns
.jpg?revision=1) button in the Utilities Toolbar.
button in the Utilities Toolbar.
- The Select columns dialog displays.
- The Select columns dialog displays.
- Use the Define main fields section of the dialog to select the columns for display in the Workflow Dashboard:
- The Column Name list shows all columns that are currently displayed in the Workflow Dashboard. The drop down menu lists all available columns that are not currently displayed in the Workflow Dashboard.
- To search for a column by name, enter the desired name in the drop down menu 'Search' box.
- The menu refreshes as you type to display only those column names that contain the text you enter anywhere in the column name.
- To add a column to the Workflow Dashboard, find the desired column name and click the '+' icon.
- The selected column is added to the Column Name list.
- To remove a column from the Workflow Dashboard, click the X in the Column Name list for the desired column.
- The selected column is remove from the Column Name list and is returned to the drop down menu.
- The selected column is remove from the Column Name list and is returned to the drop down menu.
- Use the Define dynamic fields section of the dialog to select the dynamic fields for display in the Workflow Dashboard:
- The Column Name list shows all dynamic fields that are currently displayed in the Workflow Dashboard. The drop down menu lists all available dynamic fields that are not currently displayed in the Workflow Dashboard.
- To limit the drop down menu to only those dynamic fields associated with a specific workflow, select the desired workflow from the Filter columns by workflow menu.
- To search for a dynamic field by name, enter the desired name in the drop down menu 'Search' box.
- The menu refreshes as you type to display only those dynamic fields that contain the text you enter anywhere in the field name.
- To add a dynamic field to the Workflow Dashboard, find the desired field and then click the '+' icon.
- The selected dynamic field is added to the Column Name list.
- To remove a dynamic field from the Workflow Dashboard, click the X in the Column Name list for the desired field.
- The selected field is remove from the Column Name list and is returned to the drop down menu.
- Common reasons a dynamic form field is not available for selection:
- The 'Add to Repository' box must be checked for the form field to be selected on the dashboard
- The element name or eSignature tag for the form field cannot contain any spaces; underscores are allowed as placeholders
- You can order the added columns in your desired order by using the right hand 'Arrange Columns' section. To reorder columns, simply drag and drop the column names into the desired order.
- You can pin a column by selecting the pin icon to the left of the column name in the 'Arrange Columns' section.
- If you wish to set this configuration as the default configuration for the Workflow Dashboard, select the Set as default selection check box.
- When all desired selections have been made, click the Save button to save your changes.
- The Select columns dialog closes, and the Workflow Dashboard refreshes to display the new configuration.
- The Select columns dialog closes, and the Workflow Dashboard refreshes to display the new configuration.
-
If desired, you can save the configuration for recall at any time.
To re-order columns in the Workflow Dashboard:
- Click and hold the left mouse button on the column you wish to move, then drag the column to the desired position.
Saving a Configuration
You can save a specific configuration of the Workflow Dashboard (the specific set of columns shown in the dashboard and the order in which they are displayed) for recall at any time.
NOTE
Each saved configuration must have a unique name.
To save a configuration:
- Configure the Workflow Dashboard with the desired selection of columns and column display order.
- Click the Save
.jpg?revision=1) button in the Utilities Toolbar.
button in the Utilities Toolbar.
- The New Configuration dialog displays.
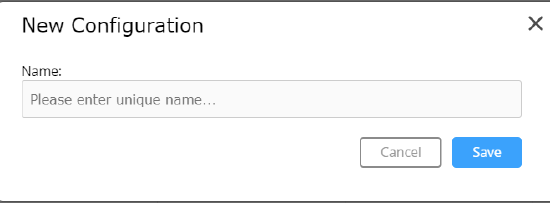
- Enter a name for the configuration in the Name text box.
- BE SURE to use a unique name for the configuration.
- BE SURE to use a unique name for the configuration.
- Click the Save button on the New Configuration dialog to save the configuration. (Click the Cancel button to return to the Workflow Dashboard without saving the configuration.)
- A confirmation dialog displays the message "Configuration has been saved."
- A confirmation dialog displays the message "Configuration has been saved."
- Click the OK button on the confirmation dialog to close the dialog.
- The New Configuration dialog closes automatically.
- The saved configuration is added to the Configuration Bar at the top of the Workflow Dashboard.
Loading a Configuration
You can load a previously saved configuration of the Workflow Dashboard to automatically reconfigure the Workflow Dashboard according to the saved parameters. Saved configurations can be accessed through the Configuration Bar at the top of the Workflow Dashboard, or by using the Load function. You can also delete a previously saved configuration.
NOTE
In cases where a large number of configurations have been saved, only most recently saved and/or loaded configurations are visible in the Configuration Bar. Configurations not visible in the Configuration Bar must be loaded using the Load function.
To load a configuration from the Configuration Bar:
The currently active (loaded) configuration is identified by a check mark .jpg?revision=1) . All other saved configurations are indicated by a pushpin
. All other saved configurations are indicated by a pushpin .jpg?revision=1) .
.
- Click the button for the desired configuration in the Configuration Bar.
- The Workflow Dashboard refreshes to display content according to the saved parameters.
To load a configuration using the Load Function:
.jpg?revision=1)
- Click the Load
.jpg?revision=1) button in the Utilities Toolbar.
button in the Utilities Toolbar.
- The Load Configuration dialog displays.
- The Load Configuration dialog is a two-page display, with tabs for User Level and Tenant Level. The tab under which a saved configuration is listed depends on the permissions granted to the user that saved the configuration.
- Click the User Level or Tenant Level tab, as necessary, to locate the configuration you wish to load.
- Click the button in the Action column for the configuration you wish to load.
- The Load Configuration dialog closes automatically, and the Workflow Dashboard is reconfigured according to the saved parameters.
To delete a saved configuration:
- Click the Load button in the Utilities Toolbar.
- The Load Configuration dialog displays.
- The Load Configuration dialog is a two-page display, with tabs for User Level and Tenant Level. The tab under which a saved configuration is listed depends on the permissions granted to the user that saved the configuration.
- Click the User Level or Tenant Level tab, as necessary, to locate the configuration you wish to load.
- Click the button in the Action column for the configuration you wish to delete.
- A confirmation dialog displays the message "Configuration deleted."
- A confirmation dialog displays the message "Configuration deleted."
- Click the OK button on the confirmation dialog to close the dialog.
- The Load Configuration dialog closes automatically, and the Workflow Dashboard returns to its default configuration.
Exporting the Workflow Dashboard
You can export a copy of the Workflow Dashboard as a Microsoft Excel (.xlsx) file. You can export the complete Workflow Dashboard, or apply filters to export a "subset" of the complete list.
NOTE
If filters have been applied to the Workflow Dashboard, only those entries shown in the filtered dashboard are included in the exported file. To export the complete dashboard, be sure to remove all filters before exporting the dashboard.
To export the Workflow List:
- Click the Export Grid
.jpg?revision=1) button in the Utilities Toolbar.
button in the Utilities Toolbar.
- A standard Download Confirmation dialog displays.
- Select the Save option on the Download Confirmation dialog, then click OK to proceed.
- A standard Save As dialog displays.
-
Enter a name for the export file in the File name text box.
NOTE
BE SURE to retain the .xlsx file extension.
- Browse to the location in which you wish to save the exported file, then click the Save button on the Save As dialog.
- The Save As dialog closes, and the file is saved to the selected location.
Workflow Dashboard Actions Bar
The Actions Bar lets you perform a variety of functions for the related workflow. The specific options available depend on the content and current status of the workflow as well as your user permissions. The following options are available:
|
Action Icon |
Function |
Description |
|---|---|---|
|
|
Cancel Request |
Lets you cancel a request at any stage in the workflow process. Note: Only super-admin can view canceled requests on their dashboard. |
|
|
Cancel Signature | Lets you cancel a signature attached to a workflow. |
|
|
Edit and Cancel eSign | For workflows with a pending e-signature, lets you cancel an e-signature and forward the workflow to the next stage. |
|
|
Documents | Lets you view, download and delete attachments for the associated workflow and upload additional files to the workflow. |
|
|
Edit |
Lets you edit item details for a workflow. |
|
|
Edit Request | Lets you edit the content of the workflow form, view and add comments, and manage attachments. |
|
|
Reassign | Lets you reassign a workflow to another user. |
|
|
Remove | Lets you remove a workflow from the Workflow Dashboard. |
 |
Resend Notification | Lets you resend the last 'Next Action' notification that was sent from that record. |
 |
Show Linked Records | Filters the dashboard to display the selected record and any records which have been linked to it. To clear filter, select the 'Show All Records' action, or refresh the dashboard. This action can only be taken when a single records is selected. |
|
|
View History | Lets you view workflow history, including the workflow audit trail, documents and communications, eSignature documents, and related workflows. |
.jpg?revision=1)
.jpg?revision=1)
.jpg?revision=1)
.jpg?revision=1)
.jpg?revision=1&size=bestfit&width=15&height=15)
.jpg?revision=1&size=bestfit&width=15&height=15)
.jpg?revision=1)
.jpg?revision=1)
Edit Request Action
The Edit Request action can be taken in order to update and complete the current stage of a workflow(s). To do this, select all workflows you would like to take this action on, and then choose 'Edit Request' from the Actions Bar.
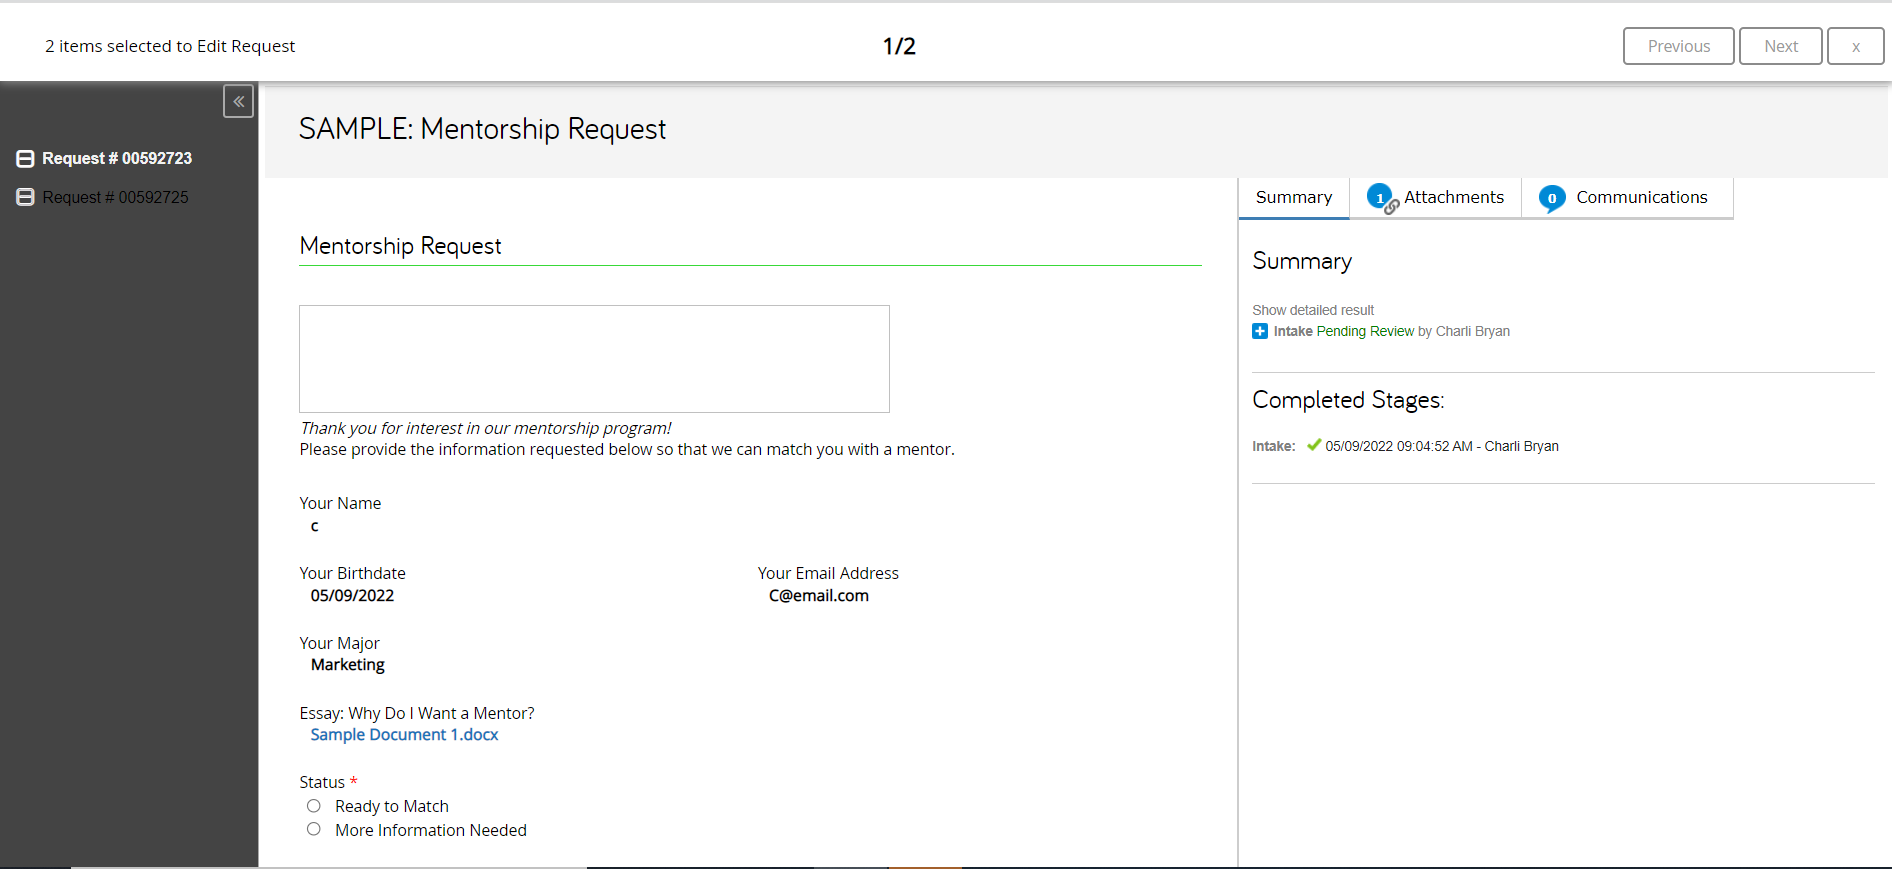
When multiple requests you can cycle through them using the Previous and Next buttons. However, once an individual request has been completed and the current stage has been submitted, you will not be able to return to that request before first returning to the dashboard. As each request is submitted, a green checkbox will appear next to the workflow name on the left hand side panel to indicate that the request has been progressed and is no longer available in the current window.
You can close the Edit Request window at any time by clicking the X in the top right corner. When closed, any requests which had not been submitted or updated will remain on the current stage.
Viewing Workflow History
The View History function lets you view complete history for a workflow, including an Audit Trail, related Documents and Communications, eSignature Documents and Related Workflows. You can also export workflow history to a PDF document for download to a local workstation, or "bulk export" a .zip file containing the Audit Trail summary details, workflow attachments and e-Signature documents, as applicable.
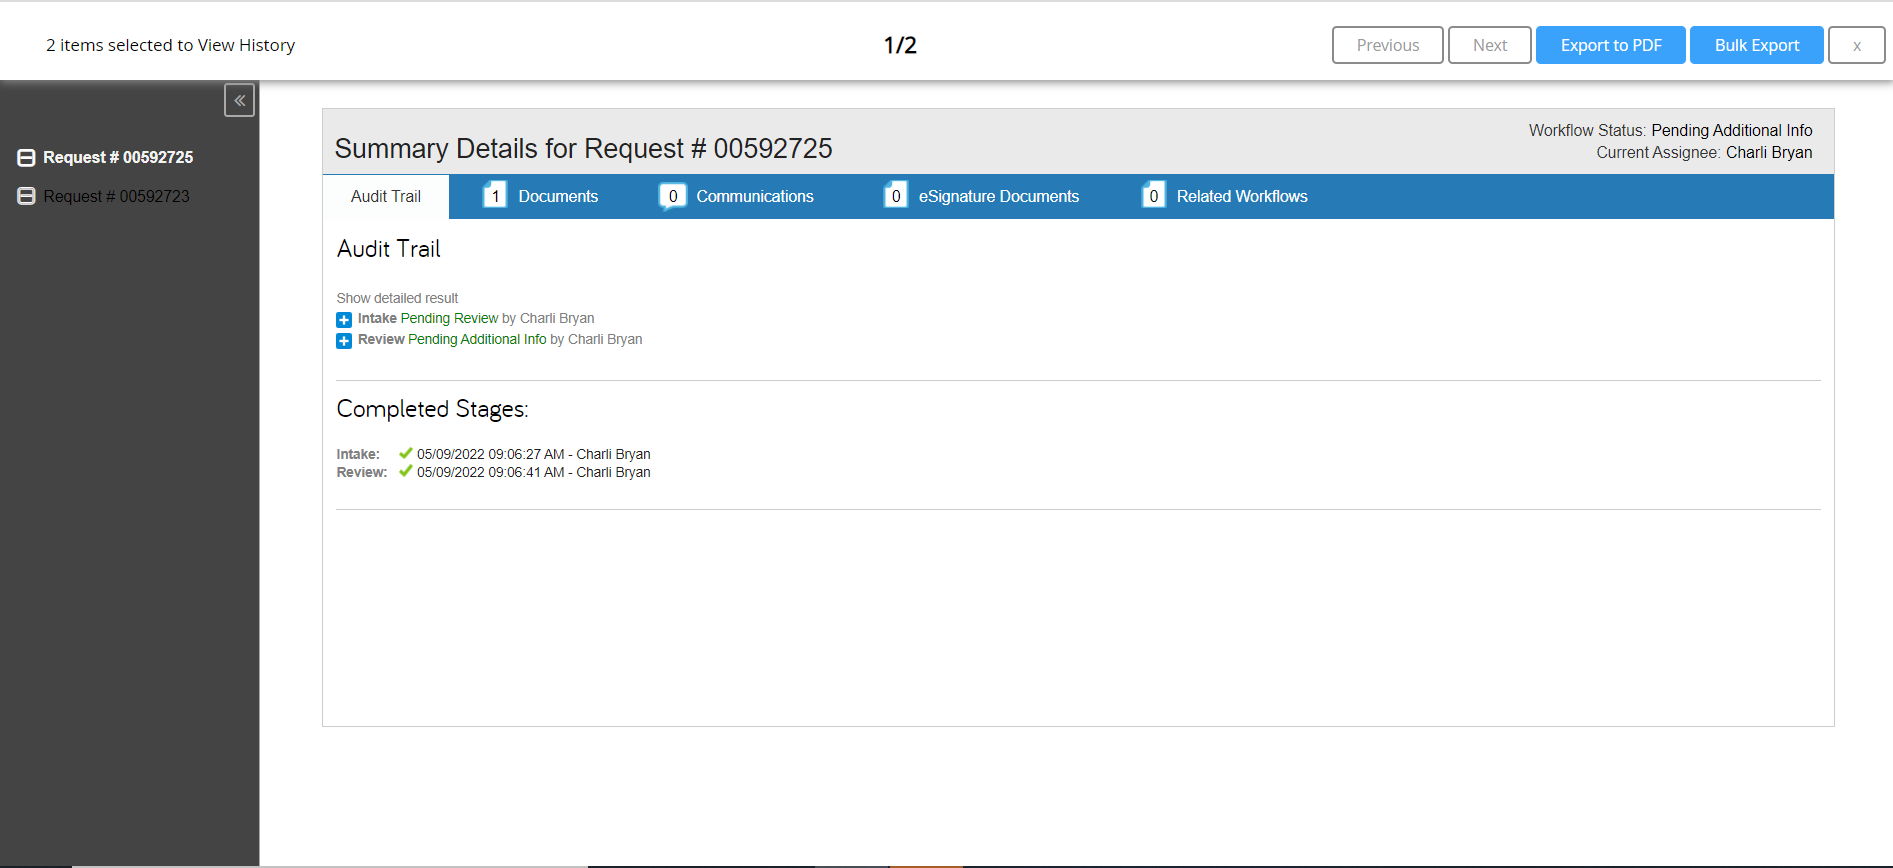
To view Workflow History:
- Locate the desired workflow(s) in the Workflow Dashboard.
- Select
.jpg?revision=1&size=bestfit&width=15&height=15) View History from the associated Actions bar.
View History from the associated Actions bar.
- The Workflow History screen displays.
- The Summary Details for field shows the name of the workflow.
- The Workflow Status field shows the current status of the workflow.
- Click a tab to view workflow history details; Audit Trail, Documents, Communications, eSignature Documents or Related Workflows.
When viewing the audit trail for multiple records, you can scroll through them using the Previous and Next buttons at the top of the page. You can also select individual records on the left hand side in order to skip directly to that record.
Dashboard Quick Submit
Certain records may have Dashboard Quick Submit enabled. These records will be indicated by a highlight and bold color bar to the left of the last pinned column:
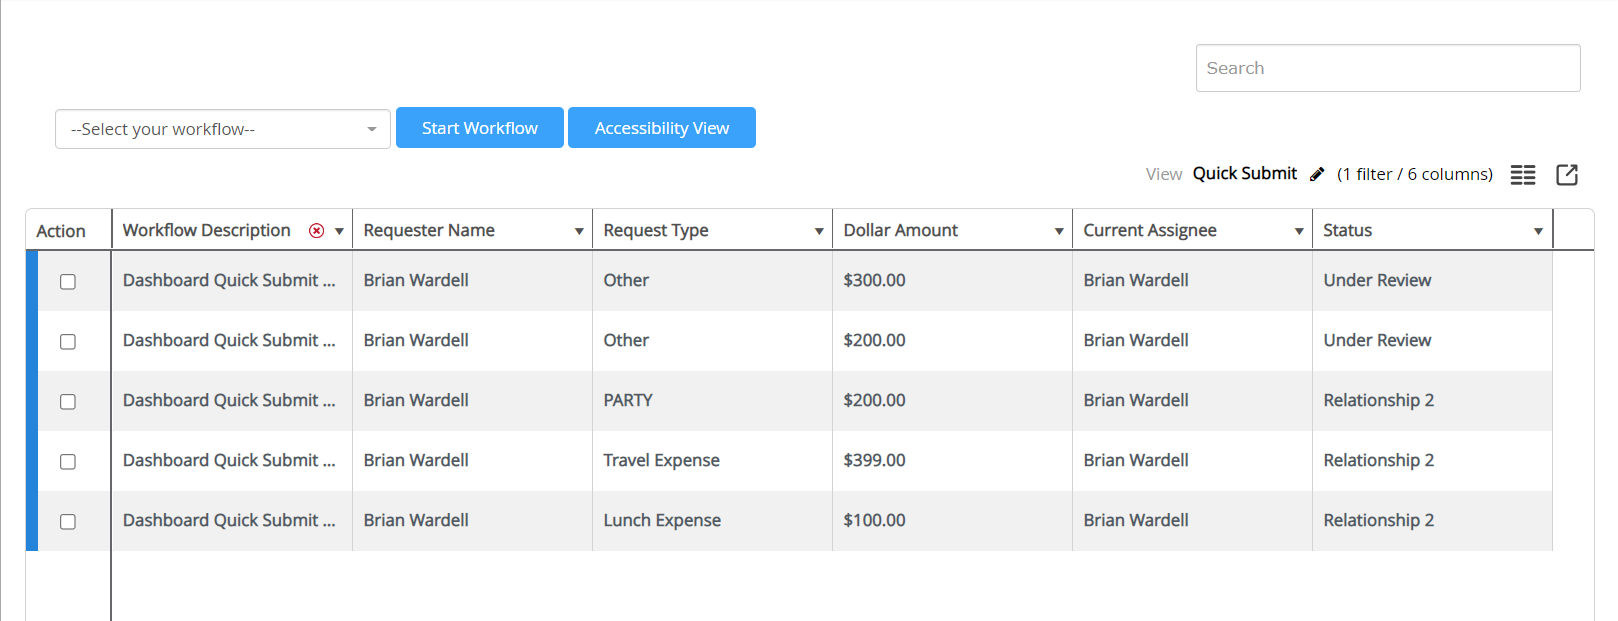
Records with this indicator can be moved to the next stage without needing to use the "Edit Request" action. To do so, check all of the records you would like to take the action on and then select the desired Quick Submit action from the Quick Submit Actions bar:
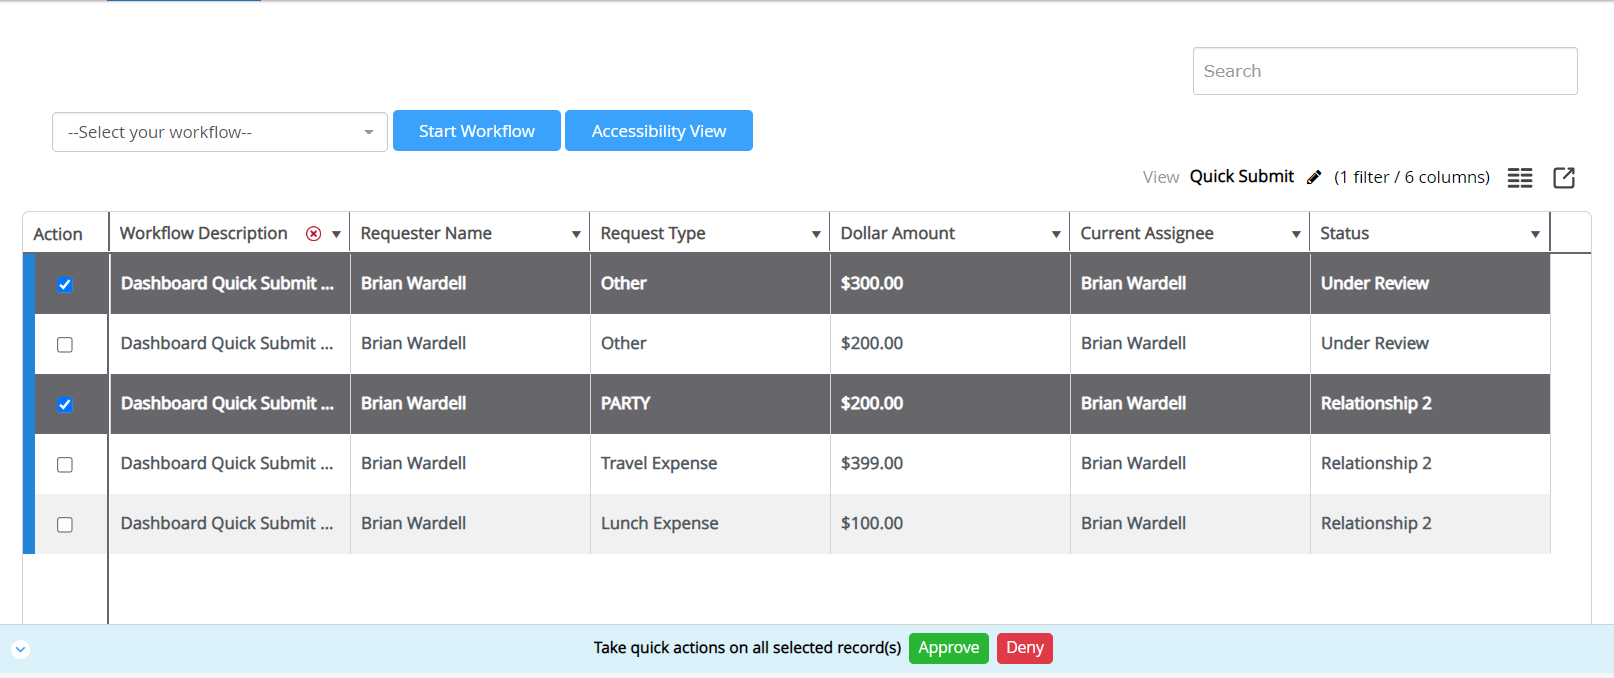
The selected action will be applied to all selected records, and any comments entered will be recorded as well. NOTE: Bulk Quick Submit actions can be taken on all records that were generated from the same workflow template (not version specific) and that are currently on a stage with identical Quick Submit configurations. If multiple records are selected and only some of them allow Quick Submit, you will not be able to Quick Submit in bulk.
Viewing the Audit Trail
The Audit Trail tab lets you view summary details for each completed stage of the workflow. The Audit Trail section of the tab lists each completed stage of the workflow by stage number and name, and shows the name of the user responsible for completing the stage. The Completed Stages section of the tab lists each completed stage of the workflow by stage number, and includes the date and time at which the stage was completed, and the name of the user responsible for completing the stage.
.jpg?revision=1)
Each completed stage in the list is shown in "collapsed" format by default.
- Click the button next to a workflow stage to "expand" the stage.
- The "expanded" entry shows the values currently entered in the workflow form for the completed stage.
- Click the button next to a workflow stage to "collapse" the stage.
Viewing Documents
The Documents tab shows a list of all documents (Uploaded Files) attached to the currently selected workflow. Each entry in the list shows the Name of the document, the name of the user that uploaded the document (Uploaded by), the document Version number, and the Source of the document. The name of the document is a hyperlink that is redirected to the document.
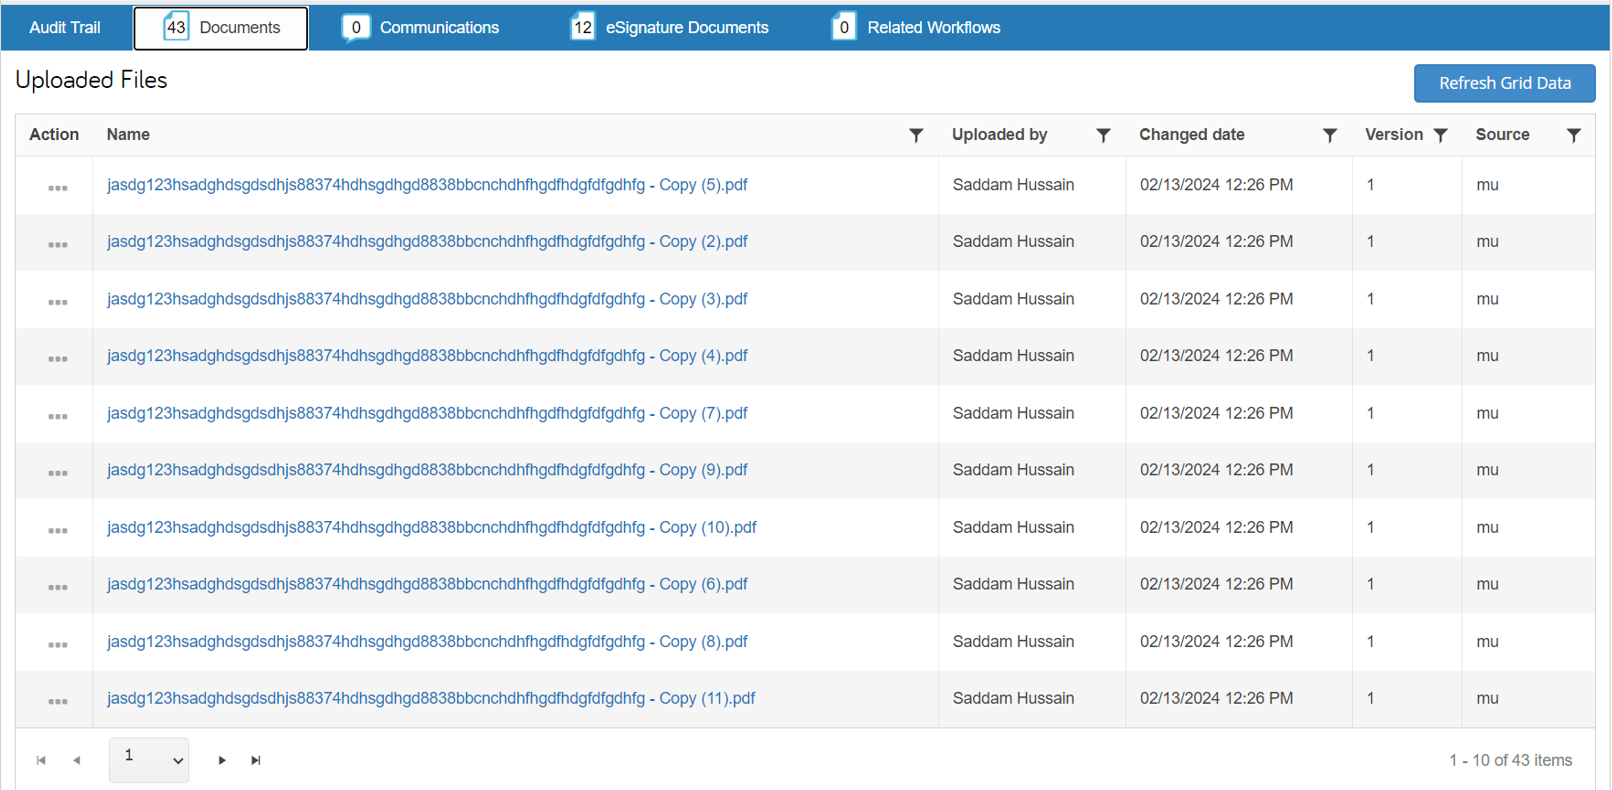
If there are more than 10 documents are attached to the currently selected workflow, the Uploaded Files list list is a multi-page screen, with a 10 documents shown per page. The sequence numbers for the currently displayed documents and the total number of documents included in the list are shown in the lower right corner of the list. Controls for navigating the list are shown in the lower left corner of the list. The list is initially sorted alphanumeric order, by Name. If desired, you can sort the list according to a selected sort key or filter the list to display a subset of documents. Additionally, the Documents tab lets you view version information and download documents associated with the workflow.
Click the Refresh Grid Data button to refresh the contents of the Uploaded Files list.
To download a document:
- Select
.jpg?revision=1) Download or
Download or .jpg?revision=1&size=bestfit&width=14&height=13) Download Merged (if available) from the Actions menu for the desired document.
Download Merged (if available) from the Actions menu for the desired document.
- A standard File Download dialog displays.
- A standard File Download dialog displays.
- Select the "save" options from the File Download dialog.
- A standard Save As dialog displays.
- A standard Save As dialog displays.
- Navigate to the location in which you wish to save the document.
- If desired, enter a new name for the document in the File name text box. Be sure to retain the file extension.
- Click the Save button on the Save As dialog.
- The document is downloaded to the selected location.
To view file versions:
.jpg?revision=1)
- Select
.jpg?revision=1&size=bestfit&width=14&height=14) Versions from the Actions menu for the desired document.
Versions from the Actions menu for the desired document.
- The File Versions list displays.
- The File Versions list displays.
- The File Versions list shows the Name of the document, the name of the user that uploaded the document (Uploaded by), the date and time at which the document was last changed (Changed date), and the document Version number.
- If there are more than 10 items in a list, the list is a multi-page list, with a 10 documents shown per page. The sequence numbers for the currently displayed documents and the total number of documents included in the list are shown in the lower right corner of the list.
- Controls for navigating the list are shown in the lower left corner of the list.
- The list is initially sorted in alphanumeric order, by Name. If desired, you can:
- Sort the list according to a selected sort key
- Filter the list to display a subset of documents
- If desired, you can download a specific version of the document.
- If there are more than 10 items in a list, the list is a multi-page list, with a 10 documents shown per page. The sequence numbers for the currently displayed documents and the total number of documents included in the list are shown in the lower right corner of the list.
- Click the Close button to close the dialog and return to the Attachments page.
To download an attachment from the File Versions dialog:
- From the File Versions dialog, click the
.jpg?revision=1) icon for the desired document.
icon for the desired document.
- A standard File Download dialog displays.
- A standard File Download dialog displays.
- Select the "save" options from the File Download dialog.
- A standard Save As dialog displays.
- A standard Save As dialog displays.
- Navigate to the location in which you wish to save the document.
- If desired, enter a new name for the document in the File name text box. Be sure to retain the file extension.
- Click the Save button on the Save As dialog.
- The document is downloaded to the selected location.
- The document is downloaded to the selected location.
To delete an attachment:
- Select Delete from the Actions menu for the desired document.
- A confirmation dialog displays the message "Do You want to delete this Workflow Attachment?"
- Click the Yes button to delete the document. (Click the No button to cancel the deletion and close the dialog.)
- The screen refreshes with the document deleted from the list.
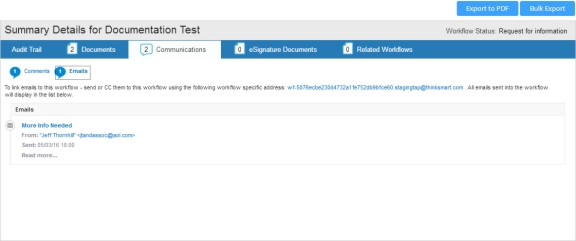
Viewing Communications
The Communications tab shows a list of all communications (Comments and Emails) attached to the workflow by all users. Communications are listed in reverse chronological order (most recent communication first).
To view Comments:
- Click the
.jpg?revision=1) icon to display the Comments page.
icon to display the Comments page. - Each entry in the list shows the name of the user that added the comment, the date and time at which the comment was added, title of the comment, and the comment text.
.jpg?revision=1)
To view Emails:
- Click the
.jpg?revision=1) icon to display the Emails page.
icon to display the Emails page. - Each entry in the list shows the email subject, the name and email address of the user that sent the email, and the date and time at which the email was sent. Click an entry to view the email text.
.jpg?revision=1)
Viewing eSignature Documents
The eSignature Documents tab shows a lost of all eSignature documents associated with the currently selected workflow. Each entry in the list shows the document Name, document Status, and the date and time at which the document was created (Creation date).
.jpg?revision=1)
If there are more than 10 eSignature documents for the currently selected workflow, the eSignature Documents list is a multi-page screen, with a 10 documents shown per page. The sequence numbers for the currently displayed workflows and the total number of workflows included in the list are shown in the lower right corner of the list. Controls for navigating the list are shown in the lower left corner of the list. The list is initially sorted alphanumeric order, by document Name. If desired, you can sort the list according to a selected sort key or filter the list to display a subset of related documents. Additionally, the eSignature Documents tab lets you download documents for with the associated workflow.
To download a document:
- Click the
.jpg?revision=1&size=bestfit&width=24&height=24) button in the Actions column for the desired document.
button in the Actions column for the desired document.
- A standard File Download dialog displays.
- A standard File Download dialog displays.
- Select the "save" options from the File Download dialog.
- A standard Save As dialog displays.
- A standard Save As dialog displays.
- Navigate to the location in which you wish to save the document.
- If desired, enter a new name for the document in the File name text box. Be sure to retain the file extension.
- Click the Save button on the Save As dialog.
- The document is downloaded to the selected location.
Viewing Related Workflows
The Related Workflows tab shows a list of all workflows associated with the currently selected workflow. Each entry in the list shows the document ID # of the related workflow, the workflow Title (same as the Workflow Name shown in the Workflow Dashboard), the Workflow Status, the Date on which the workflow was most recently updated, and the Relationship Type of the workflow (Parent or Child).
.jpg?revision=1)
If there are more than 10 related workflows for the currently selected workflow, the Related Workflows list is a multi-page screen, with a 10 workflows shown per page. The sequence numbers for the currently displayed workflows and the total number of workflows included in the list are shown in the lower right corner of the list. Controls for navigating the listare shown in the lower left corner of the list. The list is initially sorted alphanumeric order, by document ID #. If desired, you can sort the list according to a selected sort key or filter the list to display a subset of related workflows.
To view a related workflow:
- Click the View button in the Actions column for the desired workflow.
- The Workflow History screen for the selected workflow displays.
Exporting Workflow History
You can export Workflow History to a PDF file for download to a local workstation.
To export Workflow History to a PDF file:
- Click the Export to PDF button.
- A standard File Download dialog displays.
- A standard File Download dialog displays.
- Select the "save" option from the File Download dialog.
- A standard Save As dialog displays.
- A standard Save As dialog displays.
- Navigate to the location in which you wish to save the document.
- If desired, enter a new name for the document in the File name text box. Be sure to retain the .pdf file extension.
- Click the Save button on the Save As dialog.
- The document is downloaded to the selected location.
- The document is downloaded to the selected location.
To "bulk export" Workflow History:
- Click the Bulk Export button.
- A standard File Download dialog displays.
- A standard File Download dialog displays.
- Select the "save" option from the File Download dialog.
- A standard Save As dialog displays.
- A standard Save As dialog displays.
- Navigate to the location in which you wish to save the document.
- If desired, enter a new name for the document in the File name text box. Be sure to retain the .zip file extension.
- Click the Save button on the Save As dialog.
- The file is downloaded to the selected location.
Dashboard Quick Submit
As of TAP 1.9, Dashboard Quick Submit can be enabled on a workflow stage or across multiple workflow stages. To learn more about this functionality, click here.