
Configuring Smart Invoice
Smart Invoice is Mitratech’s electronic invoicing product that automates the receipt, approval, and payment of legal expenses, integrating fully with the eCounsel matter management system.
Overview
Configuring the integration is a multi-step process. The following list is a high-level overview of process; details for each step of the process are covered in the rest of this article:
- Configure the Invoice Integration and Invoice Settings in Suite Manager.
- Add the Lobby widget to the eCounsel Home page.
- Import the Collaborati Service Provider (elobby_collaborativendor_import_template.xml) through the Lobby component in Suite Manager.
- Configure the alert notifications for vendor and timekeeper approvals.
- Import the Collaborati Invoice Integration task (elobby_collaboratiinvoice_import_template.xml) in the Scheduler component in Suite Manager.
- Verify that the scheduler service is started and schedule the Collaborati Invoice Integration and the Vendors/Timekeepers/Codes/Matters tasks.
- If needed:
- Configure the Approver E-mail Notification task to e-mail messages to all invoice approvers who have items pending in their Invoices Awaiting My Approval list.
- Configure the Invoice Routing task to provide routing of invoices to approvers in sequential order.
- Import any invoice audit rules and configure notifications.
- Hide invoice tax-related fields by type profile.
- If migrating from Corridor to Collaborati, or if you import LEDES files manually using eCounsel, delete and re-import the following rules:
- LineItemCalculation
- LineItemCalculationWithTax
- SumOfLineItemsFoot
- SumOfLineItemsFootWithTax
- Run the Collaborati Vendors/Timekeepers/Codes/Matters task to import vendors into the Lobby for approval.
- Approve and map the vendors that appear in the Lobby. Note that an approved vendor must be a player on individual matters in order to bill against those matters.
- After a new vendor is approved, the client receives an email notification for configuring that vendor's account. Use the link in the email to configure the vendor in Collaborati, including adding or importing the timekeepers into Collaborati.
- If necessary, add or import the timekeepers into eCounsel. The vendor must be listed as the Employer of the timekeeper.
- Run the Collaborati Vendors/Timekeepers/Codes/Matters task again to import the timekeepers into eCounsel the Lobby widget.
- Approve and map timekeepers.
Configuring System Settings
Configuring Invoice Integration Settings
Using invoice integration with Collaborati allows for automatic import of invoices using the Collaborati Website. The Collaborati Website is a secure Website hosted by Mitratech allowing vendors/law firms to submit standard LEDES 1998B, 1998BI/1998BI V2, 2000, or XML 2.0/2.1 format invoices electronically. The Website also allows vendors/law firms to check the status of the submitted invoices.
To Enable Integration with Collaborati:
- Open Suite Manager.
- On the Suite Manager control panel, click the
 System Settings component in the System Configuration area.
 - On the System Settings window, click the eCounsel tab, and then click Invoice Integration Settings.
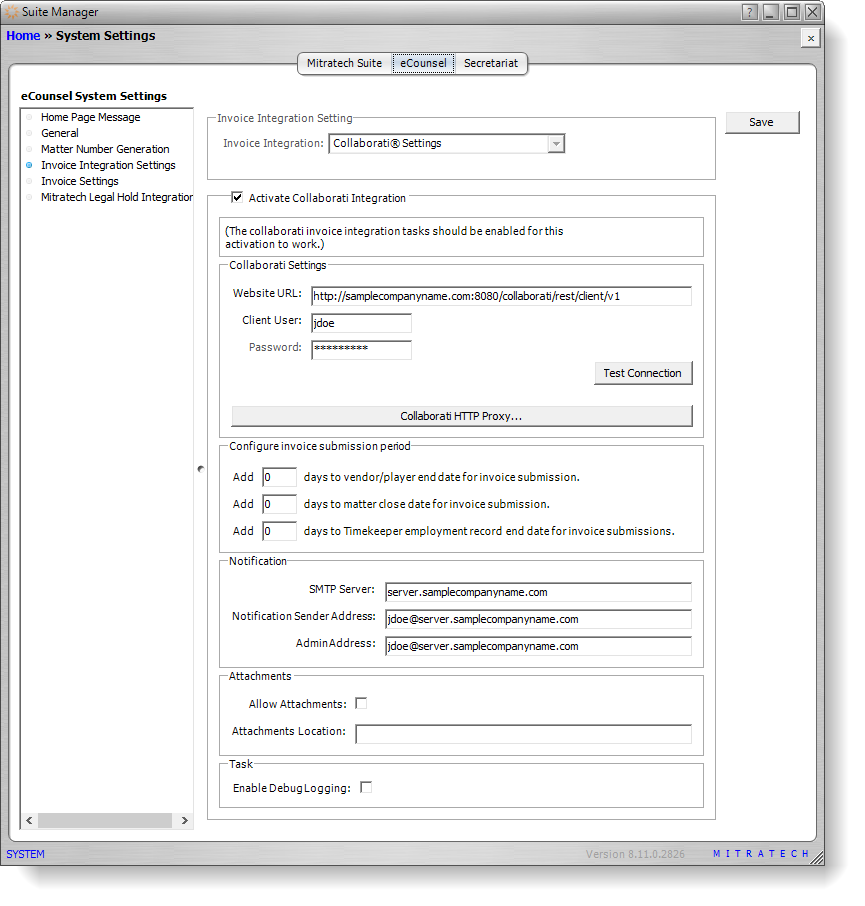
- In the Invoice Integration Setting area, select Collaborati Settings.
- Select the Activate Collaborati Integration checkbox. When this checkbox is selected, the Invoice Integration Setting cannot be changed.
- In the Website URL field, enter the URL for the Collaborati Website with rest/client/v1 added to the end. For example, if your website URL is http://samplecompanyname.com:8084/collaborati, type http://samplecompanyname.com:8084/collaborati/rest/client/v1 in the field.
- Type the client user credentials in the Client User and Password fields.
- Click Test Connection to verify the connection between eCounsel and Collaborati.
- In the Configure invoice submission period area:
- Type the number of days after a vendor’s end date on the matter that the vendor is allowed to submit invoices.
- Type the number of days after a matter's end date that the vendor is allowed to submit invoices (available starting in Suite 8.11 SP9).
- Type the number of days after a timekeeper’s employment end date that the vendor is allowed to submit invoices (available starting in Suite 8.11 SP9).
- In the Notification area, type the name of the SMTP server for sending notifications and the e- mail address that will receive any correspondence that pertains to your electronic invoicing account in the Notification Sender Address text box. This e-mail address will be used as the return address for any rejected electronic invoices.
In the AdminAddress text box, type the account that will receive notification of all activity on the electronic invoicing account. - Click Save.
Configuring Invoice Settings
In the System Settings component of Suite Manager, you can select options for the invoice settings in the Invoice module of eCounsel. For more information on configuring invoice settings, see Setting Invoice Preferences.
Enabling Import of LEDES Files
Importing LEDES files manually requires that a license key be entered in Suite Manager.
To Enable Manual LEDES Imports:
- Open Suite Manager.
- On the Suite Manager control panel, click the
 System Settings component in the System Configuration area.
 - On the System Settings window, click the eCounsel tab.
- On the eCounsel tab, click Invoice Settings.
- In Invoice Settings, type the code to allow manual LEDES file imports in the License Key text box.

- Click Save.
Configuring Tasks
Each of the tasks that are part of Smart Invoice must be scheduled so that the task runs at a client-specified time.
Note: The following tasks must be done in this order so that the initial vendor approval alerts are sent to approvers. Details on how to perform these tasks are included below.
- Import the Collaborati Service Provider template to import the appropriate tasks.
- Configure the alerts for Collaborati vendor and timekeeper approvals.
- Configure the Collaborati integration tasks to run at a client-specified time.
Importing the Collaborati Service Provider
To import the Collaborati Vendors/Timekeepers/Codes/Matters Task and the Collaborati Vendor and Collaborati Timekeeper alerts for the Collaborati integration, import the Collaborati service provider template into the Lobby.
To Import the Collaborati Service Provider:
- Open Suite Manager.
- On the Suite Manager control panel, click the Lobby component in the Tools & Utilities area.
- On the Lobby window, click Import.
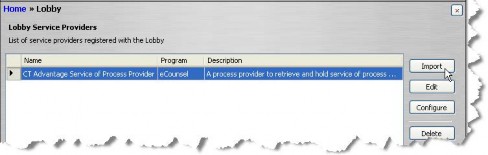
- On the Select the XML or Script file for import dialog box, navigate to and select the elobby_collaborativendor_import_template.xml file, and then click Open.
- The Collaborati Vendor Authorization Provider now appears in the list of Lobby Service Providers. Click Save and Close.
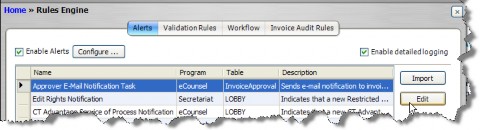
Configuring Alerts
In the Rules Engine component of Suite Manager, you can enable alerts and specify the e-mail address from which to send the alerts. E-mails sent to approvers contain a link to the Invoices Summary page and a list of links to the individual invoices. Clicking a link opens the corresponding page in eCounsel.
To Enable Alerts:
- On the Suite Manager control panel, click the Rules Engine component in the Tools & Utilities area.
- On the Alerts tab, select the Enable Alerts checkbox.
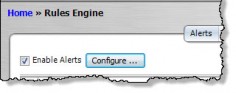
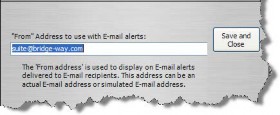
- To configure the “From” e-mail address to use with the alerts, click the Configure… button and designate the e-mail address from which the alerts will be sent. Click Save and Close.

- Select the Collaborati Vendor alert and click Edit.
- On the Properties tab, enter the deployment URL for Suite as the E-mail URL Base parameter in the following format: http://<ServerName>:<Port>/<Context>where <ServerName> is the name of the server, <Port> is the number of the port used to connect to the server, and <Context> is the context name for Suite.
- Click Save.
- On the Users tab, select the users who will be notified to approve new vendors.
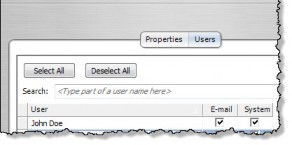
- The System checkbox enables the vendors to be displayed on the Lobby widget in eCounsel.
- The E-mail checkbox enables e-mail notifications to that user.
- Click Save.
- Repeat these steps for the Collaborati Timekeeper alert.
Configuring the Collaborati Integration Tasks
The following tasks are necessary for the Collaborati integration:
- The Collaborati Invoice Integration Task, which is imported through the scheduler, synchronizes Collaborati invoices for approval.
- The Collaborati Vendors/Timekeepers/Codes/Matters Task, which was imported through the Lobby (see Importing the Collaborati Service Provider), automatically synchronizes the following data between Collaborati and eCounsel:
- Vendor authorization
- Timekeeper authorization
- Matter records
- Task, Activity, Expense, Tax Type, and Fee codes
- Line item tax details
Codes are pushed to Collaborati from eCounsel on a client by client basis in the appropriate format. Each vendor decides which codes to use and map them in the Collaborati system. When entering new codes in Suite Manager, consider the following:
- All characters before the first space are mapped as the code in Collaborati and the whole line item (code plus description, including all spaces) is mapped as the description field. The description does not come through the LEDES file and is only used for the vendors understanding of the codes in Collaborati.
- The codes cannot contain any special characters in Collaborati, so any special character in the code (the characters before the first space) will be removed when sent to Collaborati. For example, if A/B is entered as the code, the special character is removed so that AB is sent to Collaborati.
- If a code exists in one phase in Suite Manager and you enter the same code with a different description in another phase, Suite Manager and eCounsel will accept the code but the code will not be pushed to Collaborati.
Depending on how it is configured, the scheduled Collaborati Vendors/Timekeepers/Codes/Matters Task picks up all the vendors that have been connected in Collaborati and brings them to eCounsel for approval or rejection. These vendors are displayed in the eCounsel lobby, where you can click to approve the vendor, the name of the vendor, the e- mail address, address, and tax ID.
To Import the Collaborati Invoice Integration Task:
- In Suite Manager, open the Scheduler component, click the Template tab.
- On the Select the XML or Script file for import dialog box, select the elobby_collaboratiinvoice_import_template.xml file and then click Open. This file is usually found in the XML folder of the installation media.
To Schedule the Collaborati Integration Tasks:
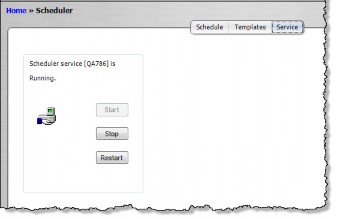
- In Suite Manager, open the Scheduler component, click the Service tab, and verify that the service has been started.
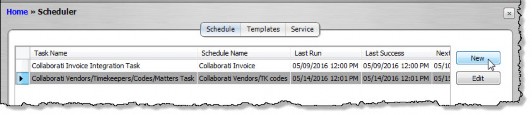
- On the Schedule tab, select the Collaborati Vendors/Timekeepers/Codes/Matters Task and click Run Now to run the task manually and allow the task to finish. When the Collaborati Vendors/Timekeepers/Codes/Matters Task has run, the vendors appear on the Lobby widget and/or the approvers will receive an e-mail, depending on the configuration.
- With the Collaborati Vendors/Timekeepers/Codes/Matters Task still selected, click New.
- In the Schedule area, create a schedule for the task. For more information on creating a schedule, see Scheduling a Task.
- Click Save and Close.
- Repeat these steps, selecting the Collaborati Invoice Integration Task in order to schedule the synchronization of invoices.
![]() If you run the Collaborati Vendors/Timekeepers/Codes/Matters Task before configuring the alerts to notify the approvers, the vendors are imported but no alerts for approval are sent. These vendors cannot be approved because the record is now stored in the database and will not be recognized as “new.”
If you run the Collaborati Vendors/Timekeepers/Codes/Matters Task before configuring the alerts to notify the approvers, the vendors are imported but no alerts for approval are sent. These vendors cannot be approved because the record is now stored in the database and will not be recognized as “new.”
If this scenario happens, delete the record from the database in both the LobbyAudit table and the Lobby table.
![]() When a vendor is removed as a player on a matter, that matter is still available in Collaborati for that vendor until the scheduled Collaborati Vendors/Timekeepers/Codes/Matters Task runs again.
When a vendor is removed as a player on a matter, that matter is still available in Collaborati for that vendor until the scheduled Collaborati Vendors/Timekeepers/Codes/Matters Task runs again.
Mitratech recommends scheduling the Collaborati Vendors/Timekeepers/Codes/Matters Task more frequently than the Collaborati Invoice Integration Task.
Configuring the Approver E-mail Notification Task
The Approver E-mail Notification task can be installed to send an e-mail to invoice approvers listing the invoices awaiting their approval. The e-mail will be sent to the address(es) that have the Is Primary checkbox selected on the person’s Contact Info tab.
![]() It is recommended that the Invoice Routing task be used in conjunction with the Approver E-mail Notification task.
It is recommended that the Invoice Routing task be used in conjunction with the Approver E-mail Notification task.
![]() If invoice logical group is enabled and a user who does not have access to a matter is explicitly assigned to approve an invoice for that matter, the Approver E-mail Notification task will send the user an e-mail from which he/she can access and approve the invoice.
If invoice logical group is enabled and a user who does not have access to a matter is explicitly assigned to approve an invoice for that matter, the Approver E-mail Notification task will send the user an e-mail from which he/she can access and approve the invoice.
However, the invoice will display “Restricted Data” in areas that pertain to the matter.
After configuring the task in the Scheduler component, you can enable alerts using the Rules Engine component and specify the e-mail address from which to send the alerts. E-mails sent to approvers will have a link to the Invoices Summary page and list the individual invoices with a link to each. Clicking a link opens the corresponding page in eCounsel.
To Configure Task Parameters:
- On the Scheduler window, click New.
- On the Schedule Information dialog box, select the Approver E-mail Notification Task from the Scheduler dropdown field.
- In the Schedule area, create a schedule for the task. For more information on creating a schedule, see Scheduling a Task.
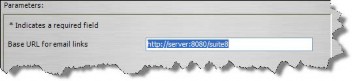
- In the Parameters area on the Schedule Information dialog box, enter the application URL (such as http://<ServerName>:<Port>/<Context>, where <ServerName> is the name of the server hosting the Suite application, <Port> is the number of the port used to connect to the server, and <Context> is the context name for Suite).
- Click Save and Close.
- Click
 Close on the Scheduler window.
To Enable Alerts for this Task:
- On the Suite Manager control panel, click on the
 Rules Engine component in the Tools & Utilities area.
 - On the Alerts tab of the Rules Engine window, click on the Configure button (if the “from” address for e-mail alerts has not been configured previously). On the Configure dialog box, type the e-mail address from which alerts will be sent, then click Save and Close.
- Click the Approver E-mail Notification Task alert.
- Click the Edit button.
- On the Alert Profile Information dialog box, click on the Users tab.
- Click on the E-mail checkbox next to a user name if a user does not want to receive e-mail notifications.
- Click on the System checkbox to next to a user name to indicate that notifications will not be made by an alert in a widget on the user’s home page.
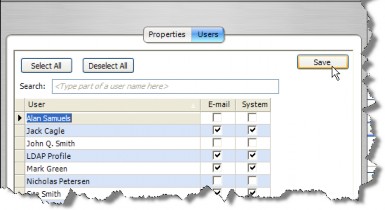
 Note that this alert works the opposite of most alerts. Checking the box causes the notification to not be sent.
 - Click Save.
Configuring the Invoice Routing Task
Install the Invoice Routing task to provide routing of invoices to approvers in sequential order and, optionally, to require approval of an invoice within a specified number of days. When this feature is activated, invoices will display on the user’s home page in the Invoices Awaiting My Approval widget. If the invoice is not approved within the specified time, the invoice will be passed to the next approver, the invoice entry will no longer display on the user’s home page, and “Yes” will be placed in the Timed Out field on the Invoice Approval tab on the Matter tab of the invoice.
Configuration of this task includes a parameter that allows you to specify in a comma-delimited list the invoice statuses for invoices you do not want routed by this task. For example, specifying “On Hold,Paid” as a value for the parameter would exclude any invoices with a status of On Hold or Paid from being routed for approval.
To Configure Task Parameters:
- On the Scheduler window, click New.
- On the Schedule Information dialog box, select the Invoice Routing Task from the Scheduler dropdown field.
- In the Schedule area, create a schedule for the task. For more information on creating a schedule, see Scheduling a Task.
- In the Parameters area on the Schedule Information dialog box, select Yes to configure the task to timeout, then type the number of days for the timeout if an approver has not approved an invoice within the specified amount of days.
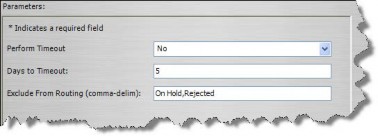
- Type a list of invoice statuses (delimited with a comma) that you want excluded from being routed. For example, specifying “On Hold,Paid” as a value for the parameter would exclude any invoices with a status of On Hold or Paid from being routed for approval.
- Click Save and Close.
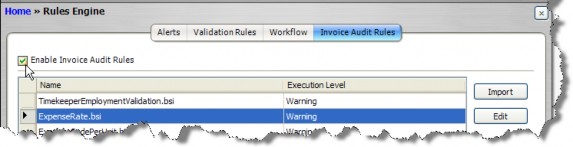
Configuring Invoice Audit Rules
You can easily automate the enforcement of your company’s billing guidelines when importing invoices from Collaborati to eCounsel. The Rules Engine can reject an invoice or include a warning on the imported invoice based on rules configured by the System Administrator. If your company has guidelines that are outside of the scope of the default set of rules included with eCounsel, contact Mitratech’s Professional Services Group.
This feature works with invoices that are imported through any of the tasks in Scheduler as well as those brought in manually through the import utility in the Invoices module. Rejection rules are run first and in the order they appear in the list. All assigned warning rules are then run.
Enabling the Invoice Audit Rule Category
Rules can be enabled for invoice audits using the steps below.
To Enable the Invoice Audit Rule Category:
- Open Suite Manager.
- On the Suite Manager control panel, click the
 Rules Engine component in the Tools & Utilities area.
 - On the Rules Engine window, click the Invoice Audit Rules tab.
- Select the Enable Invoice Audit Rules checkbox to activate the rule category for eCounsel.
Importing an Invoice Audit Rule
Rules can be imported for invoice audits. For more information, see Importing a Rule.
Re-importing Corridor Rules
If you are migrating from Corridor to Collaborati, you will need to delete any of the rules below that your company is using because Collaborati performs these validations prior to sending the invoice to eCounsel. If you import LEDES files manually using eCounsel, re-import the new versions of these rules:
- LineItemCalculation
- LineItemCalculationWithTax
- SumOfLineItemsFoot
- SumOfLineItemsFootWithTax
If you are not migrating from Corridor, you do not need to perform any steps for these rules.
For information on deleting a rule, see Deleting a Rule.
Reimport the rules using the instructions in Importing a Rule.
Hiding Invoice Tax-Related Fields by Type Profile
Invoicing in eCounsel supports taxes on fees and expenses. If this feature is not applicable to your company, you can hide the invoice tax information by type profile to prevent users from accessing the functionality.
![]() If tax information already exists for invoices, be aware that hiding the fields and tabs that contain tax information is not the same as disabling the feature and may cause unexpected results.
If tax information already exists for invoices, be aware that hiding the fields and tabs that contain tax information is not the same as disabling the feature and may cause unexpected results.
To Create an Invoice Type Profile to Hide Invoice Tax Information:
- Open Suite Manager.
- On the Suite Manager control panel, click on the
 Type Profiles component in the System Configuration area.
 - On the Type Profiles window, select the Invoices module for eCounsel.

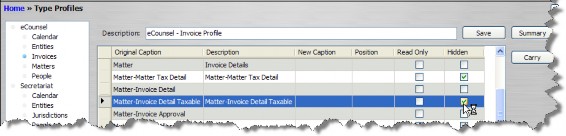
- In the tabs grid, select the following tabs, and click the Hidden checkbox to enable the checkbox to hide the tab:
- Matter-Matter Tax Detail
- Matter-Invoice Detail Taxable
- Click the Base Info tab, and click the Hidden checkbox for the following fields on the Invoices Base Info tab:
- Adjusted Pre-tax Billed
- Tax Credit Note
- Tax Invoice Note
- Tax Point Date
- Total Tax Billed

- Click the Matter tab, and hide the following fields on the tab:
- Adjusted Pre-tax Billed
- Total Tax Billed
- Click the Matter-Invoice Detail tab, and hide the following field on the tab:
- Taxable
- Click Save.
- On the Type Profiles window, click Refresh Server.
To Hide Invoice Tax Information on the Matters Cost Tab:
- On the Type Profiles window, select the Matters module for eCounsel.
- For each existing matter type profile, click Edit.
- On the Type Profile dialog box, click on the Costs tab and hide the following fields on the tab:
- Adjusted Pre-tax Billed
- Total Tax Billed
- Click Save.
- Close the Type Profile dialog box.
- On the Type Profiles window, click Refresh Server.
Running the Tasks for the First Time
To finish setting up the configuration:
-
Run the Collaborati Vendors/Timekeepers/Codes/Matters task to import vendors into the Lobby for approval.
- Approve and map the vendors that appear in the Lobby. Note that an approved vendor must be a player on individual matters in order to bill against those matters.
- After a new vendor is approved, the client receives an email notification for configuring that vendor's account. Use the link in the email to configure the vendor in Collaborati, including adding or importing the timekeepers into Collaborati.
- If necessary, add or import the timekeepers into eCounsel. The vendor must be listed as the Employer of the timekeeper.
- Run the Collaborati Vendors/Timekeepers/Codes/Matters task again to import the timekeepers into eCounsel the Lobby widget.
- Approve and map timekeepers.