
InvoiceIQ Module Installation and Configuration V2
Prerequisites
InvoiceIQ recommendations are displayed on the line items only if the interactive grids is enabled. The Interactive Line Item block should be in the users object view. For more information on how to enable interactive line item in TeamConnect, refer to this link.
Introduction to InvoiceIQ
InvoiceIQ has been introduced to bring machine learning to the Invoice Review process. There are two key parts to the InvoiceIQ process. First, invoices lines are reviewed by the model and categorized according to our proprietary MitraCodes. Second, the rules engine allows for recommendations to be made where categories are not consistent with the clients billing guidelines. The diagram below shows the high level process.
InvoiceIQ High level workflow diagram
When an invoice goes into workflow, a scheduled action sends the line items to the recommendation engine. The line items are then updated with the categorization and confidence. The recommendation rule then checks the codes for recommendations to be applied. Invoice lines can be adjusted or a warning displayed giving the review the option to make an adjustment on review.
Apart from the categorization on the line items, the product offering will also include a set of dashboards such as Vendor Comparative dashboard and Enhanced Vendor Performance dashboard which will provide an overview in the current billing practices for the outside counsel and the internal reviewers and a compliance dashboard giving increased visibility into the legal spend. These dashboards also include comparative dashboards which show the performance of a firm vs a group of firms within the client’s environment.
MitraCodes
MitraCodes are Mitratech’s proprietary list of 40 codes for categorizing activities and expenses. These codes are the core of the Invoice IQ module. These are similar to UTBMS activity codes (A Codes) and expense (E codes) and are designed to provide granular information about where resources are being spent. MitraCodes are not designed to replace UTBMS codes. Instead, they are designed to be an objective classification of activities. Because timekeepers frequently do not use UTBMS codes consistently, MitraCodes provide consistency. For more information about the list of MitraCode and definition, please refer to the link.
Important Considerations
Some clients allow for small invoices with no issues to be automatically approved without review. The rule for categorizing invoices runs for invoices that are in workflow. Therefore if there are invoices which are automatically approved, they will not be categorized. If there is a desire for these invoices to be categorized, then a “background approver” process should be implemented.
InvoiceIQ Module Installation
Follow the below instructions to install the InvoiceIQ Module on your instance:
- Navigate to Available Updates in the Admin tool.
- Select the install link for InvoiceIQ
- Once the module is installed, restart your TeamConnect Instance.
- After the restart, add the appropriate users to the InvoiceIQ Admin group
Note: Navigate to Admin > Admin Settings > About > Instance Information and verify the installed products to confirm the module installation on your instance.
The data warehouse also needs to be updated with the new fields that were added to the Invoice Line Item object.

- For hosted clients, please put in a ticket to support.
- For on premise clients, please refer to the data warehouse installation instructions.
InvoiceIQ Module Configuration
On the following settings page, you can configure the InvoiceIQ Module to get insights and recommendations on the invoice line items:
- InvoiceIQ Settings
- Threshold Settings
- MitraCode Rules
- Sync Details
- History
For more information about MitraCode Rule configurations, and how to add Insights and Recommendations, refer to the link.
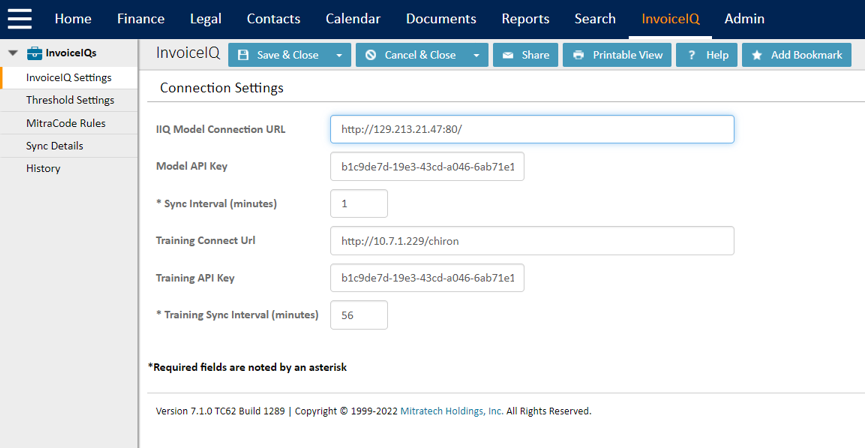
InvoiceIQ Settings:
Once the module is installed. Add the admin users to InvoiceIQ Admin group to allow access to InvoiceIQ objects. The user/admin will be able to see the InvoiceIQ tab on the global navigation menu bar.

If there are any errors for Product instance or Training instance, they will display when you click on the Test connection tab.
Clients reach out to support, and whoever manages the Production environment needs to access Chiron to generate API keys.
Ensure the connection is established for InvoiceIQ Model and Training Connect. Run scheduled actions to receive prediction, insights and recommendation. To run scheduled actions, click Scheduled IIQ sync.
Recommended to schedule the action for every 5 mins. After running the scheduled action, open the invoice which is in workflow from the Finance tab.
Once the configuration is complete, Users can see the insight and recommendation on line items based on rules configured. And the rules would work only for new Invoices.


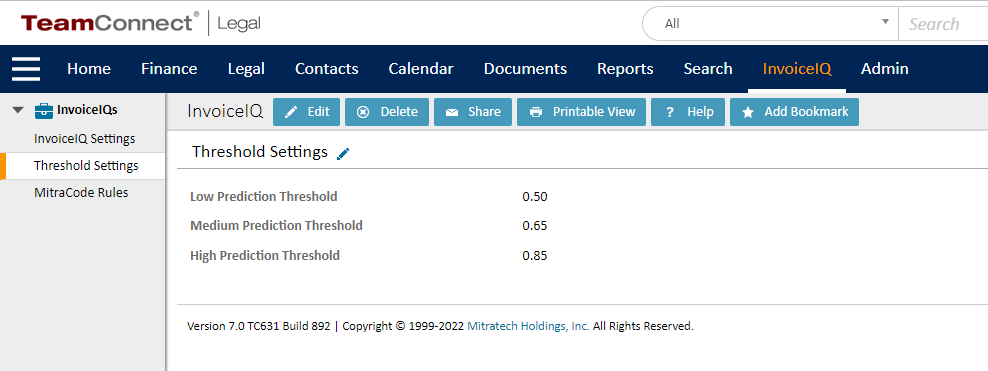
Threshold Settings:
Set the Threshold values - Threshold values indicate the probability range that the prediction should be classified as low, medium or high (Values range from 0 to 1).
Default Values:
- Low Prediction Threshold: 0.5
- Medium Prediction Threshold: 0.65
- High Prediction Threshold: 0.85
Note: It is not recommended that these defaults be modified without a thorough understanding of Invoice IQ.
Invoice Review Process and Invoice IQ Status
A status field has been added to the invoice to allow users to track where invoices are in the process. The following table defines the statuses. These status will be used in the Invoice warning block described below and the status field can be added to the interactive search view used in the My Pending Approvals screen.
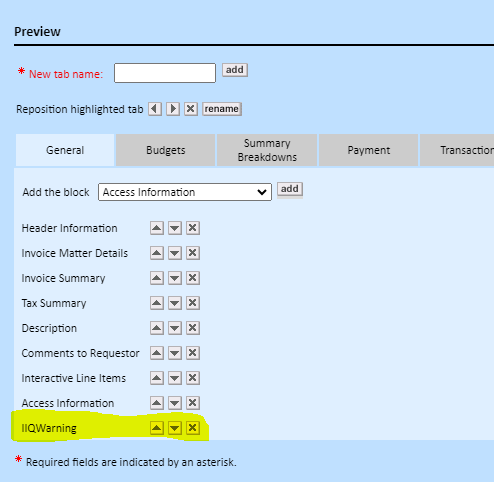
We have updated the Invoice to show users what the status of an invoice is with respect to InvoiceIQ processing. In order for this to be visible to users, the following block must be added to the object view for reviewers.
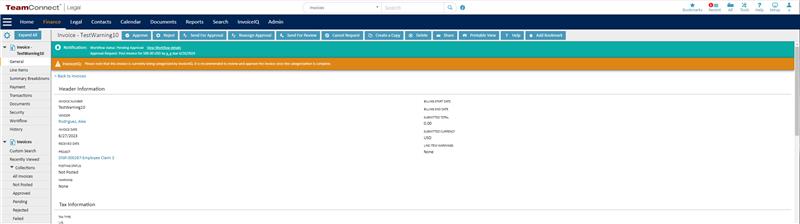
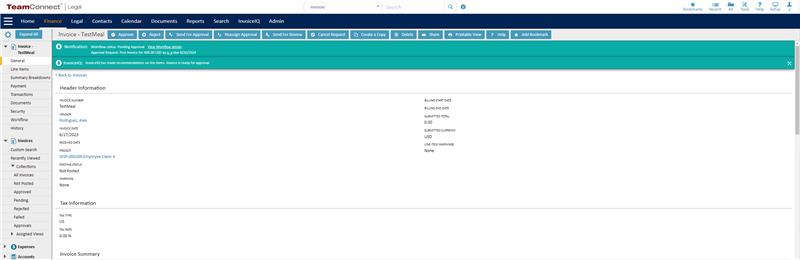
If the categorization is not complete, a categorization pending warning will appear as shown:
Note: In TeamConnect instances, clients can configure warnings. To do this, go to Setup → Object Definitions → Invoices → Blocks, and create an IIQ Warning block with the IIQWarning.xml file. Their invoice approvers should then include this block in their invoice object views.
And if the categorization is complete without any recommendations and actions, you won’t see any messages. If there are actions, with or without recommendations, you’ll get actions made notification as shown:
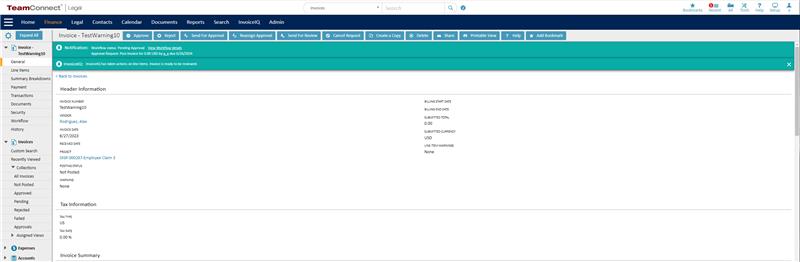
Also, if the categorization is complete with recommendations and without any actions, you’ll get recommendations made notification as shown:
No InvoiceIQ messages will populate, if the workflow is complete and no recommendations were made. No InvoiceIQ message will be displayed for invoices that are not categorized. For more information about managing InvoiceIQ, refer to this link.
Excluding Invoices from InvoiceIQ:
Accrual Invoices and Credit Notes will be automatically excluded from being categorized by InvoiceIQ. Clients may want to have other invoices excluded from InvoiceIQ as well. For example, a client may want to exclude Invoices from eDiscovery vendors from InvoiceIQ. This can be accomplished by creating a pre-population rule that uncheck the Apply Categorization field on the invoice when the invoice is created. For more information, refer to the link.
There are invoice types that do not require recommendations, or go through the InvoiceIQ process, so the rules are created and updated for the Apply Categorization field.
For the invoices with the type Accrual and Credit Note, this field needs to be unchecked by default. This is done using a pre-population rule on invoice creation.
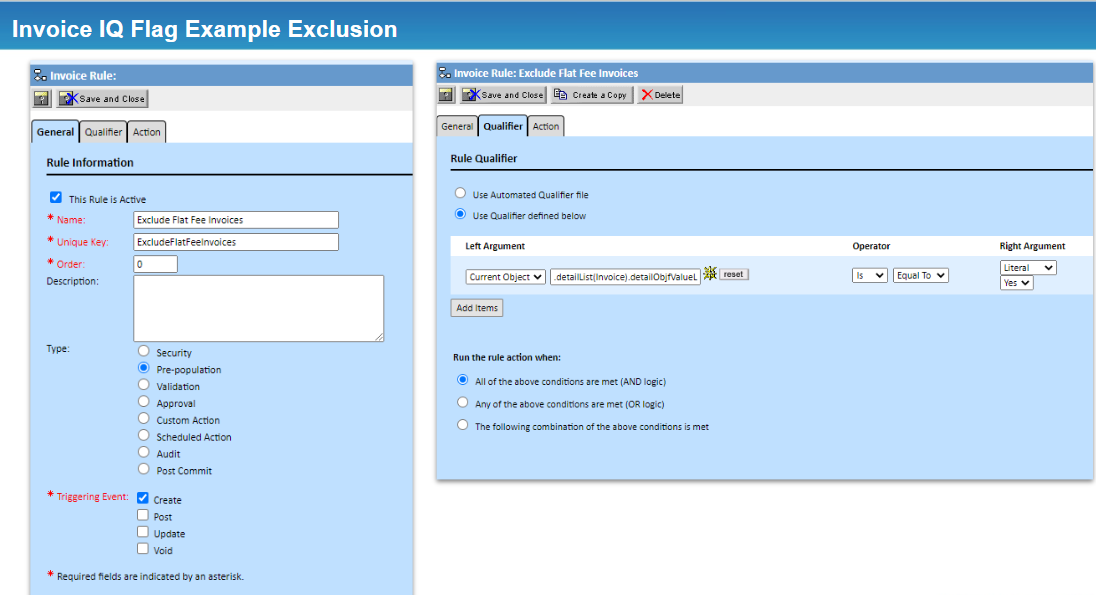
Clients will have the ability to create rules that will uncheck the checkbox when needed.
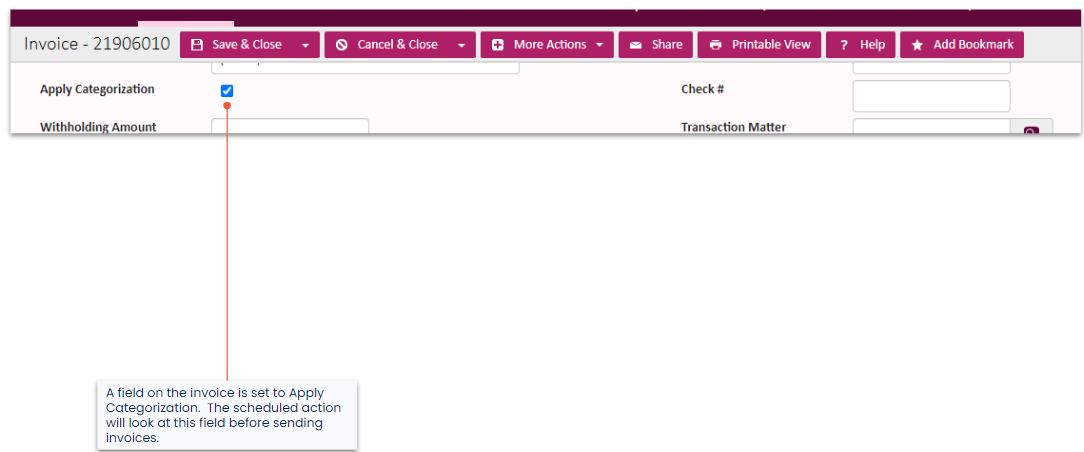
If the Apply Categorization checkbox is checked, the invoice will enter the workflow. This field is not displayed on the invoice, but is visible in the category details block and is available in custom search and reporting.
How to download the dashboard (.dash) files?
Generally, Services should provide these to the client as part of the initial implementation, along with the report integration files. In addition, if you have access to it, you can download it from Medusa.
When you don't have access to Medusa, you can raise a support ticket with a request for the desired dashboards, and someone from support will provide them. And then follow the process for installing these in the TCBI environment. The installation package contains scripts that need to apply to TCBI. For hosted clients, this requires work by hosting. The Script and the location for placement are in the instructions.
For more information about configuring embedded dashboards, please refer to this link .
For more information on how to import dashboard files, please refer to this link.