
TCBI - Dashboards
Dashboards
A dashboard is collection of graphic reports or widgets based assembled by a designer to display quantitative data. The designer that creates a dashboard becomes the dashboard’s owner. Each dashboard can have only one owner.
Dashboard Security
Before creating dashboards, it is important for Report Designers to understand how security factors into dashboards and reports. Out of the box, there is no security applied to dashboards.This implies that regardless of their TeamConnect security restrictions, anyone accessing the Dashboard will have visibility into all listed Matters. If a Report Designer needs to limit what can be viewed and by which groups, there are multiple options:
- Design your dashboard in such a way that any security concerns are mitigated.
- Turn on Matter Security. This limits viewing of matters based on a user's matter level access as set by TeamConnect administrators. NOTE: This will have an impact on performance. Find the how-to here.
- Disable "Drill to Anywhere". Details here.
- Create dashboards specific to Groups who have similar security permissions for example, a dashboard for Litigation matters is shared with the Litigation group.
Creating Dashboards
The following are the instructions on how to create new dashboard:
| Instructions | Screenshot for reference |
|---|---|
| 1. In the left pane of the Business Intelligence or Reports tab, click the plus sign next to Dashboards heading and select New Dashboard. |  |
|
2. On the New Dashboard dialog box, select the Data Set to which you want to connect and type a name for the dashboard in the Title field. This name will appear at the top of the dashboard and in the dashboards list. Click Create. |
|
|
4. In the New Widget area, click the Select Data button and select a widget to place on the dashboard. On the left side of the widget, you can select the type of chart in which the data should be displayed on the widget. Click Create. Similarly, you can add more widgets to the dashboard by clicking on Add Widget button.
|
|


Note:
- To allow other users to view your dashboard, you must share it with them.
- To show up a dashboard or report on the report lists in the Setup tool and portal panes, you must share it with the TeamConnect Business Intelligence administrator account provided to you by Mitratech.
Integrating/Importing Dashboard Templates
Dashboard templates offer a great way to jump start report creation. Several templates are now published with TCBI releases and can be imported and edited to fit your dashboard reporting needs. To import and integrate a dashboard template:
- Click on the Reports tab
- Then the + sign to the right of Dashboards in the navigation bar on the left side of the screen.
- Select Import Dashboards.
- Browse for the report file name you wish to import and click Open
- When you see the "Dashboard imported Successfully!" dialog box, click OK.


Note:
- A pop up window appears if there is an existing dashboard with the same name. You can pick any option from the dropdown list (SKIP, DUPLICATE, or OVERWRITE) and click OK to import the dashboard.

- Selecting the "OVERWRITE" will change the existing dashboard for all users, you should republish the dashboard in order for shared users to view the updates.
6. After the dashboard imports, you will receive a data access error. You must change the data source:
- Select the data source dropdown
- Choose "Change Data Source"
- Select the cube that matches with the instance database
7. Once this is done, the report should now populate with data (assuming there is actual data in the instance).

Exporting/Backing Up Dashboards
To export or back-up a dashboard:
- Click on the 3 vertical dots next to the dashboard you want to export.

- Select Export.
- A pop-up will appear that says "Opening <dashboardname>.dash. Make sure Save File option is selected. Click Save.
- The .dash file will download to your Downloads folder. Make sure to store it in a safe place.
Configuring Click-Through Links
Dashboards that have widgets which utilize click-through hyperlinks require an additional configuration step. In the first 5 Mitratech templates, only Matter Dashboard and General Counsel Dashboard require this step.
- dentify the widget with hyperlinks and click the edit (pencil icon) on the widget.
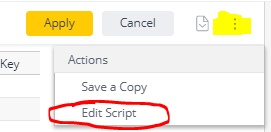
- Once in edit mode, click the icon and select "Edit Script."
- Replace the highlighted text with the full path to the TeamConnect instance you are using (in between the quotation marks, and with no trailing slash)
- Click Save on the Edit Script window, then click the X in the top left of the Window
- DO NOT CLICK APPLY on the widget edit screen! Instead simply click the Browser refresh button (there’s a known issue whereby clicking Apply causes the script to fail)
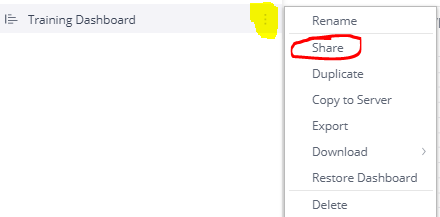
- Click the options button next to the Dashboard name and select Share (note, once this dashboard has been shared once, this option will be renamed to “Republish”)
- Search for the groups and/or users who should have access. Select the proper rights next to each name. Click Save.

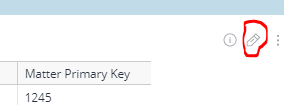

Note: The primary key field is required on the table in order for the script to identify the proper record. Typically this column can be displayed as the last column since it will not be valuable to viewers. However, if the report is a pivot table that includes grouping, this column may need to be the first column in order to ensure proper record grouping.
Sharing a dashboard
A dashboard owner (i.e., the creator of the dashboard) can share a dashboard that they have created with other users that have view and design permissions. When a dashboard has been shared, a shared dashboard icon appears in the list next to the dashboard.
When you share your dashboard, you can configure periodic email notifications containing the dashboard inside the email's body to your dashboard's recipients.
Note: In order for a dashboard or report to show up on the report lists in the Setup tool and portal panes, you must share it with the TeamConnect Business Intelligence administrator account provided to you by Mitratech.
To share a dashboard:
The following are the instructions on how to share a dashboard:
| Instructions | Screenshot for reference |
|---|---|
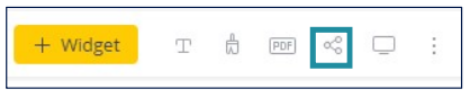
| 1. Click the Share button. | 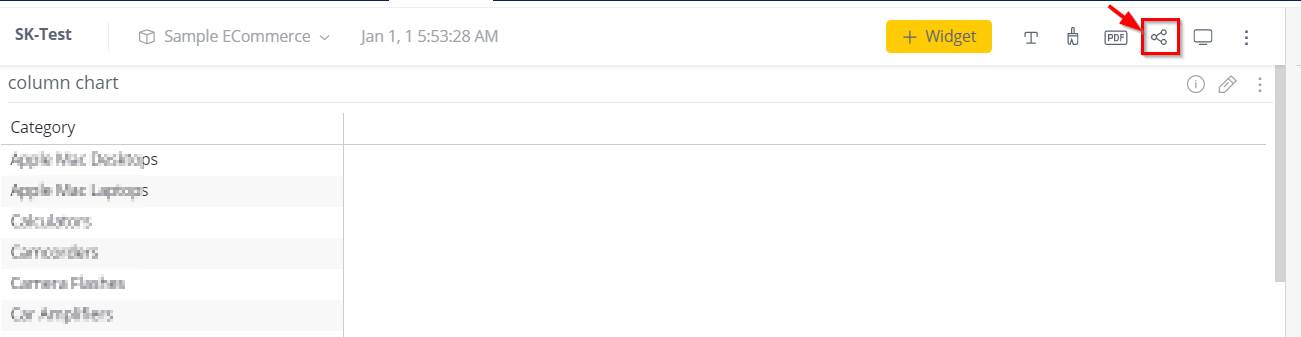 |
|
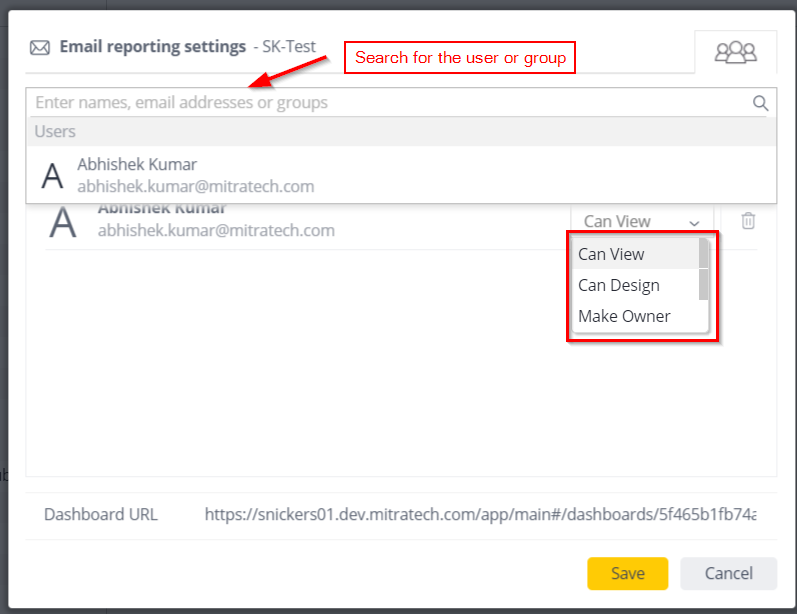
2. Enter the emails or groups of users with whom to share the dashboard. Selecting Everyone specifies that this dashboard is shared with all users and user groups. The contact information of the people you add is listed in the center of the window and is displayed the next time you open this window. If a person does not have an account, they will receive a link that guides them through the activation process. In the dropdown menu next to each user/user group, select whether the user Can Edit the report or Can view. Note that if the user is designated as Can Edit, the user only can change the report for that user; the owner and other recipients do not see those changes. Tip: Share the dashboard with groups, when possible, instead of individual users. New users who are part of the group will then have access to the dashboard automatically, and you won't have to add each new user individually. |
 |
|
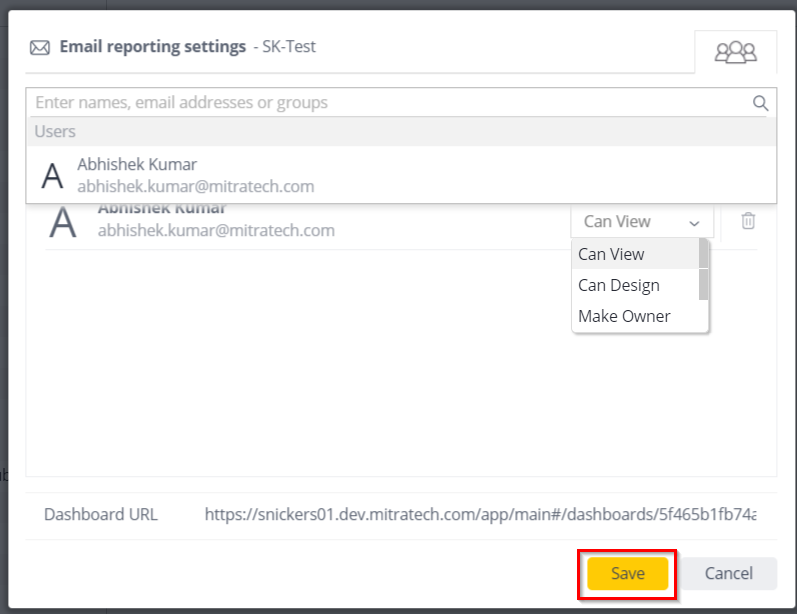
3. Click Save. Note:
|
 |
Embedding Dashboards and Widgets in Home Page Portal Panes
TeamConnect Admins and Solution Designers can embed reports into customizable portal panes, allowing users to quickly view reports as soon as they log in, without opening the Reports tab.
When embedding reports in portal panes:
-
Verify that the Sisense Admin was added to the TeamConnect tenant group in Sisense. This step is typically done during the integration process and only needs to be done one time; it does not need to be done each time a report is embedded.
-
Verify that the dashboard is shared with Sisense Admin user.
-
Verify that you are viewing the latest list of reports by clicking the Sync Report List icon in the Report Integration Tool.
Embedding a Whole Dashboard in a Portal Pane
-
Create a custom portal pane in TeamConnect Setup.
-
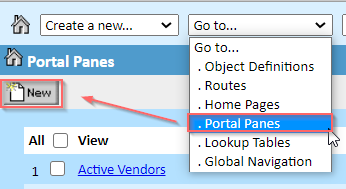
Select Go to... menu/Portal Panes in Setup and select New.
-
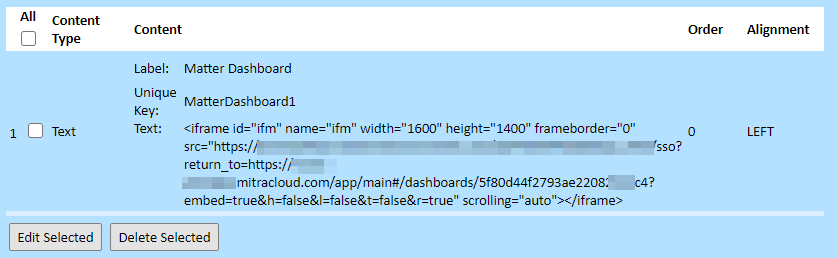
Enter a Unique Key and Title. Best practice is prefix the portal pane title with an identifier like "Matter Dashboard".
If the dashboard is not in a folder, copy the entire URL.
Note: If the dashboard is located under a folder, the folder information resides at the end of the URL. Delete information starting with the “?” before the word “folder” to the end of the line before you use this information.
Example:
https://xyz.mitracloud.com/app/main#/dashboards/5f80d44f2793ae22085842c4?folder=5fd6694794cf6d24f4c6f5af
-
-
Go back to the dashboard and click “Share” icon
-
Copy the entire URL less the folder as it is not needed
-
Go back to the Portal Pane in Set up.
-
Under Portal Pane Contents, select Text as the Content Type.
Add the URL into the text in the string below represented by {Sisense URL (the URL copied from your dashboard)} and change the {TeamConnect URL} to your TeamConnect instance. Note: Exclude the “{}”.
<iframe id="ifm" name="ifm" width="1600" height="1400" frameborder="0"
src="{TeamConnect URL}/sso?return_to={Sisense URL}?embed=true&h=false&l=false&t=false&r=true" scrolling="auto"></iframe>Example: <iframe id="ifm" name="ifm" width="1600" height="1400" frameborder="0"
src="https://xyz.teamconnect.com/XYZ/sso?...t=false&r=true" scrolling="auto"></iframe>
-
Copy/paste the combined string into the portal pane Text contents, and click the ADD ITEMS button. SAVE the portal pane.
-
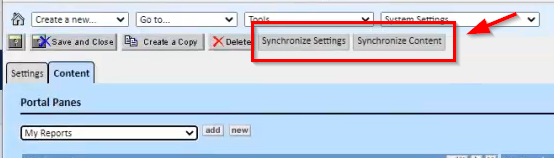
Synchronize Settings and Synchronize Content of portal pane.
-
Adjust the height and width as needed. r=true shows the filter on the right. Change to false if not needed.


Embedding a Single Widget in a Portal Pane
The process for embedding a single widget in a home page portal pane is different.
- Follow the steps to Create a Dashboard but stop after adding one widget. Note: In order for a dashboard or report to show up on the report lists in the Setup tool and portal panes, you must share it with the TeamConnect Business Intelligence administrator account provided to you by Mitratech and run the report sync.
- Go to the Setup tool and select the portal pane where you want to embed the widget. Create one, if needed.
-
Select Go to... menu/Portal Panes in Setup and select New.
-
Enter a Unique Key and Title. Best practice is prefix the portal pane title with an identifier like "Single Widget Report".
-
-
The Content Type should be Custom Content. The only field to fill out is the Class Name field and the input there is com.mitratech.teamconnect.content.reports.ReportPortlet.
-
Select Edit Parameters and choose a report from the drop down list that you would like to display in the Portal Pane.
-
Save the Portal Pane, synchronize the Settings, synchronize the content and add it to the desired home page.
Modifying Shared Dashboards
Dashboard recipients can edit the dashboard if the owner grants them permission, but the changes they make in the dashboard do not affect the owner’s or any other recipient’s copy of the dashboard. The recipient's changes are automatically performed on a separate copy of the dashboard to which only they have access.
To revert to the owner’s latest shared copy of a dashboard, right-click the dashboard's name in the Dashboards list in the left pane and select Restore Dashboard.
When you share a dashboard that's contained within a folder, the dashboard is shared using the same structure, in the same folder.
Scheduling reports
After you share your dashboard, you can schedule periodic email reports containing a static version of the dashboard that recipients can click to access the dashboard or PDFs containing images of your dashboard.
From your dashboard, you can configure how many emails the Scheduler sends and when.
To test how the report is to be displayed to your shared users, in the Shared Dashboard window, click the Send me a report now link, which generates an email report sent to your email address immediately.
Note: In order for reports scheduling to work correctly:
- Sisense email functionality must be enabled.
- Recipients must be an active TeamConnect user, have at least View-only reporting rights, and a unique email address on the reporting server.
To schedule email notifications:
- In your dashboard, click the Share icon to display the Share window.
- In the Shared Dashboard window, click the Email tab as shown below.
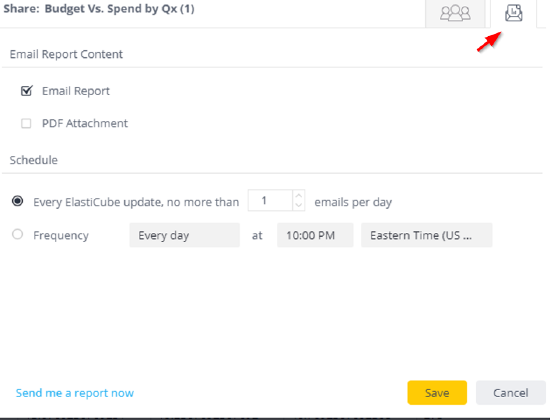
- Select the type of report you want to send.
- Email Report: The email report is attached as an image file.
- PDF Attachment: The email report is attached as a PDF. You can define how the dashboard is to be displayed in the PDF through the PDF Report Settings page by clicking Edit/View PDF Report.
- In the Schedule area, select the frequency for sending email notifications.
- Click Save.
Report Manager
The Report Manager is an advanced UI-based report scheduler with highly-flexible scheduling capabilities including event-driven triggers. You can set up and enable customized reports and send them to a wide range of audiences.
If you have Report Manager installed, refer to TCBI - Report Manager to know how to schedule the reports.
Publishing Dashboards to Recipients
When an owner modifies a dashboard, the dashboard is not automatically updated for recipients. The owner of a dashboard must publish their updated dashboard to update the dashboards of their recipients, and the dashboard recipients must refresh the dashboard before any of the owner's changes are applied.
To publish a dashboard to your recipients, do one of the following actions:
- In the heading of your dashboard, click Republish.
- In the Dashboards list, right-click the dashboard's name and select Republish.
Unsubscribing a User from a Scheduled Report
To remove a user from a scheduled report so that the user stops getting email updates about the report:
- In the heading of the dashboard, click Republish.
-
Click the Click to unsubscribe from email reports icon on the row of the email address or group name.
-
Click the Republish button.
Updating a Shared Dashboard
When a recipient modifies a shared dashboard, those changes remain local unless the recipient updates their dashboard to match the dashboard of the owner. If the recipient updates their shared dashboard to match the dashboard of the owner, any of their local changes to the dashboard are overwritten. It is recommended that recipients save any local versions of a shared dashboard as a new dashboard before updating a dashboard.
To update a shared dashboard:
- In the heading of your dashboard, click Restore Dashboard, or in the Dashboards list, right-click the dashboard's name and select Restore Dashboard.
- Click YES to confirm that you want to update the shared dashboard.
Changing Ownership of a Dashboard
The owner of a dashboard can transfer ownership of the dashboard to an Admin or another Designer. Transferring ownership of dashboards can be useful when the original owner leaves your company and you do not want to lose their dashboards. When you transfer ownership, the dashboard remains as a shared dashboard within your Dashboards list, and you become a dashboard recipient. As a dashboard recipient, you are limited to how you can modify the dashboard as described in the section Working with Shared Dashboards.
To view ownership details for a dashboard, hover over the dashboard in the Dashboards list.
To transfer ownership of a dashboard:
- In the heading of the dashboard, click the Share button, or In the Dashboards list, select Share for the relevant dashboard. The Share window is displayed.
- In the Share dialog box, enter the name of the Designer to whom you want to transfer ownership.
- In the User Privilege list of the user you want to make an owner, select Make Owner.
- Click Save and OK to confirm that you want to transfer ownership to the user.
Creating Folders
Folders are organizational elements only for categorization of the dashboards.
To create a new folder:
- In the left pane of the Reports tab, click the plus sign next to Dashboards heading and select New Folder. The folder appears in the left pane with the title New Folder.
- To change the name of the folder, click the title and type the new name, and click the green check mark to save.
- Drag and drop dashboards to move them into a folder.