
TAP/TeamConnect Integration
Welcome to the TAP-TeamConnect Integration Guide!
This guide details how to integrate the two software systems and allows you to create and integrate workflows from TAP into TeamConnect. The instructions below provide details on how to configure the respective TAP and TeamConnect settings, as well as troubleshooting tips and tricks.
Tech Specs
TAP now has the ability to integrate workflows into the follwing TeamConnect versions:
- TeamConnect 4.2 through TeamConnect 7.X
- TeamConnect Essentials
- See the TAP 3rd party matrix for a full, detailed list of 3rd party products and the features that TAP supports.
Troubleshooting
See this page for Tips, Tricks, and Troubleshooting help related to the TAP TeamConnect Integration.
Integrated Features
The list below details various integrated TeamConnect and TAP features, how to set them up, and how to use them:
- Access to TeamConnect directly in the TAP Designer to map TeamConnect Objects to TAP Fields:
- Mapping of like field types is supported. Examples such as text to text, dropdown to TeamConnect lookup tables, etc.
- Mapping dynamically to a TAP form field or hard-coding TeamConnect fields.
- Create records in TeamConnect: (Note: This is based on workflow triggers established in the designer mapping UI.)
- Objects currently supported are Custom Objects and Contacts.
- Field Types currently supported are support related object field types and setting assignee.
- TeamConnect lookup tables and Search in TAP form fields:
- Present TeamConnect lookup tables within drop downs and multi-value drop downs in forms.
- Search through TeamConnect custom objects, contacts, and users within a form.
- TeamConnect Key Management:
- Users can now connect into many TeamConnect instances from one TAP instance, located in the Admin menu, so that workflows requiring different permissions to TeamConnect instances can easily be accommodated. This feature allows for users to connect to a Production instance of TeamConnect as well as a Staging or Dev instance if needed without having to have different logins.
- Link parent and child TeamConnect object records within TAP workflows:
- Relationships follow the hierarchy defined in TeamConnect.
- Records can be created or updated while maintaining the parent-child structure.
- Display cascading dropdowns that dynamically filter options based on the previous selection, sourced from TeamConnect lookup tables:
- Supports single-level, multi-level, or full hierarchy display in one dropdown.
- Selected values can be mapped to TeamConnect records during workflow execution.
Training Videos
Introduction and Installation
Establishing Connections
TAP Form Elements
TC_TAP Workflow Actions
Launching the Workflow
Quick Start Instructions
The following instructions detail how to set up your TeamConnect integration inside of TAP.
Note: Each instance of TeamConnect may be different, but the basic setup instructions will allow users to get started.
Setting Up a TeamConnect Key
Note: Users must have a TeamConnect login/password created. It is recommended that it is not linked to a individual user's account, instead a TeamConnect service account with corresponding permissions.
- Log into TAP.
- Go to the Administration tab.
- Locate TeamConnect Keys link on the list located on the left side of the screen and click on it:
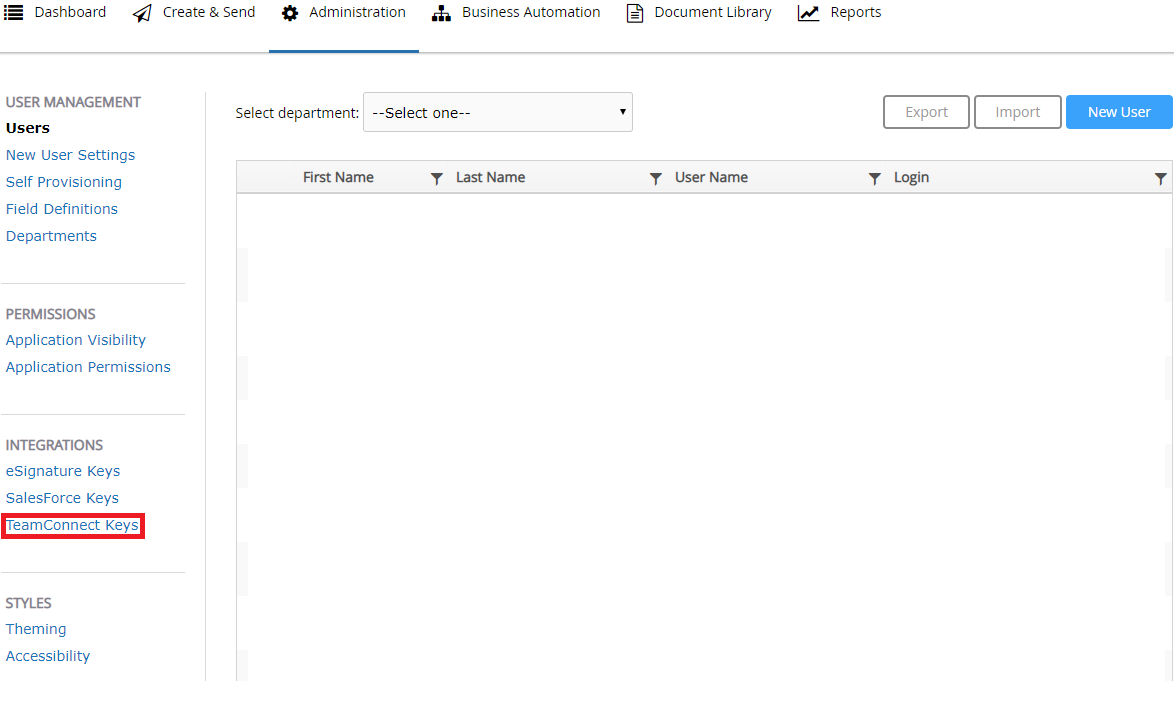
Note: You cannot delete TeamConnect keys once added, you can only edit them.
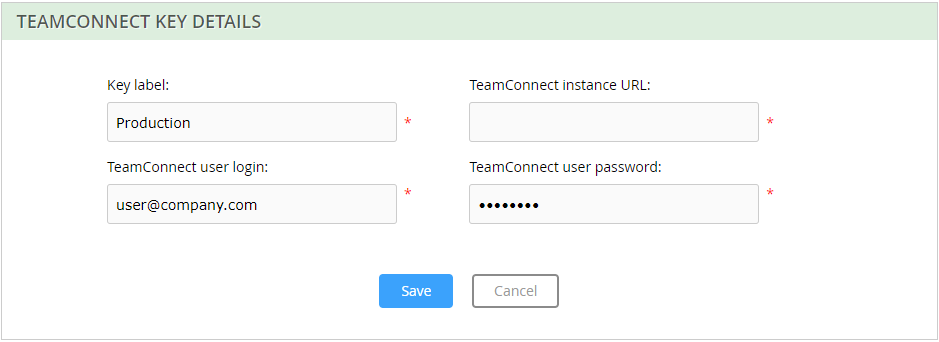
- Select the New TeamConnect key button on the right:

- Add the required information in all the fields. Click Save when finished.
Note: The label should be called what the instance being connected to is for easier identification
Note: The TeamConnect URL must be "https" and should not include the "login".
Creating a Workflow with the TeamConnect Integration
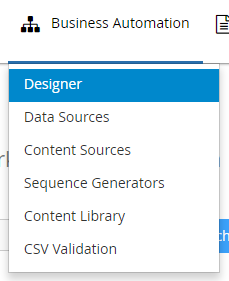
- Click Designer under the Business Automation tab (located in the top global menu).
- Select the Create button.

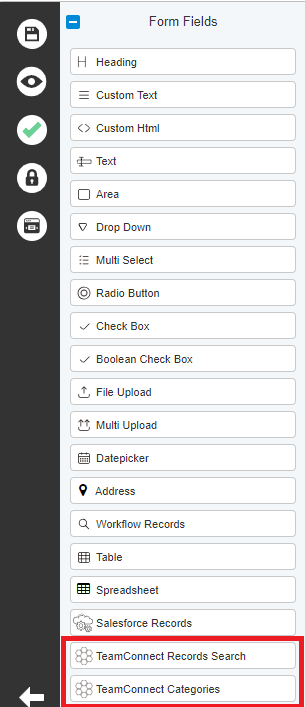
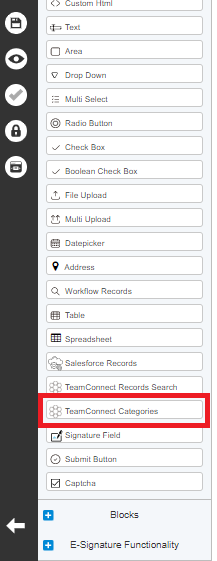
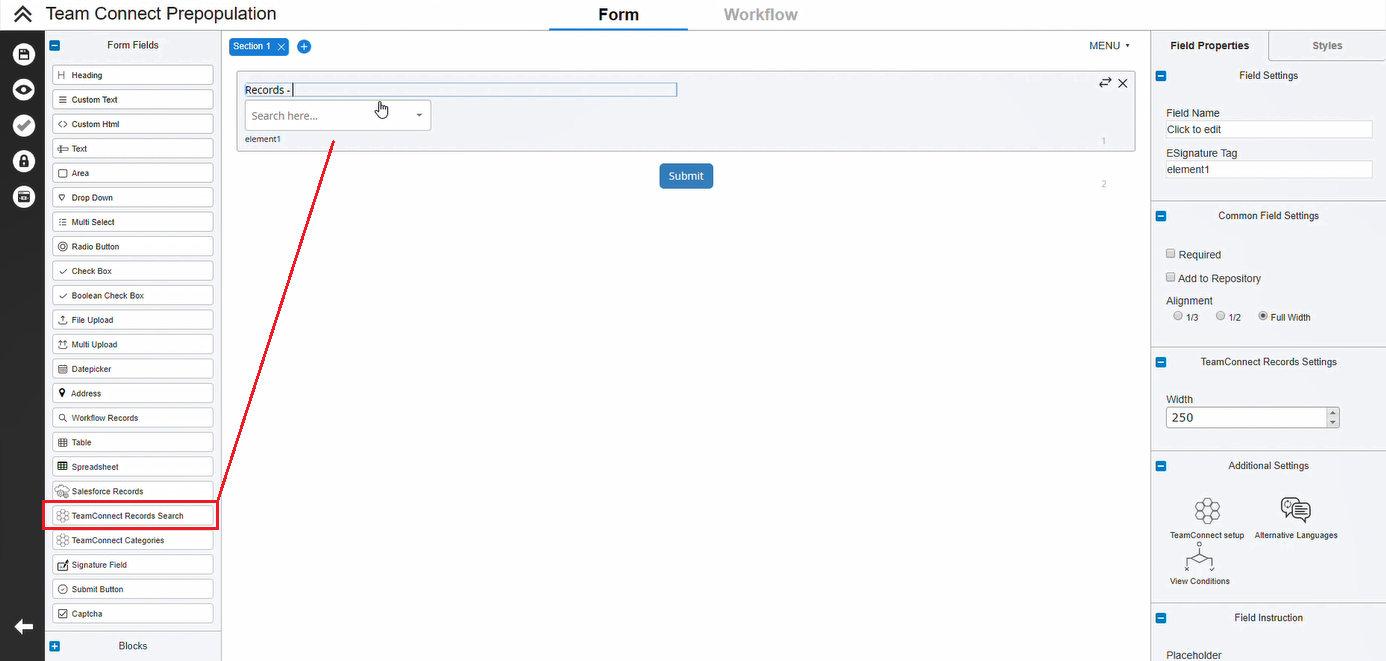
- In the Form tab, you can select the TeamConnect Records or TeamConnect Categories option on the left column:
- From there, you can select "TeamConnect Setup" on the right side and a pop up will show to select the TeamConnect Key and set various field information:
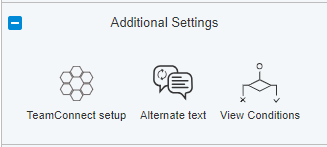
- Configure the respective TeamConnect record options you want to appear in the Form/Workflow in this pop-up:
- From there, you can select "TeamConnect Setup" on the right side and a pop up will show to select the TeamConnect Key and set various field information:
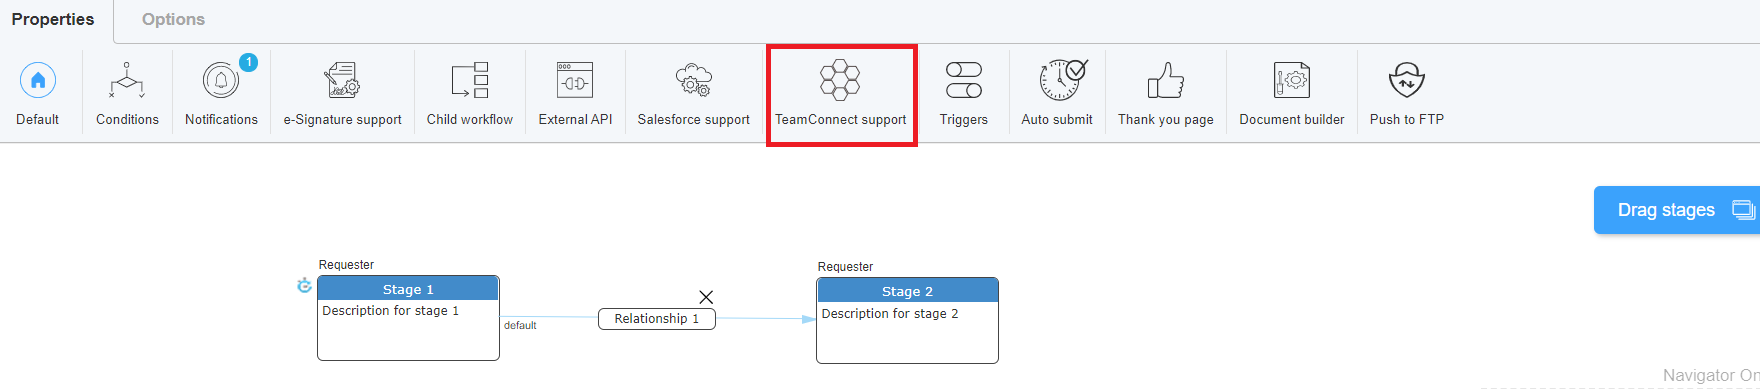
- From the Workflow Tab, users will need to have at least 2 stages (more stages can be used, but at least 2 stages are required):

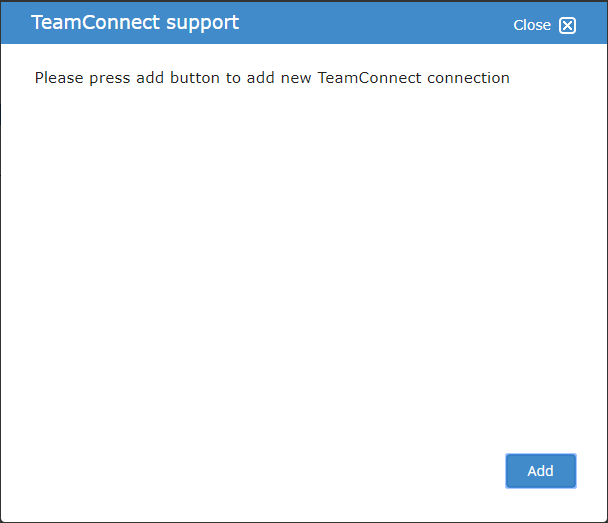
- Click on the Relationship for the stages and then click on the TeamConnect support button on the top menu.
Using the example in step 4, you would click on the box that says Relationship 1, then click the TeamConnect Support button on the top menu.

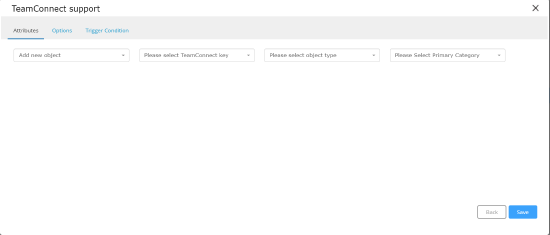
- Click Add when this TeamConnect Support pop-up appears.
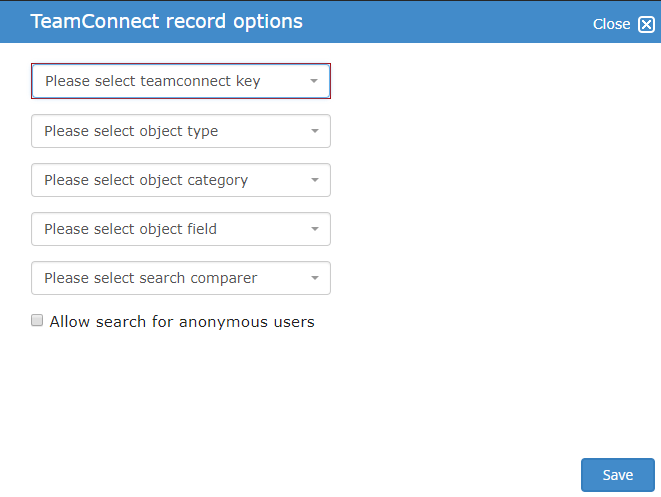
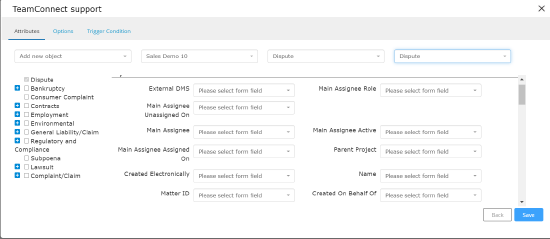
- A new window will appear. Select the following options for the 3 dropdown menus at the top of the screen:
Dropdown 1: TeamConnect key must be selected. Dropdown 2: select an Object type. Dropdown 3: select a Primary Category (if there is one).
Note: Depending on the type of Object type selected, further form fields may appear:
Required TeamConnect Objects will have a red bar next to them.
Any documents you wish to send to TeamConnect from TAP must be configured in the option tab of the TeamConnect Support pop-up.
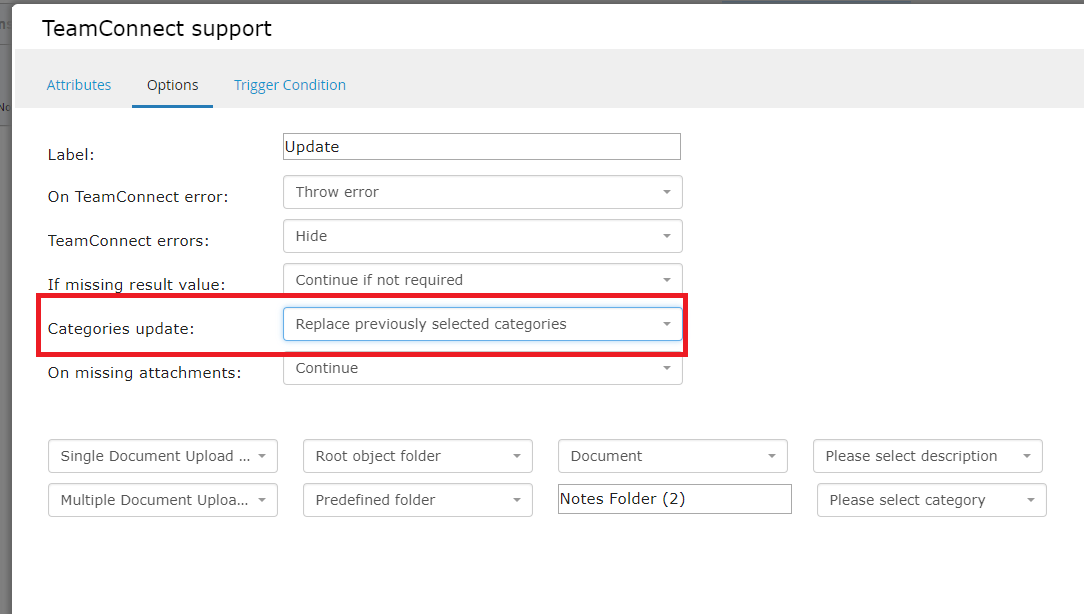
Overwrite Information:
If you wish to overwrite previous information sent to TeamConnect in one workflow, select the the "Replace Previously Selected Categories" option under the Categories update drop down.
- You can then add various other Options and Trigger Conditions if desired using the other tabs. Once done, click the Save button on the bottom.
- The TAP form fields will map to TeamConnect based on your form selections listed above. Always remember to save your workflow.
Please see the screenshot below.
Create a TeamConnect Record
TAP can also collect data from users and create a matter in TeamConnect. It can be accomplished in the following steps
1. Create a form in the form builder. Add fields that needs to be updated to TeamConnect. This is used to intake data from the users . A matter is created based on the data entered in the form.
2.In the workflow designer, select the relationship after the stage in which you want to create a TeamConnect record and select TeamConnect Support.
3.Along the top of the menu, configure your TeamConnect key, Object type, and category. You can select an explicit category or use the category field we created
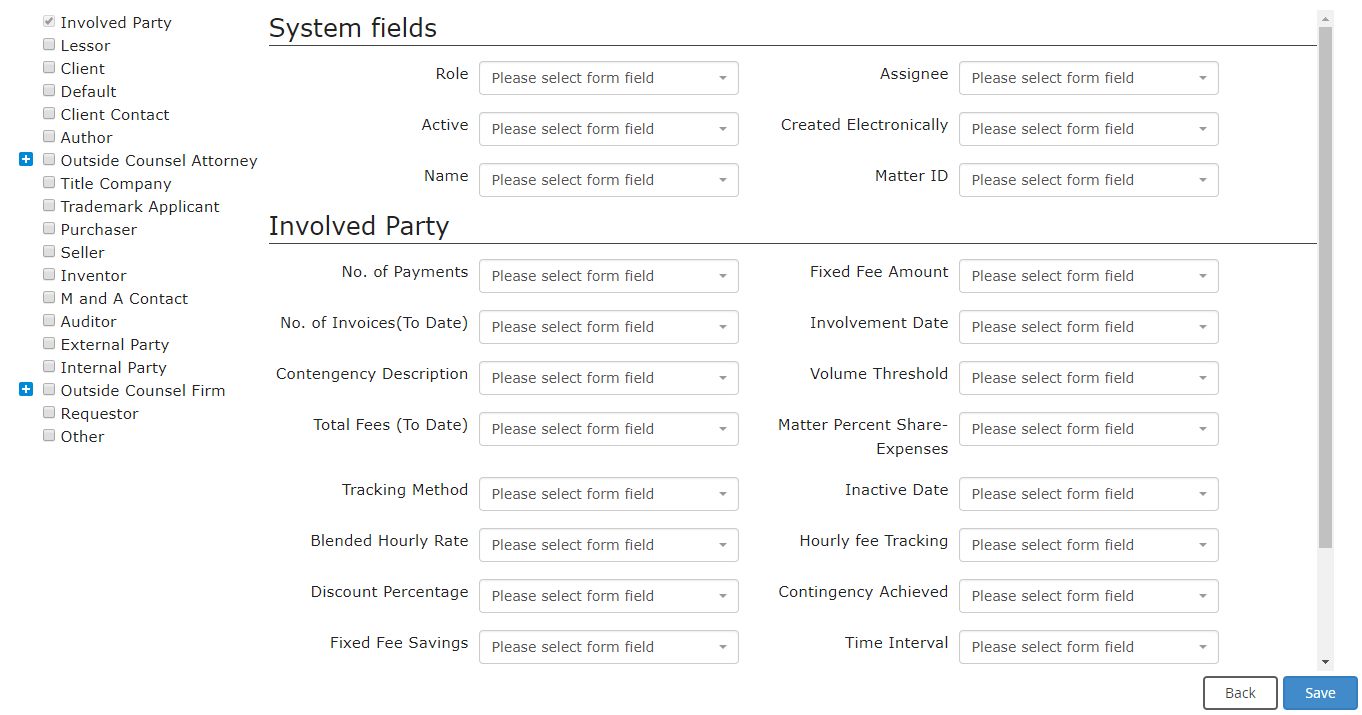
4.Next, configure the corresponding fields from your form to the options available. TAP will present all potentially relevant fields for you to configure
5.Save the workflow, open a preview window, and test the matter creation by submitting the form and checking TeamConnect for the new matter.
Using the TeamConnect Categories Field
The TeamConnect Categories field can be used in order to set record categories based on a user's selection in a TAP Form. In order to do this, you must first add and configure a TeamConnect Categories Field in your TAP Form. The TeamConnect Categories field is located directly below the TeamConnect Record Search field on the Form Builder sidebar:
Simply drag and drop the TeamConnect Categories field to the section of your form that you would like to add it to. Once added, you will need to configure the field. This can be done by clicking the TeamConnect Setup button located under Additional Settings in the Field Properties sidebar. The following popup will then display:
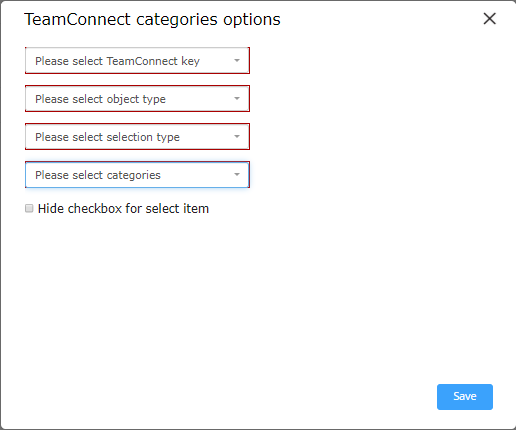
In the First dropdown, select the TeamConnect key that you would like to integrate with. In the Second dropdown, select the TeamConnect Object Type for the matter that you will be creating. The Third dropdown has 5 possible selections:
- Multi Select - Allows the user to select multiple categories/sub categories to be assigned to the matter. Any combination of category/sub category can be selected.
- Multi Select single child value - Allows user to select both a category and sub category, but not multiple of either. NOTE: If either multi select options are selected, the category will display as two dropdowns, one where the user can select multiple categories to assign to the object, and another where the user can only select a single category to be assigned as the Primary Category
- Single Select - Allows user to select a single category or sub category
- Essentials Parent - More Info TBA
- Essentials Child - More Info TBA
The Fourth dropdown is used to decide which category and sub category options you would like to display. There are two options to choose from:
- All Categories - Displays all category and sub categories for the selected Object Type.
- Predefined Categories - Allows you to select which Category and Sub Categories you would like to make selectableainin
Once the TeamConnect Categories field has been configured, you can use it to set the category of the matter you are creating through TAP. To do this, simply select the Categories field that you created in the Primary Category dropdown when configuring TeamConnect Support in the workflow section. When the workflow runs and creates a TeamConnect Matter, the category should be set to the value(s) chosen in the categories field.
Send Files from TAP to TeamConnect
To transfer files from TAP to TeamConnect, follow the steps outlined below:
- Begin by creating or loading a workflow.
- Navigate to the "Workflow" tab, then click on TeamConnect Support, followed by Add.
- Under the "Attributes" tab, select the relevant TeamConnect Key associated with the TeamConnect environment.
- Choose the Object type and Primary Category accordingly.
- Fill in all required information as prompted.
- Navigate to the "Options" tab and assign a name for the Label.
- Utilize the "Add new Attachment" option to include an attachment or file.
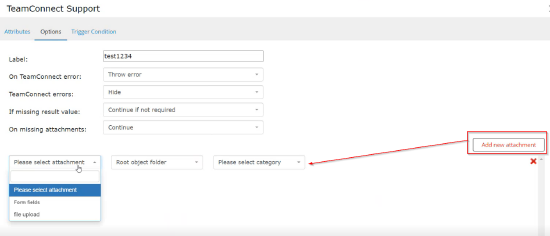
- From the "Please select attachment" dropdown, opt for "File upload".
- Next, choose "Document" from the "Please Select Category" dropdown and proceed to select a description.
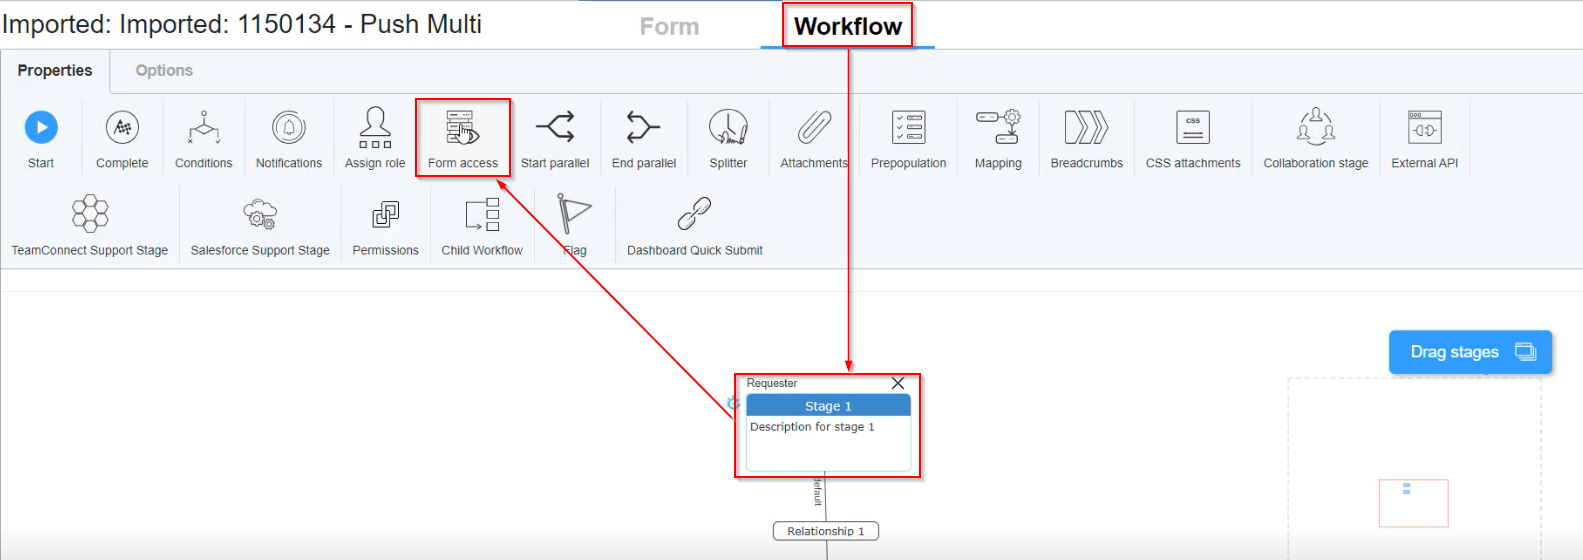
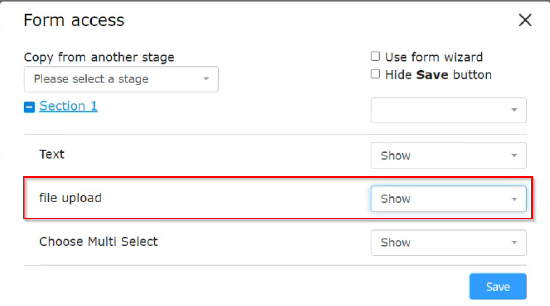
- Moving on to the workflow, access the Properties and then select a stage, followed by Form Access. Ensure that the File Upload option is set to "Show".
- Save the workflow once all necessary modifications have been made.
- Input text into the Text box and select a file for upload, then click the Submit button.
- To verify the upload, navigate to TeamConnect, then the Documents tab and select Recently Uploaded. Here, the file uploaded in TAP will be visible and accessible for download.
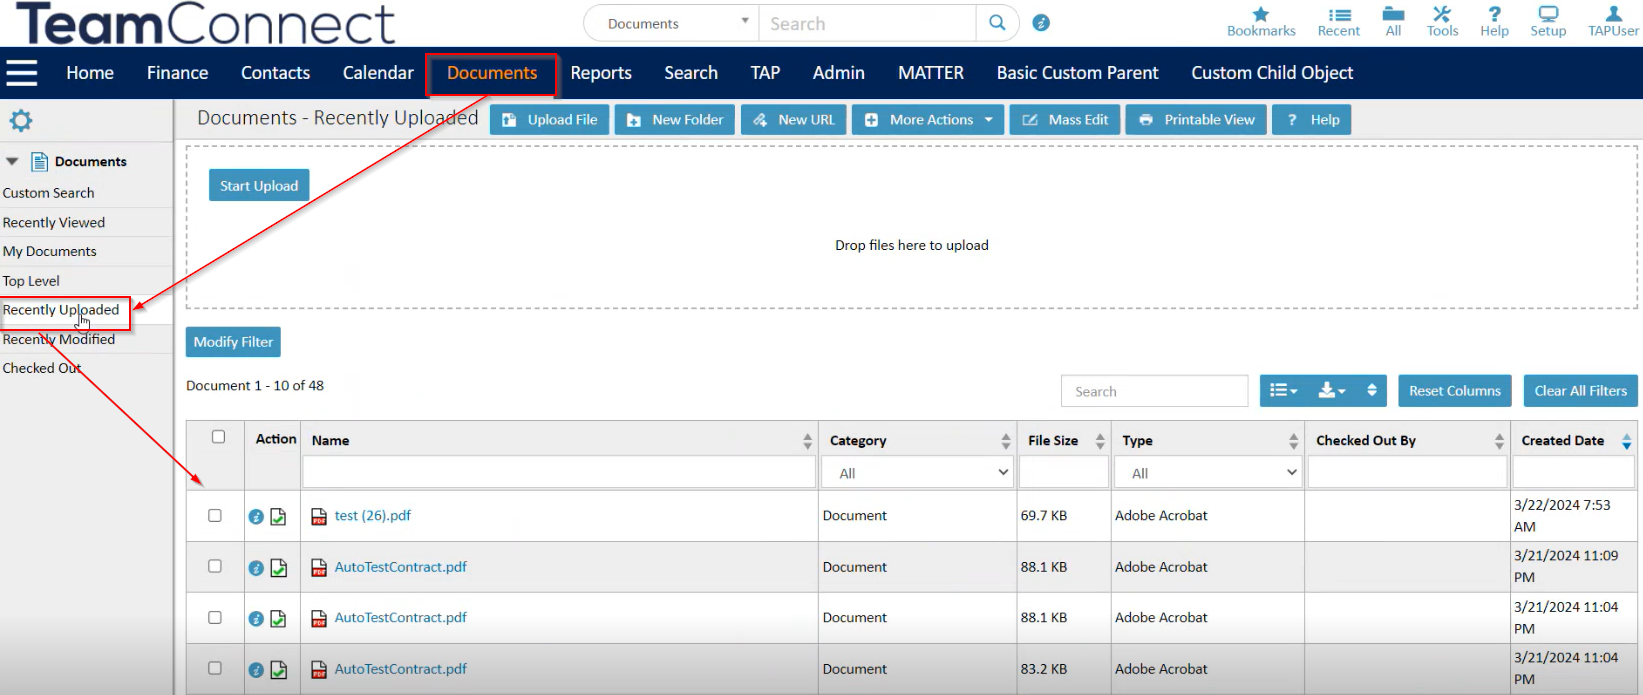
- Hovering the mouse over the document name will display the file path.
Sending a Multi-Value Custom Field to TAP
-
Multi-Value Custom Field in TeamConnect: To define a multi-value custom field in TeamConnect, you need to consider the following aspects:
- Field Label: Decide what kind of information the field should contain so that you can label it accordingly.
- Field Type: Determine the appropriate field type to store the necessary information. Common field types include Number, List, or Text fields.
- Custom Fields Tab: Enter this information on the Custom Fields tab of the relevant object definition. Once defined, users with the appropriate rights will see these fields on their pages.
- Displaying Custom Fields: To display custom fields on a page, include them in blocks. These blocks provide a layout for custom fields and allow you to add formatting attributes to their tags.
- Object Views: Finally, assign the appropriate object views to ensure that your custom fields are displayed as intended.

-
Example Multi-Value Option Configuration in TAP: Here’s an example of how a multi-value option can be defined in TAP:
|
Label |
Value |
|---|---|
|
Certified Mail |
ROOT_CERT |
|
CT Corporation |
ROOT_CTCO |
|
|
ROOT_EMAIL |
|
Fax |
ROOT_FAXX |
|
Interoffice |
ROOT_INTE |
|
Not Yet Served |
ROOT_NOTY |
|
Other |
ROOT_OTHER |
|
Personal Service |
ROOT_PERS |
|
Priority/Express Mail |
ROOT_PRIO |
|
Regular Mail |
ROOT_REGU |
|
Secretary of State’s Office |
ROOT_SECR |
|
State Insurance Commission |
ROOT_STAT |
|
Unknown |
ROOT_UNKN |
|
US Postal Service Mail |
ROOT_USPS |
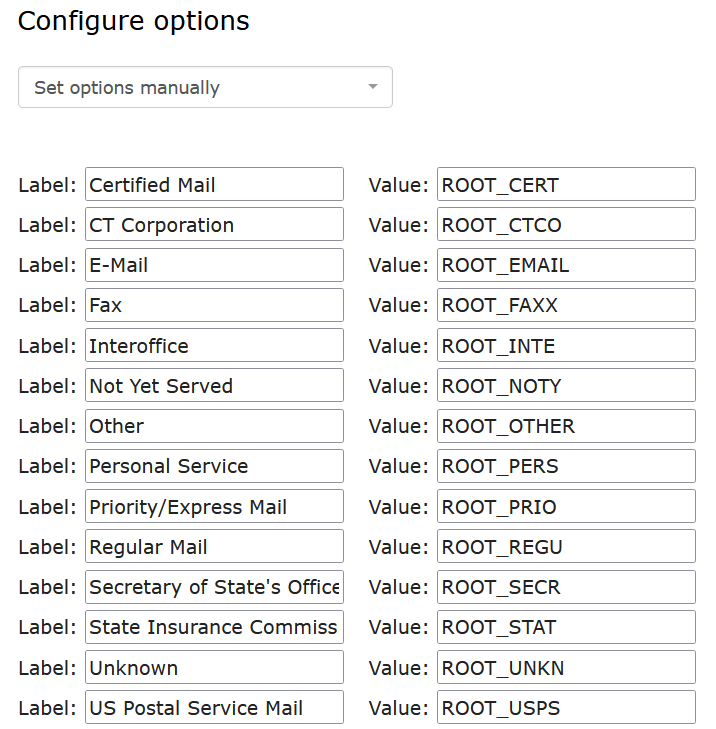
-
Each label is associated with a specific value (starting with “ROOT_”) that represents the corresponding option. Ensure that the assigned values are unique and accurately reflect the labels.
-
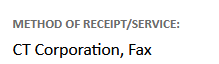
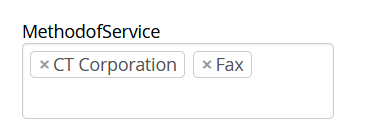
Let’s look at an example. Mapping for Field “element136”: The image shows a mapping for a field named “element136.”

-
This suggests that the value for “element136” is derived from the detailValue of the MethodofService object within the detailObjMultiValueList of the LPLUS detail list in the applicationEntity. Keep in mind that the interpretation of this mapping may vary depending on your specific system or programming language.
-
Please look at the scenario where the record on the TeamConnect side has multiple values:
-
If the same values are intended to be sent to TAP, ensure that your mapping logic correctly handles this scenario. You may need to iterate through the multiple values and process them accordingly.
Pre-Populate TAP Forms with TeamConnect Matter Fields
Form designers can configure forms to enable users to search for Matter Name, Matter ID and see matter information pre-populated in the search. Pre-population works for text fields and a drop-down that uses "Use TeamConnect Table As Option".
Admin or workflow designer: create a TAP workflow with TeamConnect Pre-population. When admin clicks the pre-population options, the admin has the ability to pre-populate all of the fields that are created or updated within the TC Support modal.
End user: When end user searches for a matter name or matter ID in a TAP workflow, the information related to the matter pre-populates within the TAP form. As a user, I want to search for a matter name or matter ID, and see matter information pre-populated after this search, so that I can make further edits or add information while referencing previously submitted matter details.
Constraints
Take the following into consideration before configuring pre-population in your forms and workflows:
- When objects are setup in designer this is a permanent configuration.
- If the object changes in TeamConnect, the pre-population field will not be changed in TAP.
- Execution nor Designer will not check these fields. The designer user/admin user will need to own the correction of the TeamConnect object in Designer form pre-population.
- If objects have conditional fields based on a type (i.e. Contact's Company Name field) these fields will be ignored.
- If TAP cannot contact the TeamConnect server, the workflow will display a warning, however it will still allow submission as long as the pre-populated fields are not read-only or are not required.
TeamConnect Pre-Population Setup
The instructions below detail how to set up TeamConnect Pre-population in a TAP form. The first few steps cover how to set up the correct form fields, then the next section covers how to configure each form field accordingly for your TeamConnect needs, and the last section covers the workflow configuration.
Begin by creating a new form.
Adding the correct fields to the form
- Add a TeamConnect Record Search field to the form. This field will be used to search and find the record we want in TeamConnect and will be used to pre-populate the rest of the information based on this record. Best practices suggest to name the field "<Custom Object> Lookup" based on clients use of user and workflow record with pre-population.
- Add a Text field. Label it Parent Text.
- Add another Text field. Label it System ID.
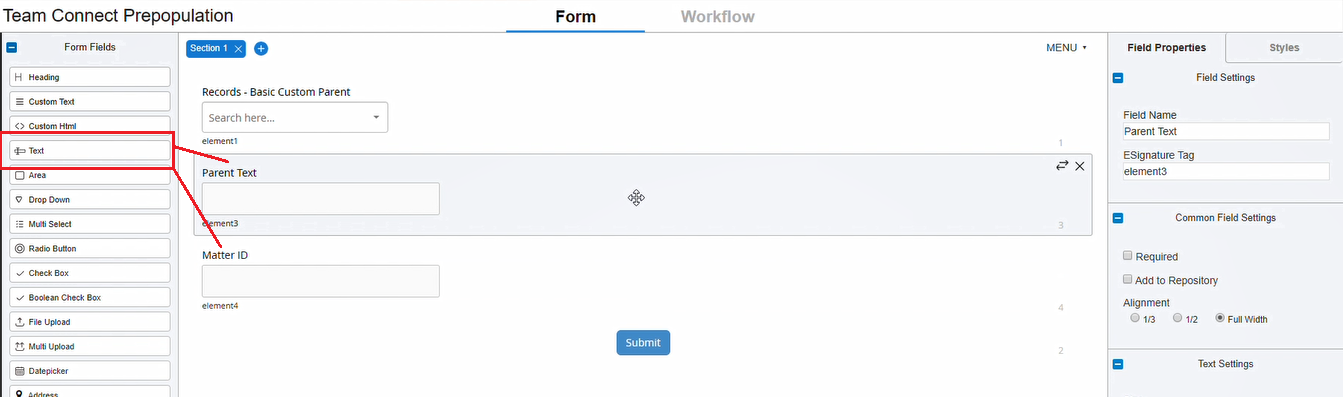
Configuring the form fields
- Highlight the TeamConnect Record Search field (the first one on the form) and click the TeamConnect Setup button from the right side menu.
- Dropdown options
- First drop-down: select your TeamConnect environment
- Second drop-down: object type (this is the name of the first form field created in Step 1)
- Third drop-down: select an object category
- Forth drop-down: search by Name
- Fifth drop-down: Select Contains
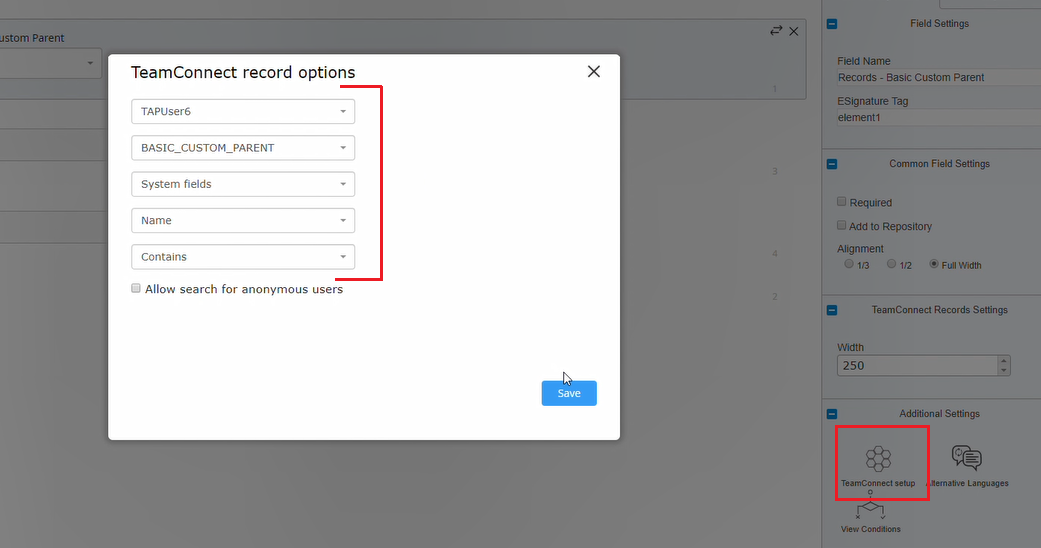
- Click Save.
- This should set up all of the form fields accordingly.
To view the complete list of supported custom field types and system field types for TeamConnect Record Search Criteria, refer to the section below.
TeamConnect Record Search
Supported and Unsupported Fields for TeamConnect Record Search Criteria
When configuring TeamConnect Record Search criteria, only specific custom and system field types are supported. The following limitations apply:
|
Supported Custom Field Types:
|
Unsupported Custom Field Types:
|
|
Supported System Field Types:
|
Unsupported System Field Types:
|
Fields not listed as supported above cannot be used in Record Search criteria configuration.
Creating the workflow
- Create a single stage.
- Click Form Access, and set the drop-down option to Show. Click Save.
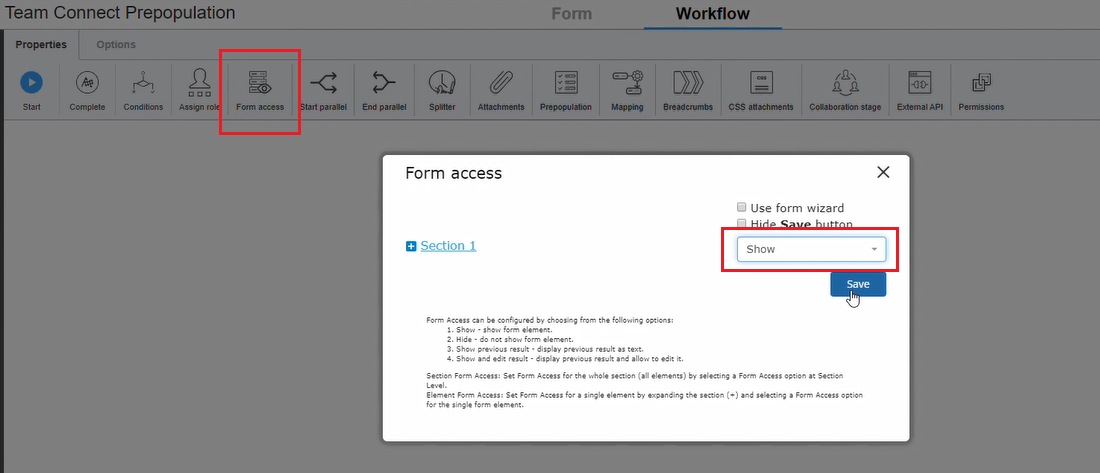
- Select Pre-population from the top ribbon menu. Click the Add button. (this is really where the TeamConnect pre-population starts).

- Enter the name of the form in the first field
- Select Use TeamConnect Records Field.
Note: Pre-population should work for text fields and drop-downs, including drop-downs that are "Use TeamConnect table as options" - Select Records - Basic Custom Parent.
- The Dropdown Fields with "Use Team Connect Table as Options" must be configured properly to allow pre-population from TeamConnect dropdown data.
Add new rules and fill the rules out in the following order:- Rule 1: Parent Text, Parent Text, Editable
- Rule 2: Matter ID, Matter ID, Editable
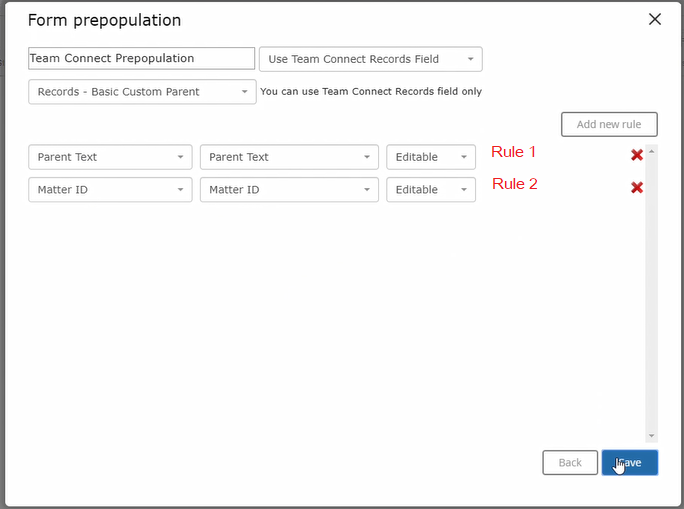
- Click Save and close the window.
- Publish the workflow.
- Save the workflow.
Creating Involved Parties on Records in TeamConnect via TAP
Prerequisite: To add an involved party in TeamConnect via TAP, the TeamConnect design must have a corresponding custom field of Involved Party type.
- Add “TeamConnect Records Search” form field to TAP form
- In “TeamConnect setup” for that form field, map to the proper key and map to the contact object

- Set up desired form access for the “TeamConnect Records Search” form field
- On the “Workflow” tab add “TeamConnect” support. The TeamConnect destination field in this example is “Agency1”. The name of the field in TAP is “agency 1 test”.

Note:
If TAP is updating TeamConnect(TC), then to the workflow be designed should to include a TC records search field so the TAP user can select the matter that needs to be updated.
If the workflow is creating a matter in TC and then continuing the workflow in TAP, one would not need the TC records search field because one could configure the TC Support to update the matter that was created at an earlier stage in that specific workflow.
Map Parent–Child Custom Object Relationships in Workflows
This feature allows admins to map child custom object records to parent custom object records that are created, updated, or selected during a workflow using TeamConnect Support pushes, workflow actions that create or update records in TeamConnect as part of a TAP workflow, and TeamConnect Record Search fields. It supports both new and existing records while preserving existing relationships and audit history.
Using TeamConnect Support pushes and TeamConnect Record Search fields, admins can:
- Link child records to parent records that are newly created, updated, or selected during a workflow
- Preserve existing parent–child relationships during updates unless explicitly changed
- Maintain TeamConnect audit history and data integrity
This feature applies only to custom objects and respects the predefined custom object hierarchy in TeamConnect.
Prerequisites
Before you begin, review the following requirements to avoid errors during workflow execution:
- TeamConnect version 7.1 or above.
- The workflow must include TeamConnect Support.
- Parent and child objects must already exist in TeamConnect.
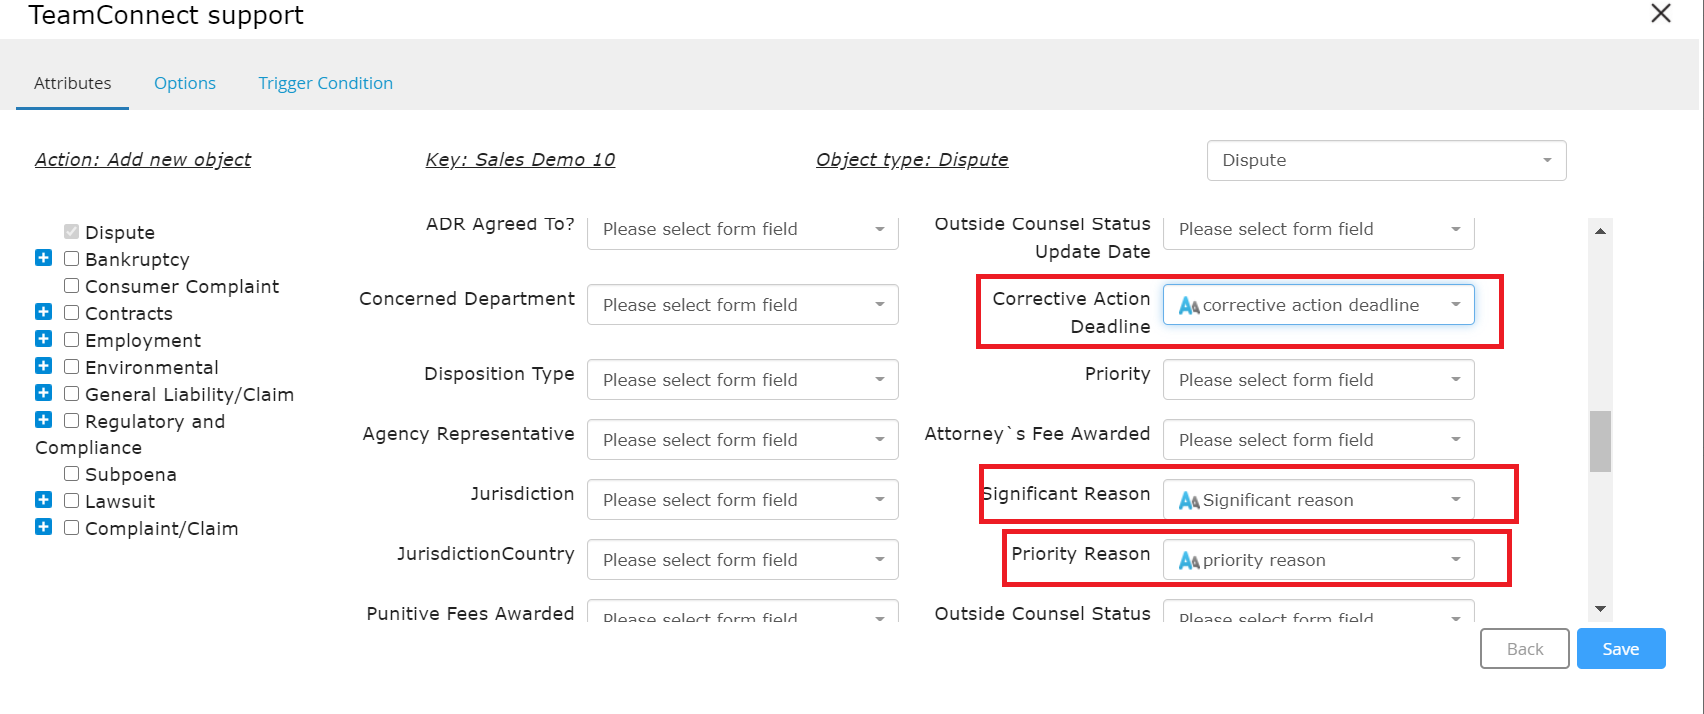
- When configuring TeamConnect Support in a workflow, parent–child selection follows the predefined TeamConnect object hierarchy. If a parent object is selected first in the TeamConnect setup, only its valid child objects are available for selection in the TeamConnect Support stage. Conversely, if a child object is selected, the corresponding parent object is automatically displayed and available in the parent field dropdown.
- This ensures that parent–child relationships always respect the configured hierarchy (for example, a Matter Child can only link to a Matter parent; see the image below). If the Parent Project field is marked as required in the TeamConnect Support configuration, users must select a valid parent record during form submission.
- System objects are not supported.

Map a Parent Record Using TeamConnect Support Pushes
Follow the steps to map a parent record created or updated within a workflow.
Step 1: Open the Workflow Configuration
- Open the workflow in edit mode.
- Navigate to the stage or relationship where the child record is created or updated.
- Open the TeamConnect Support configuration.

Step 2: Configure Record Creation or Update
-
Select whether the action will:
- Create a new TeamConnect record, or
- Update an existing TeamConnect record.
- Select the TeamConnect Key.
- Select the child custom object.
- Select a category.
When creating a new record:

For updating an existing record

Step 3: Map the Parent Record Field
- Locate the parent custom object field named “Parent Project” in the mapping section.
- In the mapping dropdown, select one of the following:
- A TeamConnect Support push
 , or
, or - A TeamConnect Record Search field
 .
.
You can create both the parent and child records from a single form submission by configuring separate TeamConnect Support pushes within the same stage or relationship.
-
If the parent record is created in the same form submission:
- The parent Support push must execute before the child Support push.
- Execution follows a top-to-bottom sequence, and incorrect ordering may require deleting and recreating the configuration.

Mapping automatically filters available options so that only valid parent object types are displayed, based on the child object’s hierarchy.

- All TeamConnect Support pushes created in any stage or relationship can be referenced by other Support pushes across the workflow (cross-stage and cross-relationship referencing).
- This feature supports multi-level custom object hierarchies in TeamConnect, including parent–child and deeper relationships such as grandchild → child → parent, where each level must be linked to its immediate parent as defined in the TeamConnect object model. Directly linking a grandchild record to a top-level parent (skipping the child level) is not supported.
Step 4: Map Additional Custom Object Fields (Optional)
- Admins can map the TeamConnect custom object field, not just parent fields.
- Supported field values include:
- TeamConnect Support push outputs
- TeamConnect Record Search selections
All supported TeamConnect field types can be mapped, provided the custom object field is configured with a specific project type (for example, Matter). Custom fields configured with the project type ALL are not currently supported.
Step 5: Save and Validate the Configuration
- Save the TeamConnect Support configuration.
- Validate that:
- Mandatory parent fields are mapped.
- The correct parent source (push or record search) is selected.
- The execution order is correct when parent and child are created together.
Map a Parent Record Using TeamConnect Record Search
Use this approach when end users must select an existing parent record during form submission.
Step 1: Add a TeamConnect Record Search Field
- Add a TeamConnect Record Search field to the form.
- Select the TeamConnect key.
- Select the object type and select the primary category.
- Configure it to search the appropriate parent object.
Step 2: Map the Record Search to the Parent Field
- In TeamConnect Support, locate the parent custom object field.
- Map it to the TeamConnect Record Search field.
- Save the configuration.
Only TeamConnect Record Search fields that reference a valid parent object based on the configured TeamConnect object hierarchy are available for selection in the Parent Project mapping dropdown.
Behavior When Updating Existing Records
- If a child record already has a parent:
- The existing parent relationship is retained unless explicitly overridden.
- If no parent value is mapped during an update:
- The current parent record remains linked.
- Parent mapping works consistently for:
- New record creation
- Existing record updates
Error Handling and Validation
When parent mapping fails, the system displays clear error messages, such as:
- Record is not a valid parent
- Parent Project is required
- Parent record failed to map
When the mandatory fields are not entered during form submission, the drop-down fields appear as below

When the configuration fails, the following screen is displayed.

Audit Trail and UI Consistency
Audit logging remains unchanged and continues to capture:
-
- Submitted form values
- Mapped record values
- Record search selections
- The mapping dropdown UI is consistent with the TeamConnect Support module.
Example Use Cases
-
Create Parent and Child Together
A workflow creates a parent custom object record in one stage and a child record in the same or a later stage. The child record is automatically linked using the Parent Project field mapped to the parent Support push.
Example: Creating a Matter and its associated Task or Sub-Matter in a single request.
-
Link Child to Existing Parent
An end user selects an existing parent record using a TeamConnect Record Search, submits the form, and a new child record is created and linked to that parent.
Example: Adding a new Contract Amendment to an existing Matter.
-
Update Parent Relationship
An admin configures a workflow that updates an existing child record and reassigns it to a different parent by mapping a new Record Search value.
Example: Reassigning an Expense, or Sub-Project from one Matter to another due to a case reorganization.
-
Add Multiple Child Records
A workflow allows repeated creation of child records linked to the same parent by referencing the original parent Support push, enabling one-to-many relationships without predefined limits. This is achieved by configuring TeamConnect Support at the stage relationship level, where a form button is assigned as the trigger for creating additional child records. After each record is created, the form fields must be refilled to create the next record. So there’s no need to restart the workflow each time.
Example: Adding multiple Vendors, Outside Counsel, or Related Agreements to a single Matter without restarting the workflow.
Configure Dependent (Cascading) Dropdown Lists
Overview
Dependent (cascading) dropdown lists allow admins to configure form fields where the available values in a dropdown are dynamically filtered based on a user’s selection in another dropdown.
The dropdown values are sourced in real time from TeamConnect lookup tables (including the ones with multi-level lists), and the dynamic filtering of dropdowns follows the hierarchy in the TeamConnect lookup table.
Dependent dropdowns support:
- Multi-level hierarchies
- Skipping intermediate levels
- Show one level per dropdown from a multi-level TeamConnect list
- Show all levels at once in a single dropdown
- Mapping selected values back to TeamConnect records using TeamConnect Support

Prerequisites
Before you begin, review the following requirements to avoid errors during workflow execution:
- TeamConnect version 7.1 or above is required.
- The workflow must include TeamConnect Support.
- Parent and child objects must already exist in TeamConnect.
- Dropdown fields must use TeamConnect List fields as their data source.
- Parent–child drop-down behavior must follow the hierarchy defined in the TeamConnect lookup table.
- System lookup tables are not supported.
- A custom lookup table mapped to a custom field on a system object (for example, Contact) will function correctly.
Follow these steps to configure a dependent (cascading) dropdown using TeamConnect list fields.
Step 1: Add or Edit a Dropdown Field
- Open the TAP form in edit mode.
- Add a new Dropdown field, or select an existing dropdown field to edit.
- Navigate to the Dropdown field → Options.
Step 2: Select TeamConnect List as the Data Source
-
In Data Source, select Use TeamConnect List Field.
-
Configure the TeamConnect list using the following selections:
- TC Key
- Object
- Category
- Select TC List

Step 3: Choose the Level to Display
-
Under Level to Display, select the hierarchy level of the TeamConnect list to show in the dropdown or choose to display all levels at once:
- Level 0 – Root level (selected by default)
- Level 1+ – Nested levels
- All Levels – Displays values from all hierarchy levels in a single dropdown
- Review the preview of sample list values shown for each selection.
- Select the level that best fits the form requirement.
This option is always available and does not depend on enabling Dependent Lists.

Step 4: Enable Dependent Lists
-
Select the Dependent Lists checkbox.
-
This option appears only when a TeamConnect list field is used as the data source.
-
-
Once enabled, the Parent Dropdown field becomes available.

Step 5: Select the Parent Dropdown
- In the Parent Dropdown, select the existing dropdown field that will act as the parent.
- Ensure the selected parent dropdown:
- Is placed earlier in the form.
- Uses a compatible TeamConnect list.
-
It is supported to use different TeamConnect lists for the parent and child dropdowns, as long as their Tree Positions match.
(Tree Positions are four-character codes that uniquely identify values within TeamConnect lookup tables. See Glossary for details.)
Step 6: Validate Parent–Child Matching
- Verify that the parent and child TeamConnect lists share matching Tree Position values (four-character codes).
- Ensure the hierarchy levels selected for display align correctly.
- If no matching values exist, the system displays the following error:
“No matching values with parent. Check that the parent dropdown’s source list is configured correctly.”
Step 7: Configure Additional Dependent Levels (Optional)
- Repeat Steps 1–6 to add more dropdowns in the sequence.
- Each additional dropdown should:
- Use a deeper hierarchy level.
- Reference the previous dropdown as its parent.
Step 8: Save and Test the Configuration
- Save the form configuration.
- Preview the form behavior:
- Child dropdowns remain blank until a parent value is selected.
- Changing a parent value updates the child options.
- Clearing a parent value resets the child dropdown.

The dependent dropdowns are now configured. End users will see dynamically filtered dropdown options based on their selections, with values dynamically pulled from TeamConnect lookup tables at the time the form is loaded, ensuring accurate and guided data entry.
Mapping Dependent List Values to TeamConnect Records
Values selected from dependent dropdowns can be mapped to TeamConnect records using TeamConnect Support.
- Selected values are passed from the form to TeamConnect custom object fields.
- When a workflow is submitted:
- A new TeamConnect record can be created, or
- An existing record can be updated
- All mapped values are persisted exactly as selected by the user.

Display Entire Hierarchy in a Single Dropdown (Optional)
Admins can configure a dropdown to display the entire TeamConnect list hierarchy in a single dropdown.
Important limitation:
- When the full hierarchy is displayed in one dropdown, dependent (cascading) dropdowns cannot be configured.
- Admins must choose either:
- Cascading dependent dropdowns, where each dropdown displays only one hierarchy level at a time, or
- A single dropdown with the full hierarchy
Example Use Cases (End User Perspective)
- Geographic Selection
- Country → State → City
- Users see only cities relevant to the selected state, even if intermediate levels are skipped.
- Product Selection
- Manufacturer → Model → Year
- Selecting a manufacturer dynamically filters available models and years.

- Team Selection
- Division → Department → Team
- Users can only select teams relevant to their chosen department.
- Workflow Integration
- Selected dropdown values are automatically mapped and stored in TeamConnect records upon form submission.
Limitations and Known Issues (Dependent Dropdowns)
TeamConnect Multi-Select Field Audit Visibility
- Values selected in TeamConnect Multi-Select fields are not saved or displayed in the Audit Trail or Workflow Notifications and may appear blank.
- This issue occurs only when the Multi-Select field references a custom lookup table that shares a table code with an existing system lookup table.
- For unique custom lookup tables, Multi-Select values are recorded and displayed correctly in the audit trail.
Inactive Lookup Values Displayed
- Inactive values from a TeamConnect lookup table may still appear as selectable options in dependent dropdowns when:
- Multi-level TeamConnect lists are used, and
- The dropdown displays levels below the root.
- As a workaround, it is recommended to append “(INACTIVE)” to the list item name in TeamConnect to help end users identify inactive values.
Glossary
TeamConnect Custom Objects - Custom objects, sometimes referred to as Projects or Matters in TeamConnect, are business objects created specifically for your organization in TeamConnect. They allow you to capture and manage information that meets your business needs. Each Custom Object definition determines how its records are created, displayed, and related to other objects in the system.
TeamConnect System Objects - System objects are core, predefined TeamConnect objects available across all environments. They work together with custom objects to support standard business functionality. Examples of system objects include Account, Appointment, Document, Line Item, Task, and User.
TeamConnect Record - A TeamConnect Record is an individual data entry stored in TeamConnect that represents a business entity such as a Matter, Invoice, Contract, or a custom object and contains structured fields, relationships, and audit history defined by TeamConnect.
TeamConnect record search field - A TeamConnect Record Search field is a form field that allows end users to search for and select an existing TeamConnect record during form submission.
TeamConnect Support Push - These are workflow actions that create or update records in TeamConnect as part of a TAP workflow.
TeamConnect List Field and Lookup Table - A TeamConnect List Field is a field that displays predefined values from a lookup table for user selection, such as in a dropdown or radio button. Lookup tables organize and store defined values (such as country, address type, or custom categories) that users can choose in drop-down lists or radio buttons. These lookup tables can be system-defined or custom and may include multi-level hierarchies with parent and child values.
Tree Positions - A Tree Position is a four-character alphanumeric code assigned to an item in a TeamConnect Lookup Table, Category, or Assignee Role. It uniquely identifies the item and its position within the hierarchy in the TeamConnect database. Tree Positions may include numbers and uppercase letters only.