
Adding an Approver to an Invoice
This procedure is necessary only if any of the following conditions are present:
- The system setting to automatically populate allocations from the Player tab has not been enabled.
- Changes were made to approver information on the Player tab after the invoice was entered.
- The invoice is to be approved by people other than those specified on the Player tab.
- The invoice was entered manually using the standard method (not single-page). To auto- load approvers after all line items have been entered, click the Defaults button on the Invoice Approval subtab on the Matter tab.
When using this method, you will have the opportunity to add the person as a player to the matter.
Additional constraints for approvers are as follows:
- The approver login identifier must be associated with his/her person record in Suite Manager (see your system administrator).
- The approver must have a contact information entry with a communication type of E-mail in order for the approver to receive e-mail notifications.
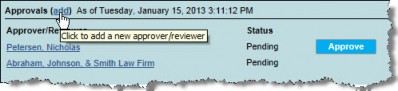
You also can add approvers to an invoice directly from the Invoices Summary page. Click on the Add link next to the Approvals heading to open the Invoice Approval dialog box.
If invoice logical group is enabled and a user who does not have access to a matter is explicitly assigned to approve an invoice for that matter, the Approver E-mail Notification task will send the user an e-mail from which he/she can access and approve the invoice. However, the invoice will display “Restricted Data” in areas that pertain to the matter.
To Add an Approver to an Invoice:
- Open the Invoices module.
- Create an invoice or open an existing invoice.
- Click on the Matter tab, then click on the Invoice Approval subtab in the Details area.
- Click
 New.
New. - On the Invoice Approval dialog box, click the
 button in the Name field, and click on a person name to select that person as a reviewer or approver. If the person is not a player, a confirmation message will display. Click Yes to add the person as a player to the matter. Click No to add the person only as an approver to the invoice.
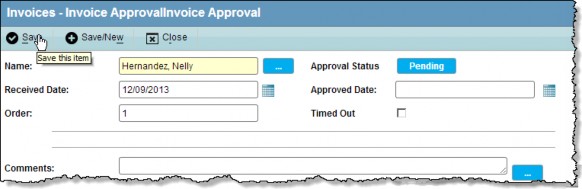
- Type a number to indicate the order in which this approver should receive the invoice. If two approvers have the same number in the order, the invoice will be routed to both at the same time and will not be routed to the next approver until both of the previous approvers have approved/rejected the invoice or timed out.
- Click
 Save.
Save.