
Importing Custom Document Templates
The Template Import component of Suite Manager also can be used to bulk import custom document templates into either Secretariat or eCounsel. In order to update Suite with information about the document template, an additional XML file must be created with information that is written to the database. The contents of the XML file are as follows:
<report>
<!—The value of the Output ID is the same as the HDTemplate_ID --
>
<Output_ID>13000</Output_ID>
<OutputName>Name of Document</OutputName>
<!—Categories: matter=1,people=2,entity=3,invoice=4 -->
<OutputCategory_ID>3</OutputCategory_ID>
<!-- The value must be "Document" -->
<OutputType_CD>Documents</OutputType_CD>
<OutputFileName>template_name.rtf</OutputFileName>
<!—The value must be "server side HotDocs/HotForms" -->
<OutputFileType>server side HotDocs/HotForms</OutputFileType>
<OutputPath/>
<NamingConvention></NamingConvention>
<Description>Comment that appears in the Reports
module.</Description>
<Required>T</Required>
<OutputTemplate_ID/>
<!-- This node is required -->
<HDTemplate_ID></HDTemplate_ID>
<!-- Program ID: suite=0,ecounsel=1,secretariat=2 -->
<Program_ID>2</Program_ID>
<!-- This node is required -->
<HD_FileName>template_name.rtf</HD_FileName>
<!-- This node is required -->
<HDComponent_ID></HDComponent_ID>
<OutputType_CAT>46</OutputType_CAT>
<!-- This node is required -->
<Template_ID></Template_ID>
<TaskDoc_ID/>
<Switches/>
<OutputCategory_Desc>Entities</OutputCategory_Desc>
<VERSIONNUMBER>2</VERSIONNUMBER>
<VERSIONDATE>3/5/2014</VERSIONDATE>
<SECRMINVERSION>8.8.1</SECRMINVERSION>
</report>
To Create the XML File for Custom Templates:
- Copy the contents of the XML sample above and paste in a new file in a text editor.
- Replace the following:
- Output ID: Type the next available identifier. Check with your DBA to assure that the number is unique.
- Output Name: Type the name of the document.
- Output Category ID: Type “1” for eCounsel matters, “2” for eCounsel or Secretariat people, “3” for eCounsel or Secretariat entities, or “4” for eCounsel invoices depending on the select parameter in the template.
- OutputFileName: Type the name of the RTF template file.
- Description: Type the comment that will appear on the Documents tab of the Reports module for the template.
- Program ID: Type “1” for eCounsel and “2” for Secretariat.
- HD File Name: Type the name of the RTF template file.
- Output Category Desc: Type the name of the category in eCounsel or Secretariat where the template should appear.
- Version Number: Optionally, type the version of the template to track revisions.
- Version Date: Optionally, type the date the template was last modified.
- Secretariat Min Version: Type the version number of the product with which the template is compatible.
- Save the file using the same name as the template name with a .XML extension.
- Copy the file to the same directory as the RTF, CMP, and RTF.MANIFEST.XML files.
To Import Custom Document Templates:
- Open Suite Manager.
- On the Suite Manager control panel, click the
 Template Import component in the Tools & Utilities area.
 - On the Template Import window, select the My computer template location.
- Navigate to the subdirectory in which the RTF, CMP, RTF.MANIFEST.XML and XML files are located.
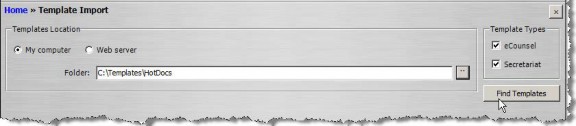
The subdirectory can be named anything, but all four files must be in the same folder for the import to work.
- Click the checkbox next to the Secretariat or eCounsel application depending on the product for which you are importing templates.
- Click Find Templates.
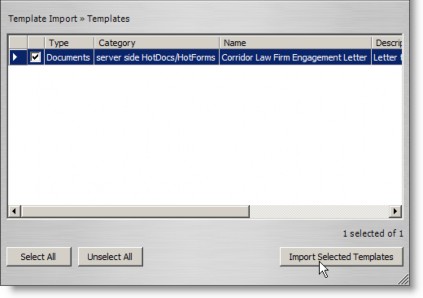
- On the Templates to Import dialog box, click the Select All button, or, if you prefer, select the appropriate checkbox(es) to indicate which templates you want to install.
- Click the Import Selected Templates button. A progress meter will display. You can abort the installation at any time by clicking Cancel. If any errors are encountered, they will display at the bottom of the dialog box.
- Click the
 Close button to exit the Templates to Import dialog box.
Making a Document Available from a Tab
After creating a custom tab or when modifying a default tab (provided by Mitratech), you can configure which documents can be accessed from the tab by clicking the Reports button on the tab. Any document template can be made accessible from a tab within any module. See Making a Document Available from a Tab.