
Configuring SAML Authentication
The SAML authentication integration needs to be configured to specify the IDP service to use in order to authenticate user logins.
To Configure SAML:
- Open Suite Manager.
- On the Suite Manager control panel, click the Authentication component in the Security area.
- On the Authentication window, click the SAML Integration tab.
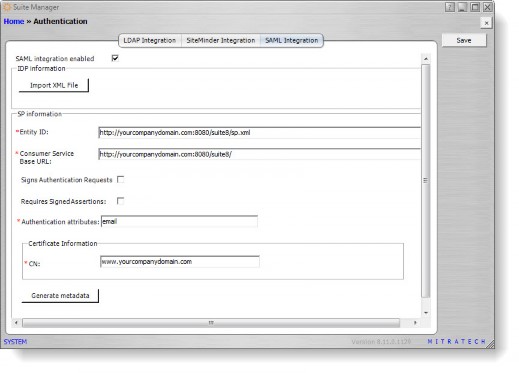
- Click the SAML integration enabled checkbox to select it.
- Click the Import XML File button and select the IdP metadata file to be used with SAML. If you do not have this file, contact your IdP administrator.
- In the SP information area, type the entity ID in the text box. This URL is the URL of the Suite instance with the suffix of /sp.xml, typically in the form http://<ServeNamer>:<Port>/<Context>/sp.xml, where
- <ServerName> is the name of the server
- <Port> is the number of the port used to connect to the server if not using IIS or a redirect.
- <Context> is the context name for Suite
For example, https://yourcompanydomain.com:8080/suite8/sp.xml. If your configuration has multiple instances, specify the instance in the URL, for example, https://yourcompanydomain.com:8080/suite8/database3/sp.xml where database3 is the name of the instance.
This URL must exactly match the URL in the certificate and the URL in the IdP.
- Type the Consumer Service Base URL in the text box. This URL is the URL of the Suite instance that is accessible to the IdP and is also the base URL that is used in the rules and scheduler of Suite Manager.
- Select the Sign Authentication Requests checkbox if you want the service provider to sign authentication requests.
- Select the Requires Signed Assertions checkbox if you want the service provider to require signed assertions.
- In the Authentication attributes field, type attributes or claims that are used to authenticate the user in the IdP. For example, PingOne might use the email attribute. If more than one attribute is used, separate attributes with a comma.
The attributes listed in this field will be mapped during the IdP configuration, so all attributes in this field must be entered in the same format as the attribute in the IdP. - In the CN field in the Certificate Information area, type the common name for the secure Web address for which the SSL Server Certificate was issued. This name is generally the Consumer Service Base URL without the prefix of http://.
- Click Save.
![]() You must click save prior to generating the sp-metadata.xml file or the file will be generated with the previously saved values, not the current values on the window.
You must click save prior to generating the sp-metadata.xml file or the file will be generated with the previously saved values, not the current values on the window.
- To generate an sp-metatdata.xml for the IdP, click the Generate metadata button. Suite Manager will check for the certificate, and if it does not exist, Suite Manager will create the certificate.
- To download the sp-metadata.xml file, click the link and click Save. Use this file to register the SP in the IdP. Depending on the IdP, you can register the SP by adding this file to the metadata folder of the IdP.
To Configure the IdP:
- Log in to your IdP configuration tool.
- In the IdP configuration tool, map the attributes listed in the Authentication attributes field in the Suite Manager SAML Integration tab. Your IdP may require additional configuration. For example, for PingOne, the Advanced Attribute Option for email must have the NameFormat value set to:
urn:oasis:names:tc:SAML:2.0:attrname-format:uri - For the Assertion Consumer Service (ACS) URL value in the IdP, enter the Consumer Service Base URL (found on the Suite Manager SAML Integration tab) with the suffix:
/servlet/com.bsi.servlets.AdminServlet?cmd=validatesamllogin
For example, if the URL is https://yourcompanydomain.com:8080/suite8/database3,
enter: https://yourcompanydomain.com:8080/suite8/database3/servlet/com.bsi.servlets.AdminSe rvlet?cmd=validatesamllogin - For the entityID value, enter the same entityID that is in the Entity ID field of the Suite Manager SAML Integration tab.
- Your IdP might require more configuration specific to your situation. For example, PingOne may require the Attribute Option to be set to Name Format.
When SAML is enabled, each user must be assigned a Distinguished Name with the value of the attribute in the Authentication attributes field. For more information on mapping a Distinguished Name, see Creating a User Account and Assigning a Distinguished Name to a User (SAML).