
Pages and Tabs
Wizards List Page
The Wizards List page allows you to access timesaving features that combine document creation with database updates and accomplish complex or tedious tasks with a minimum of effort.

Categories
All – Click to list all available wizards.
Favorites – Click to list all wizards that have been categorized as favorites.
Any other categories are determined by the System Administrator or a user with Wizard Access security attribute rights.
Fields
Wizards – The name of the timesaving feature.
Buttons
Run – Click to start the selected wizard.
Add to or Remove from Favorites – Click to move the selected wizard to the list of favorites or delete the selected wizard from the list of favorites.
Edit – Click to modify information concerning the selected wizard.
Address Consolidation Wizard
The Address Consolidation Wizard allows you to consolidate multiple address records into a single address record that is used by multiple entities.

Fields
Step 1 – Select the items with addresses to be consolidated.
Step 2 – Select the item with the address that should be used as the surviving address for all items selected in Step 1.
Step 3 – Verify the information.
Buttons
Next – Click to access the next screen of the wizard.
Cancel – Click to close the wizard without saving any changes.
![]() Options – Click to change the display options for the items on the screen.
Options – Click to change the display options for the items on the screen.
Select – Click to select the address to use for all the items selected in Step 1.
Back – Click to access the previous screen of the wizard.
Finish – Click to merge the addresses.
Close – Click to close the wizard.
Copy Data Wizard
The Copy Data Wizard allows you to create a new entity record using data from an existing record.

Fields
Step 1 – Select the entity from which to copy.
Copy from – The entity record from which information should be copied.
Step 2 – Select the entity to which to copy.
Copy to – The entity record to which information should be copied.
Step 3 – Select the types of data to copy.
Copy Positions – An indication of whether position information will be copied.
Copy Incorp/Qual/Registration – An indication of whether incorporation and registration information will be copied.
Copy Other Data Options – An indication of whether other information will be copied.
Copy Positions Fields
Use existing dates – An indication to copy the record exactly as is from the source entity.
Use new date – An indication to copy the information using the specified date.
Copy Registrations Fields
Use existing dates – An indication to copy the record exactly as is from the source entity.
Use new date – An indication to copy the information using the specified date.
Copy Other Data Fields
Copy Base Info – An indication that the Fiscal/Tax Year End and Has Employees values from the Base Info tab will be copied.
Copy Contact Info – An indication that all information from the Contact Info tab will be copied.
Copy Corporate-wide User Fields from User Fields tab – An indication that all information from corporate-wide user fields will be copied.
Copy Entity Type-specific User Fields – An indication that all information specific to an entity type will be copied from user fields.
Buttons
Next – Click to access the next screen of the wizard.
Cancel – Click to close the wizard without saving any changes.
Back – Click to access the previous screen of the wizard.
Finish – Click to change the status of the selected entity.
Print – Click to send the information to the default printer.
Close – Click to close the wizard.
Corporate Meeting Wizard
The Corporate Meeting Wizard allows you to prepare documents for corporate meetings using information entered in Secretariat and dates selected on the wizard screens. This wizard also updates the database to reflect the new Last Elected Date for re-elected positions and adds the date for newly elected positions.

Fields
Effective date – This date will update records in the database in the following manner:
- the last elected date for any re-elected position(s)
- the effective, first elected, and last elected date for any new position(s)
- the end date for any retiring position(s)
Notice date – The date a notice must be generated.
Meeting date – The date a meeting will occur.
Update last meeting date – An indication that the last meeting date will be updated.
Update next meeting date – An indication that the next meeting date will be updated.
Next Meeting Date – The date of the next meeting.
Document Category – The type of document being created.
Template – The template to be used in the document creation.
Positions Held Fields
No changes to slate – An indication that all slate positions listed on this screen will be re-elected using the effective date entered on the previous screen.
Skip re-election altogether – An indication that the documents will be prepared with no changes to the database.
Re-elect with change – An indication that people will be retired and added to the slate.
Positions – Select the names of people to be elected to and/or retired from positions in the company. Elections can be new people and positions or re-election of past positions.
Buttons
Next – Click to access the next screen of the wizard.
Cancel – Click to close the wizard without saving any changes.
Back – Click to access the previous screen of the wizard.
Select Position Types – The positions that will appear for the slate.
Finish – Click to change the status of the selected entity.
Print – Click to send the information to the default printer.
Generate Documents – Click to open the Document Assembly Wizard to prepare documents.
Entity Change Status Wizard
The Entity Change Status Wizard allows you to change the status of an entity.

Fields
Step 1 – Select an entity.
Entity – The name of the entity for which the status is being changed.
Step 2 – Specify the effective date.
Effective date of change – The date the status should be changed.
Step 3 – Specify the new status and status type.
Status – The current status (such as Inactive) of the entity.
Status type – The new status (such as Dissolved) of the entity.
Step 4 – Enter end dates for position records, securities records, parent records, committees, registration records, securities records, subsidiary records, and/or committee members.
Step 5 – Specify if you wish to add an entry to Notes/History/Charts tab.
Add entry to Notes/History/Charts? – An indication of whether an entry will be created on the Notes/History/Charts tab of the entity’s record.
Comments – Freeform text to indicate the text that will be used to create the entry in the Notes/History tab.
Step 6 – Select the surviving entity. These fields appear for mergers only.
Surviving Entity – The name of the entity that will be created from the merge of the two entities.
Step 7 – Specify if you wish to transfer subsidiary records. These fields appear for mergers only.
Transfer subsidiary records to this entity – An indication that subsidiary records for the entity being changed that do not have an end date will be copied to the successor entity.
Buttons
Back – Click to access the previous screen of the wizard.
Next – Click to access the next screen of the wizard.
Cancel – Click to close the wizard without saving any changes.
Finish – Click to change the status of the selected entity.
Print – Click to send the information to the default printer.
Global Appoint/Promote/Retire Wizard
The Global Appoint/Promote/Retire Wizard allows you to prepare documents and update the database when a person/company is appointed to a position, promoted to a position, or retired from multiple positions.

Fields
Global Appoint/Promote/Retire – Select to appoint, promote, or retire a person/company to/from a position across multiple entities. For the Global Retire option, a replacement may be designated for the position.
Global Appoint – Start Fields
Step 1 – Select a person/company to appoint.
Name – The name of the person/company to appoint to a position.
Step 2 – Specify a title and effective date.
Title – The name of the position to which the person/company is being appointed.
Effective Date – The date the appointment is effective.
Global Promote – Start Fields
Step 1 – Select a person/company to promote.
Name – The name of the person/company to promote to a position.
Step 2 – Specify the current title and end date.
Current Title – The name of the position from which the person/company is being promoted.
End Date – The date the current position will end.
Step 3 – Specify the new title and effective date.
New Title – The name of the position to which the person/company is being promoted.
Effective Date – The date the promotion is effective.
Positions – Select the specific position with an entity from which the person/company is being promoted.
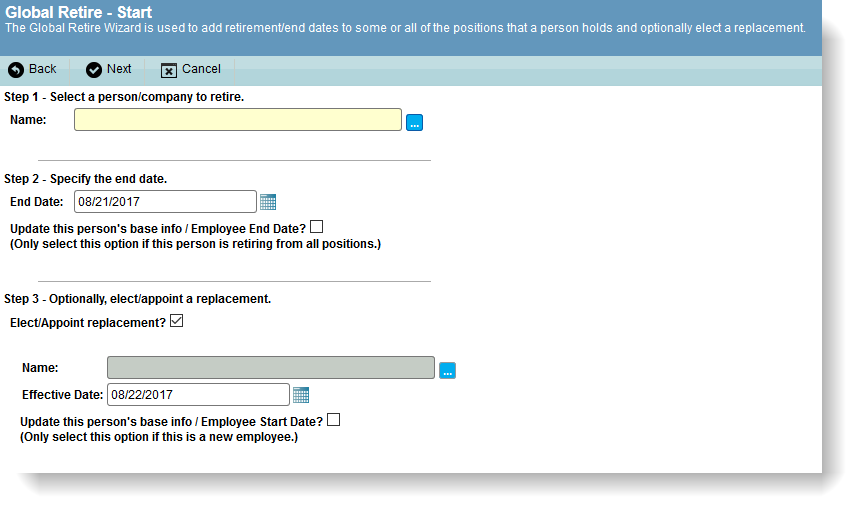
Global Retire – Start Fields
Step 1 – Select a person/company to retire.
Name – The name of the person/company to retire from a position.
Step 2 – Specify an end date.
End Date – The date the current position will end.
Update the person's Base Info / Employee End Date? – Select to automatically update the person’s record
Step 3 – Optionally, elect/appoint a replacement.
Elect/Appoint replacement – An indication of whether a new person/company will be designated for the position.
Name – The name of the person/company to replace the retiree.
Effective Date – The date the election/appointment is effective.
Update the person's Base Info / Employee End Date? – Select to automatically update the person’s record
Positions – Select the specific position with an entity from which the person/company is being retired.
Select Documents Fields
Effective date – The date the change is effective.
Notice date – The date a notice will be issued for the change.
Meeting date – The date of the meeting to announce the change.
Document Category – The name of the filter used to categorize the document.
Template – The name of the template to be used to create documents.
Buttons
Next – Click to access the next screen of the wizard.
Cancel – Click to close the wizard without saving any changes.
Back – Click to access the previous screen of the wizard.
Finish – Click to commit the changes.
Print – Click to send the information to the default printer.
Generate Documents – Click to open the Document Assembly Wizard to prepare documents.
Global Sort Order Update Wizard
The Global Sort Order Update Wizard allows you to make mass updates to the sort order of position records.

Fields
Title – The name of the title.
Number of records holding this title – The number of records in the database of people who have been assigned the selected title will be listed.
New Sort Order Value – A number assigned to titles to rank them in the order they need to appear in a report. The sort orders have a range from 1 to 10,000, with 1 being the highest on the list. The default setting is 10,000, changing this setting is optional. If sort order is used, generating a positions report will list all positions assigned the same sort order alphabetically by last name within the title type. If sort order is not used, then the list would be alphabetical by last name, regardless of title type.
Change default sort order value for the title in the Titles module/Change the sort order for all current position records that hold this title/Change the sort order for all historical position records that hold this title – An indication to change only current records, only historical records, or both. Status is determined by the End Date field on the Positions tab (Entities module) and Titles Held tab (People module) .
Buttons
Show List – Click to view a list of records of people assigned to the selected title.
Back – Click to access the previous screen of the wizard.
Next – Click to access the next screen of the wizard.
Cancel – Click to close the wizard without saving any changes.
Finish – Click to close the wizard and save the changes.