
Upload Multiple Timekeepers With Rates
You can upload many new Timekeepers along with rates by clicking the Upload Timekeepers with Rates link on the Timekeepers with Rates tab.
You can save time by uploading new timekeeper information and rates in an Excel .csv file or text .txt file or use one of the provided sample files.
Timekeeper sample file contain headings that represent the fields on the Timekeeper Profile page. Under each heading, you can enter specific information for multiple timekeepers, and then upload this file to create an individual timekeeper profile.
Manually created files
You can use an Excel spreadsheet (saved as .csv format) or a text file (.txt) to create a file that you can use to upload information for multiple Timekeepers.
Sample files
You can access the timekeeper 5.0.csv sample file on the Upload Timekeepers with Rates page. Sample files contain all of the appropriate field headings. Simply replace the required and additional Timekeeper information.
The following image displays a sample Excel .csv file that uploads 3 timekeepers:

Timekeeper File
The timekeeper 5.0.csv sample file contains all basic and required field headings as follows:
Note: Headings listed with an asterisk (*) are required. Please note the maximum character limitations for each field. If you exceed these limitations, an upload error occurs. Fields that do not list a limitation do not have one, but there may be a limitation in the user interface once the information is uploaded.
Based on the client settings, fields that are required in addition to existing mandatory fields for timekeeper submission are displayed in the description area. An error message is displayed if any of the mandatory field is missing in the uploaded file.
For a full breakdown on how to format your Timekeeper file, please click here.
- *displaycode —8 characters maximum
- *classification—Enter the two-letter symbol for each classification:
- Partner—PT
- Associate—AS
- Of Counsel—OC
- Legal Assistant—LA
- Other Timekeeper—OT
- *firstName
- middleName
- *lastName
- homeOffice
- Home Offices that are uploaded via .csv will be checked by default on the Timekeeper profile page. See this page to learn how to edit this information.
- Home Office can be blank.
- If a bad value is input into this field, an error message will be thrown.
- phone
- *vendorTimekeeperId —8 characters maximum
- salutation—15 characters maximum
- suffix—15 characters maximum
- permittedToPracticeYear—4 digits. Minimum value of 1900. Enter a value in this field only if you enter a PT, AS, or OC in the classification field.
- primaryExpertise—40 characters maximum. Select an option from the Primary Expertise drop-down on the Timekeeper Profile page, and enter it exactly as it appears.
- secondaryExpertise—40 characters maximum. Select an option from the Secondary Expertise drop-down on the Timekeeper Profile page, and enter it exactly as it appears.
- clerkships—40 characters maximum
- city—40 characters maximum
- state—40 characters maximum. Select an option from the State/Province drop-down on the Timekeeper Profile page, and enter it exactly as it appears.
- postalCode—20 characters maximum
- country—50 characters maximum. Enter a valid two-letter country code.
- mobilePhone—20 characters maximum
- fax—20 characters maximum
- licensedToPracticeLawIn—Use commas to separate states/countries. Select an option from the Licensed To Practice Law In drop-down on the Timekeeper Profile page, and enter it exactly as it appears.
- languagesSpoken—Use commas to separate languages. Select an option from the Languages Spoken drop-down on the Timekeeper Profile page, and enter it exactly as it appears.
- firstYearinCurrentCategory—4 digits. Minimum value of 1930. Only enter a value in this field if the classification field has PT, AS, or OC.
- clientcode—Would match the Client Code (Internal Client Code) for the client ; only used when there is a need for a client specific timekeeper, otherwise, leave this field blank (click here for more information about Client Specific Timekeepers)
- PracticeArea
- PracticeArea(Other)
- yearOfJD(Bar)
- gender
- race
- race(Other)
- LGBTQ
- veteran
- disability
Timekeeper Rate Proposal file
The Timekeeper Rate Proposal Sample 2.0.csv file contains these fields:
|
Column Name |
Description |
|---|---|
|
*office |
The Office for that Timekeeper referenced in the Timekeeper identifier column. Note the Office must be assigned to the Client. |
plus other fields from the file used to Upload Rate Requests (Timekeeper Rate Proposal Sample 3.0.csv file)
|
Column Name |
Description |
|---|---|
|
*timekeeper identifier |
Provide the Timekeeper Display Code or Timekeeper ID of the timekeeper that you want to associate with the rate. |
|
*category |
The type of rate. Enter Timekeeper rate to specify a rate for the timekeeper or Invoice task rate to specify a rate for a specific fee. |
|
taskCode |
The code for the task you want to associate with the rate. This field is required if category is Invoice task rate, but the field should be empty if category is Timekeeper rate. |
| matter number | The Matter number associated with the rate request (Optional Field), if the client has "Matter Level Rates" setting On. |
|
*currency |
The name of the currency, which must be the same type of currency the client sets up. Enter the full Currency Name, as listed in the Acceptable Currencies table. |
|
*rate(Hourly) |
The number amount, based on the currency, that the timekeeper charges per hour. Enter the rate with a period for the decimal point. Collaborati does not accept a comma as the decimal point. |
|
startDate |
The start date for this rate in one of the following formats: M/D/YYYY, M/DD/YYYY, MM/DD/YYYY, MM/D/YYYY. |
|
endDate |
The end date for this rate in the same formats acceptable for startDate. |
|
note |
Notes about the rate. |
| assigneeAndMatterDetails | Optional field for entering the Assignee or other Matter Details |

Note: Column names with an asterisk are required.
For information about how to submit rate requests, see How do I submit rate requests?
To download sample files
- Click the Timekeepers tab.
- Click Upload Timekeepers With Rates.
- Click Download Sample Timekeepers File.
- On the dialog, select an option to access the .zip file that contains the sample files.
- Extract the appropriate file and complete the Timekeeper information.
- Save the sample file.
Once the file is complete and saved, you can upload it to the Timekeeper with rates Profile page.
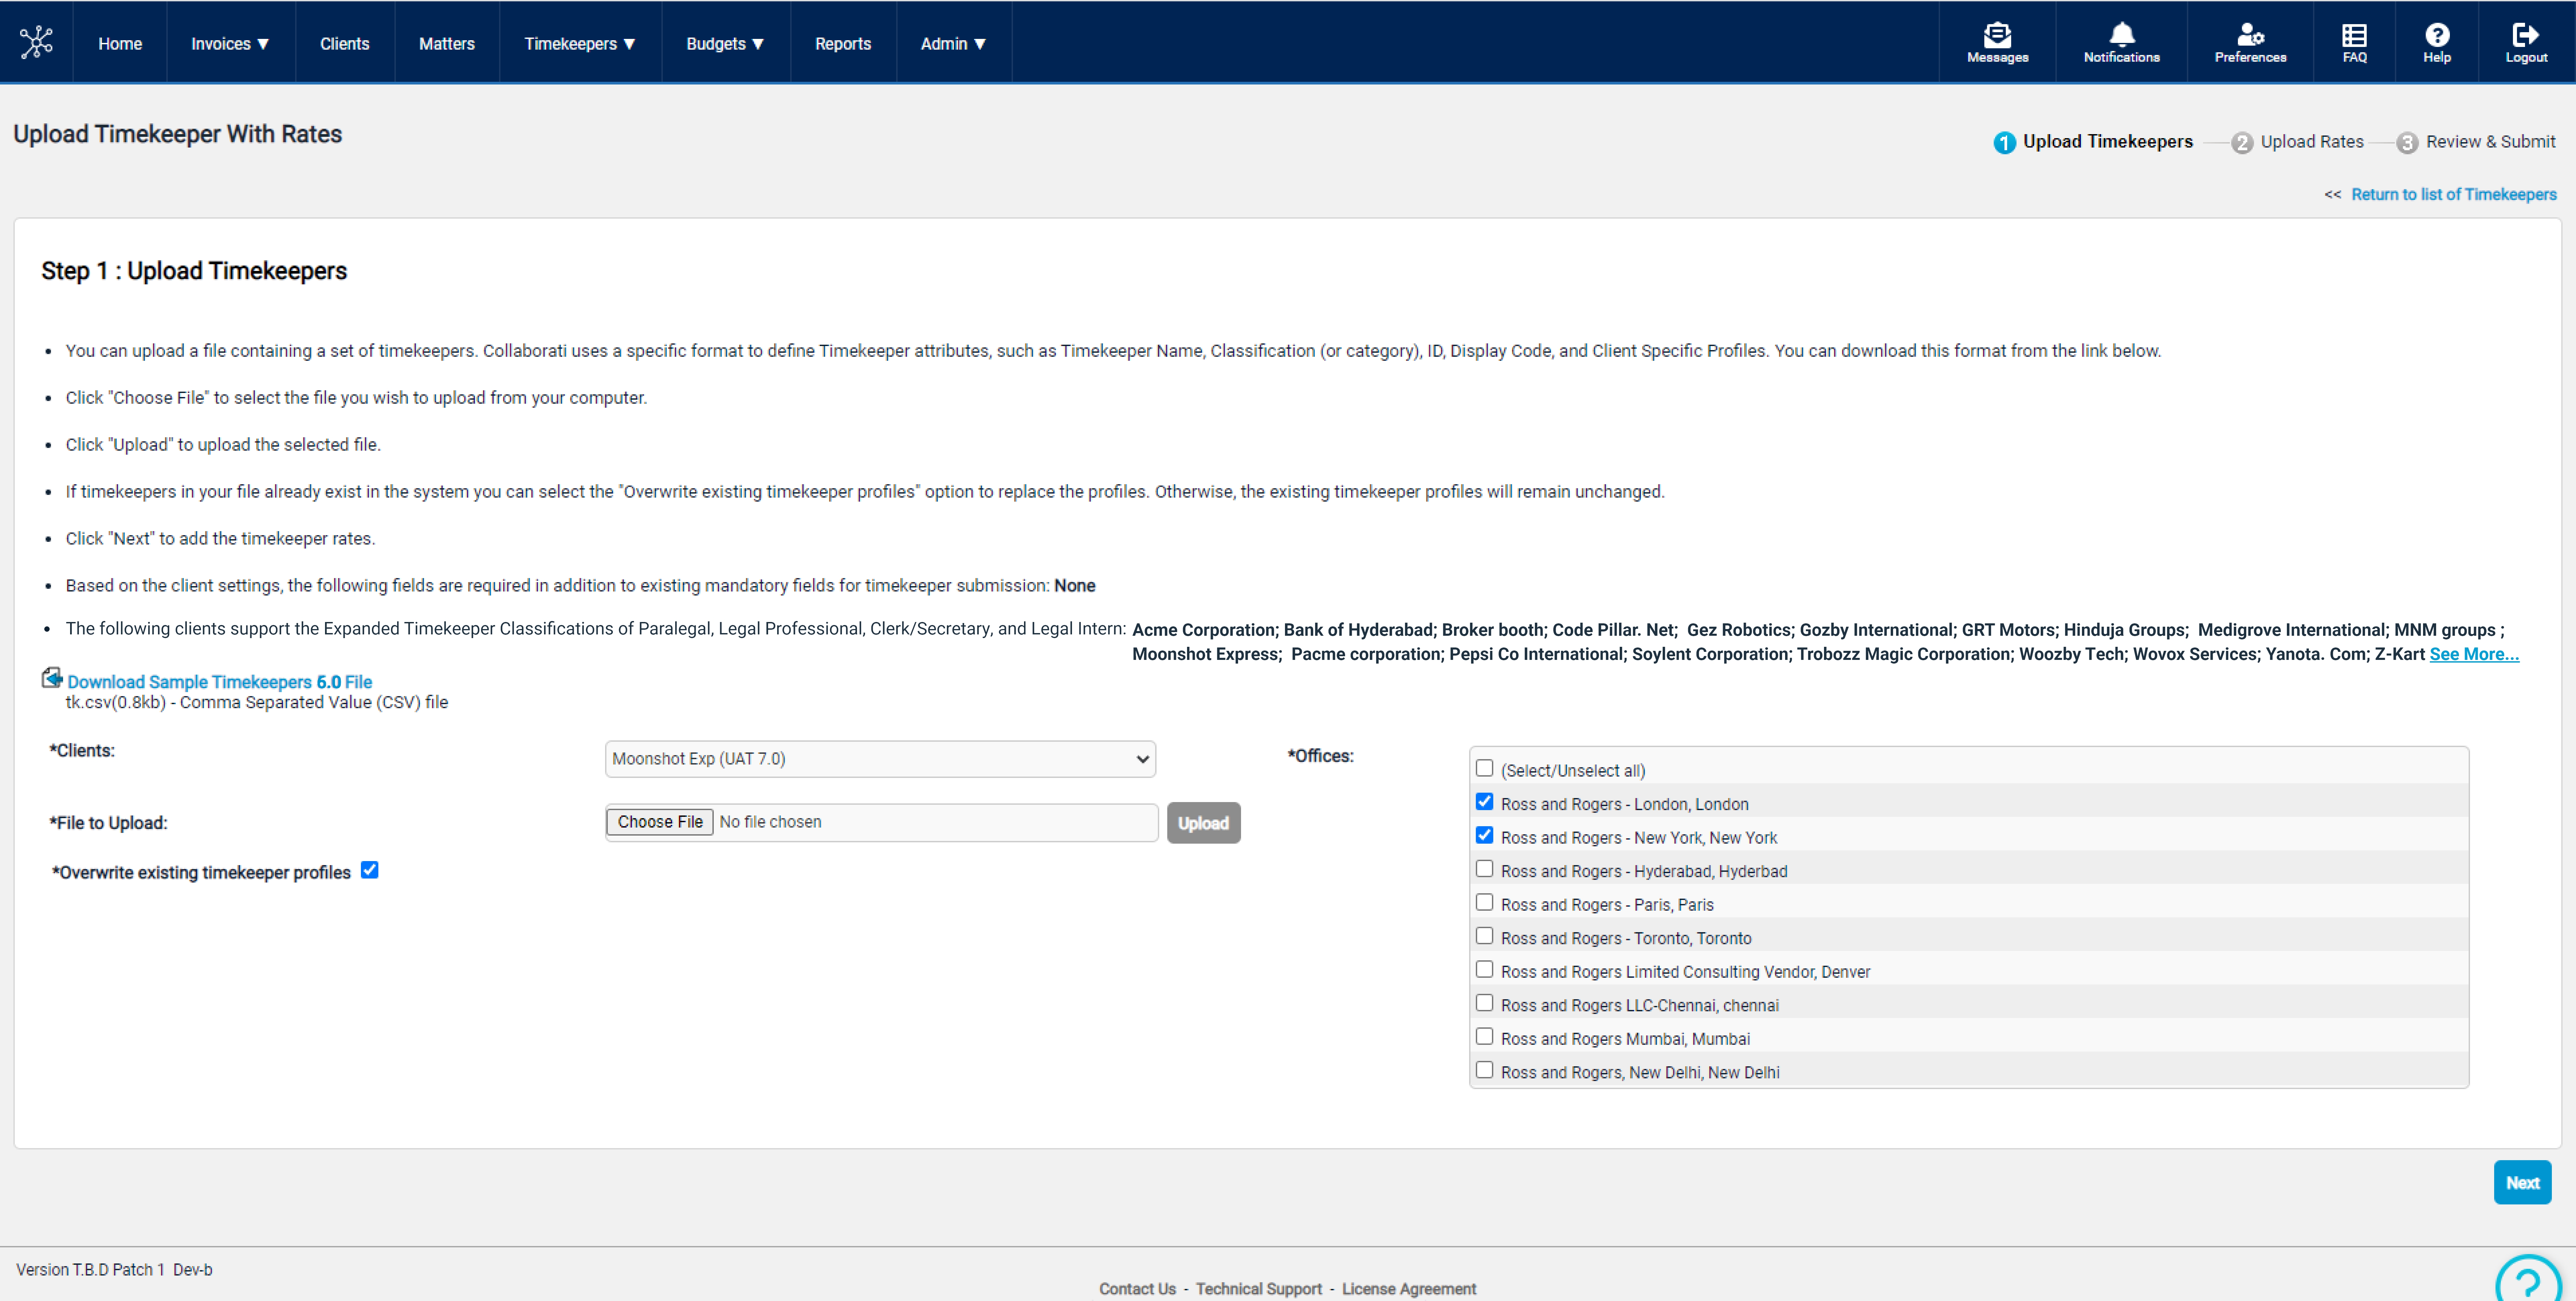
To upload timekeepers with rates
- From the Timekeepers tab, select Upload timekeepers with rates.
- Select the Client from the Clients dropdown list.
- Specify the Office you want to assign to these timekeepers by selecting the appropriate checkbox in the Office box. Timekeepers can be assigned to multiple offices at once from this screen.
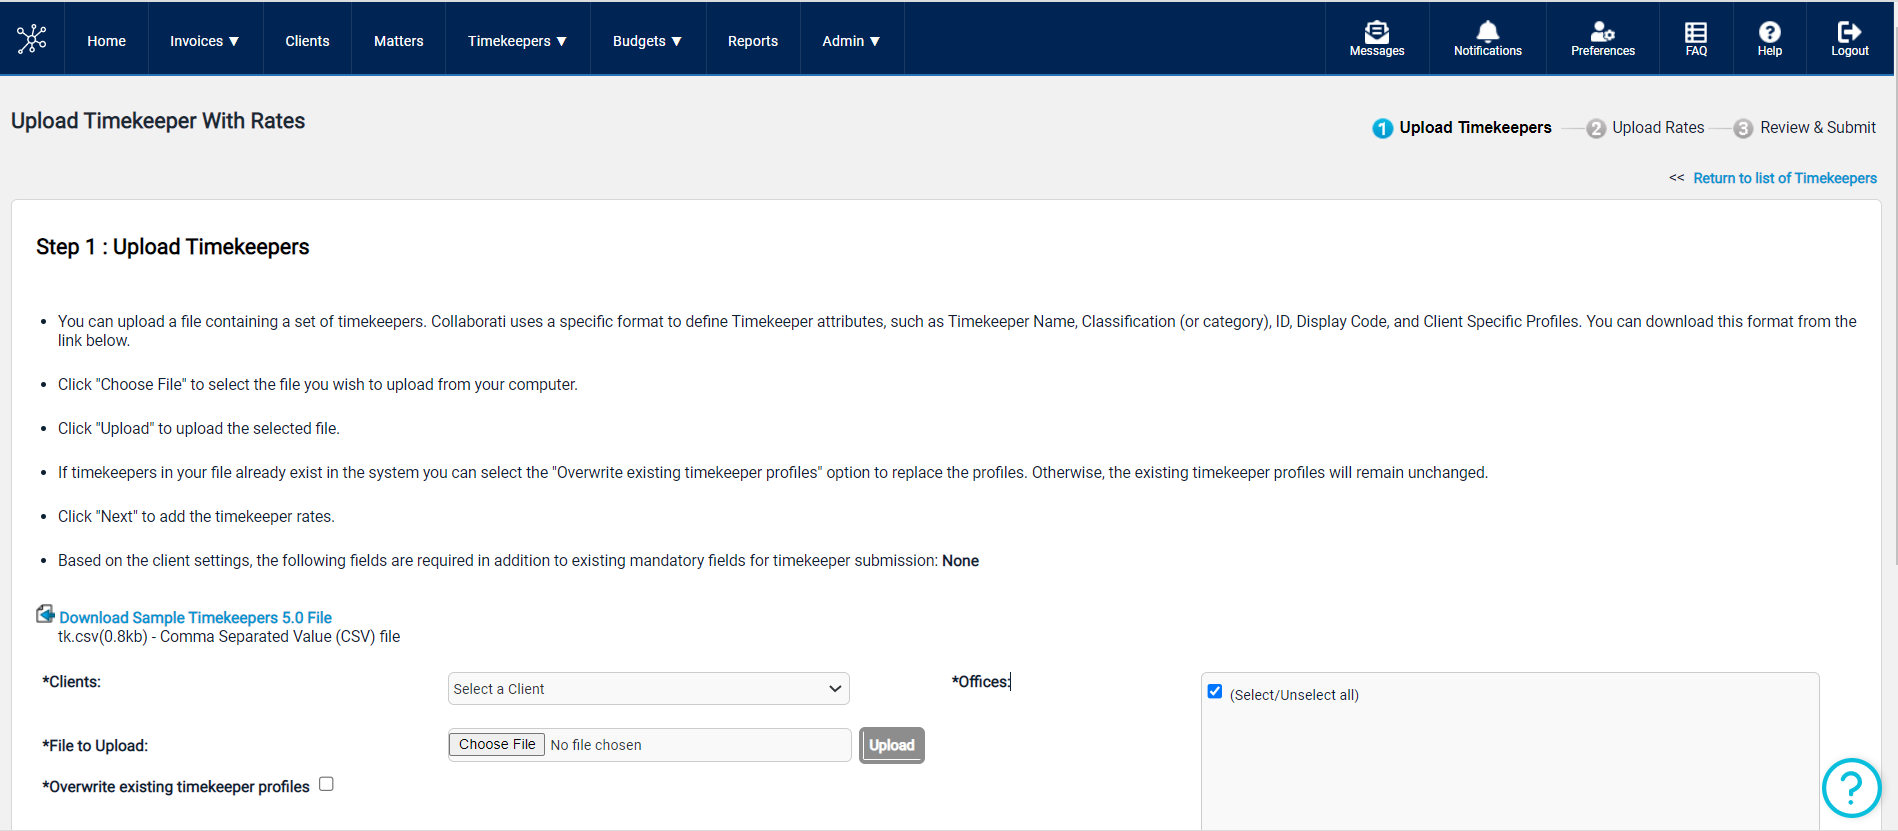
- Select one of the following options:
- To upload an existing file, click Choose File and select the appropriate file. If you are updating existing timekeepers, select the Overwrite existing timekeeper profiles checkbox.
- To use a sample .csv file, click Download Sample Timekeepers File. Open the appropriate zip file and enter the information for all Timekeepers. Save the file, and then return to the Upload Timekeepers screen. Click Choose File to locate and select the file.
- Note:
To distinguish a client-specific timekeeper profile from a regular timekeeper profile, you must populate the clientCode column in the sample .csv file that was downloaded. - Old version sample.csv files are no longer supported.
- While uploading the timekeeper file in collaborati, if any one of the associated clients of a firm account has Enable Expanded Timekeeper Classifications as Yes then a new bullet point will be displayed at the bottom of the list of bullet points on the upload screen.
- If at least one of the associated clients of a firm account has Enable Expanded Timekeeper Classifications as Yes then a new timekeeper upload sample files named Timekeeper Sample file 6.0 will be displayed on the screen which helps in uploading the multiple timekeepers updated in Collaborati. If associated clients don't have enable expanded timekeeper classifications, the current sample file 5.0 will be displayed
- Note:
Click Upload button to upload the file.
The file is checked for errors and duplicates and a error preview screen displays the list of errors found while uploading the timekeeper file.
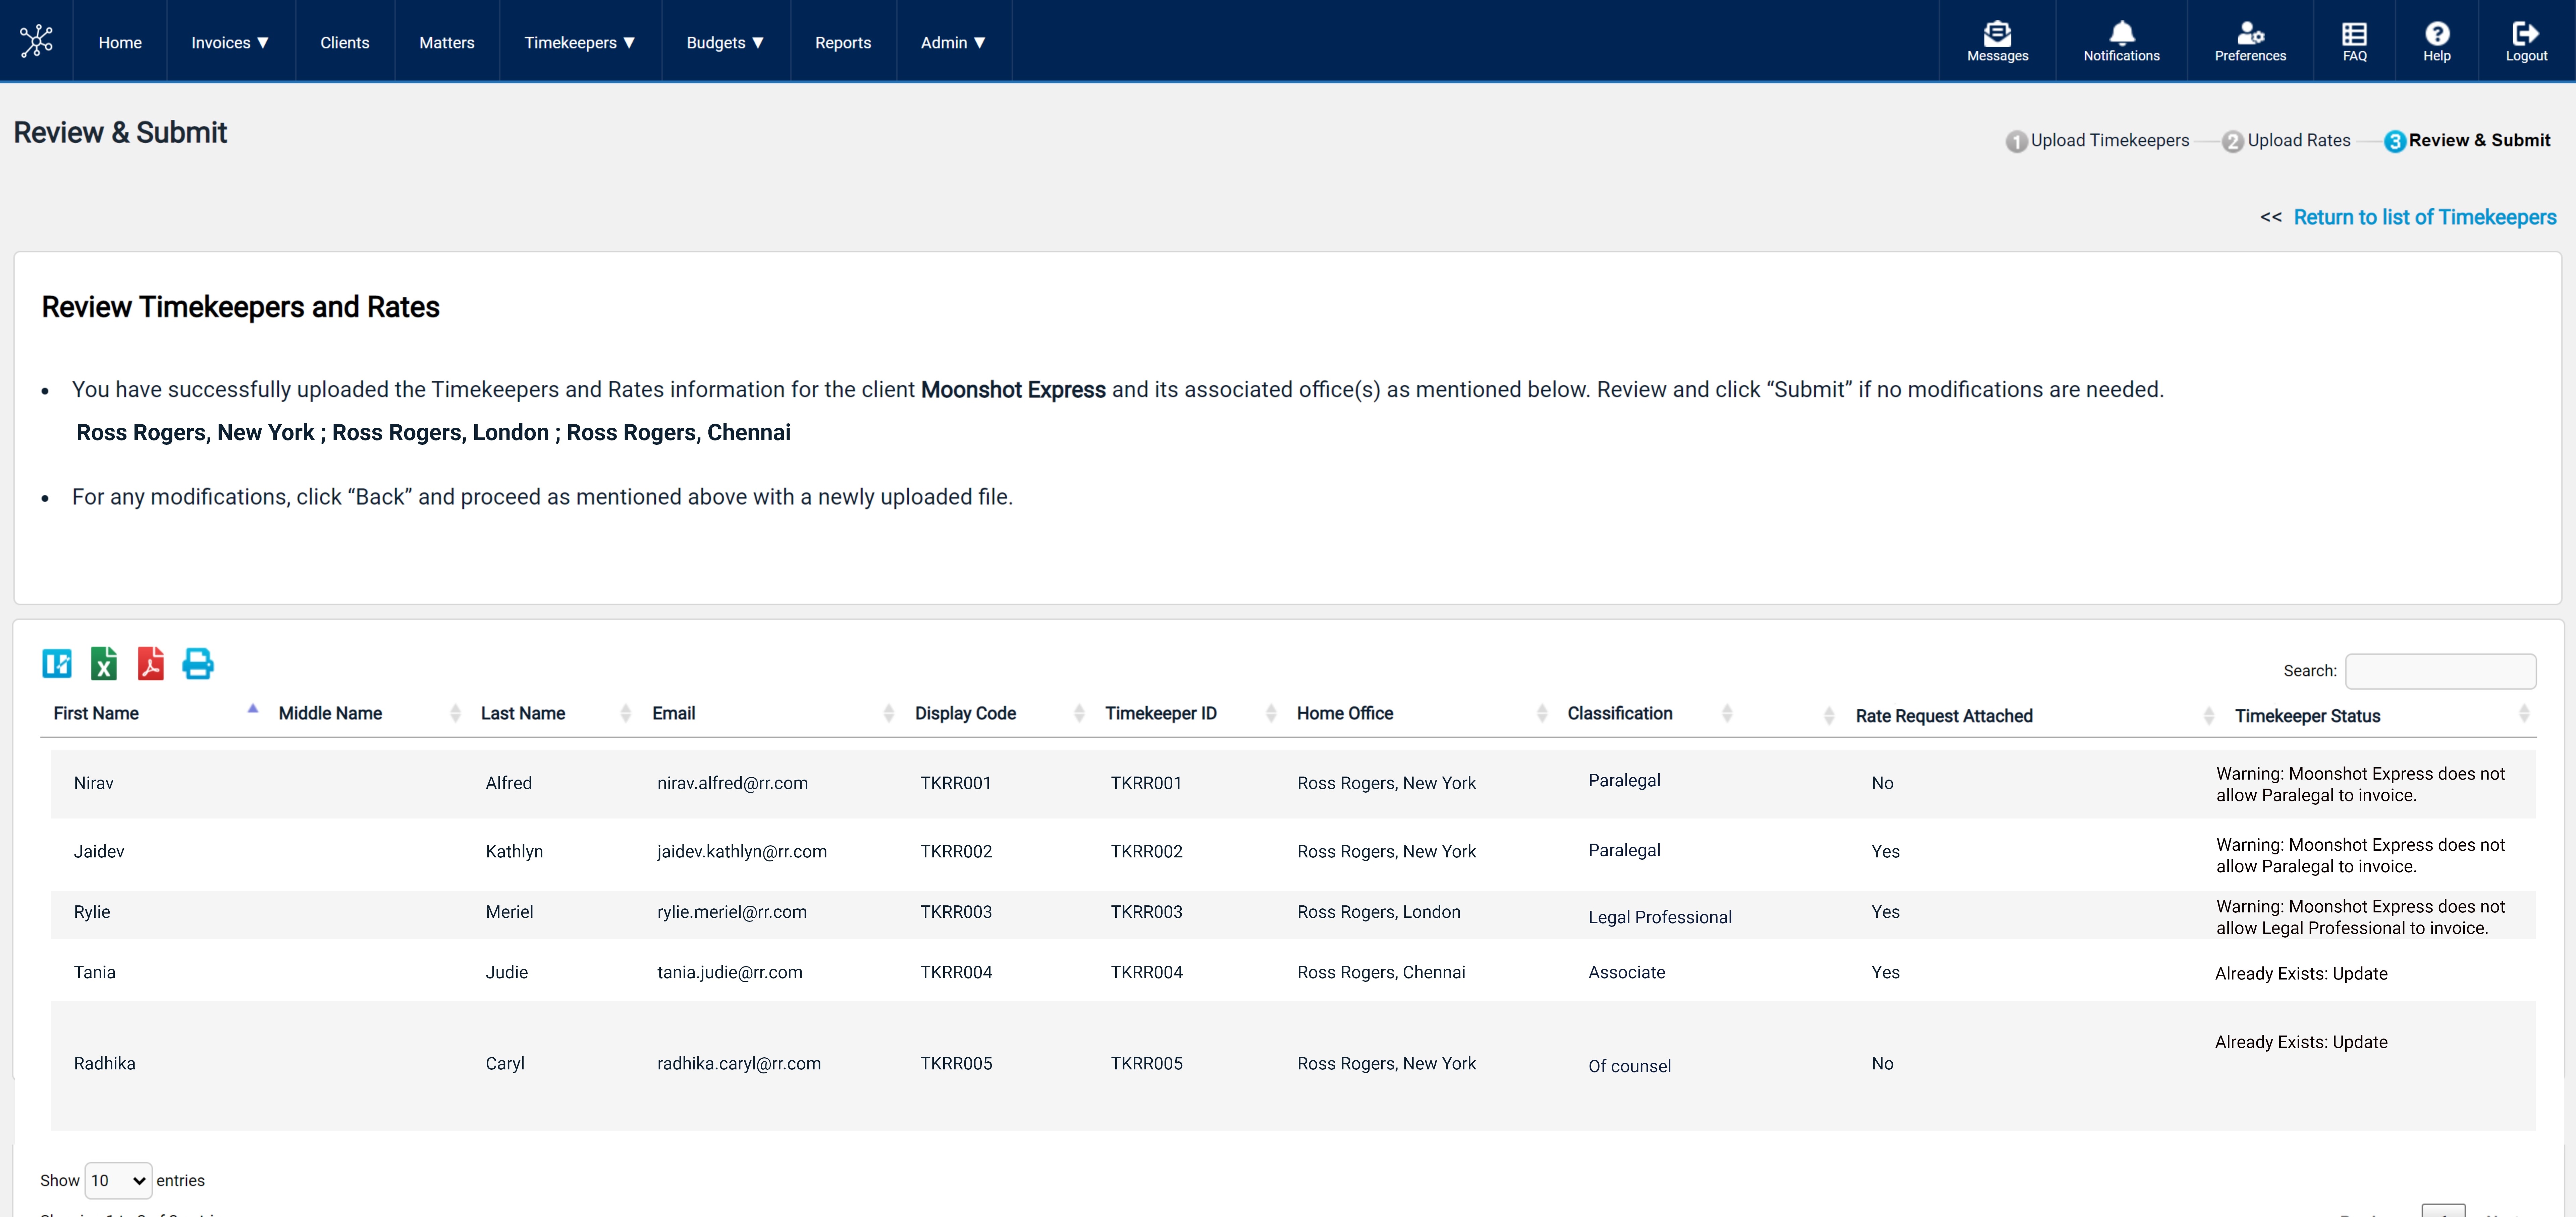
Review the preview screen. Use the Status column to review the validity of each entry as follows:
New Record—The Timekeeper information is valid and will be uploaded without errors
Already Exists—A timekeeper with this ID already exists and any changes will be added to the existing record
Note: The existing records are updated with new information if the Overwrite existing timekeeper profiles check-box is selected on the previous screen.
Error: Incomplete—Required timekeeper information is missing. These timekeepers will not be added to the system. You can go back to your file and correct these errors, and then upload again.
Note: If you receive an error stating that the timekeeper upload file does not comply to the Collaborati Timekeeper upload format specification, check the timekeeper file for format issues and upload again.
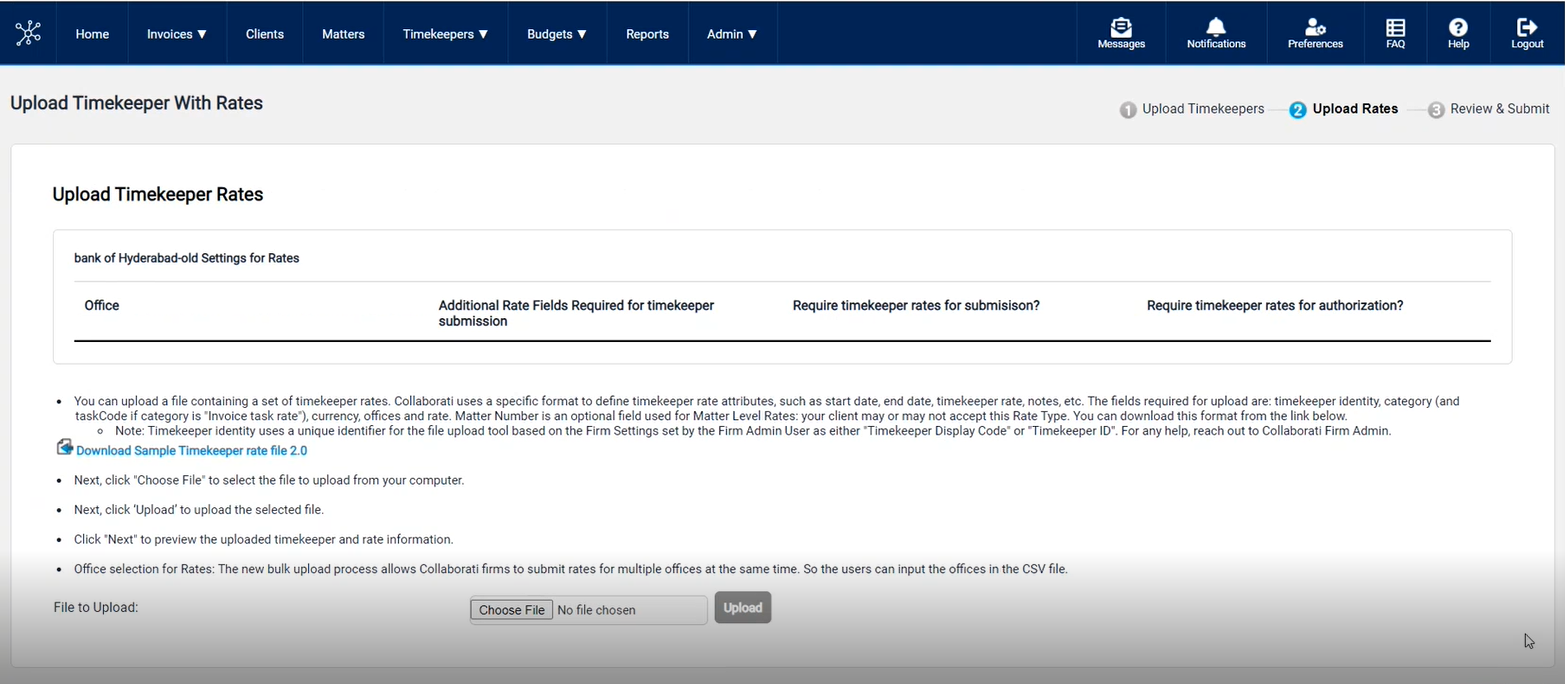
- On the Upload Timekeeper Rates page, follow the instructions displayed on the screen and Click Next after successful upload of timekeeper rate file. if you click Back button, you need to re-upload the .csv file again to upload the timekeeper(s) profiles.
- When the timekeepers with the paralegal, legal professional, clerk/secretary, or legal intern classifications and at least one selected client has the "Enable Expanded Timekeeper Classifications" setting set to NO, and there is no client timekeeper profile with PT, AS, LA, OC, or OT for the selected clients with the setting = NO, a popup message will display on the screen to create a Client Timekeeper profiles.
-
On the popup, if users click on Confirm Client Timekeepers, collaborati will create a client timekeeper profile with default classification as Legal Assistant for each applicable Timekeeper and associated client and if the user selects Cancel option will return to Step 1.
A data table is displayed that provides the detailed information on Client settings for each Office. This table provide information related additional Rate Fields required for timekeeper submission, whether timekeeper rates are required for timekeeper submission(Yes/No) or for authorization(Yes/No) with respect to each office based on the client's configuration for each office.
Note:
1) Collaborati firms can submit rates for multiple offices at the same time and can input the offices in the .csv file.
2) Uploading Timekeeper rates information is not mandatory step and user can directly move to review and submit page.
If the user has choosen the timekeeper rates .csv file and then clicks Next button without uploading the file, a warning message is displayed stating "The selected rate file has not been uploaded. Click "Upload" to upload the file or click "Next" to submit without rates."
Note: Old version sample.csv files are no longer supported.
-
Newly created Client Timekeeper Profiles has been added to review timekeeper rates screen. This screen will provide the information related to Client Timekeeper profiles created. Review the uploaded timekeeper rates. Refer to the Status column to determine if you entered a field incorrectly. Click Next to review and submit the Timekeepers and rates information. If you click the Back button, you need to re-upload the .csv file again to upload the timekeeper(s) rates.
Note: Based on the client-office(s) settings, a warning message is displayed in the Timekeeper Status column on Review & Submit page as “Timekeeper will not be submitted to selected office(s) as it requires rates for submission. However, it will be submitted to other offices.”
-
A warning message has been added when a timekeeper has a classification and the associated client has the setting Not allowed to invoice is equal to Yes then the warning message will display as given below.
- After verifying the information, By clicking the Submit button, the users can create, and update Client timekeepers and rates without any errors or warnings, and will return to the timekeeper with rates page.
Individual Timekeeper Profile and Timekeeper Rate Request(s) are created or updated based on the information in the upload file.