
I-9 Pro and I-9 Pro + E-Verify Feature Guide
This document provides a high-level overview of the Remote I-9 Pro and I-9 Pro + E-Verify feature.
Introduction
The purpose of this guide is to help introduce Tracker I-9 clients to our new I-9 Pro and I-9 Pro + E-Verify remote verification solution. This guide provides a description of the feature and instructions on how to begin using its capabilities. An FAQ section can be found at the end of the document. Continue reading to learn more.
Background
On 07/25/2023, the Department of Homeland Security (DHS) published a final rule to the Federal Register titled “Optional Alternative 1 to the Physical Document Examination Associated With Employment Eligibility Verification (Form I-9).” The ruling authorizes employers enrolled in E-Verify (or an authorized representative acting on such an employer’s behalf) the option to remotely examine their employees’ identity and work authorization document(s) under a new DHS-authorized alternative procedure. You can access the final ruling here.
In response to the new rule, the Tracker I-9 team has developed a new service offerings called I-9 Pro and I-9 Pro + E-Verify. With I-9 Pro or I-9 Pro + E-Verify, after an employee completes Section 1 of the Form I-9, they will be able to schedule an appointment to meet virtually with one of Tracker I-9’s own compliance experts who will complete Section 2 of the Form I-9. I-9 Pro and I-9 Pro + E-Verify provide effortless verification and document inspection while minimizing the burden and cost of new process adoption, enabling employers to capitalize on the DHS rule changes that permit virtual document inspection with ease and efficiency. With I-9 Pro + E-Verify, Tracker I-9's compliance experts will also manage the E-Verify workflow for select E-Verify case statuses.
I-9 Pro Feature Enablement
In order to take advantage of the I-9 Pro or I-9 Pro + E-Verify workflow, existing clients will need to reach out to their Tracker I-9 representative and request a new service agreement that describes the terms, conditions, and fees associated with the service. If you do not know who to contact, please have your authorized administrator reach out to the Tracker I-9 support team by creating a case on the Support Portal.
Note: The scope of services provided by I-9 Pro or I-9 Pro + E-Verify only include the completion of Section 2. At this time Section 2 amendments, receipt reverifications, and reverifications are not supported. However, with I-9 Pro + E-Verify Tracker I-9's compliance experts will not only complete Section 2, but they will also manage the E-Verify workflow for select E-Verify case statuses. Please note that to take advantage of I-9 Pro or I-9 Pro + E-Verify the Remote Document Inspection feature and Employer Appoint workflow must also be enabled.
Feature Enablement
Follow the steps below to enable the I-9 Pro / I-9 Pro + E-Verify feature:
- Access the Tracker I-9 application as a System Admin user.
- Search for a respective client.
- Select “System Settings” from under the “Admin Control Panel” drop-down menu.
- Select “Features” tab under “Client Configuration”.
- The following options will be displayed and can be enabled one at a time only:
- Enable I-9 Pro: Check the “Enable I-9 Pro” checkbox only when enabling support for our Verifications team to complete Section 2 of Form I-9 records on behalf of an Employer.

Hover over the accompanying tool tip to learn more: “Enabling this feature will allow new hires to schedule an appointment and meet virtually with an I-9 Pro representative who will conduct a remote inspection of documents and complete Section 2 of their Form I-9 in accordance with the DHS-authorized alternative procedure requirements.”

- Enable I-9 Pro + E-Verify: Check this “Enable I-9 Pro + E-Verify” checkbox to enable the extended service offering that supports our Verifications team completing Section 2 of Form I-9 records on behalf of an Employer plus E-Verify case administration for select E-Verify statuses.
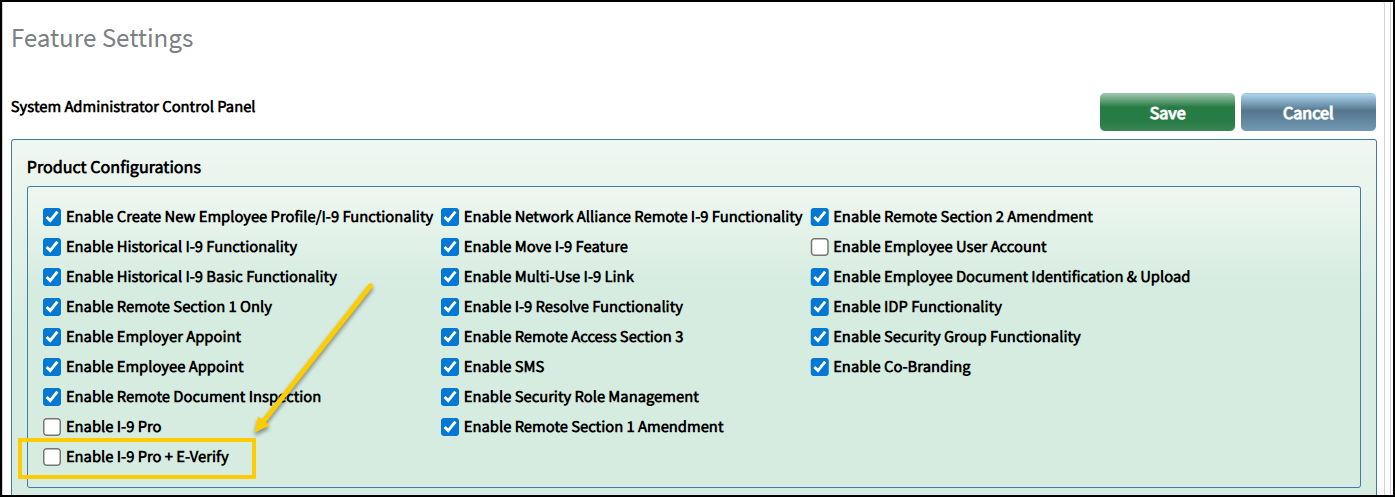
Hover over the accompanying tool tip to learn more: “Enabling this feature allows new hires to schedule a virtual appointment with an I-9 Pro representative, who will remotely inspect their documents and complete Section 2 of the Form I-9 per DHS-approved alternative procedure requirements. The representative will also manage E-Verify cases for select statuses after Section 2 is complete. The new hire’s employer must have the E-Verify Auto-Submit feature enabled.”

- Enable I-9 Pro: Check the “Enable I-9 Pro” checkbox only when enabling support for our Verifications team to complete Section 2 of Form I-9 records on behalf of an Employer.
Note: The I-9 Pro / I-9 Pro + E-Verify checkbox is disabled until the Remote Document Inspection (RDI) checkbox is checked.
I-9 Pro to I-9 Pro + E-Verify Conversion
Once an I-9 record is created, it retains its original record type through completion.
For example, if a client is initially configured for I-9 Pro, any records created during that time will remain in I-9 Pro records, even if the client configuration is later updated to I-9 Pro + E-Verify.
Only records created after the I-9 Pro + E-Verify configuration is enabled will be treated as I-9 Pro + E-Verify records.
- If an existing I-9 Pro record is modified after the client configuration changes to I-9 Pro + E-Verify, the record type may update based on the action taken:
- If the I-9 workflow is changed to another type (e.g., Employer Appoint) and then switched back to I-9 Pro, the record will now be treated as an I-9 Pro + E-Verify record, based on the current client configuration.
- If the Delete and Restart I-9 Pro Workflow option is used, the newly created I-9 record will also be considered an I-9 Pro + E-Verify record.
Only System Admin or Distributor Admin users with All Access permissions can enable or modify the I-9 Pro / I-9 Pro + E-Verify feature.
I-9 Pro Calendaring URL feature
This feature empowers Admins to manage multiple scheduling URLs, giving control over which I-9 Pro calendaring URL is presented to new hires (USC – U.S.Citizens and Foreign Nationals-Noncitizens) for booking appointments.
The benefit of adding two Calendaring URLs is that appointment durations can be tailored based on the new hire’s Employment or Immigration status: USC appointments require less time for Form I-9 Section 2 verification, while FN appointments, needing additional documents, allow for a longer virtual session with a Tracker I-9 compliance expert.
Steps to configure the I-9 Pro Calendaring URL feature (applicable to System Admins, Client Admins, Distributor Admins):
- Access the Tracker I-9 application as an Admin user (System, Client, or Distributor).
- Select System Settings (for System/Distributor Admins) or System Configurations (for Client Admins) under the Admin Control Panel drop-down menu.
- Under the Configuration tab, two separate URL fields are available for USC and FNs:
- I-9 Pro Calendaring URL (USC & LPR): This URL is presented to U.S. Citizens (USC) and Lawful Permanent Residents (LPR) new hires for booking a shorter, 15-minute Section 2 document verification appointment.
- I-9 Pro Calendaring URL (Noncitizen): This URL is presented to Foreign Nationals (Noncitizen) new hires for booking a longer, 25-minute Section 2 document verification appointment.
Here are the corresponding navigation pages to configure I-9 Pro Calendaring URL:
For System/Distributor Admin User: Admin Control Panel >> System Settings >> Admin Tools >> Configurations.


Client Admin User: Admin Control Panel>> System Configurations >> Configurations.

Configure Email Alerts Changes
To help ensure timely scheduling of employee appointments and maintain compliance with I-9 regulations, two new email alerts have been added:
- I-9 Pro Appointment - Not Scheduled: This alert notifies that an employee’s I-9 Pro appointment has not been scheduled and prompts necessary action to ensure the appointment is set before the Section 2 due date.
- I-9 Pro Appointment Action Required: This alert notifies when an employee’s scheduled I-9 Pro appointment is set after the Section 2 due date, prompting rescheduling to ensure the appointment is completed on or before the due date to maintain compliance.
- I-9 Pro - No Show Appointment: This alert notifies when an employee’s I-9 Pro appointment status is updated to No Show. It prompts recipients to determine the appropriate workflow and coordinate with the employee on next steps to ensure Section 2 of Form I‑9 is completed in compliance.
Follow the steps below to enable these email alerts at the Employer level:
- Log in as a Client Admin.
- Click the respective employer link.
- Click the "Configure Email Alerts" tab.
- Scroll down to enable these alerts:
- I-9 Pro Appointment - Not Scheduled
- I-9 Pro Appointment Action Required
-
I-9 Pro - No Show Appointment

- I-9 Pro Appointment - Not Scheduled


I-9 Pro / I-9 Pro + E-Verify Workflow Options
There are three ways to initiate an I-9 Pro or I-9 Pro + E-Verify workflow:
- Manually create a new I-9 Pro / I-9 Pro + E-Verify record directly in the Tracker application.
- Change the workflow of an existing, incomplete I-9 record to I-9 Pro directly in the Tracker application.
- Create a new I-9 Pro record via the Tracker API, file integration, or through one of our partner integrations that support the I-9 Pro / I-9 Pro +E-Verify workflow. For more information, please speak to your Tracker I-9 representative.
The descriptions and screenshots that follow provide an overview of the steps necessary to complete the I-9 Pro / I-9 Pro + E-Verfiy workflows for options 1 and 2 above. It’s important to note that the screenshots below depict views from accessing the Tracker application via a standard desktop or laptop computer.
Note: These changes also apply when accessing the Tracker I-9 application from a mobile device or tablet. However, the layout and presentation of information are slightly different since the screen size is smaller.
Option 1: Manually Create a New I-9 Pro Record
I-9 Pro
Select the I-9 Pro option from the “Remote” workflows under the “Create I-9” page. To enable or display this radio button, follow the steps mentioned here: Feature Enablement section.
Hover over the accompanying tool tip to learn more: “This option creates a new I-9 Pro record that sends a message to the employee to complete Section 1. It also instructs the employee to schedule an appointment date/time to meet with an I-9 Pro representative via a live interactive video meeting to complete Section 2.”
Note: This radio button is displayed conditionally. It appears when the “I-9 Pro” feature is enabled and the Worksite on the associated Employee Profile record is E-Verify enabled.

When the Worksite of the associated Employee Profile record does not have E-Verify enabled, the I-9 Pro option is disabled and shows the following tooltip when the I-9 Manager hovers over the radio button: “The Worksite on the associated Employee Profile record does not have E-Verify enabled. E-Verify is one of the requirements for being able to use the optional alternative procedure to physical documentation examination as authorized by DHS. For this reason, the I-9 Pro radio button is disabled.”

When the employee chooses the I-9 Pro radio button, the relevant fields will appear for completing the page.

If the Start Date is before the E-Verify Effective Date of the Worksite indicated on the associated Employee Profile record, then the following error message will be displayed: “I-9 Pro is not an option since the I-9 will not be subject to E-Verify.”

After the I-9 manager enters valid details, click the "Create I-9" button, and a confirmation pop-up will be displayed.

Choose "No" to close the pop-up or "Yes" to initiate the I-9 Pro workflow. Another confirmation message will be displayed confirming that the I-9 Pro email has been sent to the employee.

Clicking “OK” navigates the I-9 Manager to the “Employee Profile” page. The employee will receive an email from Tracker with instructions for completing the Form I-9 and scheduling an appointment to meet virtually with a Tracker I-9 compliance expert who will complete Section 2 of the Form I-9.
I-9 Pro + E-Verify
Select the I-9 Pro + E-Verify option from the “Remote” workflows under the “Create I-9” page. To enable this radio button or display this, follow the steps mentioned here: Feature Enablement section.
Hover over the accompanying tool tip to learn more: “This option creates a new I-9 Pro + E-Verify record that sends a message to the employee to complete Section 1. It also instructs the employee to schedule an appointment date/time to meet with an I-9 Pro representative via a live interactive video meeting to complete Section 2. Afterwards, the I-9 Pro representative may also be responsible for administering the associated E-Verify case for select statuses.”
Note: This radio button is displayed conditionally. It appears when the “I-9 Pro + E-Verify” feature is enabled and the Worksite on the associated Employee Profile record is E-Verify enabled.

When the Worksite of the associated Employee Profile record does not have E-Verify enabled, the “I-9 Pro + E-Verify” option is disabled and shows the following tooltip when the I-9 Manager hovers over the radio button: “The Worksite on the associated Employee Profile record does not have E-Verify enabled. E-Verify is one of the requirements for being able to use the optional alternative procedure to physical documentation examination as authorized by DHS. For this reason, the I-9 Pro + E-Verify radio button is disabled.”

When the employee chooses the “I-9 Pro + E-Verify” radio button, the relevant fields will appear for completing the page.

If the Start Date is before the E-Verify Effective Date of the Worksite indicated on the associated Employee Profile record, then the following error message will be displayed: “I-9 Pro + E-Verify is not an option since the I-9 will not be subject to E-Verify.”

After the I-9 manager enters valid details, click the "Create I-9" button, and a confirmation pop-up will be displayed.

Choose "No" to close the pop-up or "Yes" to initiate the I-9 Pro workflow. Another confirmation message will be displayed confirming that the I-9 Pro email has been sent to the employee.

Clicking “OK” navigates the I-9 Manager to the “Employee Profile” page. The employee will receive an email from Tracker with instructions for completing the Form I-9 and scheduling an appointment to meet virtually with a Tracker I-9 compliance expert who will complete Section 2 of the Form I-9.
After completing Section 1 and the EDU, a confirmation pop-up will be displayed to proceed to the I-9 Pro Scheduling Application. This occurs when the employee clicks "Continue" on the EDU page after uploading the necessary files.

If the employee chooses to skip the EDU page for the first time by clicking the “Skip For Now” button, a similar pop-up message will be displayed. Upon confirming, the system will also navigate the employee to the I-9 Pro Scheduling Application.

Once confirmed, the system will display the embedded I-9 Pro Scheduling page (iframe) where the booking process continues.
Employee Journey/Appointment Scheduling
With the I-9 Pro / I-9 Pro + E-Verify workflows, the employee journey conditionally changes. Here is the sequence of events that will take place:
- Employee completes/signs Section 1 of the Form I-9.
- Employee is navigated to the Employee Document Identification and Upload (EDU) page where they select their identity and work authorization document(s) that they intend to present to one of Tracker I-9’s compliance experts when they meet with them during a live interactive video meeting. The employee is prompted to upload front/back copies of all documents.
Note: The Employee Document Identification and Upload (EDU) feature is an optional/opt-in feature. You can find out more information on the feature here. The only notable differences when using I-9 Pro is:- EDU is automatically included as a step within the employee journey. The EDU feature does not need to be enabled. However, to use I-9 Pro both the I-9 Pro and Remote Document Inspection features must be enabled along with the Employer Appoint workflow.
- Typically, the attachment and forced attachment settings of the Employer that is associated with the Form I-9 determine when an employee is prompted to upload copies of their documents on the EDU page. With I-9 Pro the employee is always prompted to upload front/back copies of ALL documents, even if there is no information on the back of the document.
- The employee lands on the “Form I-9 Section 1 Complete – Next Steps” page where they can view/download a copy of their Form I-9.
- The next steps page is now enhanced and embedded with the I-9 Pro scheduling solution where the employee will be able to book an appointment to meet virtually with a Tracker I-9 compliance expert who will complete Section 2 of their Form I-9.
- Click "Next" to proceed to the appointment scheduling process.
- Click "Print Form I-9 Receipt" to download or print a copy of your Form I-9 receipt.
As a security precaution, the "Form I-9 Receipt" button can only be clicked once to ensure controlled access to this information. This page will expire if the employee navigates away or closes the page.
Note: The I-9 Pro appointment must be scheduled and completed no later than the Section 2 Due Date.
- The available appointment time will be displayed based on the “Employee Employment Status” selection in Section 1.
- If the employee selects “A citizen of the United States” or “A lawful permanent resident”, a 15-minute time slot will be displayed for the remote Section 2 appointment.
- If the employee selects “A noncitizen national of the United States (see instructions)” or “A noncitizen (other than Item Numbers 2 and 3 above) authorized to work”, a 20-minute time slot will be displayed for the remote Section 2 appointment.
- On the “Schedule Your Remote I-9 Pro Appointment” page, the employee can adjust their time zone if needed. To join the waitlist for alternative appointment options, select "Click here to join the Waitlist for another date/time".
- After selecting a date and time for the I-9 Pro virtual appointment, the employee should click "Next" to proceed to the “Your Information” page. On this page, the following fields are displayed:
- Booking for: The Employee's First and Last Name will be auto-populated in this field.
- Cell Phone: Enter the phone number (optional).
- Comments: Add any additional comments (optional).
- Allow EMAIL Messages: This checkbox is enabled by default to receive I-9 Pro Appointment email notifications for the Employees. This is optional and we recommend not to uncheck this checkbox.
- Click "Save" to finalize the appointment and proceed to the “Thank You” page.
- On the “Thank You” page, the employee will see the following appointment details:
- Staff assigned to the appointment.
- Time and date of the appointment.
- Service requested (related to Form I-9 processing).
- Location where the appointment will take place. The employee should close their browser after reviewing the appointment details.
- The employee will receive a calendar invite for their appointment from noreply@timetap.com. Embedded in the calendar invite is a link that the employee can click if they need to reschedule their appointment.
Note: Employees will not be able to reschedule their appointment if it is within 12 hours (configurable) of their scheduled appointment time.
- The Employees can also add the I-9 Pro appointment to their Calendars with the section 2 virtual zoom meeting invite linked the location field.
- The employee will receive an appointment reminder from their scheduled appointment.
- The employee attends the virtual Zoom meeting. The employee must bring their unexpired employment authorization and identity document(s) to the appointment and be prepared to show them to the Tracker I-9 compliance expert on camera.
- The Tracker I-9 compliance expert will virtually inspect the documents and complete Section 2 of the Form I-9. Once Section 2 is completed, the I-9 Pro workflow is considered complete. The employer is responsible for administering the associated E-Verify case after Section 2 is completed. The employer should closely monitor their E-Verify dashboard and take timely action on cases when appropriate.
- When an employee accesses an expired version of the Next Steps page, the following scenarios will occur based on their appointment status:
- If the Employee Has Not Booked an Appointment: The scheduler page will be displayed as an embedded iframe, allowing the employee to book an appointment.
- If the Employee Has Already Booked an Appointment: Appointment details will be fetched from the ManageAppt URL, enabling the employee to reschedule their appointment.
- If the Employee Has Not Booked an Appointment: The scheduler page will be displayed as an embedded iframe, allowing the employee to book an appointment.
- Rescheduling Restrictions: If the employee attempts to reschedule an appointment within 12 hours (Configurable) of the scheduled time, an error message will appear based on the configured hours.
- EDU Page Changes: When the I-9 manager accesses the EDU page, there are two options to schedule a meeting with an I-9 Pro representative:
- When the I-9 manager is on the EDU page and selects the “Skip For Now” option, the new I-9 Pro scheduling system will redirect to the following page.
- After the employee enters the relevant details and clicks the "Continue" button on the EDU page, a pop-up will be displayed to select the date/time to meet with an I-9 Pro representative.
- Choose "No" to dismiss the pop-up or "Yes" to proceed with scheduling I-9 Pro with a representative.
- When the I-9 manager is on the EDU page and selects the “Skip For Now” option, the new I-9 Pro scheduling system will redirect to the following page.


Option 2: Change I-9 Workflow to I-9 Pro
Note: At this time, changing workflows can only be done by accessing the Tracker application via a standard desktop or laptop computer.
To convert an incomplete, I-9 record that will be subject to E-Verify to I-9 Pro, an I-9 Manager should take the following steps:
- Navigate to the Form I-9 record and launch the “Administrative Options” menu.
- Depending on what the current workflow is will determine which page the I-9 Manager will need to launch the Administrative Options menu from (e.g., Section 1 page, Remote I-9 page, Employer Appoint page, Employee Appoint page).
- Under the REMOTE WORKFLOW options, the I-9 Manager should select “Change I-9 Workflow” and then click “Switch to I-9 Pro Workflow”.
- The I-9 Manager should confirm or edit the “Start Date” and “Employee Email Address fields” and click the “Yes” button.
- The I-9 Manager receives confirmation that the I-9 Pro email has been sent to the employee and clicks the OK button.
- The employee will receive an email from Tracker with instructions for completing the Form I-9 and scheduling an appointment to meet virtually with a Tracker I-9 compliance expert who will complete Section 2 of the Form I-9.


Form I-9 Page Changes
Under the Form I-9 page, you will see the following changes displayed for the Remote Form I-9 Pro workflow.

- The I-9 workflow is named I-9 Pro.
- This section indicates the status of the remote I-9 Pro Appointment for section 2 verification (TBD/DateTime/ Cancelled/Abuse/Credit/No show/Completed) and is named as Remote I-9 Pro Appointment Date.
- The tab name displays as I-9 Pro.
- The Action name displays as I-9 Pro Form I-9 Actions.
Different actions & Statuses of Remote I-9 Pro Appointment Date:
- To Be Scheduled – Displayed when the I-9 Manager initiates the I-9 Pro workflow, or the Employee completes Section 1 but has not scheduled the remote Section 2 appointment or restarts the I-9 Pro workflow.
- Scheduled Date/Time – Displayed when the Employee schedules the remote Section 2 appointment.
- No Show – Displayed if the Employee misses the scheduled remote Section 2 meeting, marked as "No Show" by Tracker Compliance experts.
- Abuse – Displayed if the Employee fails to provide necessary documents or engages in misconduct during the remote Section 2 meeting, marked as "Abuse" by Tracker Compliance experts.
- Credit – Displayed if the Employee receives credit due to technical issues during the remote Section 2 meeting.
- Completed – Displayed when the Employee successfully completes the remote Section 2 meeting and verifies documents, marked as "Completed" by Tracker Compliance experts.
- Cancelled – Displayed if Tracker Compliance experts stop the remote access workflow or switch the I-9 Pro workflow to a different remote option.
Note: If an appointment is scheduled beyond Section 2 due date, a yellow triangle icon alerts I-9 Managers to take action and avoid delays.
I-9 pro Administrative Options
The I-9 Manager now has access to a new Admin Control Panel via the hamburger menu, located on the right side of the I-9 Pro Page.
Follow the steps below to access the administrative options:
- Navigate to the Form I-9 section from the main dashboard.
- Select the “I-9 Pro” tab to access the “Administrative Options” menu.
- From the available options, click “Stop or Reject I-9 Pro Form I-9” under the REMOTE WORKFLOWS.
- The following four options will be displayed, as shown in the image:
- Retain Section 1 and Restart I-9 Pro Workflow
- Delete and restart I-9 Pro Workflow
- Stop Remote Access Workflow
- Reschedule I-9 Pro Workflow


A. Retain Section 1 and Restart I-9 Pro Workflow
- Select “Retain Section 1 and Restart I-9 Pro Workflow” option.
- Hover over the accompanying tool tip to learn more: “Deletes and Restart the current Remote I-9 Workflow, but retains the completed Section 1”.
- Fill in the “Enter Start Date” and “Enter or Edit Employee Email Address” values.
- Choose “Cancel” to continue with the existing workflow or “Continue” to restart the I-9 Pro workflow.
- The following popup will be displayed and click "OK" to confirm the selection and proceed.
- The Employee receives two email notifications from Tracker:
- The previously scheduled remote Section 2 appointment cancellation email.
- A new email with instructions to complete the Form I-9 Section 1 and schedule the remote Section 2 appointment.


Note: The Remote I-9 Appointment Date field on the Form I-9 UI will display 'Cancelled' status.
B. Delete and restart I-9 Pro Workflow
- Select the “Delete and Restart I-9 Pro Workflow” option.
- Hover over the accompanying tool tip to learn more: “Allows user to delete the current I-9 and restart the I-9 Pro Workflow. Deleting is permanent and cannot be undone.”.
- Fill in the “Enter Start Date” and “Enter or Edit Employee Email Address” values.
- Choose “Cancel” to continue with the existing workflow or “Continue” to delete and restart the I-9 Pro workflow.
- A delete confirmation message will be displayed. Choose 'No' to close the pop-up or 'Yes' to confirm the deletion.
- Another final confirmation pop-up message will be displayed.
- Choose 'No' to close the pop-up or 'Yes' to confirm the deletion. This action will delete the I-9 record and restart the I-9 Pro workflow.
- The following popup will be displayed and click "OK" to confirm the selection and proceed.
- The Employee receives two email notifications from Tracker:
- The previously scheduled remote Section 2 appointment cancellation email.
- A new email with instructions to complete the Form I-9 Section 1 and schedule the remote Section 2 appointment.
- The previously scheduled remote Section 2 appointment cancellation email.


Note: The Remote I-9 Appointment Date field on the Form I-9 UI will display 'To Be Scheduled' status.
C. Stop Remote Access Workflow
- Select the “Stop Remote Access Workflow” option.
- Hover over the accompanying tool tip to learn more: “Allows user to stop the remote access process.”.
- Choose “Yes” to prevent the Employee from being able to schedule a remote I-9 appointment.
- The Employee receives two email notifications from Tracker.
- The previously scheduled remote Section 2 appointment cancellation email.
- A new Section 2 due email with instructions to complete the Form I-9 Section 2.


Note: The Remote I-9 Appointment Date field on the Form I-9 UI will not be displayed.
D. Reschedule I-9 Pro Workflow
- Select the “Reschedule I-9 Pro Workflow” option.
- Hover over the accompanying tool tip to learn more: “Allow users reschedule the appointment with the I-9 Pro Authorized Representative.”.
- Choose “Yes” to reschedule the Employee’s I-9 Pro appointment or “No” to dismiss the alert.
- The following screen will be displayed once the employee clicks “Yes” from the popup.
- Click the “Reschedule” button and follow the steps detailed in the Schedule Appointment section to complete the rescheduling of the appointment.
- The employee will receive a new calendar invite for their appointment from noreply@timetap.com. The updated appointment details are embedded in the calendar invite.
- The employee will receive a new appointment confirmation email containing the updated date, time, and staff name. Additionally, the Remote I-9 Appointment Date field on the Form I-9 user interface will reflect the new date and time.


Section 1 Employee Information
When an employee selects "A noncitizen (other than Item Numbers 2 and 3 above) authorized to work" as their employment status, the Date Authorized to Work Until field is now visible in the "View Section 1 Employee Information" container under Section 2. This helps the Tracker Compliance Experts team identify discrepancies between work authorization dates in Sections 1 and 2 during I-9 Pro appointments.

Reports
I-9 Pro Usage Report
Admins can now take advantage of the I-9 Pro Usage reporting solution to generate detailed reports on demand, enabling them to track and analyze data logs for I-9 Pro remote appointments.
This Report provides insights with filters for I-9 Start Date, I-9 Created Date, and Remote I-9 Appointment Date ranges.
Click the Run Report button to generate the I-9 Pro Usage report. Here is the corresponding navigation page to access it:
System and Distributor Admin View:
Navigation: Admin Control Panel >> System Settings >> Admin Tools >> I-9 Pro Report.

Client Admin View:
Navigation: Admin Control Panel >> System Configurations >> I-9 Pro Report.


I-9 Custom Reports
The visibility of I-9 Pro data points, such as the I-9 Pro appointment status and appointment date/time, is also available in our on-demand I-9 Custom Reporting solution. Those field are:
- I-9 Pro Appointment Status
- I-9 Pro Appointment Date/Time
These fields will display in the report once the user clicks the “Run Report” button, as shown below:

I-9 Record Summary List View Report
The I-9 Workflow dropdown now displays all available workflow types, regardless of whether they are currently active or inactive. This ensures that users can view and report on records across all workflow configurations.
The following workflow types are available in the dropdown:
- Employee Appoint
- Employer Appoint
- Historical Form I-9
- Historical Form I-9 Basic
- I-9 Pro
- I-9 Pro + E-Verify
- I-9 Resolve Form
- Network Alliance
- New Form I-9
- Remote Section 1 Only

Section 2 Page
The Section 2 page displays two tabs: Section 2 and E-Verify, allowing navigation between verification steps. This is the page that Mitratech’s I-9 compliance experts will be completing during the I-9 Pro or I-9 Pro + E-Verify appointment. The information provided below is for reference purposes only.

The Verifications team representative can use the Administrative Options menu at the upper right corner of the Section 2 container to access attachments, employee communication settings, document upload requests, and Remote Section 1 amendments. Section 1 employee data is visible by default and can be collapsed or expanded. The Employment Verification Documents container displays document tiles with required fields and image upload prompts. The representative can save Section 2 data before proceeding to sign. After signing, the workflow continues to the E-Verify page.
Note: A yellow caution symbol appears when no Social Security Number is provided. This helps the representative identify incomplete Section 1 data at a glance.
The Remote Section 2 page remains active for 24 hours after signing. Once expired, attempts to access it should trigger the designated expiration screen.
E-Verify Page
The E-Verify tab remains inactive until Section 2 is signed. Once completed, the Verifications team is automatically routed to the E-Verify page and can toggle between Section 2 and E-Verify tabs as needed.
E-Verify Processing Responsibility
- If the client is configured for I-9 Pro only, the Verifications team is not responsible for E-Verify processing.
- If configured for I-9 Pro + E-Verify and the associated Employer has Auto Submit enabled, the Verifications team is responsible only when the initial case status is:
- Employment Authorized
- Photo Match
- Are You Sure
- If Auto Submit is not enabled, the I-9 Manager handles all E-Verify actions, regardless of case status.
E-Verify Status Display
- If the initial or final case status is Employment Authorized, the page shows:
E-Verify Status: Employment Authorized - If the final case status is anything other than Employment Authorized, the page shows:
E-Verify Status: Employer is responsible for E-Verify - If the status is Confirm Photo, the Photo Match page opens:
- Based on the final result, the page shows either: Employment Authorized or Employer is responsible for E-Verify
- If the status is “Additional Verification”, the “Are You Sure” page opens.
- If the result is Employment Authorized, the same status is shown.
- Otherwise, the page shows: Employer is responsible for E-Verify