
TeamConnect Command Line Installer Tool User Guide
Note: The TeamConnect Comand Line Installer tool is not designed to function with incompatible configurations. If your environment is in an incompatible state, please proceed with manual upgrades and installations.
TeamConnect Command Line Installer (CLI) tool.
TeamConnect Command Line Installer (CLI) is a text-based interface that allows users to enter commands to interact with a computer’s operating system, functioning through the default shell as an intermediary between the user and the operating system. The TeamConnect CLI tool is specifically designed to automate upgrades and new installations of TeamConnect and Mitratech-associated modules. This tool enables users to quickly determine the correct upgrade path and effectively identify which TeamConnect versions and modules are currently installed.
How to download TeamConnect CLI ?
To download the latest TeamConnect CLI package, users can access the file from the following location:
Internal - Location: \\medusa\Release\TC_CLITool\7.X\Releases\7.X.0
Clients - Only available upon client requests.
PreRequisites
Below prerequisites are required to install TeamConnect and its modules using the TeamConnect CLI tool:
- Java must be installed on the computer.
- Required JAR files must be included in the TeamConnect CLI folders to integrate JDBC files.
- Both Windows and Linux users must have the appropriate permissions to create files in the CLI directory.
- TeamConnect database credentials are necessary to connect the TeamConnect CLI tool with the database.
- A valid TeamConnect license file is required to access the necessary TeamConnect modules.
How to incorporate a jdbc file in TeamConnect CLI?
To incorporate jdbc file into the TeamConnect CLI package, follow these steps:
- Download the TeamConnect CLI package from the official source.
- Identify your database type within TeamConnect.
- For SQL Server, procure the `mssql-jdbc` jar file
- For Oracle, obtain the `ojdbc` jar file.
-
Locate the library (lib) and Driver folder within the TeamConnect CLI package directory.
-
Place the corresponding jar file (`mssql-jdbc` for SQL Server or `ojdbc` for Oracle) into the library and drivers folder.

By following these steps, you can integrate the required jar files into the TeamConnect CLI package according to your database specifications.
How do you open the command line installer on your system?
To open the Command Prompt, follow these steps according to your operating system:
On Windows:
Method 1:
- Press Win+E to open File Explorer.
- Navigate to the folder where you want to open the Command Prompt.
- Click on the address bar in the File Explorer window, type ‘cmd’, and press Enter.
Method 2:
- Press Win+E to open File Explorer.
- Navigate to the folder where you want to open the Command Prompt.
- To execute, press and hold the Shift key, then right-click either on the folder or within it, and select "Open PowerShell window here" or "Open Command window here" from the context menu.
Note: In recent versions of Windows, you might see "Open PowerShell window here" instead of Command Prompt.
On Linux
Method 1:
- Open the Applications menu in your desktop environment (typically located in the top-left or bottom-left corner of the screen).
- Navigate to the System Tools or Accessories category.
- Locate and click on an application such as Terminal, Konsole, XTerm, or similar, depending on your desktop environment, to open the terminal emulator.
Method 2:
- Open your File Manager (e.g., Nautilus for GNOME, Dolphin for KDE).
- Navigate to the folder where you wish to open the terminal.
- Right-click on an empty space within the folder.
- From the context menu, select "Open in Terminal" or a similar option.
Connecting the CLI tool to TeamConnect database
To connect the TeamConnect Command line installer tool to TeamConnect database, follow these steps:
-
Locate the `upgrade.properties` or `install.properties` files within the TeamConnect CLI package directory.
-
Depending on whether you are performing an upgrade or installation task:
- For upgrades: Update the `upgrade.properties` file.
- For installations: Update the `install.properties` file.

-
Within the chosen properties file, update the values for the following fields according to user requirements:
| Name of the Field | Description |
| db.product | Name of the database in use. Note: This is case sensitive eg. “Oracle” |
| db.url | URL of the database. |
| db.username | Database username. |
| db.password | Database password. |
| module.1.product | Name of the module to be Installed/upgraded. |
| module.1.build | Details of the build to be Installed/upgraded. |
| install.allowResume | Enables the installation to resume from the point of failure if set to ‘Yes’. By default it is 'No'. |
| download.only.mode |
Enables users to download necessary files required for offline installation or upgrades. By default it is ‘No.’ |

Once the properties file(s) are updated, proceed to execute commands in the TeamConnect CLI tool. The tool will utilize the information provided in the properties file to carry out the specified tasks, whether it involves an upgrade or installation.
Note: Legal Matter Management will be excluded from the upgrade and installation process unless explicitly specified by the user in the respective properties file.
Additional Information: For users who do not have a TeamConnect instance in their local setup, they need to obtain the TeamConnect database details from the administrator of their connected TeamConnect instance and update the properties file to perform an upgrade or installation.
Commands available in the TeamConnect CLI tool.
Below is a table listing the commands available in the TeamConnect CLI tool:
| Command | Description |
| help | Provides a list of available commands along with their descriptions. |
| info | Provides information about the currently installed TeamConnect version and its modules. |
| path | Provides information about the upgrade path for TeamConnect and its modules. |
| upgrade | Upgrades the requested TeamConnect version and modules. |
| install | Installs the requested TeamConnect version and modules. |
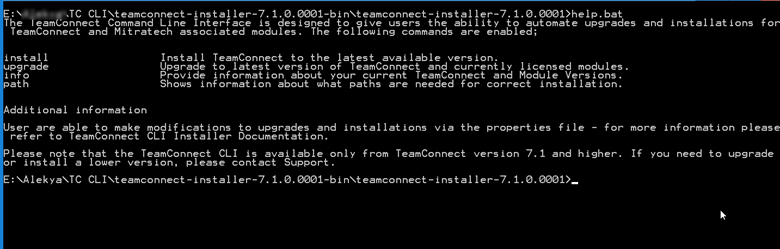
“help” Command
The "help" command provides a list of available commands along with their descriptions. The following commands are supported: install, upgrade, info, and path.
“info” Command
The info command allows you to view the currently installed version of TeamConnect, as well as all Mitratech modules.

Note: If users execute the Info command and no TeamConnect Configurations are found, an error message will be displayed as follows:
- Error: No versions of TeamConnect or associated Mitratech modules have been identified.
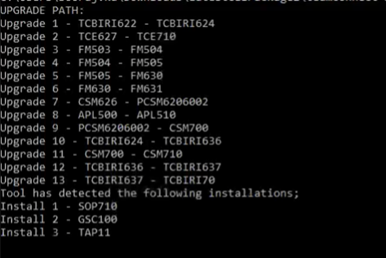
“path” Command
The path command provides the necessary steps for a complete upgrade of TeamConnect and all currently installed Mitratech modules. Additionally, if there are purchased but uninstalled modules, they will be listed under "Install".
Note: Please note that the initial response to this call may take approximately 4 minutes to compute.
- If there is a failure in reading the License file or Property file, the tool displays the following error message:
- Error : while processing license/property file.
- If users execute the Path command and no TeamConnect Configurations are found, the following error message will appear:
- Error: No versions of TeamConnect or associated Mitratech modules have been identified.
“upgrade” Command
The upgrade command will upgrade the TeamConnect and its modules as indicated in the properties file or License file. Additionally this command will display the status of the upgrade process.
Note: The Upgrade Command can also detect modules that require installation.

“install” Command
The install command will install TeamConnect and its modules as specified in the properties file or license files. Additionally, this command will display the status of the installation process.

For upgrade instructions, refer to Upgrading TeamConnect and its Modules Using the TeamConnect CLI Tool.
For installation guidance, refer to Installing TeamConnect and its Modules Using the TeamConnect CLI Tool.