
Upgrading TeamConnect and its Modules using TeamConnect CLI tool.
Please watch the following video for a detailed understanding of Upgrading TeamConnect and its modules using TeamConect CLI tool.
After watching the video, please refer to the below upgrade Instructions.
DISCLAIMER:
The TeamConnect CLI tool relies on Maestro information and a valid License file to successfully generate the upgrade path and complete the upgrade and installation process. Users have to ensure that they have the necessary Maestro information and a valid License file before using the TeamConnect CLI tool.
When upgrading from a TeamConnect version older than 7.1, do not provide Office 365 (O365) as input via the CLI or include it in the properties file if it is part of the license. The O365 module is automatically installed when the license containing O365 is uploaded. Attempting to install it again through the CLI will cause redundancy and result in an installation.
Prerequisites
Below prerequisites are required to upgrade TeamConnect and its modules using the TeamConnect CLI tool:
- Java must be installed on the computer.
- Required JAR files must be included in the TeamConnect CLI folders to integrate JDBC files.
- Both Windows and Linux users must have the appropriate permissions to create files in the CLI directory.
- TeamConnect database credentials are necessary to connect the TeamConnect CLI tool with the database.
- A valid TeamConnect license file is required to access the necessary TeamConnect modules.
- Details of TeamConnect Modules to be upgraded along with TeamConnect.
Note:
-
TeamConnect CLI tool does not support upgrading from versions 6.3.2 and 6.3.3 of the Financial Module to the latest version.
-
Legal Matter Management will be excluded from the upgrade and installation process unless explicitly specified by the user in the respective properties file.
Step by Step procedure to Upgrade TeamConnect and its Modules:
-
Download the TeamConnect CLI setup package from Medusa as per the instructions provided (refer to the How to download TeamConnect CLI section).
-
Incorporate the required Jar files into the library (lib) folder within the TeamConnect CLI folder directory (refer to the How to use Jar files in TeamConnect CLI section).
-
Locate the upgrade.properties file in TeamConnect CLI folder directory and update necessary fields according to the user requirements (Alternatively user can avoid updating properties file by placing the license file under license folder). Below are available fields in the properties file:

| Name of the Field | Description |
| db.product | Name of the database in use. Note: This is case sensitive eg. “Oracle” |
| db.url | URL of the database. |
| db.username | Database username. |
| db.password | Database password. |
| module.1.product | Name of the module to be Installed/upgraded. |
| module.1.build | Details of the build to be Installed/upgraded. |
| download.only.mode |
Enables users to download necessary files required for offline installation or upgrades. By default it is ‘No.’ |
Note: When users update modules and build details in the upgrade.properties file, they need to delete the Upgradepath.json file located in the resource folder.
-
After providing all the required details in the properties file, open the command prompt in your system. (refer to the How to open Command line installer in your system section).
-
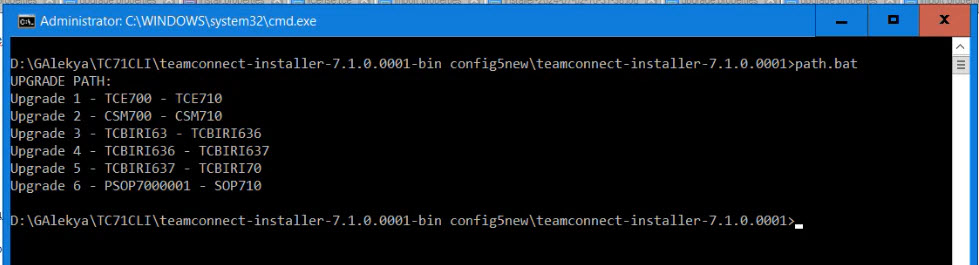
In the command prompt, type `path.bat` and press Enter. The TeamConnect CLI tool will then verify all the provided details and display the upgrade path based on the module versions specified in the properties file. After the upgrade path is computed, verify the TeamConnect and module version details displayed on the screen.
-
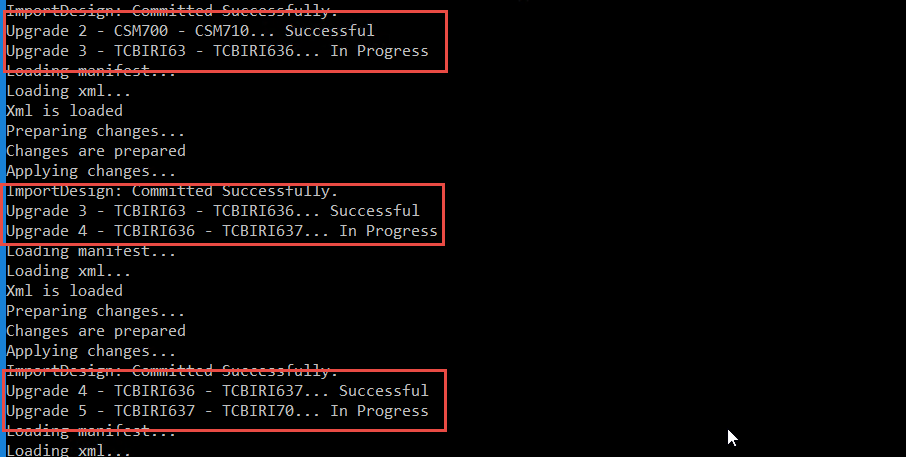
After verification, type `upgrade.bat` in the command prompt and press Enter. TeamConnect CLI tool will begin upgrading TeamConnect and its modules according to the computed upgrade path. The status of the upgrade process will be displayed on the screen for users to monitor.


-
Once the upgrade of TeamConnect and all modules is complete, the tool will display a summary of the upgrades performed. This summary will include the latest version of TeamConnect and its modules, which can be viewed under the About section in the TeamConnect instance as illustrated in the image below.


Offline Upgrades of TeamConnect and its Modules
To perform offline upgrades, users must first connect to a server. Once the connection with the server is established and the folders are downloaded, users can proceed with an offline (on-prem) upgrade or installation.
Users can perform the offline upgrades of TeamConnect and its versions by enabling the download.only.mode property in upgrade.properties file.
When download.only.mode is set to ‘Yes’, the necessary files will be downloaded and saved in the resource folder. These files can then be used for offline upgrades.

When download.only.mode is set to No, the tool will initiate the upgrades process if the required files are available locally. If any of the required files are not downloaded, the tool will download the files and perform the upgrades.
After the upgrade of TeamConnect and all modules is complete, the tool will display a summary of successful, failed and skipped downloads of upgrades.

In case of any failure during the file download process, the tool will resume the download from the point of failure. If users wish to re-download all the files, they must manually delete all existing files from the resource folder.
Handling the Failed Upgrades
While upgrading TeamConnect and its associated modules using the Command Line Installer tool, if the upgrade process fails at any step, the tool will take the following actions in subsequent runs:
- Rollback Changes: The tool will roll back the changes made during the failed step.
- Resume from Failure Point: The tool will restart the upgrade process from the same step where it previously failed.
- Maintain Upgrade Path: The tool will not regenerate Upgrade Path.json or recompute the upgrade path. It will detect the failed step and restart the upgrade process from that point.
- Resume Module Installation: If the installation of new modules fails during the upgrade, the tool will resume the installation in the next upgrade run.
Upgrade Error Notifications
The tool will prompt error messages in the following scenarios if users fail to provide relevant information:
- Upgrade Failure: Users will receive error messages if there are any failures during upgrade of TeamConnect and its modules.
- Error Message: upgrade of <module version abbreviation> failed. Please refer to the logs for more information.
-
Incomplete Database Details: If users do not provide the necessary database values, the tool generates the error message:
-
Database details are incomplete in the properties file.
-
-
Incorrect Module Name: If users enter an incorrect module name in the properties file, the tool displays the error message:
-
"<Wrong Module Name> cannot be found in Maestro. Please update the details in the properties file."
-
-
Upgrade Path Computation Error: During the computation of the upgrade path, if the tool encounters any error, it displays the message:
-
"Error while generating the upgrade path. Please check the log file for more details."
-
-
Incompatible Module Version: If the module version specified in the tool's properties file is incompatible with the installer TeamConnect version, the system displays an error message on the screen and terminates the upgrade process:
-
"<Module name + Version from properties file> is not compatible with TeamConnect Enterprise <Version>."
-
-
Skipped Modules Incompatibility: If a user skips any modules during the upgrade process and those modules are not compatible with the updated TeamConnect version, the CLI tool displays an error message on the screen and terminates the upgrade process:
-
"<Skipped Module name + Version in Maestro> is not compatible with TeamConnect Enterprise <Version>."
-