
End User Guide for TeamConnect Add-In O365 4.2
Please watch the following video for a detailed understanding of creating, editing, and deleting tasks in the Add-In.
After watching the video, please refer to the below end-user guide for additional details and instructions.
Getting Started
Overview
TeamConnect O365 Add-In 4.2 is a newly developed product utilizing Microsoft’s latest Add-in technology. Its purpose is to empower attorneys and users by allowing them to conveniently access commonly used TeamConnect features through Outlook 365, rather than TeamConnect.
This user guide provides clear, step-by-step instructions and comprehensive information to help end users effectively use the TeamConnect O365 Add-In version 4.2. It supports the migration of appointments and tasks from the legacy Outlook Plugin to the new Outlook Add-in. It introduces efficient task management capabilities, allowing attorneys and other professionals to track matter-related activities. Task migration requires coordinated efforts between the TeamConnect Administrator, the Office Suite Administrator (for managing permissions), and the end user.
What's New in this Release 4.2?
Task Management Integration: Users can now view, create, edit, complete, and delete tasks directly from the Add-in, with bi-directional synchronization between TeamConnect and Microsoft To-Do. This ensures all tasks associated with a matter are efficiently tracked and nothing slips through the cracks. Refer to the Tasks section below.
Grant Permissions During Login: After upgrading to TeamConnect 7.2 PB1, if delegated permissions are enabled, users must grant calendar and/or task access during their first login to the O365 Add-in.
Migrating from the Plugin to the Add-in?
Refer to the Migrate from Office Plugin to Outlook Add-in section for a smooth and successful transition.
Note:
- If you are new to Outlook Add-In, we recommend reading the "Entire Guide" to get familiar with all the features and functionality.
- If you are upgrading from Add-In 4.0 or 4.1, refer to the What's New section above to learn about the updates in version 4.2.
Disclaimer: Please avoid concurrent usage of the Office Suite Plugin and O365 Add-in. It is vital that users stop using and uninstall the Office Suite Plugin (for Outlook) after the datastore file has been uploaded and before end users start using the Add-in. Concurrent usage will cause data issues such as duplicate appointments, deletion of data within appointments, etc. If the Plugin is accidentally used again after uninstalling, stop using it and generate/upload a new datastore file.
Feature Availability Across Versions
| Feature | 4.0 | 4.1 | 4.2 |
|---|---|---|---|
| Document Management | Introduced | Available with No Changes | Available with No Changes |
| Appointment Management | Introduced | Available with No Changes | Available with No Changes |
| Appointment Migration | Not Available | Introduced | Available with No Changes |
| Task Management | Not Available | Not Available | Introduced |
| User-Granted Permissions | Not Available | Not Available | Introduced |
Setup and Access Requirements
Prerequisites for TeamConnect O365 Add-In 4.2:
Following are the prerequisites before you begin installing the TeamConnect O365 Add-In 4.2:
- Microsoft Account: A valid Microsoft O365 account is required.
- Supported Operating Systems: Compatible with desktop environments on both Windows and macOS.
- Supported Browsers:
- Google Chrome
- Microsoft Edge
- Mozilla Firefox
- Safari (version 17.2.1 or above)
Compatibility
- TeamConnect Version Compatibility:
- The O365 Add-In 4.2 is compatible only with TeamConnect Enterprise version 7.2 or higher.
- Appointment Migration:
- Supported for TeamConnect 7.1 PB1 and above.
- Only applicable for users who were using appointments in the Outlook Plug-in.
- Task Migration:
- Supported for TeamConnect 7.2 and above.
- Only applicable for users who were using tasks in the Outlook Plug-in.
Logging In
You must log in and authenticate successfully to use the TeamConnect O365 Add-In 4.2. Login procedures may vary based on the authentication process used by your organization.
- Click on any email in the Outlook inbox and click on the Apps
 icon, you can find a TeamConnect symbol
 .
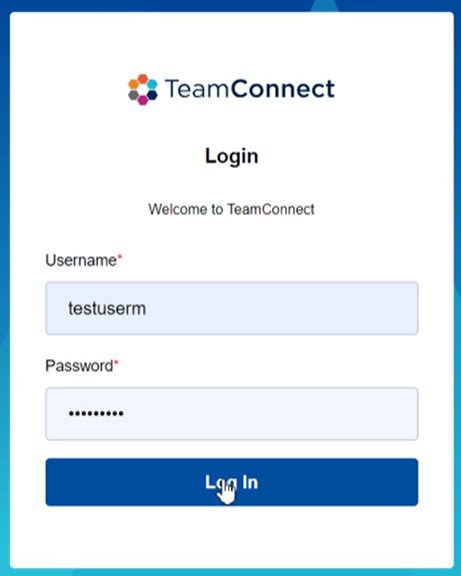
- Click on the TeamConnect Symbol. A new dialog box opens up prompting for the TeamConnect username and password.

Note: You may encounter multiple domains depending on your company’s setup. Select the desired domain.
- Enter your TeamConnect username and password. Click Log In.
- If Single Sign-On (SSO) is enabled, logging into Outlook 365 will automatically grant access to the TeamConnect Add-in.
- You are now ready to experience the TeamConnect O365 Add-In 4.2.
Permission Handling and Notifications
If permissions are required on the system, users may be prompted to grant access during first time login. Otherwise, user will be logged in directly without any prompts.
-
Grant Permissions During Login
- After logging in to the O365 Add-in for the first time, users might need to provide consent for specific permissions required by the Add-in (calendar and/or task access).
Note: No specific permissions are required for document management. - If permissions are denied, an error message will appear in the Add-in, and access will be restricted until consent is granted.
- Below are the Login Scenarios based on enabled features:
| Login Scenarios | Screenshot for Reference |
|---|---|
| Tasks Only Enabled: If the TC Admin has enabled only tasks, users will see a corresponding screen during login. | 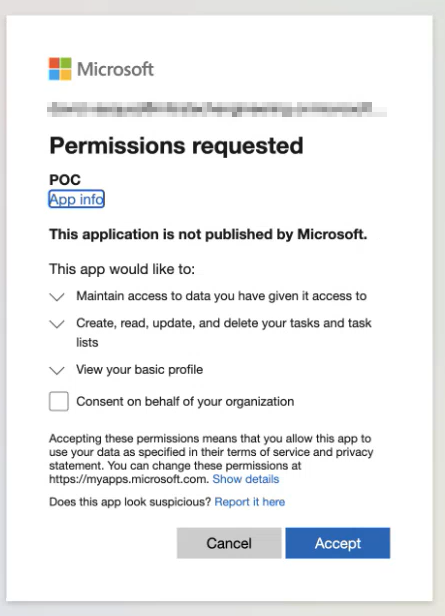 |
| Calendars Only Enabled: If only calendars are enabled, users will encounter a calendar-specific screen at login. |  |
| Both Tasks and Calendars Enabled: If both features are enabled, users will see a combined screen prompting them to accept permissions for both tasks and calendars. | 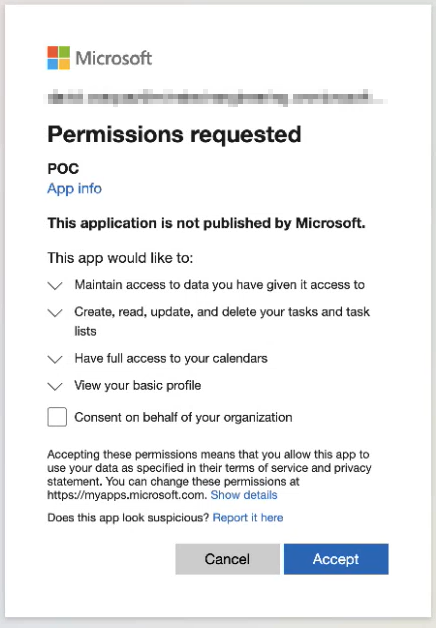 |
-
If permissions were not accepted during the initial login, users must review the permissions and provide consent before accessing the respective features in the Add-in.

- Re-authentication: If a user has been inactive for an extended period or not logged in for a while, they are prompted to log in again.
- New Objects: When admins enable new settings (appointments and/or tasks), users must re-authenticate to grant access to these objects.
Logging Out
To log out of your account:
| Instructions | Screenshot for Reference |
|---|---|
|
 |
|
 |
|
 |
|
 |
 located at the top-right corner of the Add-in window.
User Interface
The all-new TeamConnect O365 Add-In 4.2 has an updated user interface that offers an intuitive experience for document management, matter creation, and appointment synchronization directly from the Outlook interface.
-
If your organization has customized the ribbon with the TeamConnect icon, the TeamConnect task pane will be displayed upon clicking the icon.


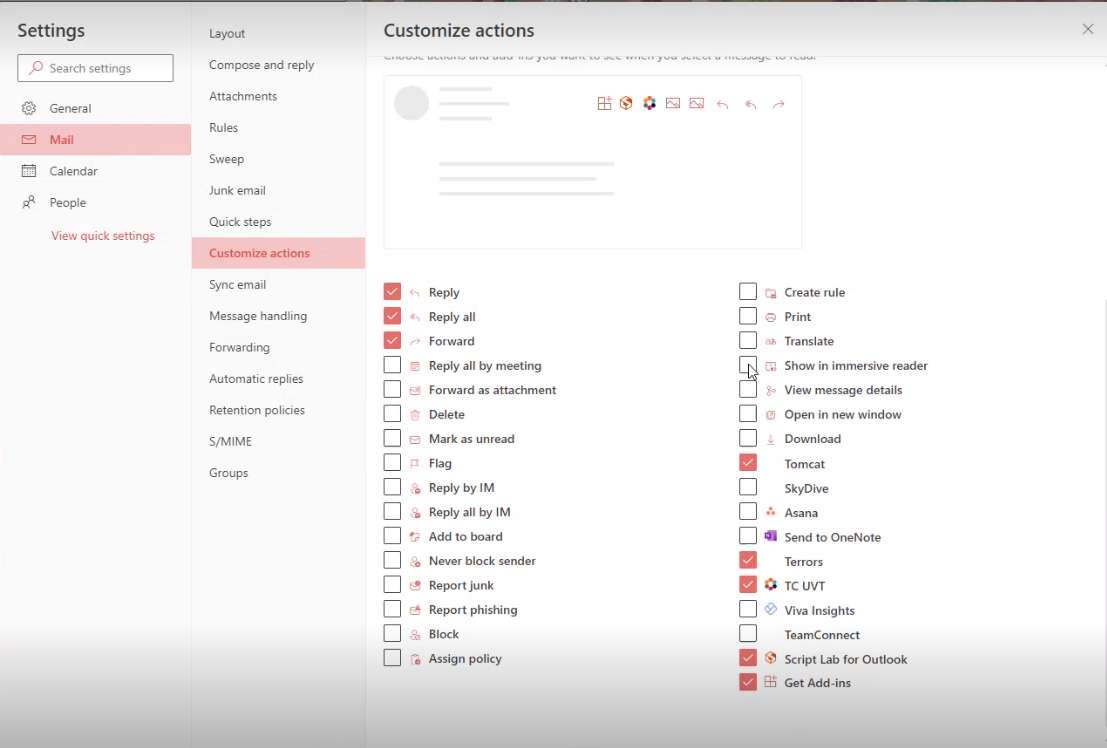
- Else, click on Settings → Customize Actions → Select the TeamConnect O365 Add-In 4.2 check box to view the Add-in on the ribbon.
- Enter your TeamConnect login credentials if you are redirected to login page.
Note: User’s first name is displayed on the Add-in.

Ease of Access
You can pin the task pane to the mail view by clicking the pin icon above the task pane. So, whenever an Outlook mail is opened, the task pane for the Add-in will be visible by default.
Customize the Mail View
The user interface can be further customized and you can select the options that should be visible on your mail page. Modify your mail view by enabling or disabling the following settings:
- Navigate to Settings → Mail → Customize Actions.
- Select all the actions to be displayed on the mail page.
Note: If the TeamConnect O365 Add-In 4.2 is already configured, you will not be able to unselect it.
Add-In Localization
This Add-in version offers localization, follow the below instruction to change the language:
- Click on the user icon and choose "Preferences".
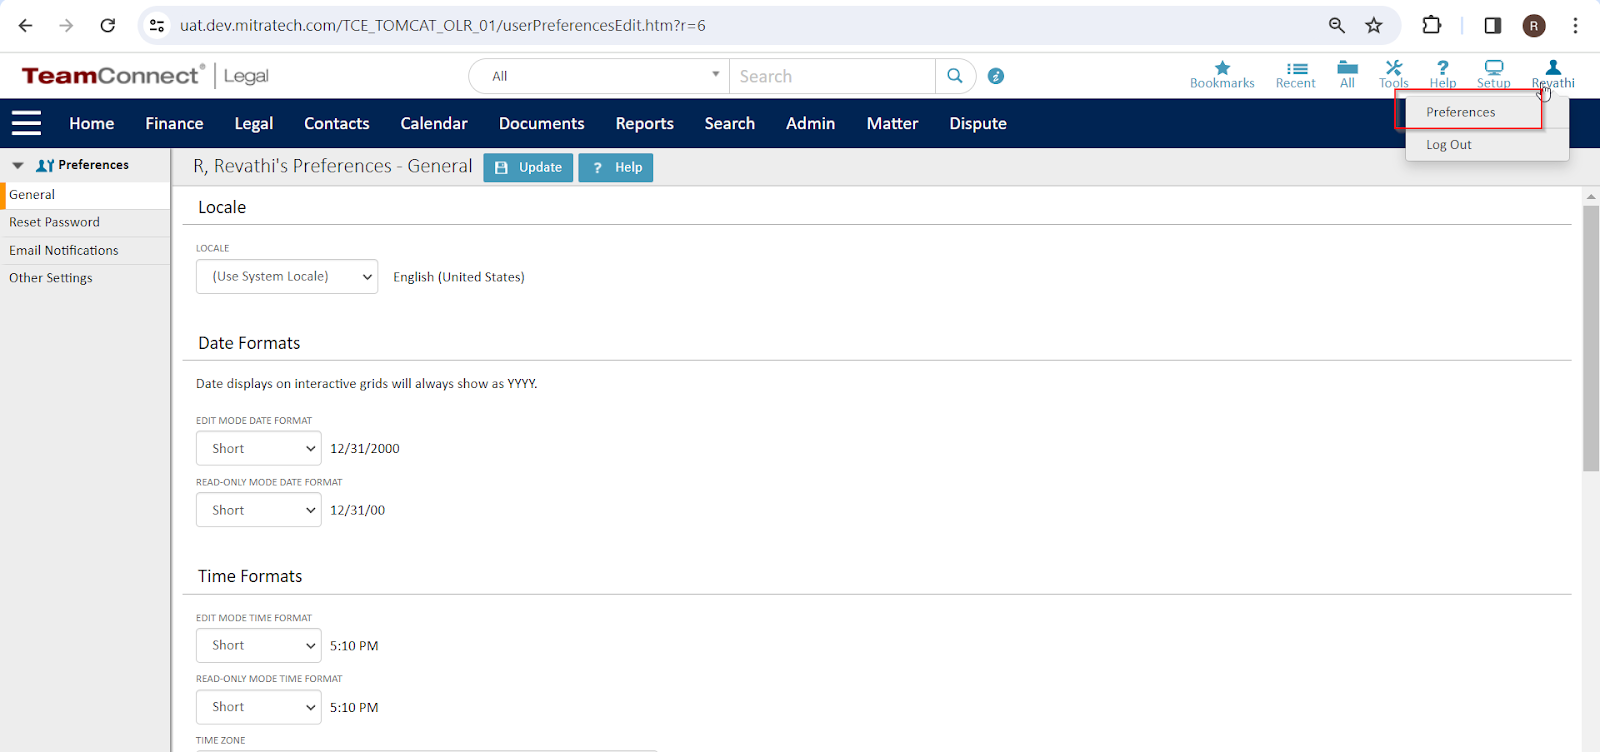
- In the General tab, locate the Locale drop-down menu.
- Select the language you wish to use from the available languages in the drop-down menu. If the desired language is not visible, please contact your administrator for assistance.
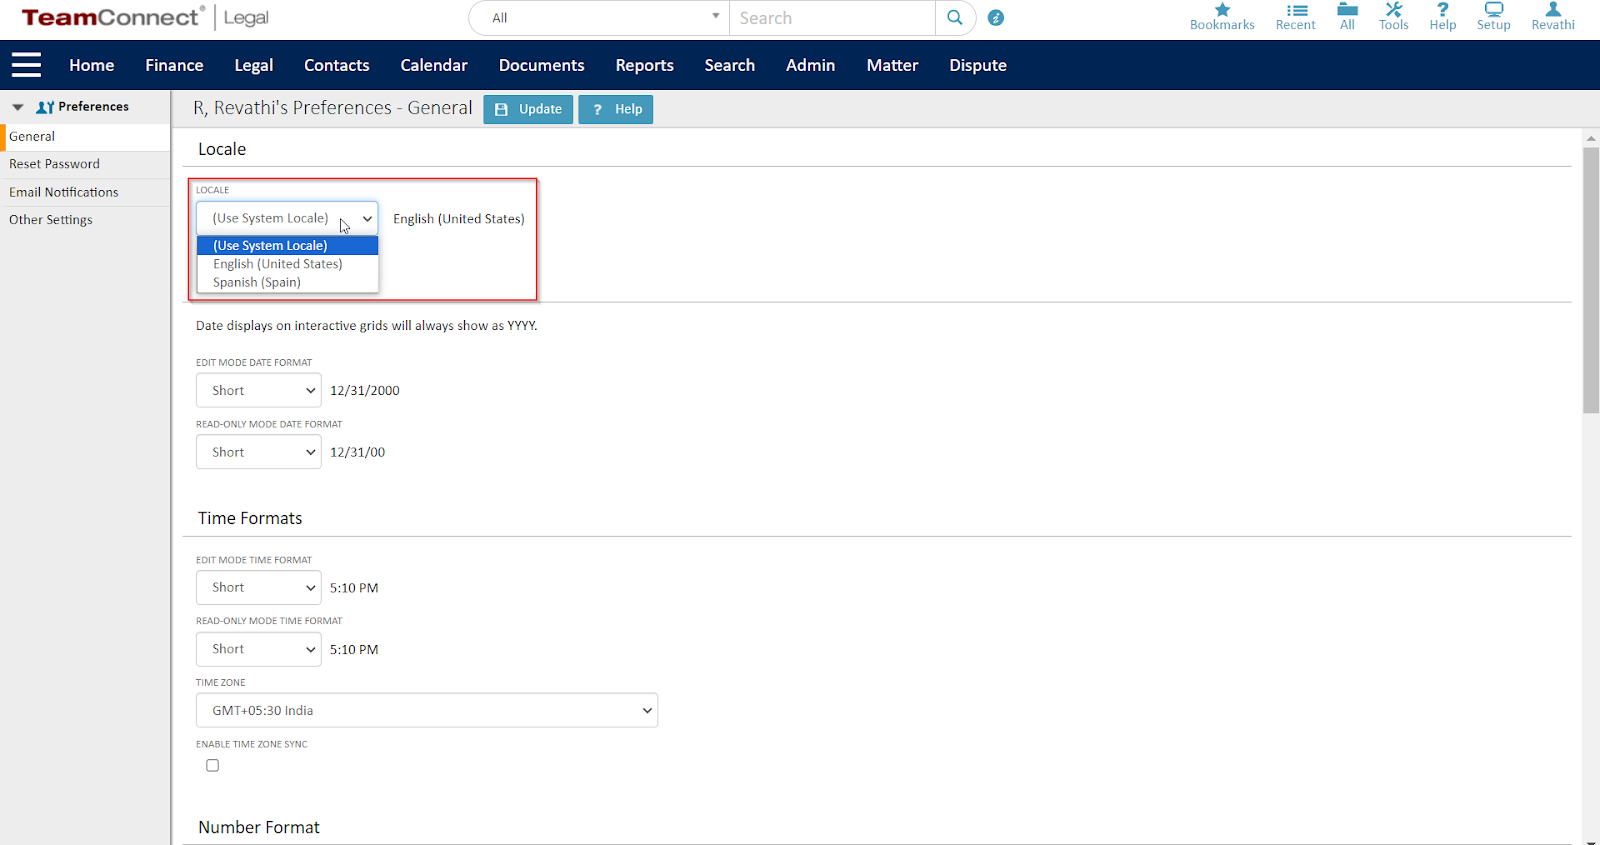
-
Click Update. The Add-in will then switch to the language you've selected.
Matter Creation and Search
The Matter tab allows you to organize, compile, and manage the details of an incident or event from the beginning to its conclusion. Matter records encompass any type of litigation or dispute, including administrative issues, people involved in the incident, all relevant dates, tasks that must be completed, users and specialists assigned to the matter, and all related documents.
When the Matters tab is clicked, there is a search bar that helps you to search for the matters you are looking for.
Matters can also be searched using date filters, and search results can be sorted based on a few categories. Detailed elucidation on Matters is provided in the subsequent topics.
Click to explore Matter Management features
Matter Creation
You can quickly create a matter through the Add-in without logging in to TeamConnect. This will help you save time as you can instantaneously add any document to a matter without leaving the Outlook interface.
| Instructions | Screenshot for Reference |
|---|---|
|
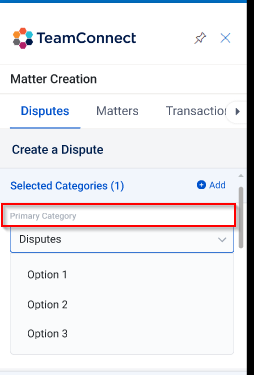
A button to create a new matter is present in the Add-in against all objects. Click on the "Create a Matter" button to create a new matter quickly. Note: This option is visible only if matter creation is enabled in TeamConnect. 1. Click the "Create a Matter" button to get a list of the objects and the primary category. 2. When creating a matter, you can assign multiple categories to it. The primary category is the root category for the matter and is selected by default. 3. Based on the primary category, corresponding categories are populated. 4. You can change the primary category by selecting the drop-down options. |
 |
|
5. Selecting a primary category will change the previous primary category to an additional category. 6. Click the "Add" button to select any additional categories that are displayed in the modal. 7. The options displayed are active elements from the lookup table. Select the required options from the multi-level list as per hierarchy. Note: If at least one child category option is selected, the parent category of the tree structure will automatically be selected. If all the child categories are de-selected, the parent category still remains selected. As in TC, deselecting the parent category will deselect all the child category options. |
 |
|
8. The fields associated with the category selected are displayed on the user interface. 9. The setting in TeamConnect designed to hide the tree structure for categories on the create matter screen does not function as intended. As a result, the tree structures for categories will always be displayed by default on the new matter creation screen. |
 |
|
10. Enter the appropriate details in the "Memo" field which is mandatory. This is populated with the category selected. 11. Select the checkbox(es), if required, that is populated with the category selected. 12. Search for assignees using the search boxes. 13. Select the appropriate value from the drop-down options. 14. Enter the date in the date field. Note: When a date is selected from the date picker, and random numbers are input into another date field, the current day’s date will be displayed in TeamConnect. 15. Click the "Save" button and then the "Submit" button. 16. The matter will be created successfully. |
 |
Search by Matter Name and/or Number
To view documents associated with the matter in TeamConnect through the Outlook Add-in, you can perform a search by typing the matter name or number in the search field which is located at the top of the Add-in.

The search field is always visible at the top of the Add-in and does not disappear during different transitions of content at the bottom of the Add-in. Enter a minimum of 3 to a maximum of 250 characters of strings or numbers to commence a search. To clear the search results, click ‘x’.
Note: You can search by matter number only if the display for “number-name“ is enabled in TeamConnect.

Date Filters for Matter Search
| Instructions | Screenshot for Reference |
|---|---|
|
1. Once you search for the matters, a date picker 2. Click on it and the search box area expands down into the search results portion of the Add-in to display a series of date filter options. 3. Select between the two date parameters - Created Date and Modified Date or use them independently. |
 |
|
4. View all the matters that were created/modified in a particular date range. 5. Once one of these is selected, you can either enter a single value for the date type or specify a range. 6. If a single value is entered, click Done, and the results that match the exact create date (or modified date) of a matter will be displayed. 7. If you enter two values and click Done, the search results will match all matter records whose date range is included in the difference between the two dates, both inclusive. |
 |
Sort Results of a Matter Search
Sometimes the search for a matter by its title and date filters may result in large result set numbers.
To find a particular matter, you can sort and categorize the search results based on Modified on Date, Opened on Date, Matter Name, Matter Type, and Status options using the Sort-By drop-down options provided. The displayed results are sorted, but not the entire result set.

Document Management
If you're upgrading from Add-in version 4.0, the documents functionality remains the same.
At the upper panel of the Add-in, you'll find a Document tab. This tab enables you to search for all documents related to the TeamConnect matter without requiring a login to TeamConnect. By simply clicking on the Document tab, you can utilize the search feature to find documents by name.
Click to explore Document Management features
Search and Filter
Quick Navigation
An option to quickly navigate to options within the selected matter and its document directory is added.
The quick navigation is found at the bottom of the TeamConnect task pane.
- Click the quick navigation icon to display the tree structure of the documents within the selected matter.
- Each folder and the sub-folders within it will be displayed.
- Click on a folder name to navigate to the folder.
- Select X or click the area outside to close the quick navigation.
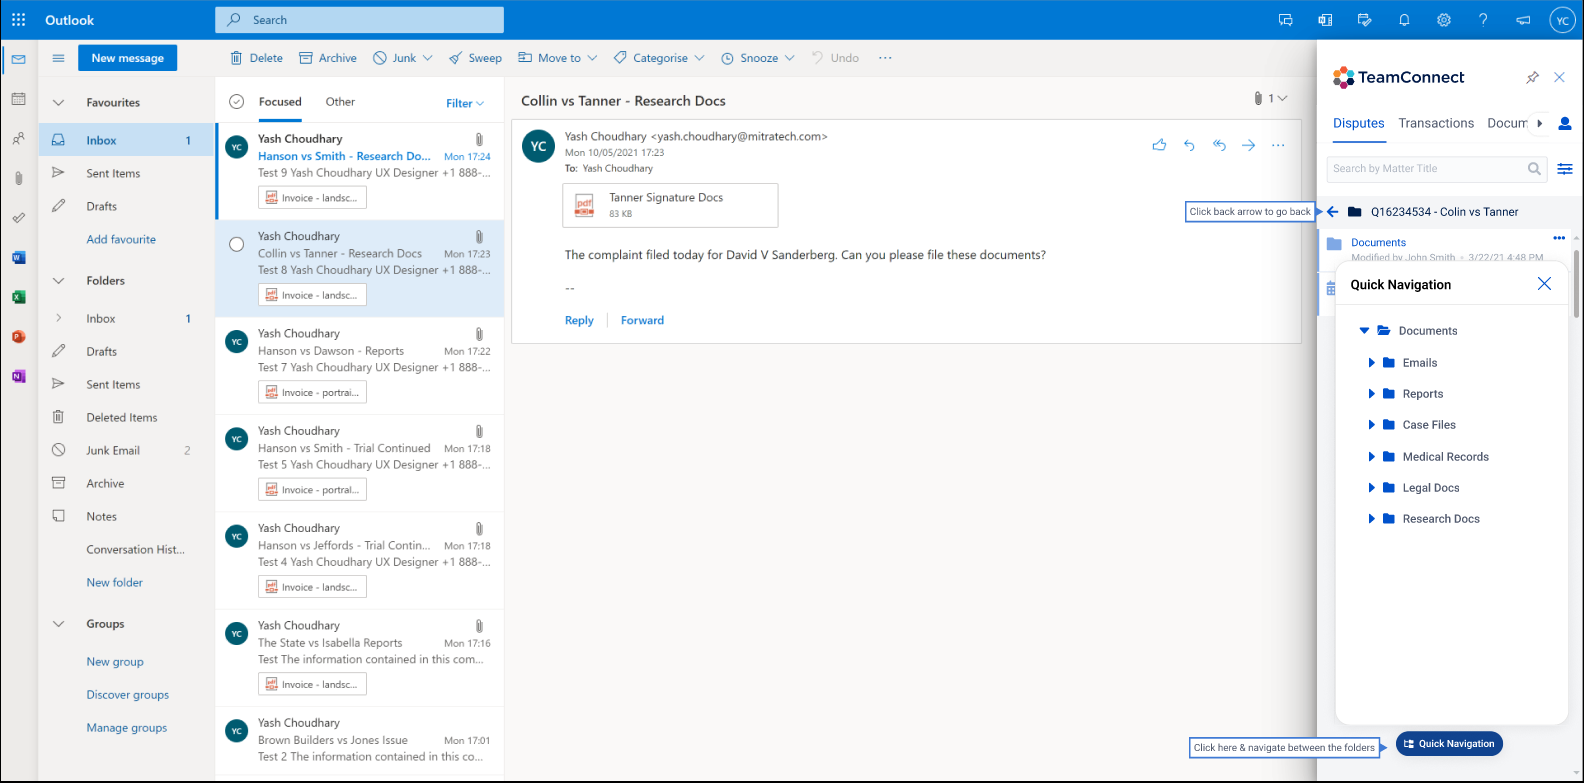
Note: If the folder is empty, the expand arrow will be disabled.
Document Tab
The Document tab allows you to search for and view TeamConnect documents directly within the Outlook Add-in. You can search by document name, apply date filters, and sort results or folders based on TeamConnect settings.
Search by Document Name
- When you intend to view TeamConnect documents inside the Outlook Add-in, perform a search by typing the document name in the search field which is located at the top of the Add-in.
- The search field is always visible at the top of the Add-in and does not disappear during different transitions of content at the bottom of the Add-in.
- Enter a minimum of 3 to a maximum of 250 characters of strings or numbers to commence a search.
- To clear the search results, click ‘x’.
Date Filters for Document Search
This function is similar to the date filters for matter search. Click here to know how it works for matters and the same can be applied to documents.
Sort Results of a Document Search
This function is similar to the sort results of a matter search. Click here to know how it works for matters and the same can be applied to documents.
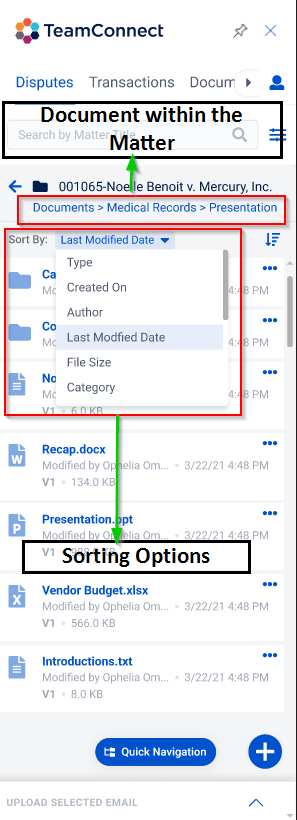
Sort Documents within a Matter Search
This option allows you to sort documents within a folder of a matter record. Select a document within a matter. The Sort By option is displayed above the list of all the documents. The sorting options are dynamic based on the TeamConnect settings. The default sorting option is ‘modified by’.
Attach Files to New Emails
This option allows you to attach a document or email file from TeamConnect directly to a new Outlook email message using the Add-In. You can quickly add important case or matter documents to your email in a few easy steps.
-
Click the "New Email" button on the Home tab to open a fresh email compose window.

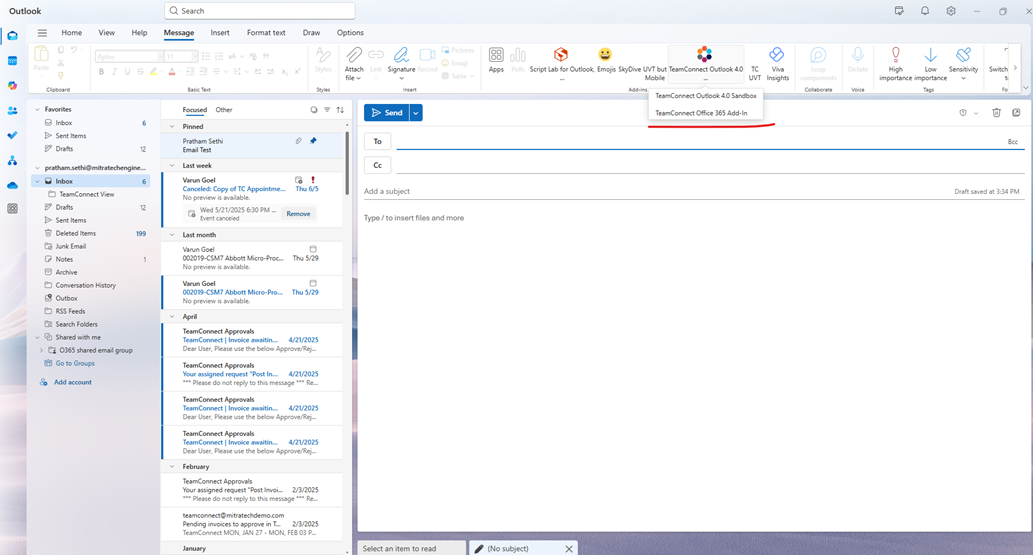
-
With the new email window open, open the TeamConnect O365 Add-in from the “Message” toolbar.
- In the Add-in panel, select the appropriate Case/Matter → click on Documents.
- Identify the preferred document/email file and click on the ellipsis ( … ) icon.
- Select the "Attach to New Email" option from the dropdown menu.

-
The selected file will be added as an attachment to the new email message.
Note: If the file is large or the network is slow, you should be able to see a “loading icon” as in the screenshot below. Hovering over the icon will provide more details.

-
Verify that the file appears in the attachments list of your email compose window. This confirms that the document has been successfully added.

Important Note: Microsoft 365 enforces a default attachment size limit of 25 MB, as set by the Admin Console. If you need to send files larger than this limit, it is recommended that you either send a TeamConnect share link or use OneDrive to share the file.
Upload Document/File from Computer
- Select a mail or a matter to which the document is to be uploaded.
- Click on the floating ‘+’ icon that appears. You get an option to upload a file, select it and you will be directed to files from your local storage. You can select one or multiple files by clicking the "Upload" button. All the file uploads are displayed in a single modal. The selected files will be uploaded successfully.

Upload Attachments from Emails
You have the option to upload attachments from emails directly without downloading them.
- To upload documents from emails to a particular matter/document, select any email with attachments.
- The email is opened in the panel, and all the attachments are shown at the bottom of the Matters/Documents tab.
- Select the attachment(s) to be uploaded and click the "Upload" button. The number of attachments selected is shown beside the Upload button.

-
The attachments will be uploaded to the pre-selected matter/document folder.

Upload Email to Matter
This option allows you to upload an entire email directly to the matter without downloading the attachments in the email. The email is uploaded in .eml format.
Note: We DO NOT recommend clients to use .eml files uploaded from the Add-in as sources for legal holds.
- Select the matter in the TeamConnect panel to which the email must be attached.
- Select the email to be attached. It is opened in the display panel.

- At the bottom of the TeamConnect panel, you can find the Upload Email to Matter button. Click on it.

- The email is uploaded in '.eml' format to the matter selected
- If a duplicate email already exists, you get a warning message. Then modify the subject line and upload the email as a copy.
Limitations to Uploading a File
- The file or document you upload must not exceed the upload size limit (MB) set by your TeamConnect admin. Else, an error message, “File size exceeds maximum allowed limit in TC admin settings(MB). This file will be skipped during upload. Please contact your system admin for further information.” is displayed.
- When you try to upload a duplicate file, an error message, “Document with the name <file name> already exists in the same folder.”
You now have two options:-
1. Create a Copy or 2. Create a Version
1. Create a Copy |
2. Create a Version |
|
If the file you upload already exists in the same TeamConnect folder, you can rename it by creating a copy of the file. 1. Select Create a Copy. 2. Rename the file in the Name field and click the Confirm button. 3. When renaming a file, remove the file extension from the text field. 4. Your file is uploaded and a separate copy with a different name is added. |
If the file you upload already exists in the same TeamConnect folder, you can create a version of the same file. 1. Select Create a Version. 2. Enter the version comments in the Comments text box and click the Confirm button. 3. Your file is uploaded and a newer version of the document is uploaded. Note: When a new document version is uploaded, it exclusively updates the content while incorrectly populating the metadata with the "Wrong Version" and modified name. |
 |
 |
More Document Options
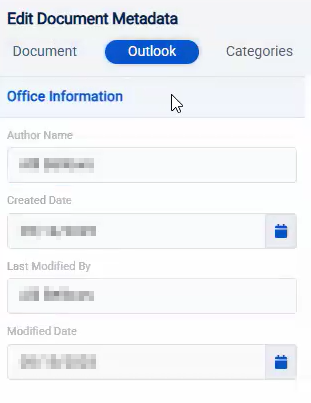
Viewing and Sorting Office Document Metadata in Outlook 365 Add-In
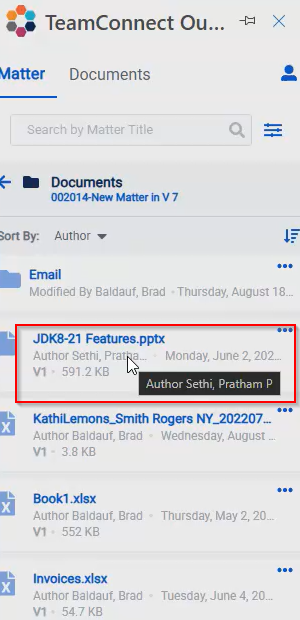
This feature allows users of the Outlook 365 Add-In to view and sort metadata derived from Office documents (Word, Excel, PowerPoint) uploaded into a matter. Metadata fields such as Author, Created On, Last Modified By, Last Modified Date, and Office can be displayed and used for sorting in the document card view.
View in Outlook 365 Add-In
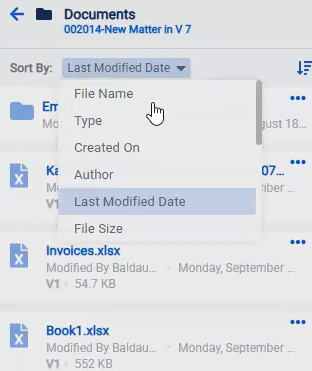
- Open a matter and navigate to the Documents tab.
- Use the Sort by dropdown to sort documents using the enabled metadata fields. The dropdown will display all metadata fields that are enabled in TeamConnect.
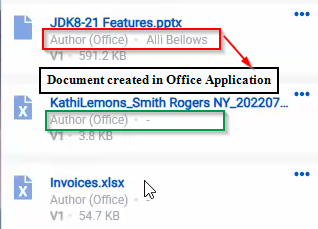
- Metadata such as the real author will be shown on the document card only if the document was created using an Office application (Word, Excel, or PowerPoint).
- In the dropdown options, "Author (Office)" refers to the original author from the Office application, while "Author" refers to the author recorded in TeamConnect.
- Similarly, for other metadata fields, if "(Office)" appears next to the field name, it indicates that the value was captured from an Office application.
- Note: You can customize the labels for these fields using the Localization/Locale Manager.
View Full Metadata Tooltip
Hover over any partially displayed metadata fields (shown with ellipses ...) to see the complete value in a tooltip.
Right-click options - Matters/Documents
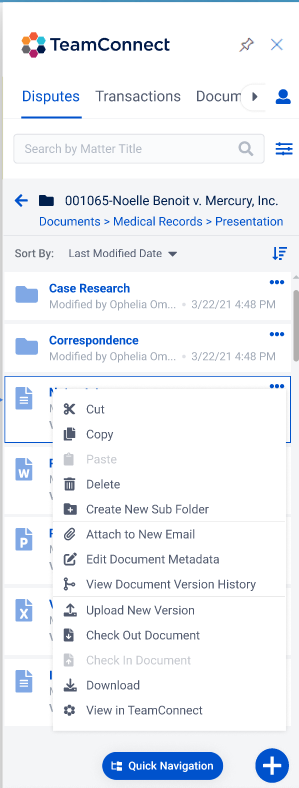
You get the following options when you right-click or click the ellipsis icon () on any Matter/Document.
| Right-click option | Function |
|---|---|
|
Cut |
Click on this to remove the selected matter and temporarily place it on the clipboard which can be pasted elsewhere. |
|
Copy |
This is an inbuilt function that allows you to make a copy of the selected matter. |
|
Paste |
Click this option to insert the current clipboard matter, priorly cut or copied, into a new location. |
|
Please be aware that distinct clipboards are used for individual document cut/copy and paste, as well as for multiple document cut/copy and paste actions. |
|
|
Delete |
This is an inbuilt function to erase the selected matter and its corresponding attributes from the application. If you do not have the security rights to delete, a system error is shown. |
|
Attach to New Email |
Selecting this will start composing a new email with the selected document attached.
|
|
View Document Version History |
View all the previous versions of the selected document chronologically, with the current version displayed on top. Right-click on a version to revert or download any version on your local. |
|
Upload New Version |
Uploads a new document. |
|
Check Out Document |
When you click on check out, the selected document is downloaded to your local machine. You can make the necessary changes. Note: If the document is checked out in the Add-in, it will be checked out in TeamConnect also. |
 |
|
|
Undo Check Out |
This option is disabled if no document is checked out. You can reverse the checkout by selecting ‘Undo Check Out’ if there are no changes to the document. |
|
Check-In Document |
The check-in option is disabled in two instances. Note: File check-In/check-Out is supported in the Outlook Add-In, rather than in Word, PowerPoint, and Excel. Users can efficiently manage files through Outlook Add-In or directly through TeamConnect for seamless file handling. |
|
|
Modify the document with the necessary changes and check it in as a version. Enter the version comments and click ‘Confirm’. The document is checked in as a newer version. Note: If the document is checked-in in the Add-in, it will be checked-in in TeamConnect also. |
|
|
Download |
Click this option to download the selected document on your local machine to save and view on your desktop. |
|
View in TeamConnect |
Click on this to navigate to the document list in TeamConnect. The selected document will be downloaded to your local device. |


Edit Document MetadataClick on this if you intend to edit an uploaded document’s metadata. You can see the three sub-tabs: |
||
|
Document |
Outlook |
Categories |
|
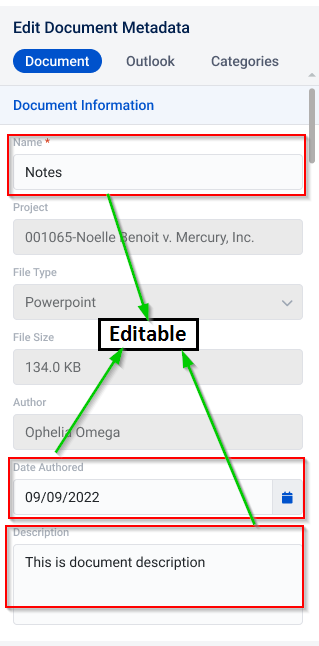
This option allows you to edit document information here. The following information is captured in the Documents tab. This has two sections. |
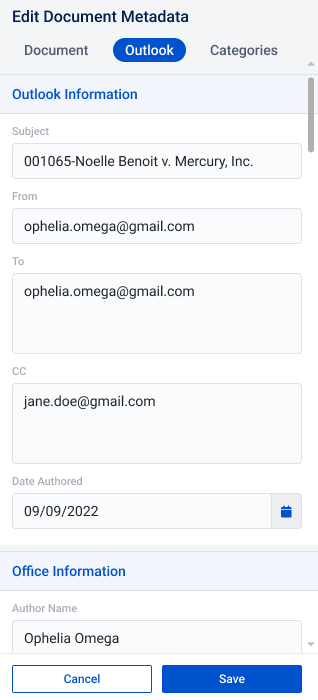
You can edit the Office and Outlook information here. The following information is captured in the Outlook tab. |
You can select and apply one or more categories for the document. Once applied, the categories can only be removed from within the TeamConnect application. |
|
Document Information
Access Information
Note: If a document is checked out, the document metadata cannot be edited. |
All the above fields are editable. |
Click the Save button to save the necessary changes made. A success message will appear. |
|
Scroll down for more options |
Scroll down for more options |
Scroll down for more options |

Edit Metadata for a Document
To view or edit detailed metadata for a specific document:
- Click More Options (or the ellipsis icon ...).
- Select Edit Metadata from the menu.
- Navigate to the Outlook tab.
This allows you to review and update metadata fields associated with the document, if necessary.
Modify multiple documents
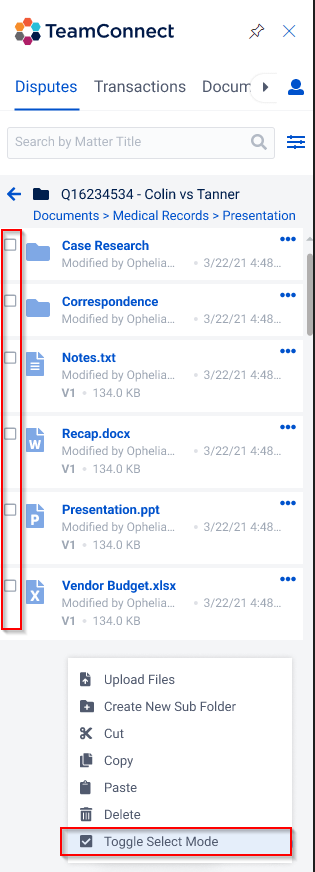
Toggle Multi-Select Mode
- When the + button is clicked, there is an option to select toggle mode.
- Select the "Toggle Select Mode" checkbox.
- Select any number of files from the list to cut or copy.
- Choose any option from Cut or Copy. A message will appear saying how many documents have been selected.
- Go to the folder where you want to paste the files and select Paste.
- The files will be saved successfully if there are no duplicates in the folder.
Note: If there are duplicates, an error message is displayed and the selected files remain in the original folder.
If the Toggle Select Mode is off, all the files selected will be unselected.
Upload File from Computer
Under the Document tab, right-click on a document to delete, upload a new version of the document, or view it in TeamConnect.

If you do not have permission to add a file, an error message, “You do not have the necessary permissions to add documents. Kindly contact your System Administrator.” is displayed.
Appointment Management
If you're upgrading from Add-in version 4.1, the appointments functionality remains the same.
Appointments are activities that you schedule in your calendar that do not involve inviting other people or reserving resources. You can turn an appointment into a meeting by adding attendees.
Click to explore Appointment Management Features
Appointment Migration
This applies only when transitioning from the Plugin to the Outlook Add-in.
Appointment Migration from Plugin to Add-in: How to upload DataStore file?
A TeamConnect Admin will assign you to the new permission group called "Office Suite User," which will grant you the required permissions to initiate the migration of your appointments from the Plugin to the Add-in. The group's ID is "OfficeSuiteUser," if you do not have this permission group or are unable to see any of the below screens, please contact your IT administrator for assistance.
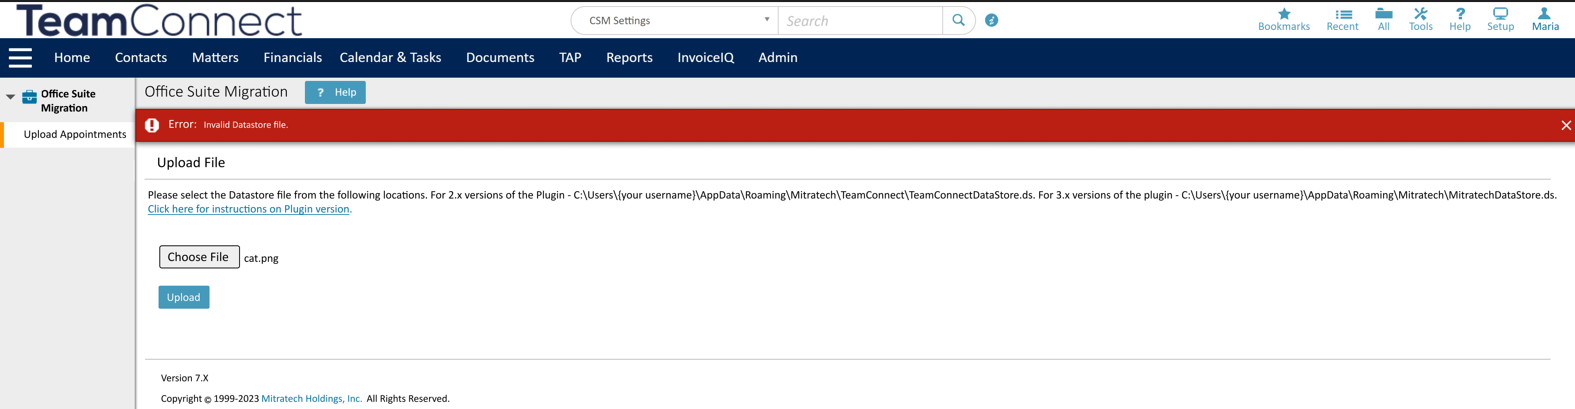
The migration process begins by uploading the datastore files. These files contain essential data that needs to be transferred to the new system.
To ensure a smooth migration, it's crucial to follow the correct procedure for uploading these files:
| Instructions | Screenshot for Reference |
|---|---|
|
 |
|
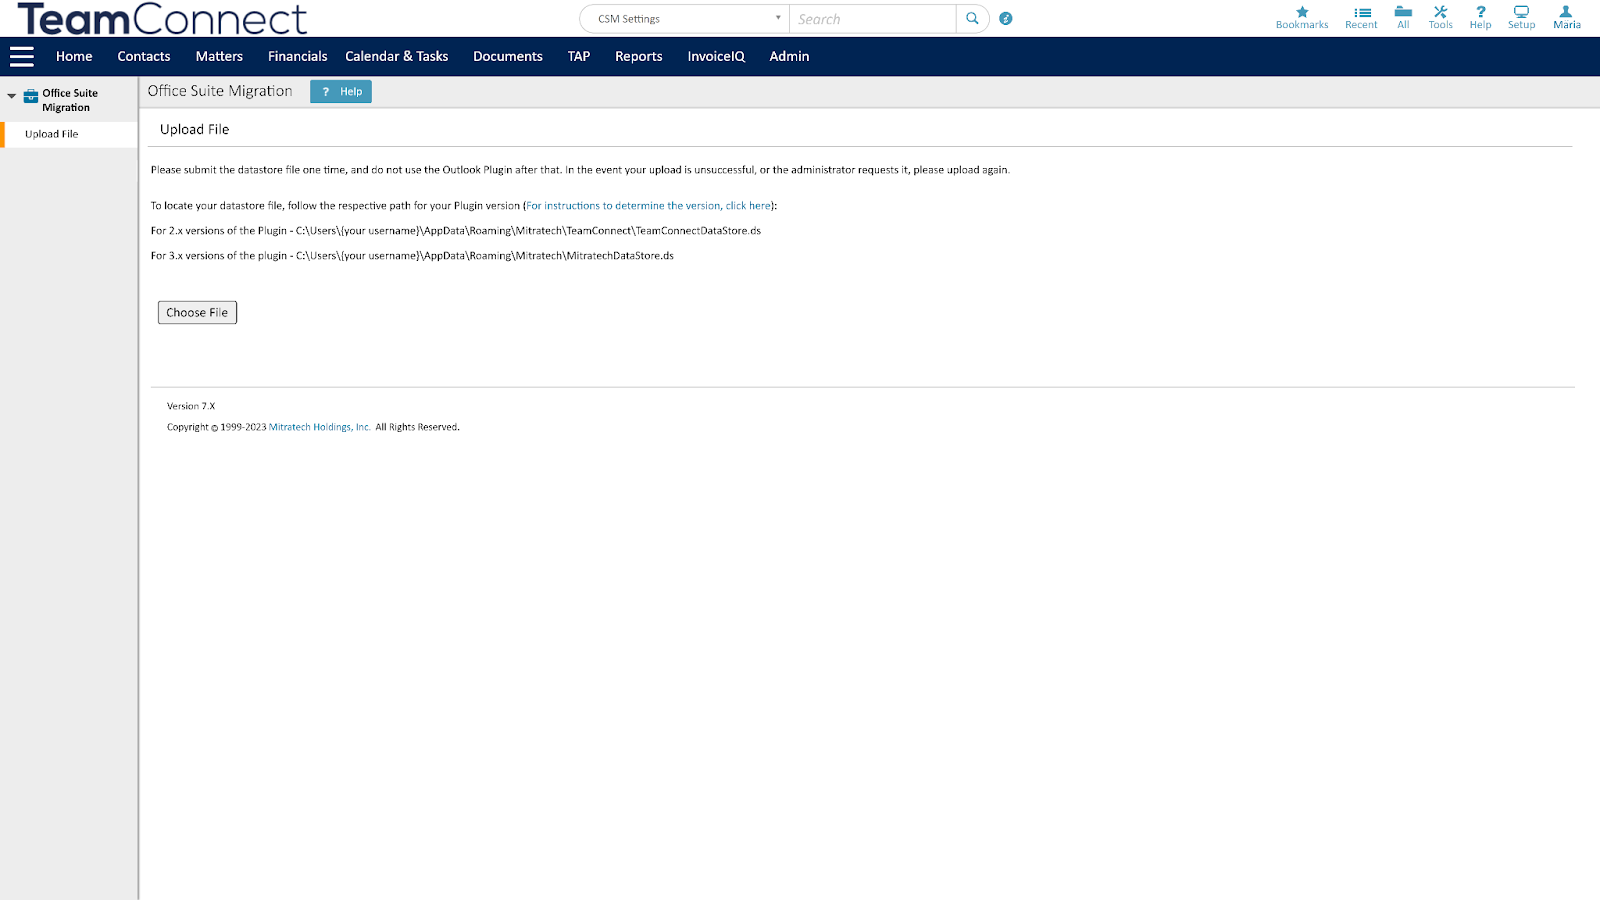 |
Please note the datastore file location varies depending on which Plugin Version you are on.
How to identify your Plugin Version?
2.x and 3.x Versions
To identify the version of the Outlook Plugin you're using, refer to the Outlook interface. Follow the below instructions to determine the Plugin version:
-
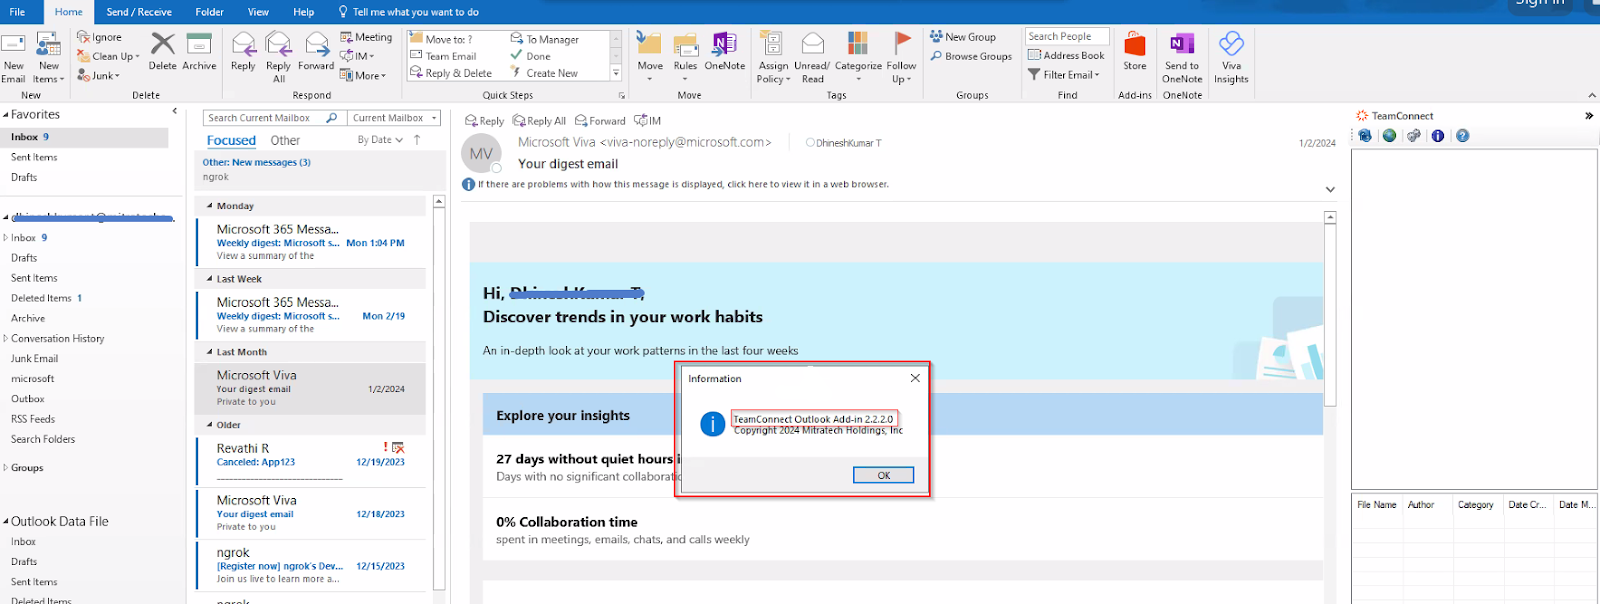
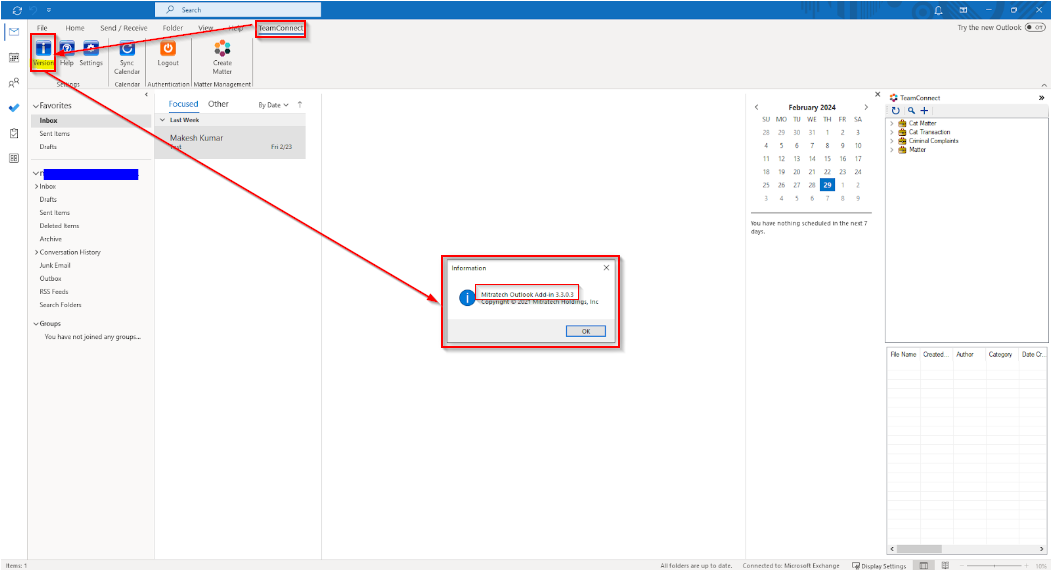
Navigate to the TeamConnect task pane or tab on the Home Page → Click on the info icon
or the version icon
.
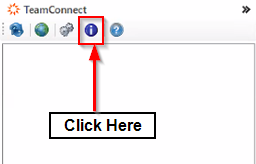
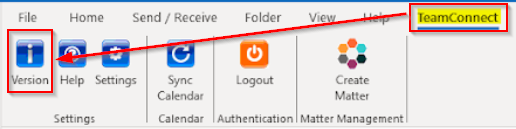
-
A dialog box with the Current Plugin Version will be displayed as shown below.
|
 |
|
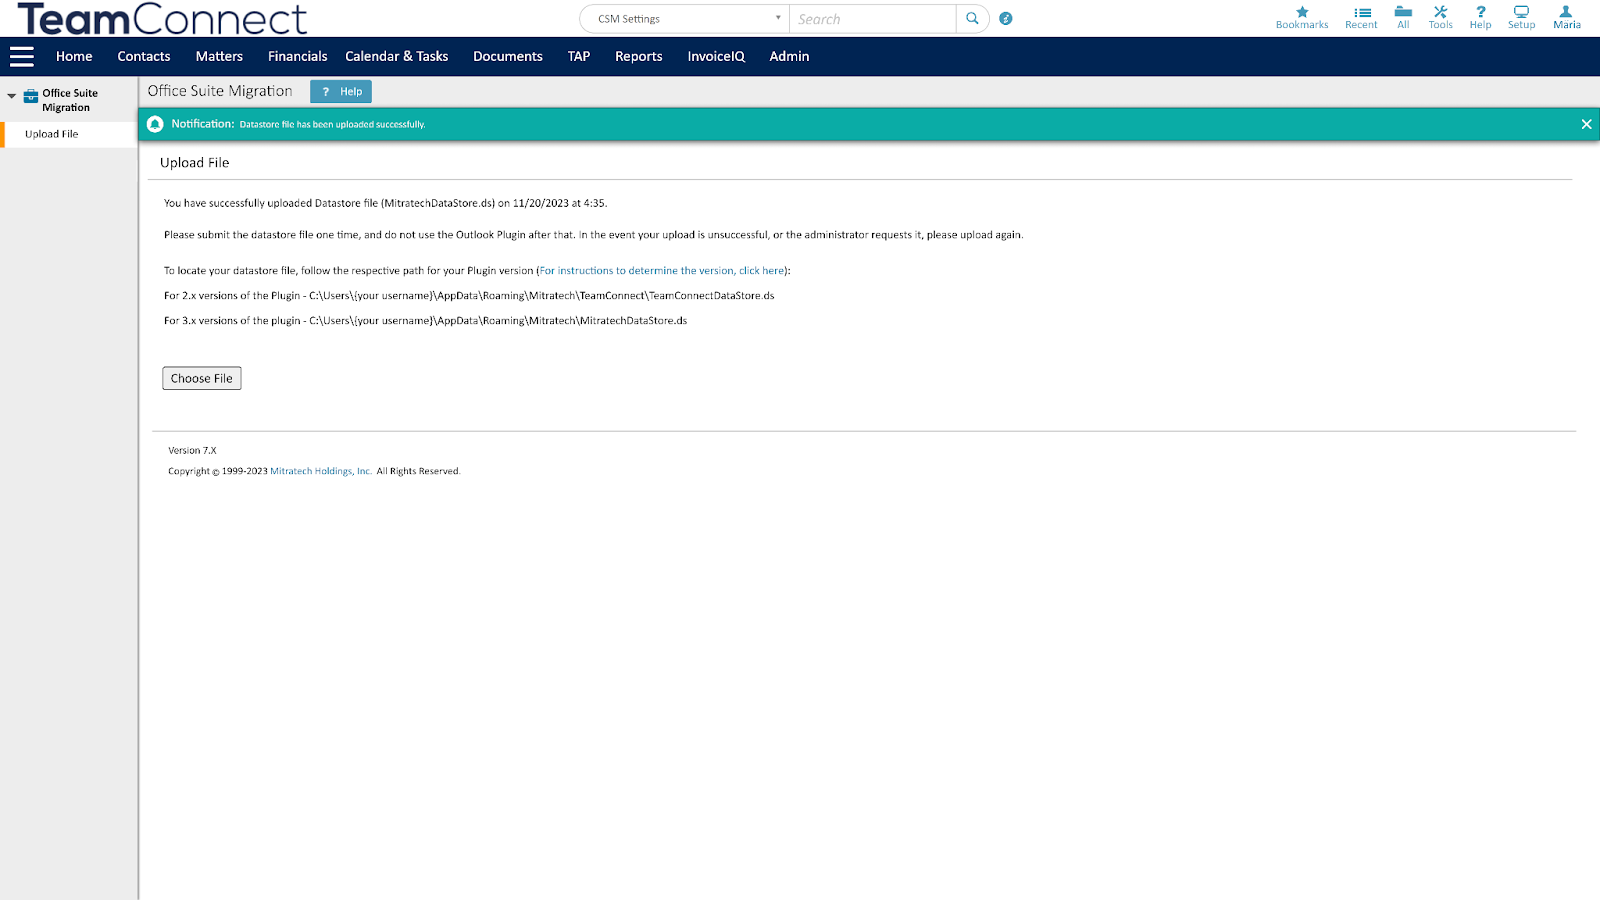 |
IMPORTANT WARNING: Once you have uploaded your datastore file please DO NOT use the Plugin again, you should use the Add-in.
-
If new appointments are created in the Plugin after you have uploaded your datastore file, a new file and upload must occur.
-
Upload only one file
Monitoring Appointment Migration Status in Office Suite Module
The migration process will be handled by the Office Suite Admin on behalf of you (the end user). You can easily track the status of the Appointment Migration progress from the Office Suite module where/how do they navigate. Upon uploading the dataStore file, users receive immediate feedback and the upload time and migration status.

However, when there is a "Failure" or "Partial Failure" during migration, the "Upload" button reappears, and the users need to upload a new DataStore file and initiate the migration process again.
Attendees and Organizers
Based on their roles and responsibilities in an event or appointment, we have the following classifications:
Organizers
The organizer of a meeting or appointment is the person who schedules the event and sends out invitations to other participants. The organizer typically has control over the meeting details, such as setting the agenda, date, time, and location, and adding or removing attendees.
Note: You are discouraged from replacing an Organizer and designating a different individual as the new organizer. We do not support reassignment as yet and it will disrupt appointment syncing.
External Organizer An "external organizer" typically refers to an individual who is not an internal member of your organization but is involved in organizing or scheduling events, meetings, or appointments within TeamConnect. Appointments created by an external organizer are synced to TeamConnect by a TeamConnect user, and the External Organizer flag is enabled for this user. When the External Organizer flag is active, any edits to these appointments will only affect TeamConnect and won't sync to Outlook.
Invitee/Attendee An invitee for an appointment, also commonly referred to as an attendee, is an individual who is invited to participate in a scheduled event or appointment. Invitees are people expected to attend the event, and they are typically invited by the event organizer.
Non-TeamConnect User A non-TeamConnect user refers to an individual who does not have an account or active involvement in TeamConnect. Non-TeamConnect users are external to TeamConnect and do not have the same level of access or permissions as TeamConnect users within the organization. They may still interact with TeamConnect data or appointments but often in a more limited or read-only capacity. These users are shown in the notes in TeamConnect.
Create and Manage Appointments in Outlook
Create Appointments
Initially, you must have access to the Appointment Category in order to create an appointment using the Add-in. To know how to schedule or create appointments through Outlook, go through the following steps:
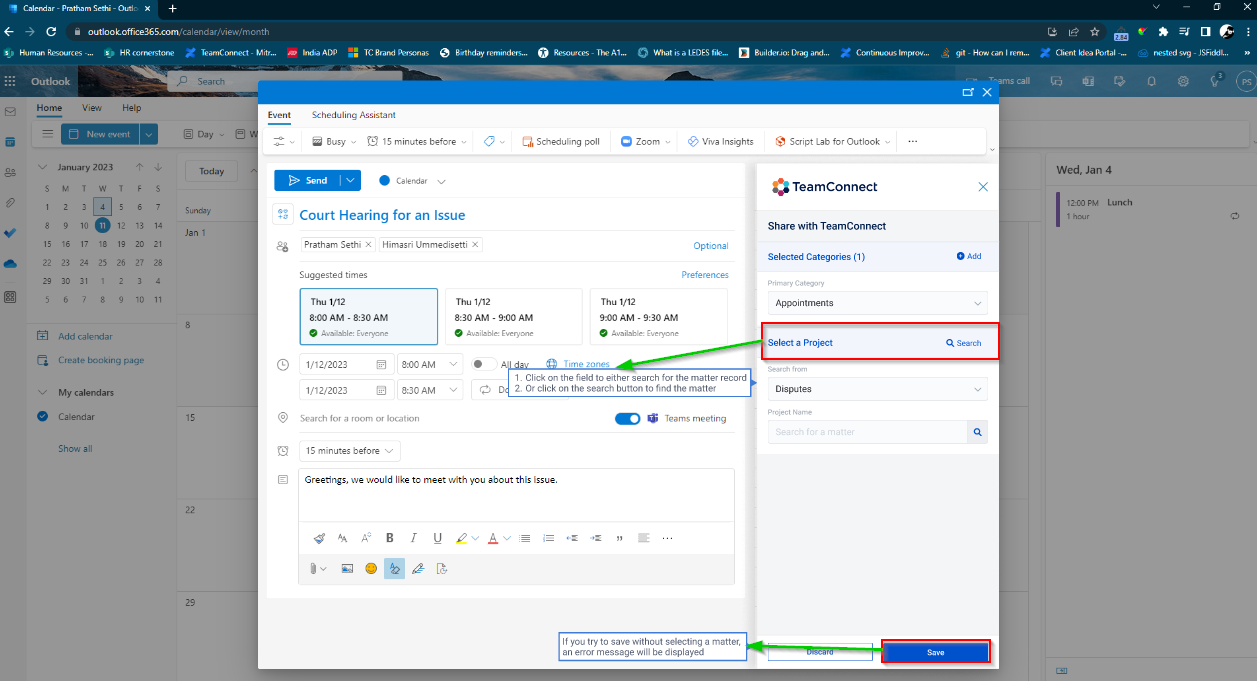
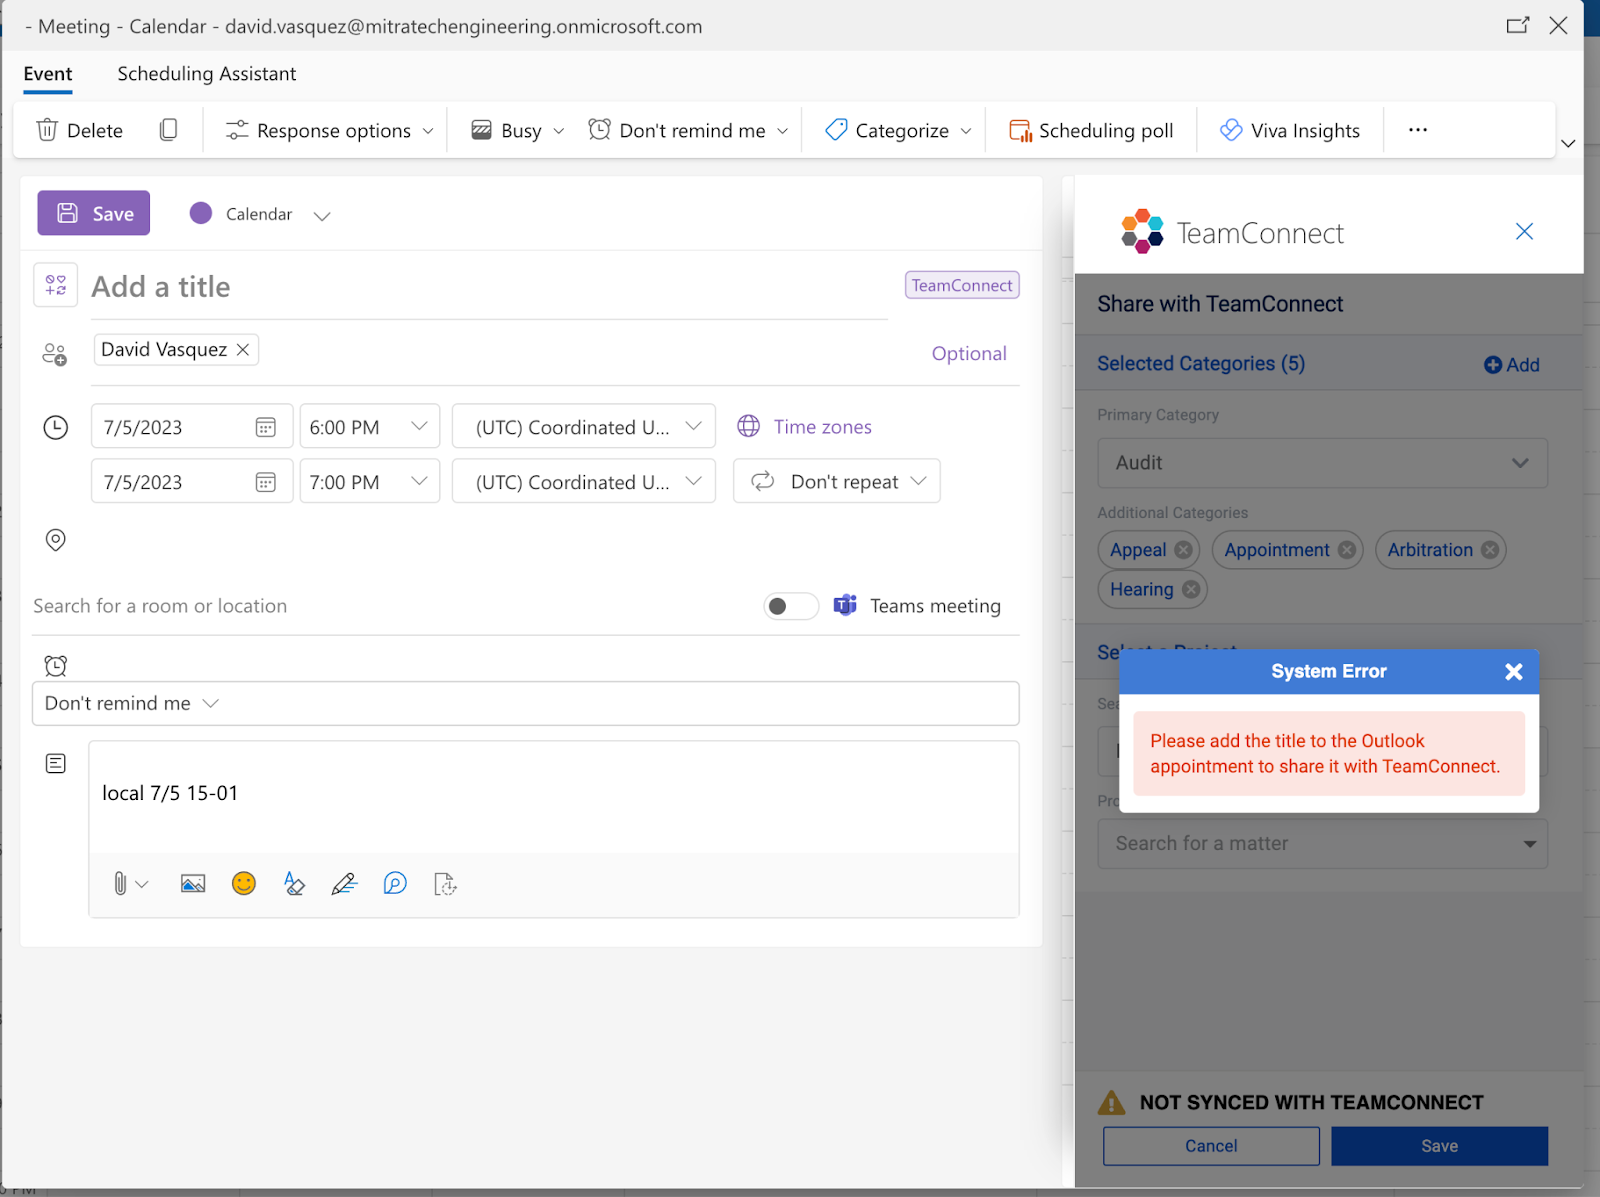
|
1. Navigate to Home → Calendar icon on the left task pane → Select New Event. 2. Enter a title, location, start and end time, and click the Save button. 3. Open the appointment and click the TeamConnect icon. 4. Click on the Create New Appointment button. 5. Select Primary Category from the drop-down options. 6. Click on the Search field to find the matter to which the appointment is being created. Click the Save button. 7. Project Name is optional. |
 |
|
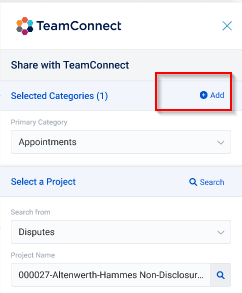
8. Click the Add button to select categories. |
 |
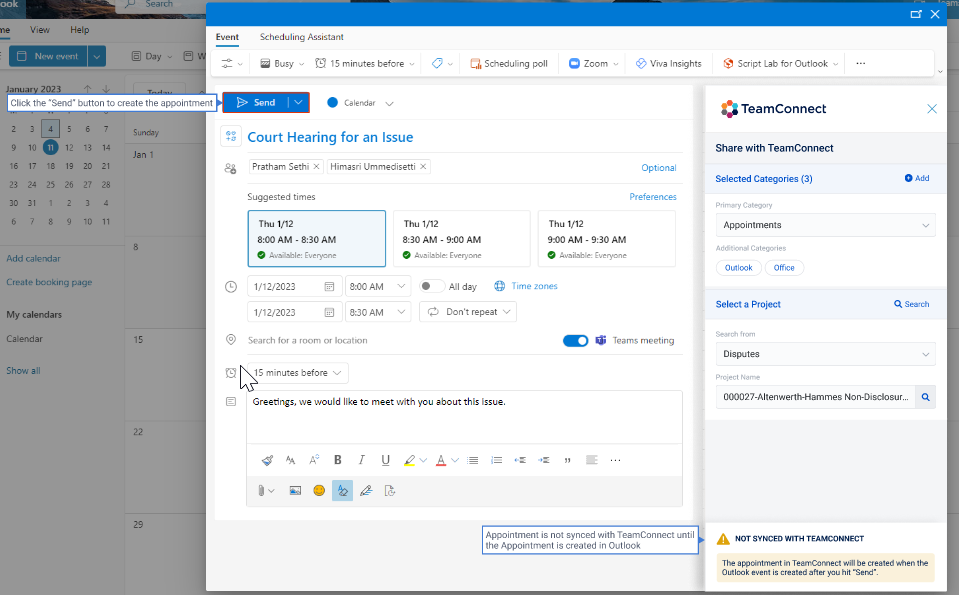
|
9. Click the Save button. (Appointment is still not created in Outlook.) Note: A warning message is displayed and the appointment is not synced until the appointment is created in Outlook. 10. Click the Send button to create the appointment in Outlook. Note: If you are the only attendee, you need to Save the appointment, else you need to Send the appointment. 11. A new appointment is created in the Outlook calendar. |
 |
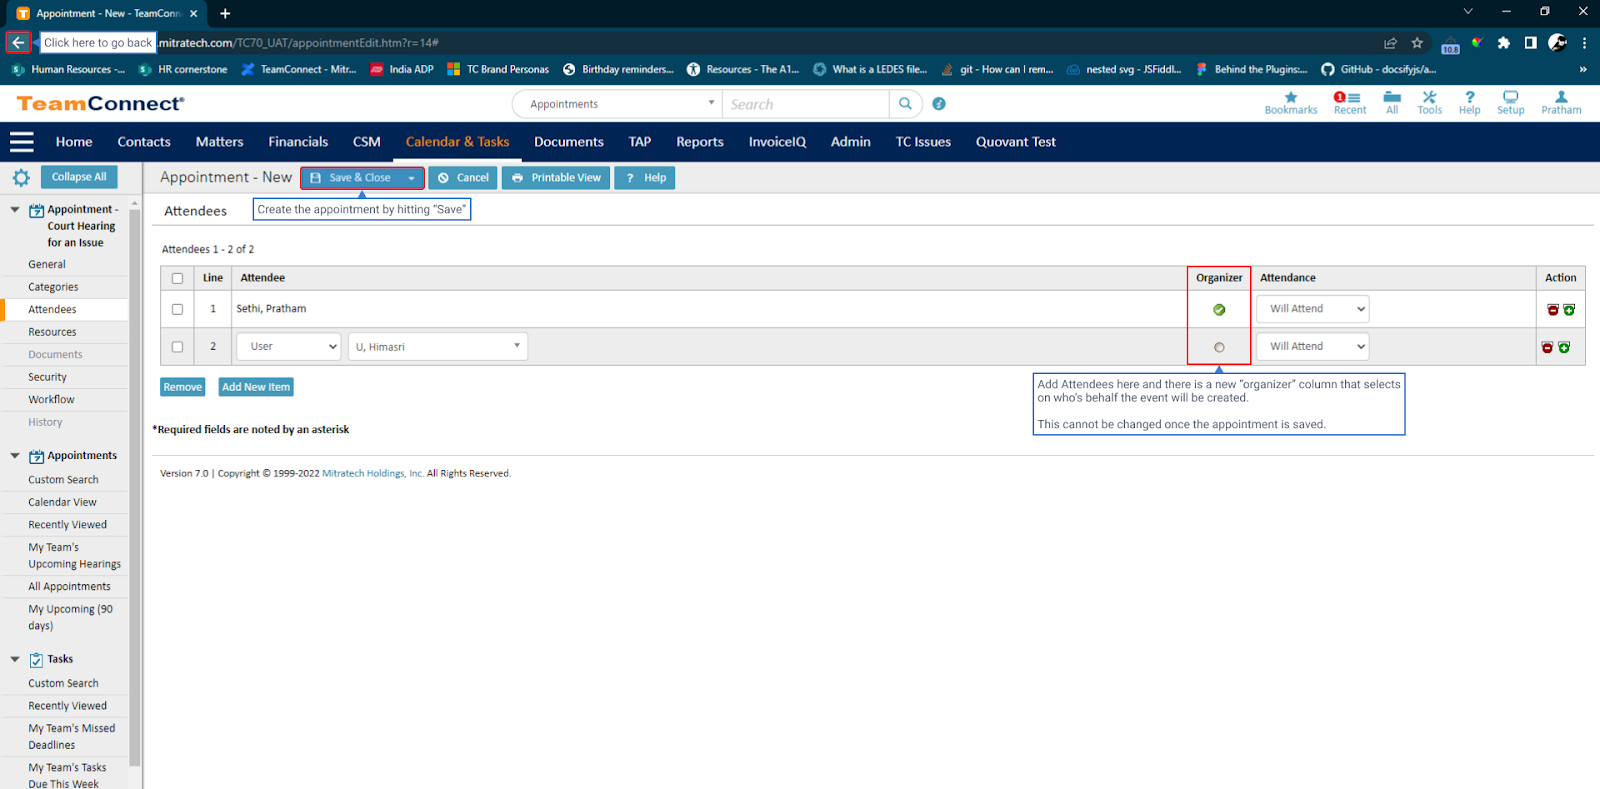
Know that
- Appointments require an additional field for the attendee that is designated as the organizer.
- Subscriptions for the organizer are the only ones that can change appointment details.
- If the organizer does not have an email address, the user cannot save the appointment.
- Attendees can change only their own attendance status.
- We do not support ‘All-Day Events’ with the Add-in.
Edit appointments
An appointment that is created can be further edited for any changes to it.
- To edit, just right-click on the appointment to be modified and select Edit.
- Make the necessary changes and click the Save button.
- The appointment with the changes made is updated in the calendar.
- If an appointment is edited on Outlook and the subject is left blank, an error message is displayed only if the Add-in is open.
Delete an appointment
You can delete or cancel an appointment that is synced to TeamConnect. We have different scenarios for deleting an appointment.
- If the organizer deletes/cancels an appointment from Outlook, the appointment is deleted from Outlook for all the invitees though it still remains in TeamConnect. The status of all the invitees changes to “will not attend”.
- If the non-organizer deletes/cancels an appointment from Outlook, the appointment is deleted from their Outlook only and it remains in TeamConnect. The status of the user changes to “will not attend”.
Undo Delete an appointment
When an appointment is deleted in Outlook, the appointment remains unsynced to TeamConnect though it is restored. Hence, we recommend you create a new appointment.
Sync Existing Appointments from Outlook to TeamConnect
Upon a user's initial login to the Add-in, subscriptions are established. To ensure successful subscription creation, the email address listed on their TeamConnect contact card must match their Add-in user profile. Only after these subscriptions are in place will appointment syncing commence for users.
You can sync an existing appointment from Outlook to TeamConnect by the following steps:
- Select an existing appointment and right-click on it to Edit.
- Make the necessary changes.
- Click the Save button.
- A success message will appear. The appointment can now be viewed in Team Connect by clicking on the View in TeamConnect button.

Note: The External Organizer checkbox will be automatically selected in TeamConnect if the organizer of the appointment is not a Team Connect user.
We recommend you check the scenarios for syncing appointments from Outlook to TeamConnect.
Create and Manage Appointments in TeamConnect
Create Appointments
To create an appointment in TeamConnect, click here.
- The new appointment created will be displayed under the matter name selected.
- When an appointment is created in TeamConnect, select at least one attendee as the organizer if using the Add-in. To synchronize appointments with Outlook, select the "Sync to Outlook" box.
Note: When creating an “All Day” appointment in TeamConnect, the date shifts to one day before in Outlook as the “All Day” in TeamConnect is different from the “All Day” term in Outlook. The Timezone used for TC is GMT+5.30 and for Outlook is UST+5.30.
Edit Appointments
If an appointment is edited on TeamConnect and the subject is left blank, the previous appointment title is taken as the subject, and an error is shown in the logs.
Delete Appointments
This table summarizes various scenarios related to appointment deletion, along with the scenarios and the resulting outcomes.
|
Scenario |
Result |
|---|---|
|
Organizer (Not External) Deletes Appointment in TeamConnect |
Deleted from TC and Outlook for all invitees (TC & non-TC users); Warning message displayed, “Deleting the appointment would delete the appointment for all invitees in Outlook”. |
|
External Organizer Deletes Appointment in TeamConnect |
Deleted from Outlook for logged-in user; User's attendance status changed to "Will not attend" in TC. |
|
Non-Organizer Attempts to Delete Synced Appointment (to/from Outlook) |
An Appointment cannot be deleted by a non-organizer in both TC and Outlook. |
|
Non-Organizer (with Delete Permissions) Deletes Unsynced Appointment |
Deleted from TC, and not synced to Outlook. |
Create a Copy of Appointment in TeamConnect
You can create a copy of appointments in TeamConnect. The following section summarizes how changes made in one system affect the other and what happens to the original and copied appointments.
Sync Appointments from TeamConnect to Outlook
When appointments are synced from TeamConnect to Outlook, all details like the matter name, event description, event category, etc. will be taken to Outlook. This would let you manage your matter-related appointments directly from Outlook without logging into TeamConnect.
To synchronize appointments from TeamConnect to Outlook, simply select the "Sync to Outlook" checkbox during appointment creation. Please note that this selection cannot be altered once the appointment is created. The “Sync to Outlook” checkbox is selected by default.

We recommend you check the scenarios for syncing appointments from TeamConnect to Outlook.
Two-way Sync between Outlook and TeamConnect
The synchronization of appointments occurs bidirectionally between Outlook and TeamConnect. For an appointment that is synced from TeamConnect to Outlook, the changes made in Outlook will automatically be updated to TeamConnect. When you edit the following details in Outlook, all the modifications will be sent back to TeamConnect.
- Project Name (matter)
- Categories
- Subject (Mandatory; Appointment cannot be saved without a subject)
- Location
- Start date and time
- End date and time
- All-day event checkbox
- Comments
- Attendees - If the attendees are added or removed to the appointment, same changes reflect in TeamConnect
- Organizer
A similar process applies when dealing with an external organizer. For a comprehensive overview of the scenarios, please consult the document on Bidirectional Synchronization of Appointments with External Organizer.
Customize the Calendar View
You can select the Add-ins that should be visible on your calendar surface. Modify your calendar’s view by enabling or disabling the following settings:
- Navigate to "Settings → Calendar → Customize Actions" and select all the Add-ins to be displayed on the calendar surface.
- To customize Appointment label and color in Outlook, refer to the Customizing Appointment Categories in Outlook page.

Task Management
Task Management allows you to create, assign, and track tasks efficiently within your calendar and inbox. It helps manage deadlines, organize to-dos, and collaborate with others.
Click to explore Task Management Features
Task Migration
Task Migration from Plugin to Add-in: How to upload DataStore file?
A TeamConnect Admin will assign you to the new permission group called "Office Suite User," which will grant you the required permissions to initiate the migration of your tasks from the Plugin to the Add-in. The group's ID is "OfficeSuiteUser". if you do not have this permission group or are unable to see any of the below screens, please contact your IT administrator for assistance.
The migration process begins by uploading the datastore files. These files contain essential data that needs to be transferred to the new system.
To ensure a smooth migration, it's crucial to follow the correct procedure for uploading these files:
| Instructions | Screenshot for Reference |
|---|---|
|
 |
|
 |
Please note the datastore file location varies depending on which Plugin Version you are on. Know how to identify your Plugin Version in the above section.
IMPORTANT WARNING: Once you have uploaded your datastore file please DO NOT use the Plugin again, you should use the Add-in.
- If new tasks are created in the Plugin after you have uploaded your datastore file, a new file and upload must occur.
- Upload only one file
Monitoring Task Migration Status in Office Suite Module 
The migration process will be handled by the Office Suite Admin on behalf of you (the end-user). You can easily track the status of the Task Migration progress from the Office Suite module where/how they navigate. Upon uploading the dataStore file, users receive immediate feedback and the upload time and migration status.

However, when there is a "Failure" or "Partial Failure" during migration, the "Upload" button reappears, and you will need to upload a new DataStore file and your Office Suite Admin will initiate the migration process again.
Create and Manage Tasks in Outlook
Create a New Task
This section will walk you through creating a new task for a matter in the O365 Add-in.
Note: Tasks cannot be created directly through Microsoft To-Dos; they must be created using the Add-in. This is a Microsoft limitation.
| Instructions | Screenshot for Reference |
|---|---|
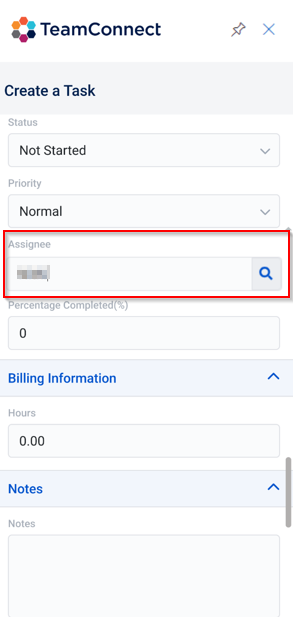
|
 |
|
Task pane on scroll view while creating and entering task details |
Note: Reminders are triggered based on the Due Date you selected and Reminder days can only be set or edited if a due date is specified for the task.
|
|

After Task Creation
- After successfully creating a task, a success message banner will appear on your screen, confirming the task's creation.
- You will be automatically redirected to the task list for the associated matter.
- The newly created task will also appear in Microsoft To-Dos with the task name prepended with the matter name.
Task Assignee and Syncing tasks from O365 Add-In to TeamConnect:
- The following details are bi-directionally synced between TeamConnect and Microsoft To-Dos automatically:
- Task Name
- Category: A new "TeamConnect" category is available in Microsoft To-Dos for synced tasks.
- Changes to reminders, due dates, titles, and notes, as well as task completion and deletion (individually or in bulk).
- The assignee for the task will be automatically set to the user who created it. You currently cannot assign tasks to other users. This feature is in development and is tentatively scheduled for release in early 2025.
View and Edit Task Details
This section explains how to view and edit details of an existing task within the Add-in.
| Instructions | Screenshot for Reference |
|---|---|
|
View Task Details:
|
 |
Edit a Task:
|
 |
|
 |
|
 |
Delete a Task
To delete a task in the Add-in, follow these steps:
| Instructions | Screenshot for Reference |
|---|---|
|
 |
|
 |
Assign a Task
This feature enables users to assign tasks to others directly within the Add-in during task creation or while editing an existing task. It ensures task synchronization across Microsoft To-Do or other connected systems, adhering to user permissions.
Key Functionality:
-
Add Assignees:
You can assign tasks to others while creating a new task or editing an existing one in the Add-in.
-
Default Assignee:
By default, the logged-in user's name is automatically set as the assignee for new or edited tasks. -
Permission-Based Assignment:
When delegated permissions are selected, tasks can be assigned to another user through the Add-in or Microsoft To-Do only if the other user has already provided consent. However, when selecting application permissions, they work as described in the previous release. For more information, please refer to TeamConnect O365 Add-In Application Access Policies. -
Reassigning Tasks:
-
When a task is reassigned, it is removed from the original user’s list and added to the new assignee’s list. When a task is reassigned from User 1 to User 2:
-
- The task will be added to User 2's Tasks/MS To-Do list.
- The task will be removed from User 1's Tasks/MS To-Do list.
Complete a Task in Microsoft To-Dos
To mark a task as completed, users can simply click the radio button located next to the task name.

Note:
- When updating a task in Microsoft To-Dos that violates an active rule in TeamConnect, the task will not be closed; the notes section of the Task will be updated to include the rule violation information, along with a timestamp.
- Please ensure that the task details are accurately synced from TeamConnect to prevent any discrepancies, and resolve any rule violations before closing the task.

Create and Manage Tasks in TeamConnect
Create a New Task
For creating tasks in TeamConnect, please refer to the "Create Tasks" section.
Delete a Task
For deleting tasks in TeamConnect, please refer to the “Delete Tasks” section.
Important Note:
-
Deleted tasks cannot be recovered. Ensure you want to permanently remove the task before proceeding with deletion.
Troubleshooting Scenarios
Whenever you encounter a problem with the Add-in, know that there are some basic troubleshooting techniques you can use to fix issues like this.
- Users cannot see or manage assigned tasks – Admins should configure proper permissions in the Add-in settings and ensure users accept these permissions during login if required. For more details or assistance, please contact your administrator.
- Tasks not showing up on the new assignee’s calendar – Tasks will show up in the new assignee’s calendar only if they accept the delegated permissions. This occurs only if your admin has selected delegated permissions. If permissions are not accepted, the system will retry based on a pre-set number of attempts. For more details or assistance, please contact your administrator.
- Subscription appears expired after login – When you log in, and your subscription has expired, renew the subscription. Logging out and logging back in will restore the renewed subscription
- Organizer has left the company – When an organizer on an appointment quits the client’s company, any TeamConnect user in the attendees has to manually reassign all the appointments for which the user was an organizer to another user, making them the organizer
- Failed Synchronization and Error Logs – If a user's synchronization encounters an issue due to a subscription, the error will be recorded in the error log (TC office logger).
It is recommended that you go through the Troubleshooting Guide to find a solution for any unexpected error in the application.